Page is loading ...

M
I N I
5
M
I N I
5
Lorem ipsum dolor sit amet, consectetuer
adipiscing elit. Nam nibh. Nunc varius facili-
sis eros. Sed erat. In in velit quis arcu ornare
laoreet. Curabitur adipiscing luctus massa.
Integer ut purus ac augue commodo com-
modo. Nunc nec mi eu justo tempor consec-
tetuer. Etiam vitae nisl. In dignissim lacus ut
ante. Cras elit lectus, bibendum a, adipiscing
vitae, commodo et, dui.
Ut tincidunt tortor. Donec nonummy, enim
in lacinia pulvinar, velit tellus scelerisque
augue, ac posuere libero urna eget neque.
LIGHTBRIDGE
Instruction Manual
MINI SERIES

Sun Warning
WARNING!
Never use a Meade
®
Telescope to look at the Sun! Looking at or near the
Sun will cause instant and irreversible damage to your eye. Eye damage
is often painless, so there is no warning to the observer that damage has
occurred until it is too late. Do not point the telescope at or near the Sun.
Children should always have adult supervision while observing.

Quick Start
In order to get started observing night sky objects, you will need to do the following:
1) Attach the red dot viewnder 3) Align the red-dot viewnder
2) Insert the eyepiece
4) Balance the telescope
(114mm & 130mm models only)
1

Table of Contents
Introduction
Specications
About Your Telescope
Attaching The Accessories
Balancing The Scope
Aligning The Red Dot Viewnder
Adjusting The Azimuth Tension
How To Use Your Telescope
Observing
Resources
Tip and Tricks
Calculating Magnication
Collimation
Viewnder Battery Replacement
Care and Maintenance
Accessories
Recycling
Customer Service and Warranty
2
3
4-6
7
8
10
12
14
15
16
20
21
23
24
30
31
32
33
34

Introduction
Congrats on getting a LightBridge Mini Telescope! Now you can setup and share the stargazing
experience in seconds. Whether you are camping in the outdoors or relaxing in your backyard, grab your
Lightbridge Mini Dobsonian and take it wherever life takes you. Your telescope is already pre-assembled
for you at our factory, so you only have to attach the accessories to start viewing galaxies, planets, stars
and more!
Each telescope contains the following parts:
• Optical tube
• Dobsonian Mount
• Two Eyepieces
• Barlow lens
• Red dot nder
• Software dvd
• Optical tube
• Dobsonian Mount
• Two Eyepieces
• Red dot nder
• Software dvd
82mm
114mm and 130mm
3

Looking at or near the Sun will cause irreversable damage to your eye. Do not point this telescope at or near the Sun. Do not look through the telescope as it is moving.
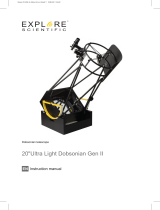
1. Mount Feet
2. Dobsonian Mount
3. Azimuth Tension Nut
4. Optical Tube Assembly (OTA)
5. Front Dust Cover (not shown)
6. Secondary Mirror Collimation Adjustments (not visible)
7. Red Dot Viewfinder (See Image B)
8. Red Dot Viewfinder Bracket Mounting Thumbscrews
(See image A)
9. Focuser
10. Focuser Drawtube
11. Focuser Knob
12. Eyepiece
13. Eyepiece Holder Thumbscrews
14. Vertical Lock Knob (See Image A)
15. Red Dot Viewfinder Power Switch (See Image B)
16. Red Dot VIewfinder Adjustment Knobs (See Image B)
11
2
3
4
5
6
7
7
9
10
12
16
15
13
13
11
8
14
Image A
Image B
Accessories
FIGURE 1A
4

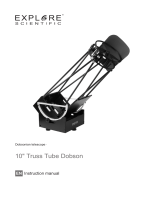
1. Mount Feet
2. Dobsonian Mount
3. Azimuth Tension Nut
4. Optical Tube Assembly (OTA)
5. Front Dust Cover (not shown)
6. Secondary Mirror Collimation Adjustments (not visible)
7. Red Dot Viewfinder (See Image B)
8. Red Dot Viewfinder Bracket Mounting Thumbscrews (See Image A)
9. Focuser
10. Focuser Drawtube
11. Focuser Knob
12. Eyepiece
13. Eyepiece Holder Thumbscrews
14. Vertical Lock Knob
15. Red Dot Viewfinder Power Switch (See Image B)
16. Red Dot VIewfinder Adjustment Knobs (See Image B)
17. Primary Mirror Collimation Adjustment Knobs (not visible)
18. Dovetail Locking Knob (See Image A)
19. OTA Dovetail (not visible)
20. Dovetail Receiver (not visible)
Looking at or near the Sun will cause irreversable damage to your eye. Do not point this telescope at or near the Sun. Do not look through the telescope as it is moving.
&
7
16
15
Image B
Image A
1
1
2
7
10
13
13
11
12
3
9
4
14
18
19
20
8
5
6
17
Accessories
FIGURE 1B
5

Specications
Optical tube design
Optical tube focal length
Primary mirror diameter
Focal ratio
Viewfinder
Eyepieces
2X Barlow
82 mm
Reflector
300mm
82mm (3.2 in.)
f/3.7
Red dot
Two(2)
1.25” H26mm, H9mm
Included
114mm
Reflector
450mm
114mm (4.5 in.)
f/4
Red dot
Two(2)
1.25” MA 26mm, MA 9mm
Optional Accessory
130mm
Reflector
650mm
130mm (5.1 in.)
f/5
Red dot
Two(2)
1.25” MA 26mm, MA 9mm
Optional Accessory
6

About The Telescope
The LightBridge Mini Series are Dobsonian tabletop telescopes. The word “Dobsonian” comes from it’s inventor
John Dobson, who created this specialized mount. This mount style allows you to move the telescope both up/down
(vertical) and left/right (horizontal). Because its height is xed, use the telescope on a tabletop or stable elevated
surface for comfortable viewing. Sturdy tabletop surfaces permit you to enjoy the 360° swivel mount while the
“point-and-look” design allow you to aim the scope at whatever celestial object you choose.
These optical tubes, called reectors, use mirrors to focus incoming light. Inside the telescope, there are two
mirrors: a primary and a secondary mirror. The primary mirror is the largest of the two and is located at the bottom of
the tube. The secondary mirror is near the top of the tube.
The large primary mirror collects light from the object you’re looking at and bounces it forward to the secondary
mirror which redirects it out the side of the tube.
Looking at or near the Sun will cause irreversable damage to your eye. Do not point this telescope at or near the Sun. Do not look through the telescope as it is moving.
7

Attaching your Accessories
Red Dot Finder
An eyepiece (fig.1, #12) has a narrow eld of view. A red dot viewnder
(fig.1, #7) has a wider eld of view, which makes it easier to locate objects.
Once the red dot viewnder is aligned to the optical tube, the red dot can
be used to locate and place objects more easily in the telescope’s eyepiece.
STEP 1: Remove the two thumbscrews (fig. 1, #8) from the optical tube.
STEP 2: Take the red dot viewnder and place the bracket onto the
threaded screws, with the viewnder lens forward towards the front of the
telescope.
STEP 3: Use the two thumbscrews to secure the red dot viewnder
bracket to the optical tube. Tighten to a rm feel.
Step 1.
Step 2.
Step 3.
8

Attaching your Accessories
Inserting An Eyepiece
Magnication, or power is based on eyepiece focal length. The higher power will present a larger, dimmer
image, with smaller eld of view. The lower the power, the brighter and smaller the image will be, with a
wider eld of view.
STEP 1: Slide desired eyepiece directly
onto the focuser draw tube
(fig.1 #10).
STEP 2: Tighten the eyepiece holder
thumbscrews (fig.1 #13) to hold the eyepiece
securely.
When locating objects it is always best to start with the lower power (26mm) eyepiece. The 26mm has a wide
viewing eld that will allow objects to be more easily found. Once located and centered, you can switch to a
higher power eyepiece such as a 9mm to increase the viewing power. The higher power will present a larger,
dimmer image, with smaller eld of view.
Step 1. Step 2.
Expert’s Tip
9

Balancing the Scope
*114mm and 130mm models ONLY*
Balancing
Sometimes when using heavy eyepieces or accessories, the optical tube can become out of balance. It
is important to balance the optical tube so when you release the vertical lock (fig.1, 14), the telescope will
not swing quickly or move uncontrollably. A balanced telescope also allows for smooth motion when using
the telescope.
STEP 1: Test the balance of the scope.
While supporting the optical tube with one hand, loosen the ver-
tical lock knob on the side of the mount. The optical tube will
turn freely about this axis. If the optical tube tends to move or drift
when your supporting hand is moved, it is necessary to balance
the optical tube.
STEP 2: Determine the imbalance; either
top-heavy or bottom-heavy.
Top-heavy: If the front of the telescope tube wants to rotate down-
ward, the optical tube is too heavy in the front and needs to be
adjusted toward the back.
Bottom heavy: If the back of the telescope wants to rotate down-
ward, the optical tube is too heavy in the back and should be ad-
justed forward.
Step 1.
Step 2.
Top heavy Bottom heavy
10

Balancing the Scope
*114mm and 130mm models ONLY*
STEP 3: Adjust until balance is achieved.
Loosen the dovetail locking knob (g. 1b,#18) slightly and
slide the optical tube (g. 1b, #4) along the dovetail receiver
(g. 1b, 20) until the telescope remains in any given position
without tending to drift up or down in the vertical axis.
NOTE: Do not over-loosen the dovetail locking knob or the
optical tube could come completely o of the mount.
STEP 4: Tighten when balanced.
Relock the dovetail locking knob until rm.
Step 3.
Step 4.
11

Aligning the Red Dot Viewnder
Aligning the red dot viewnder allows you to accurately point at the same location as the telescope. It is
recommended that you perform steps 1 and 2 during the day and step 3 during nighttime.
STEP 1: Point telescope at an easy-to-nd target.
NOTE: DO NOT EVER POINT AT OR NEAR SUN !
STEP 2: Look through the 26mm eyepiece and turn
the focuser knob (fig 1. #11) until the image is sharply
focused. Center the object precisely in the eyepiece’s
eld of view.
STEP 3: Turn on the red dot viewnder by turning
the on/o switch (fig 1. #15) clockwise.
Step 2.
Step 3.
12

Aligning the Red Dot Viewnder
STEP 4: Look through the red dot viewnder. Turn
one or both of the viewnder’s alignment screws (fig 1.
#16) until the red dot is precisely over the same object as
you centered in the eyepiece. The side alignment screw
controls the horizontal, while the rear alignment screw
controls the vertical.
STEP 5: When nished, turn o the red dot viewnder by
rotating the on/o switch (fig 1. #15) counter- clockwise.
STEP 6: Check this alignment at night on a celestial object,
such as the Moon or a bright star, and use the viewnder’s
alignment screws to make any necessary renements.
Once they are aligned and pointing at the same location,
use the red dot viewnder to locate objects by placing
the red dot over the object. Then use the 26mm eyepiece to
view the object.
Step 4.
Step 5.
13

Adjusting the Azimuth Tension
The LightBridge Series Telescopes can move in both
the horizontal and vertical motions. The tightness of the
vertical motion is controlled by adjusting the
vertical lock knob (fig. 1, #14).
The tension for the horizontal motion is adjusted at the
Meade factory. If the adjustment is not to your liking, it
is easy to adjust by tightening/loosening one screw (fig.
1, #3).
Two wrenches are needed to make the adjustment.
One wrench is needed to hold the screw head located
at the bottom side of the mount base.
The other wrench is placed on the Azimuth Tension
Nut (fig. 1, 3) and adjusted as desired.
BASE TOP
BASE BOTTOM
14

How to use your Telescope
Step 1
Pick an object in the sky that you want to view, and make sure you
are using the 26mm eyepiece.
Step 2
Turn the red dot nder on. Adjust the vertical lock knob as needed
and take aim at the object using your red dot viewnder.
Step 3
When the red dot is placed over the object, tighten the vertical
lock knob to secure the optical tube in place.
Step 4
Look through the eyepiece to see if the object is in view and center
it, if necessary.
Step 5
Gently adjust the focus in or out until you have a crisp, clean image.
Step 6
Try out the dierent eyepieces to get a closer look at the object.
Looking at or near the Sun will cause irreversable damage to your eye. Do not point this telescope at or near the Sun. Do not look

Observing
We have one very important rule that you should always follow when using your telescope:
Have Fun!
Have a good time when you’re observing. You may not know everything that there is to know about a
telescope or what all the sights in the universe are, but that’s OK. Just point and observe at rst. You will
enjoy your telescope the you practice and learn more about it. Galileo, who is one of the rst astronomers
to use a telescope, discovered four of the moons of Jupiter with a telescope about the same size as yours-
-and his didn’t even focus very well!
Don’t be scared o by dicult terms or complicated procedures. Don’t panic! Just relax and enjoy your
scope. Utilize the internet and books to learn about constellations, stars, planets and the hobby overall.
Don’t
stress,
Have fun!
16

Observing the Moon
The Moon is the best object to observe the rst time you go
out at night. Pick a night when the Moon is a crescent. No
shadows are seen during a full Moon, making it appear at
and uninteresting. Look for dierent features on the Moon.
The most obvious features are craters. In fact you can see
craters within craters. Some craters have bright lines about
them. These are called rays and are the result of material
thrown out of the crater when it was struck by a colliding
object. The dark areas on the Moon are called maria and
are composed of lava from the period when the Moon still
had volcanic activity. You can also see mountain ranges and
fault lines on the Moon.
Looking at or near the Sun will cause irreversable damage to your eye. Do not point this telescope at or near the Sun. Do not look through the telescope as it is moving.
17

Observing the Solar System
Venus is seen before dawn or after sunset, because it is close to the Sun. You
can observe Venus going through crescent phases. But you cannot see any
surface detail on Venus because it has a very thick atmosphere of gas. When
Mars is close to the Earth, you can see some details on Mars, and sometimes
even Mars’ polar caps. Jupiter is quite interesting to observe. You can see
bands across the face of Jupiter.
The more time you spend observing these bands, the more details you will
be able to see. One of the most fascinating sights of Jupiter are its moons.
The four largest moons are called the Galilean moons, after the astronomer
Galileo, who observed them for the rst time. If you’ve never watched the
Galilean moons in your telescope before, you’re missing a real treat!
Each night, the moons appear in dierent positions around the Jovian sky.
This is sometimes called the Galilean dance. On any given night, you might
be able to see the shadow of a moon on the face of Jupiter, see one moon
eclipse another or even see a moon emerge from behind Jupiter’s giant disk.
Probably the most memorable sight you will see in your telescope is Saturn.
Although you may not see many features on the surface of Saturn, its ring
structure will steal your breath away. On nights of very steady seeing you may
be able to see a black opening in the rings, known as the Cassini band.
Looking at or near the Sun will cause irreversable damage to your eye. Do not point this telescope at or near the Sun. Do not look through the telescope as it is moving.
18
/