40gram 1s brushless Toothpick drone
AIO Flight controller with ELRS Receiver and 5.8G VTX
CADDX ANT Camera
New 1202.5 KV11500 brushless motor
Recommend to use 1s 450mah/650mah/660mah/720mah battery
Compatible with CaddxFPV Peanut and Insta360 GO2
Carrying Caddxfpv peanut Got 4.5 minutes flying time with 1s 650mah battery
Brand Name: Happymodel
Item Name: Crux3 1S ELRS
Wheelbase: 115mm
Size: 97mmx97mmx35mm (without propellers)
Weight: 40g(without battery)
Crux3 Frame and canopy
ELRS F4 2G4 flight controller built-in SPI ExpressLRS 2.4G receiver
Happymodel EX1202.5 KV11500 brushless motor
Gemfan 75mm bi-blade Propellers(4cw+4ccw)
Caddx Ant 1200TVL Global WDR with OSD 2g Ultra Light Nano FPV Camera
5.8G 25mw~ 00mw 4 ch vtx (Flight controller built-in) 4 8
Screw Driver
Propeller disassemble tool
3D Printed canopy for Insta360 GO2 and CaddxFPV Peanut
Happymodel Handbag
Qty
1
1
4
1
1
1
1
1
1
Camera
+5V out
GND
BIND
BOOT
LEDS GND
V OUT_
V IN_
+5V
RX1
TX1
1.Plug USB to the flight controller and connect to Betaflight configurator.
Go to the CLI command tab from Betaflight configurator then type “bind_rx" or
Go to Receiver tab from Betaflight configurator then hit "Bind Receiver",
the red LED on the flight controller will blinking fast ,that means the receiver is in bind mode.
2. Turn on your radio transmitter and running ELRS.LUA v2 version, scroll down the menu and
hit [Bind]. The Red LED on the flight controller would get to be solid first and then start to
blinking slowly. It means bind successfully. the USB and then you will find link was Reconnect
established.
1. The Default Arm/Disarm switch for Crux3 is AUX1(Channel 5),and you can also customize it with
Betaflight Configurator.
3.The default channel map for ELRS version is TAER1234. Please make sure your Crux3
transmitter is matched, otherwise it wouldn't be armed. Toggle the AUX1 Switch ,the Green LED
on the flight controller will getting to be solid, this indicates the motor was armed . And also you
can found“Armed" notice displayed on your FPV Goggles or the FPV Monitor. Please make sure
keep the level before arming .Be careful and Happy flying !Crux3
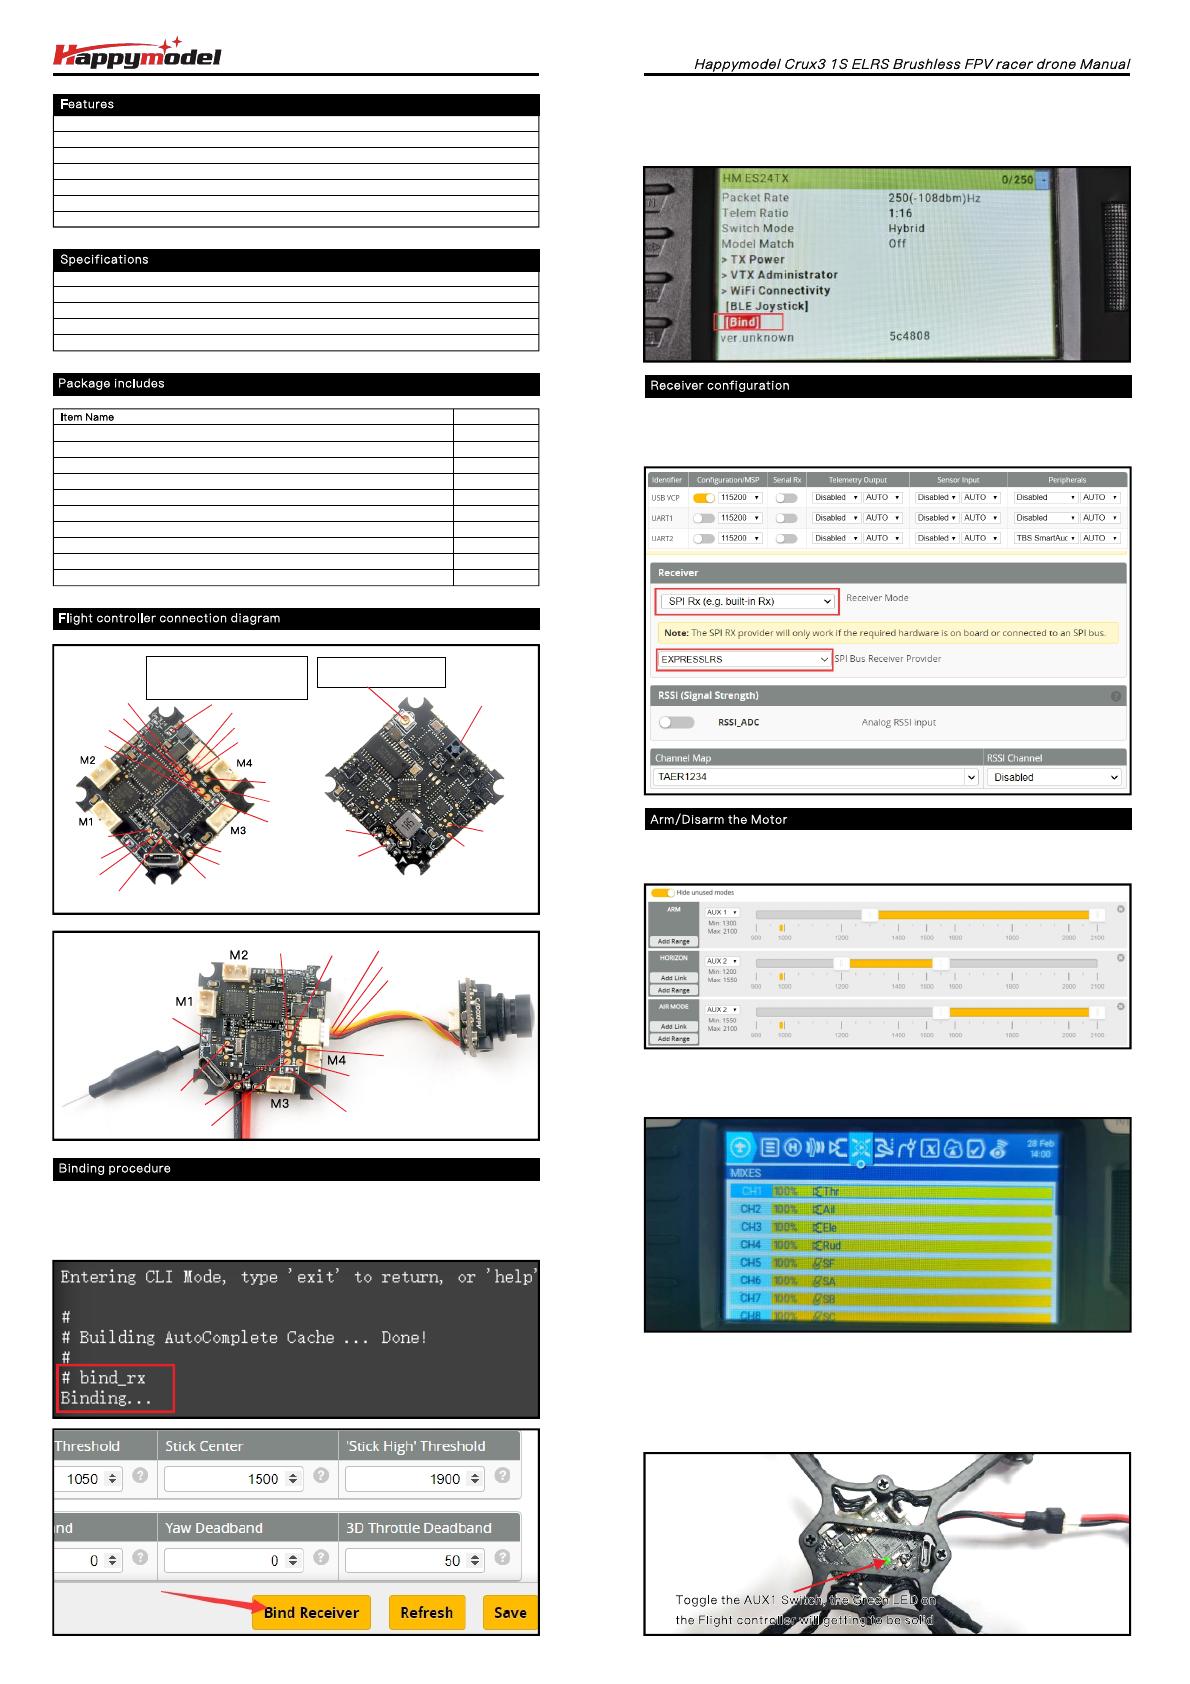
Please set Receiver mode to be SPI RX Support from the Configuration tab of the Betaflight
Configurator, then select EXPRESSLRS from the SPI Bus Receiver Provider list. Don't enable
Serial RX since the CRAZYBEE Flight controller is integrated SPI BUS Receiver.
2.Turn on the Radio transmitter with ELRS TX module installed(Use TX16S as an example) and
move to the MIXES interface, Set CH5 channel to "SF" or other aux channel to ARM/DISARM the
motor
VTX Antenna Connector
IPEX/U.FL
SMD Antenna for RX
Vcc+
1S Lipo
GND
BUZZ-
BUZZ+
GND
+5V
Camera_in
Video out
RX1
TX1
Power switch for onboard vtx.
Bridge=Power on.
Disconnect = Power off
BIND
Camera_in
+5V OUT
GND
VCC+1S Lipo
GND
Onboard vtx
SmartAudio
LED_Strip
BOOT
TX2RX2


