Date Issued 9/26/03
IS-8405-CB
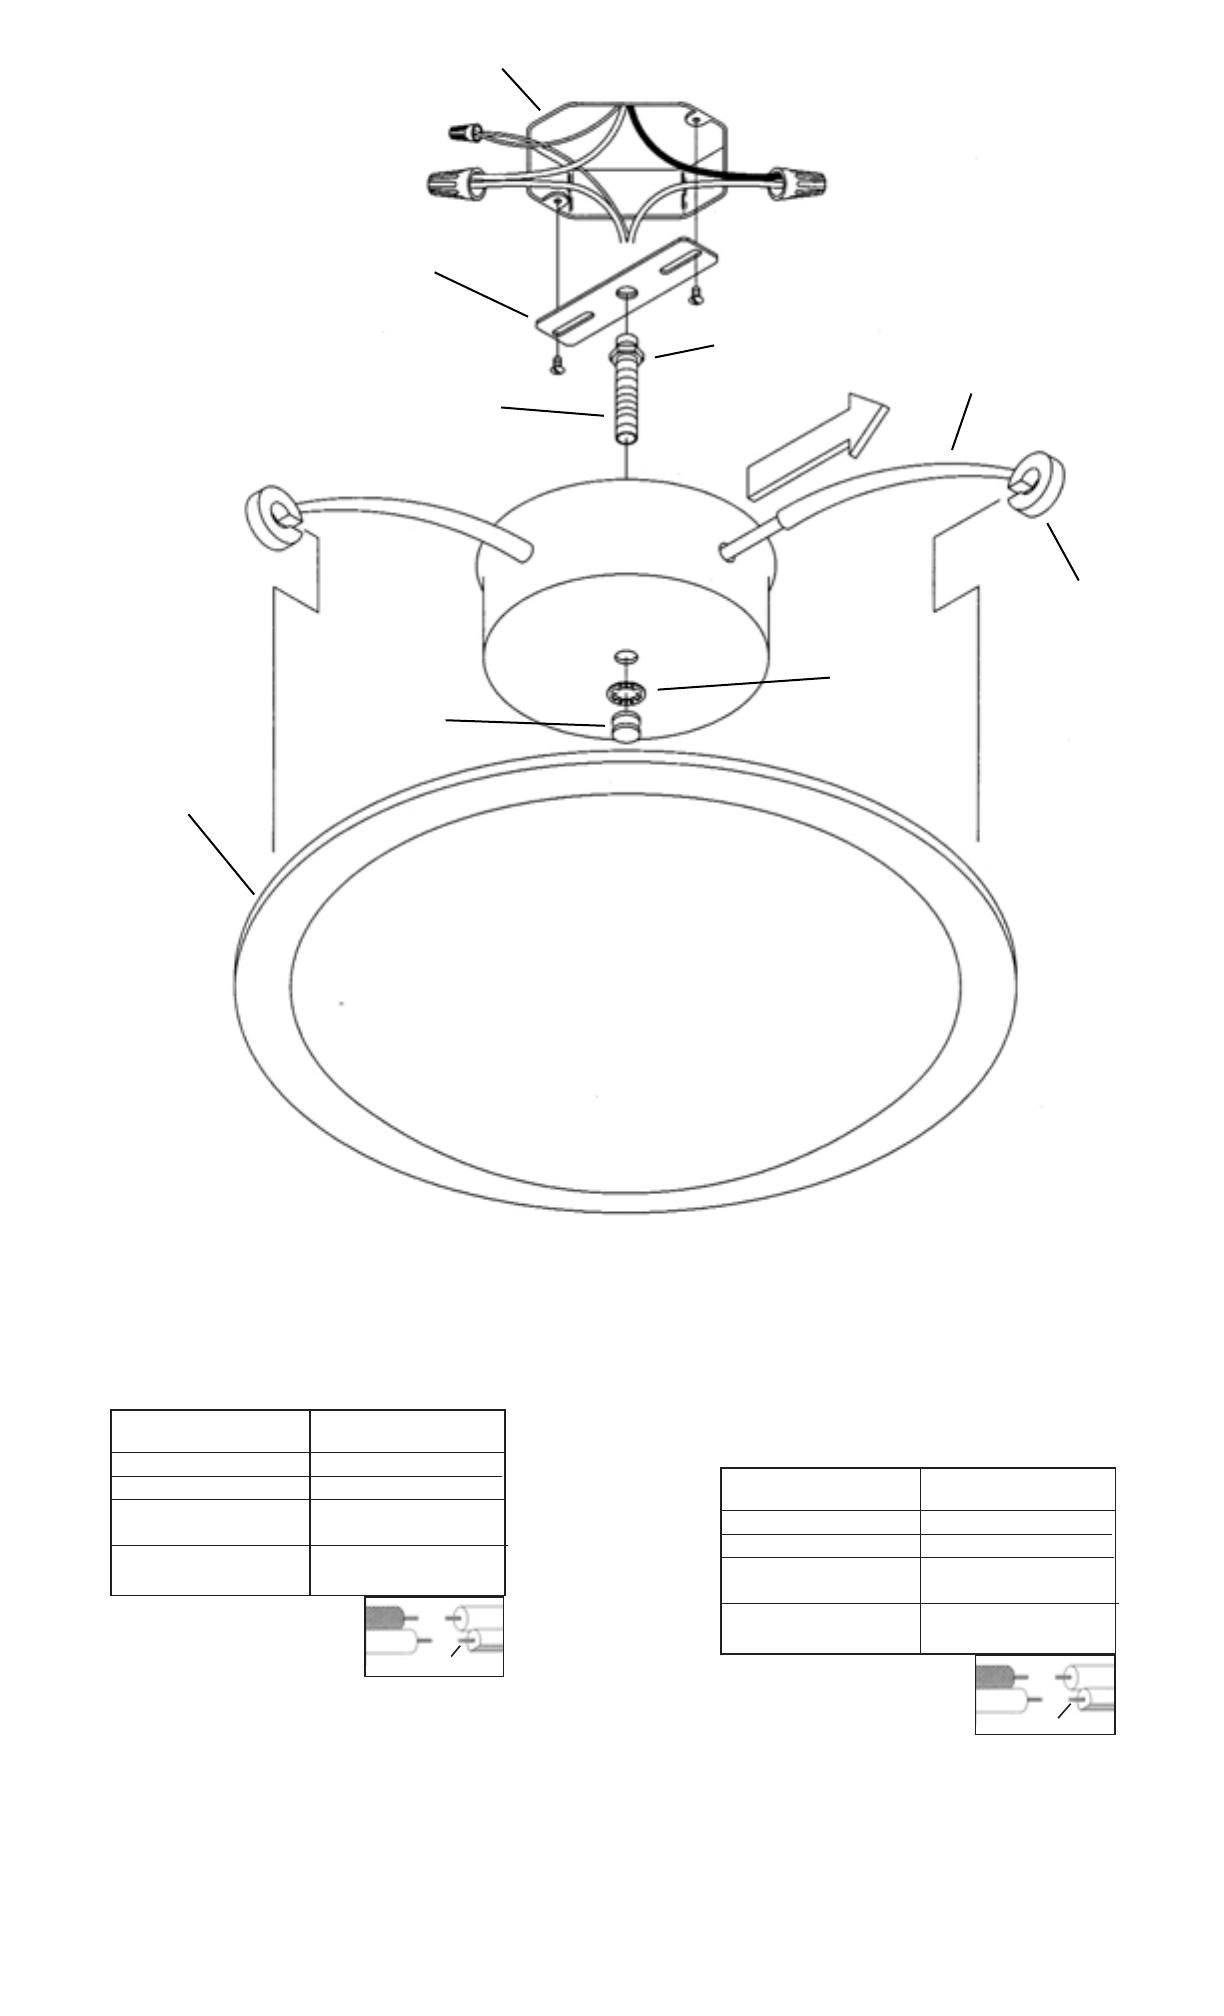
1) Turn off power.
2) Attach mounting strap to outlet box. (Screws not provided)
3) Thread hexnut onto threaded pipe so that 5 threads are exposed above
hexnut. Thread that end of threaded pipe into mounting strap and tighten
hexnut against mounting strap.
4) Make wire connections (connectors not provided.) Reference chart
below for correct connections and wire accordingly.
5) Push fixture to ceiling, carefully passing threaded pipe through hole.
6) Tighten fixture to ceiling with lockwasher and threaded cap.
7) One arm is spring loaded. Determine that arm and pull outward.
8) Carefully slip edge of shade into hooks and slowly allow spring loaded
arm to return.
Connect Black or
Red Supply Wire to:
Connect
White Supply Wire to:
Black White
*Parallel cord (round & smooth) *Parallel cord (square & ridged)
Clear, Brown, Gold or Black
without tracer
Clear, Brown, Gold or Black
with tracer
Insulated wire (other than green)
with copper conductor
Insulated wire (other than green)
with silver conductor
*Note: When parallel wires (SPT I & SPT II)
are used. The neutral wire is square shaped
or ridged and the other wire will be round in
shape or smooth (see illus.)
Neutral Wire
1) Couper l’alimentation secteur.
2) Visser la barrette de montage à la boîte de jonction. (Vis non fournies).
3) Visser l’écrou hexagonal sur la tige filetée de façon à laisser apparaître
5 filets au-dessus de l’écrou hexagonal. Visser cette extrémité de la
tige filetée sur la barrette de montage et serrer l’écrou hexagonal contre
la barrette de montage.
4) Effectuer les raccordements électriques (les cosses ne sont pas
fournies). Si les fils du lustre ne sont pas noir et blanc, se reporter au
tableau ci-dessous pour effectuer les raccordements convenables et
câbler en conséquence.
5) Plaquer l’armature contre le plafond, en passant soigneusement la tige
filetée dans le trou.
6) Serrer l’armature contre le plafond avec la rondelle-frein et le bouchon
fileté.
7) Un bras comporte des ressorts. Une fois ce bras identifié, le tirer vers
l’extérieur.
8) Placer avec précaution l’extrémité de l’abat-jour dans les crochets puis
remettre lentement le bras à ressorts dans sa position.
Connecter le fil noir ou
rouge de la boite
Connecter le fil blanc de la boîte
A Noir A Blanc
*Au cordon parallèle (rond et lisse)
*Au cordon parallele (à angles droits el strié)
Au bransparent, doré, marron, ou
noir sans fil distinctif
Au transparent, doré, marron, ou
noir avec un til distinctif
Fil isolé (sauf fil vert) avec
conducteur en cuivre
Fil isolé (sauf fil vert) avec
conducteur en argent
*Remarque: Avec emploi d’un fil paralléle
(SPT I et SPT II). Le fil neutre est á angles
droits ou strié et l’autre fil doit étre rond ou
lisse (Voir le schéma).
Fil Neutre
INSTRUCTIONS
For Assembling and Installing Fixtures in Canada
Pour L’assemblage et L’installation Au Canada
OUTLET BOX
BOÎTE À PRISES
ARM
BRAS
THREADED PIPE
TUBE FILETÉ
FIXTURE
LUMINAIRE
LOCKWASHER
RONDELLE D’ARRÊT
HOOK
CROCHET
GLASS
VERRE
THREADED CAP
CAPUCHON FILETÉ
MOUNTING STRAP
BRIDE DE FIXATION
HEXNUT
ÉCROU HEXAGONAL


