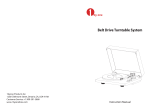
Denon DP-400 Owner's manual

Category
Audio turntables
Type
Owner's manual

Denon DP-400 is a turntable with a modern design and features such as automatic arm lifter, stabilizing rotation control, and the ability to switch between 33 1/3, 45, and 78 RPM. It comes with a dust cover that can be used as a record stand, and an MM cartridge pre-attached to the headshell for immediate use.

Denon DP-400 is a turntable with a modern design and features such as automatic arm lifter, stabilizing rotation control, and the ability to switch between 33 1/3, 45, and 78 RPM. It comes with a dust cover that can be used as a record stand, and an MM cartridge pre-attached to the headshell for immediate use.

.
DP-400
TURNTABLE
Owner’s Manual
Contents Preparations Connections
Playback and recording
Tips Appendix
1
Front panel Rear panel
Accessories
4
Features
5
Part names and functions
6
Front panel
6
Rear panel
8
Preparations
Assembly
10
Mounting the turntable
11
Mounting the counterweight
12
Mounting the head shell with cartridge
12
Attaching the dust cover
13
Using the dust cover as a record stand
13
Adjustments
15
Adjusting the stylus pressure
15
Adjusting anti-skating
17
Connections
Connecting devices that do not have a phono input
19
Connecting devices that have a phono input
20
Connecting the AC adapter
21
Playback and recording
Record playback
24
Record playback
24
Stopping playback
26
Using the automatic stop function
27
Contents Preparations Connections
Playback and recording
Tips Appendix
2
Front panel Rear panel
Tips
Contents
28
Troubleshooting
29
Power does not turn on/Power is turned off
30
The turntable does not spin
30
No sound comes out
31
Audio skips, scratches or is distorted
31
Howling is produced
32
The tone arm stops moving halfway
32
Appendix
Replacing the stylus
33
Specifications
34
Contents Preparations Connections
Playback and recording
Tips Appendix
3
Front panel Rear panel
Thank you for purchasing this Denon product. To ensure proper operation, please read this owner’s manual carefully before using the product.
After reading this manual, be sure to keep it for future reference.
Accessories
Check that the following parts are supplied with the product.
.
P
US
H
Quick Start Guide
Safety Instructions AC adapter
AC adapter plugs
(5 pieces)
Dust cover
Dust cover stand
Turntable Turntable sheet
45 rpm adaptor
Head shell with cartridge Counterweight Audio cable
Contents Preparations Connections
Playback and recording
Tips Appendix
4
Front panel Rear panel
Features
0
Modern design
Much like the PMA-60, DRA-100 and other devices in our Denon
Design Series, all unnecessary decoration has been eliminated for an
updated minimalistic design.
0
The automatic arm lifter function automatically raises the tone
arm at the end of record playback
0
Stabilizing rotation control improves rotation precision
A sensor has been installed that measures the RPM to maintain a
precise rotation speed.
0
An MM cartridge is pre-attached to the headshell to enable
immediate use without assembly
0
Equipped with an equalizer switch to turn the built-in phono
equalizer on and off
The phono equalizer is built in to enable direct connection, even if the
amplifier or mini component system does not have phono input. Use the
switch to turn the equalizer off to enable connection to amplifiers with a
phono input.
0
Equipped with a function to switch RPM between 33 1/3, 45 and
78
Change record playback speed between 33 1/3, 45 and 78 RPM as
needed. This means that both 7 inch and 12 inch record playback in all
RPM formats is supported.
0
Equipped with a dust cover that can be used as a record stand
The included dust cover can also be set up for use as a record stand.
Use it to display the sleeves of your records.
Contents Preparations Connections
Playback and recording
Tips Appendix
5
Front panel Rear panel
Part names and functions
Front panel
.
0
3.5
3
0.5
1
qe rwytu
o
i
Q0
For details, see the next page.
Contents
Preparations Connections
Playback and recording
Tips Appendix
6
Front panel Rear panel
.
0
3.5
3
0.5
1
qe rwytu
o
i
Q0
A
Power/rpm switch knob
Turn the power on and off and change the RPM as needed during
record playback. (v p. 24)
B
Turntable
Attached by mounting on the center spindle on the main unit. The belt
is equipped underneath. (v p. 11)
C
Turntable sheet
Mounted on top of the turntable. (v p. 11)
D
Center spindle
Place the turntable and records so that it comes out through the center.
E
Tone arm
0
The counterweight is mounted on the back. (v
p. 12)
0
The head shell with cartridge is attached to the tip. (v p. 12)
F
Counterweight
Attached to the back of the tone arm to adjust stylus pressure.
0
“Mounting the counterweight” (v p. 12)
0
“Adjusting the stylus pressure” (v p. 15)
G
Anti-skating dial
Adjusts anti-skating. (v p. 17)
H
Head shell with cartridge
Attached to the tip of the tone arm. (v
p. 12)
I
Armrest
Rest the tone arm here when it is not in use for record playback.
J
Lifter lever
Raises and lowers the tone arm. Lowering the lever slowly lowers the
tone arm to place the stylus without damaging it or the record to be
played.
Contents
Preparations Connections
Playback and recording
Tips Appendix
7
Front panel Rear panel
Rear panel
.
qewtr
A
EQUALIZER ON/OFF switch
This switches the built-in equalizer on and off. Switch as needed
depending on whether the connected amplifier or mini component
system are equipped with phono input or not.
0
“Connecting devices that do not have a phono input” (v
p. 19)
0
“Connecting devices that have a phono input” (v p. 20)
B
PHONO OUT connectors
For connecting devices with external audio or phono inputs.
0
“Connecting devices that do not have a phono input” (v p. 19)
0
“Connecting devices that have a phono input” (v
p. 20)
C
SIGNAL GND terminal
Use the grounding wire on the supplied audio cable, even when
connecting this device to amplifiers with grounded connections.
(v p. 20)
D
AUTO STOP ON/OFF button
Automatically raises the tone arm and stops the turntable at the end of
a record when this function is on during record playback. (v p. 27)
E
AC adapter input connector
For connecting the included AC adapter. (v p. 21)
Contents Preparations Connections
Playback and recording
Tips Appendix
8
Front panel Rear panel
o
Contents
Assembly
Mounting the turntable 11
Mounting the counterweight 12
Mounting the head shell with cartridge 12
Attaching the dust cover 13
Using the dust cover as a record stand 13
Adjustments
Adjusting the stylus pressure 15
Adjusting anti-skating 17
Contents Preparations Connections
Playback and recording
Tips Appendix
9
Front panel Rear panel
Assembly
Mount these included parts on the main unit before use.
Make sure to perform setup on a stable, even surface to prevent the influence of vibration or slanted angles on record playback.
.
Turntable sheet
Turntable
Ribbon tape
Center spindle
Stylus cover
Head shell with cartridge
Tone arm
Counterweight
NOTE
0
Make sure the AC adapter is not connected from this unit to a wall socket during assembly.
Contents Preparations Connections
Playback and recording
Tips Appendix
10
Front panel Rear panel
Mounting the turntable
1
Mount the hole in the center of the turntable on the
center spindle.
2
Turn the turntable until the roller of the main unit is
visible from the square hole on the side with the ribbon
tape.
3
Pull out the ribbon tape, and hang the belt on the roller.
0
Remove the ribbon tape after hanging the belt.
.
0
Take care not to twist the belt when hanging it.
0
Store the ribbon tape after use, as it is required when replacing the belt.
4
Mount the turntable sheet on the turntable.
0
Mount the sheet with the side featuring the DENON logo facing down.
Contents Preparations Connections
Playback and recording
Tips Appendix
11
Front panel Rear panel
Mounting the counterweight
1
Insert the counterweight into the shaft on the back of
the tone arm, and turn it in the direction of the arrow
while gently pushing it.
.
0
3.5
3
0.5
1
0
3.5
3
0.5
1
Stylus pressure adjustment ring
0
Mount the counterweight so that its stylus pressure adjustment ring is facing
the front.
Mounting the head shell with cartridge
1
Insert the head shell into the tip of the tone arm.
0
Insert the head shell with its guide pin facing up and aligned with
the hole on the top of the tone arm.
.
Guide pin
2
Turn the lock nut in the direction of the arrow to secure
the head shell.
.
Lock nut
NOTE
0
Perform this operation with the stylus cover of the cartridge lowered to protect the
stylus tip.
Contents Preparations Connections
Playback and recording
Tips Appendix
12
Front panel Rear panel
Attaching the dust cover
1
Mount the hole on the dust cover on the center spindle.
.
Dust cover
0
Remove the dust cover before record playback.
Using the dust cover as a record stand
Attach the dust cover to the included dust cover stand to use it as a record
stand. Use it in this way when it is not attached to the main unit.
1
Face the dust cover as shown in the picture below to
insert it into the groove in the dust cover stand.
.
Contents
Preparations Connections
Playback and recording
Tips Appendix
13
Front panel Rear panel
2
Record sleeves can be fitted into the indent on the dust
cover stand and leaned against the dust cover.
.
Contents
Preparations Connections
Playback and recording
Tips Appendix
14
Front panel Rear panel
Adjustments
.
0
3.5
3
0.5
1
Counterweight
Tone arm
Anti-skating dial
Armrest
Lifter lever
Turntable
Stylus cover
Head shell
NOTE
0
Make sure the AC adapter is not connected from this unit to a wall socket when
performing adjustments.
Adjusting the stylus pressure
To enable the record stylus to follow the grooves of the record and pick up
sound (vibrations), it is necessary to apply a constant pressure (stylus
pressure) to the record from the stylus tip. A suitable stylus pressure value
is specified for each cartridge. If the stylus pressure is higher or lower than
the specified value, not only will the record playback sound be distorted
and the stylus jump, but the record stylus may wear out faster and the
record may become damaged. Therefore, make sure to adjust the stylus
pressure to the suitable value.
1
Set the anti-skating dial to “0”.
.
2
Lower the lifter lever.
Contents Preparations Connections
Playback and recording
Tips Appendix
15
Front panel Rear panel
3
Release the armrest lock.
.
4
Holding the finger lift of the headshell, move the tone
arm over the turntable.
.
2.5
1
.
3
1
3
.
5
0
.
5
0
Finger lift
NOTE
0
Perform this operation with the stylus cover of the cartridge lowered to
protect the stylus tip.
5
Turn twist the counterweight so that the tone arm is
floating parallel to the turntable.
0
Perform adjustment by turning the counterweight gradually while
periodically removing your hand to check the position.
.
Keep it parallel
6
Return the tone arm to the armrest.
Contents Preparations Connections
Playback and recording
Tips Appendix
16
Front panel Rear panel
7
Holding the counterweight with a finger so that it does
not move, turn the stylus pressure adjustment ring so
that its “0” mark is lined up with the line on the tone
arm.
.
Stylus pressure
adjustment ring
8
Turn the counterweight in the direction of the arrow so
that the “2” mark of the stylus pressure adjustment
ring is lined up with the line on the tone arm.
.
0
The appropriate stylus pressure for the cartridge included with this unit is
2.0 g (19.6 mN).
Adjusting anti-skating
Anti-skating adjustment is performed to counter the force which pulls the
stylus tip inside due to the record rotation.
1
Turn the anti-skating dial so that it is lined up with “2”.
.
0
Make sure that the anti-skating value is the same as the stylus pressure
value.
Contents Preparations Connections
Playback and recording
Tips Appendix
17
Front panel Rear panel
o
Contents
Connecting devices that do not have a phono input 19
Connecting devices that have a phono input 20
Connecting the AC adapter 21
NOTE
0
Do not plug in the AC adapter until all connections have been completed.
0
Do not bundle AC adapter together with connection cables. Doing so can result in
humming or noise.
Contents
Preparations Connections
Playback and recording
Tips Appendix
18
Front panel Rear panel
Connecting devices that do not have a phono input
This unit has a built-in phono equalizer that enables record playback when connected to devices with external audio input without a built-in phono
equalizer or with mini component system. Use the EQUALIZER ON/OFF switch to turn the phono equalizer on this unit “ON” when connected to a device
without a built-in phono equalizer.
.
R
L
AUX IN
R
L
R
L
Audio cable
(supplied)
Amplifier/mini stereo system
without a PHONO input terminal
0
It is recommended that the earth wire of the included audio cable is kept out of the way by securing it with a tie such as the twist tie of the audio cable.
0
If the EQUALIZER ON/OFF switch is not set correctly, audio will be extremely low or distorted.
Contents Preparations Connections
Playback and recording
Tips Appendix
19
Front panel Rear panel
Connecting devices that have a phono input
When connected to a device with a built-in phono equalizer, use that device’s phono equalizer during record playback. Use the EQUALIZER ON/OFF
switch to turn the phono equalizer on this unit “OFF” when connected to a device with a built-in phono equalizer.
.
R
SIGNAL
GND
L
PHONO IN
R
L
R
L
Audio cable
(supplied)
Amplifiers with a
phono input
0
If a device connected to this unit has an earth terminal, connect the earth wire of the audio cable (supplied) to the earth terminal of this unit (SIGNAL GND). This may reduce
noise during playback.
0
If the EQUALIZER ON/OFF switch is not set correctly, audio will be extremely low or distorted.
Contents
Preparations Connections
Playback and recording
Tips Appendix
20
Front panel Rear panel
  • Page 1 1
  • Page 2 2
  • Page 3 3
  • Page 4 4
  • Page 5 5
  • Page 6 6
  • Page 7 7
  • Page 8 8
  • Page 9 9
  • Page 10 10
  • Page 11 11
  • Page 12 12
  • Page 13 13
  • Page 14 14
  • Page 15 15
  • Page 16 16
  • Page 17 17
  • Page 18 18
  • Page 19 19
  • Page 20 20
  • Page 21 21
  • Page 22 22
  • Page 23 23
  • Page 24 24
  • Page 25 25
  • Page 26 26
  • Page 27 27
  • Page 28 28
  • Page 29 29
  • Page 30 30
  • Page 31 31
  • Page 32 32
  • Page 33 33
  • Page 34 34
  • Page 35 35
  • Page 36 36
  • Page 37 37
  • Page 38 38

Denon DP-400 Owner's manual

Category
Audio turntables
Type
Owner's manual

Denon DP-400 is a turntable with a modern design and features such as automatic arm lifter, stabilizing rotation control, and the ability to switch between 33 1/3, 45, and 78 RPM. It comes with a dust cover that can be used as a record stand, and an MM cartridge pre-attached to the headshell for immediate use.

Ask a question and I''ll find the answer in the document

Finding information in a document is now easier with AI