Page is loading ...

3
GVP Series Belt-Mounted Powered Air Purifying
Respirator Assembly
User Instructions for 3M™ Belt-Mounted PAPR Assembly GVP-1, GVP-1U, GVP-CB,
GVP-PSK2, GVP-614-SK and 3M™ PAPR Unit GVP-100
Ensemble respirateur d’épuration d’air propulsé
monté à la ceinture de série GVP
Directives d’utilisation pour les ensembles respirateurs d’épuration d’air propulsé
montés à la ceinture GVP-1, GVP-1U, GVP-CB, GVP-PSK2 et GVP-614-SK 3M
MC
et
le respirateur d’épuration d’air propulsé GVP-100 3M
MC
Respirador Puricador de Aire Forzado montado en
cinturón Serie GVP
Instrucciones para PAPR montado en cinturón 3M™ GVP-1, GVP-1U, GVP-CB,
GVP-PSK2, GVP-614-SK y Unidad PAPR 3M™ PAPR GVP-100
Conjunto de Respirador e Puricador de Ar Motorizado,
Montado na Cintura, da Série GVP
Instruções de Uso para Conjunto PAPR montado em cinto GVP-1, GVP-1U, GVP-CB,
GVP-PSK2, GVP-614-SK da 3M™ e a unidade PAPR GVP-100 da 3M™
IMPORTANT: Before use, the wearer must read and understand these User Instructions. Keep these User
Instructions for reference.
IMPORTANT : Avant de se servir du produit, l’utilisateur doit lire et comprendre les présentes directives
d’utilisation. Conserver ces directives d’utilisation à titre de référence.
IMPORTANTE: Antes de usar el producto, el usuario debe leer y entender estas Instrucciones. Conserve estas
Instrucciones para referencia futura.
IMPORTANTE: Antes de usar, o usuário deve ler e compreender estas Instruções de Uso. Guarde estas Instruções
de Uso para consulta.
98-0060-0007-3_6
34-8719-5281-7
3M PERSONAL SAFETY DIVISION
3M CENTER, BUILDING 0235-02-W-70
ST. PAUL, MN 55144-1000
3M and Versao are trademarks of the 3M Company,
used under license in Canada.
PSD products are occupational use only.
3M PERSONAL SAFETY DIVISION
3M CANADA
P.O. BOX 5757
LONDON, ONTARIO N6A 4T1
DIVISION DES PRODUITS DE PROTECTION
INDIVIDUELLE DE 3M COMPAGNIE
C.P. 5757
LONDON ONTARIO N6A 4T1
3M et Versao sont des marques de commerce de 3M,
utilisées sous licence au Canada.
Les produits de la Division des produits de protection
individuelle sont destinés uniquement à un usage en
milieu de travail.
3M MÉXICO S.A. DE C.V.
AV. SANTA FE NO. 190
COL. SANTA FE, DEL. ÁLVARO OBREGÓN
MÉXICO D.F. 01210
3M y Versao son marcas registradas de 3M Company,
usada bajo licencia en Canadá.
Los productos 3M PSD sólo están diseñados para uso
ocupacional.
3M do Brasil Ltda.
Via Anhanguera, km 110 - Sumaré - SP
CNPJ 45.985.371/0001-08
3M e Versao são marcas registradas da 3M Company.
Produtos de PSD da 3M para uso ocupacional somente.
© 3M 2017.

ENGLISH
TABLE OF CONTENTS
FOREWORD .......................................................................................................................... 1
Contact Information ...................................................................................................... 1
System Description ....................................................................................................... 1
Listing of Warnings and Cautions within these User Instructions .................................... 1
LIMITATIONS OF USE ............................................................................................................. 2
RESPIRATOR PROGRAM MANAGEMENT ................................................................................ 2
APPROVAL, CAUTIONS & LIMITATIONS ................................................................................... 2
OPERATING INSTRUCTIONS ................................................................................................... 3
INSPECTION .......................................................................................................................... 9
ENTERING AND EXITING THE CONTAMINATED AREA ............................................................ 10
CLEANING, STORAGE AND DISPOSAL .................................................................................. 11
SPECIFICATIONS ................................................................................................................. 12
COMPONENTS, ACCESSORIES AND REPLACEMENT PARTS .................................................. 14
TROUBLESHOOTING ............................................................................................................ 17
IMPORTANT NOTICE ............................................................................................................ 18

1
2
W WARNING
This product is part of a system that helps protect against certain airborne contaminants. Before use, the wearer must read
and understand the User Instructions provided as a part of the product packaging. A written respiratory protection program
must be implemented meeting all the requirements of OSHA 29 CFR 1910.134 including training, t testing, and medical
evaluation. In Canada, CSA standards Z94.4 requirements must be met and/or requirements of the applicable jurisdiction,
as appropriate. Misuse may result in sickness or death. For proper use, see packaging instructions, supervisor, or call 3M
PSD Technical Service in U.S.A. at 1-800-243-4630 and in Canada at 1-800-267-4414.
FOREWORD
Contact Information
Read all instructions and warnings before using. Keep this User Instructions for reference. If you have questions regarding these products
contact 3M Technical Service.
In United States:
Website: www.3M.com/workersafety
Technical Service: 1-800-243-4630
In Canada:
Website: www.3M.ca/Safety
Technical Service: 1-800-267-4414
System Description
The 3M™ GVP Powered Air Purifying Respirator (PAPR) Assembly is designed to be used with certain 3M respiratory headgear, lter/cartridges,
batteries and breathing tubes to form a complete NIOSH approved respiratory system. When used in accordance with its NIOSH approval, these
systems help provide respiratory protection against certain airborne contaminants. See “NIOSH Approval” section of this User Instructions for
additional information on approvals.
The GVP belt mounted assemblies consist of a blower unit, lter/cartridge, waist belt and either GVP-111 nickel cadmium, BP-15 nickel metal
hydride battery pack or TR-630 lithium-ion battery. The TR-659 battery adapter and either the TR-656 or TR-657 holster are required when the
TR-630 battery is used with the GVP PAPR assembly.
NOTE: The BC-210 charger, used to charge the BP-15 battery pack, was discontinued and is no longer available.
The GVP assembly used with the GVP-111 battery pack is an intrinsically safe system for the following: Division 1, Class I; Group D, Class II,
Groups E, F, G and Class III. The GVP assembly used with the BP-15 or with the TR-630 battery pack is not an intrinsically safe system.
The motor/blower unit (i.e. turbo assembly) draws ambient air through the lter/cartridge and provides ltered air to the headgear via the
breathing tube. The GVP-111, BP-15 and TR-659 adapter (when used with the TR-630 battery) have a visual alarm to alert the wearer to a low
battery voltage state.
The 3M™ GVP Assembly is available with a variety of accessories and belt options. Consult the “Listing of Components, Accessories and
Replacement Parts” in this User Instructions for additional information including a listing of 3M™ GVP PAPR part numbers. Refer to the
enclosed 3M™ GVP NIOSH Approval Label for approved system congurations.
Use the 3M™ Spark Arrest Cover GVP-146 to help reduce exposure of the 3M™ Motor Blower GVP-100 and 3M™ GVP Cartridges or Filters to
sparks and other hot materials, typically resulting from grinding, welding operations or other “hot work”.
NOTE: The 3M™ Vinyl Belt GVP-117 should not be used for high heat or spark producing operations.
Listing of Warnings and Cautions within these User Instructions
W WARNING
• These respirators help protect against certain airborne contaminants. Before use, the wearer must read and understand the User
Instructions provided as a part of the product packaging. A written respiratory protection program must be implemented meeting all
the requirements of OSHA 29 CFR 1910.134 including training, t testing, and medical evaluation. In Canada, CSA standards Z94.4
requirements must be met and/or requirements of the applicable jurisdiction, as appropriate. Misuse may result in sickness or
death. For proper use, see User Instructions, supervisor, or call 3M PSD Technical Service in U.S.A. at 1-800-243-4630 and in Canada
at 1-800-267-4414.
• Each person using this respirator assembly must read and understand the information in these User Instructions before use. Use of
these respirators by untrained or unqualied persons, or use that is not in accordance with these User Instructions, may adversely
affect respirator performance and result in sickness or death.
• Do not use with parts or accessories other than those manufactured by 3M as described in these User Instructions or on the NIOSH
Approval Label for this respirator. Do not attempt to repair or modify any component of the system except as described in these User
Instructions. Failure to do so may adversely affect respirator performance and result in sickness or death.
• Always correctly use and maintain the lithium-ion battery packs. Failure to do so may cause re or explosion or could adversely
affect respirator performance and result in injury, sickness, or death.
a. Do not charge batteries with unapproved chargers, in enclosed cabinets without ventilation, in hazardous locations, or near sources
of high heat.
b. Do not immerse without the battery storage and cleaning cover installed.
c. Do not use, charge, or store batteries outside the recommended temperature limits.
d. Charge in an area free of combustible material and readily monitored.
• To reduce exposure to hazardous voltage:
a. Do not attempt to service the chargers. There are no user-serviceable parts inside.
b. Do not substitute, modify or add parts to the chargers.
c. Inspect the chargers and power cords before use. Replace if any parts are damaged.
d. Do not use the chargers outdoors or in wet environments.
• Be certain that the lter and/or cartridge that you are placing on the unit is appropriate for the contaminants to which you will be
exposed. Failure to do so may result in sickness or death.
• Do not over-tighten lter/cartridge. Over-tightening may result in distortion or displacement of the seal and may allow contaminated air
to enter the respirator headpiece and may result in sickness or death.
• Failure to pass a user performance check and complete all necessary repairs before use may adversely affect respirator
performance and result in sickness or death.
W WARNING
• Before using a 3M™ GVP PAPR Assembly, each person must read and understand the information in these User Instructions and
the User Instructions provided with the respirator headpiece to be used. Use of these respirator systems by untrained or unqualied
persons, or use that is not in accordance with these instructions, may adversely affect respirator performance and may result in
sickness or death.
• Use of this respirator in atmospheres for which it was not NIOSH certied and designed may result in sickness or death. Do not wear
this respirator where:
a. Atmospheres are oxygen decient.
b. Contaminant concentrations are unknown.
c. Contaminant concentrations are immediately dangerous to life or health (IDLH).
d. Contaminant concentrations exceed the maximum use concentration determined using the assigned protection factor (APF)
recommended for the applicable headpiece or the APF mandated by specic government standards, whichever is lower. Refer to the
User Instructions provided with the applicable headpiece.
• Do not enter a contaminated area until properly donning the respirator system. Do not remove the respirator before leaving the
contaminated area. Doing so may result in sickness or death.
• Contaminants that are dangerous to your health include those that you may not be able to see or smell. Leave the contaminated area
immediately if any of the following conditions occur. Failure to do so may result in sickness or death.
a. Airow decreases or stops.
b. Any part of the system becomes damaged.
c. Airow into the respirator decreases or stops.
d. Breathing becomes difcult.
e. You feel dizzy or your vision is impaired.
f. You taste or smell contaminants.
g. Your face, eyes, nose or mouth become(s) irritated.
h. You suspect that the concentration of contaminants may have reached levels at which this respirator may no longer provide adequate
protection.
• Do not expose blower/lter assembly directly to sparks or molten metal spatter. Direct contact with sparks or molten metal spatter may
damage the lter, allowing unltered air into the breathing zone and may cause the lter or blower assembly to ignite, resulting in
serious injury, sickness or death.
• Never alter or modify this respirator. Repair or replace parts only with the 3M components approved for this assembly. Failure to do so
may adversely affect product performance and result in sickness or death.
• Do not clean respirator with solvents. Cleaning with solvents may degrade some respirator components and reduce respirator
effectiveness. Inspect all respirator components before each use to ensure proper operating conditions. Failure to do so may result in
sickness or death.
• Never attempt to clean lters by knocking or blowing out accumulated material. This may result in damage to the lter membrane
allowing hazardous particles to enter the breathing zone, resulting in sickness or death.
• To reduce the risks associated with re, explosion, and environmental contamination:
Do not dispose of Li-ion batteries in a re or send for incineration. Battery packs should be treated as special waste and in accordance
with your local environmental regulations.
CAUTION
• The 3M™ GVP when used with the BP-15 battery pack or the TR-630 and TR-659 battery/adapter combination IS NOT an
intrinsically safe system.
• 3M™ Motor Blower GVP-100, 3M™ Power Cord GVP-110 and 3M™ Battery Pack GVP-111 combination has been tested and
classied by UL for intrinsic safety for the following: Division 1, Class I; Group D, Class II, Groups E, F, G and Class III. If the GVP-111
battery case is compromised or cracked, or if the rubber switch boot is damaged or missing, the battery pack and system should no
longer be considered intrinsically safe.
• To reduce the risks associated with hot surfaces:
- Do not touch pins after battery has been charged.
LIMITATIONS OF USE
Do not wear this respirator system to enter areas where:
• Atmospheres are oxygen decient.
• Contaminant concentrations are unknown.
• Contaminant concentrations are Immediately Dangerous to Life or Health (IDLH).
• Contaminant concentrations exceed the maximum use concentration (MUC) determined using the Assigned Protection Factor (APF) for the
specic respirator system or the APF mandated by specic government standards, whichever is lower.
Refer to the User Instructions provided with the applicable headgear and the additional cautions and limitations under the “NIOSH Cautions and
Limitations” in this User Instructions.
RESPIRATOR PROGRAM MANAGEMENT
Occupational use of respirators must be in compliance with applicable health and safety standards. By United States regulation employers
must establish a written respirator protection program meeting the requirements of the Occupational Safety and Health Administration (OSHA)
Respiratory Protection standard 29 CFR 1910.134 and any applicable OSHA substance specic standards. For additional information on this
standard contact OSHA at www.OSHA.gov. In Canada, CSA standard Z94.4 requirements must be met and/or requirements of the applicable
jurisdiction as appropriate. Consult an industrial hygienist or call 3M Technical Service with questions concerning applicability of these
products to your job requirements.
APPROVAL, CAUTIONS & LIMITATIONS
NIOSH Approval
The GVP PAPR assembly is one component of a NIOSH approved respiratory system. Refer to the User Instructions and/or the NIOSH Approval
Label provided with the GVP PAPR assembly for a listing of components that can be used to assemble a complete NIOSH approved respirator
system or contact 3M Technical Service.

3
4
NIOSH Cautions and Limitations
A – Not for use in atmospheres containing less than 19.5 percent oxygen.
B – Not for use in atmospheres immediately dangerous to life or health.
C – Do not exceed maximum use concentrations established by regulatory standards.
F – Do not use powered air-purifying respirators if airow is less than four cfm (115 lpm) for tight tting facepieces or six cfm (170 lpm) for
hoods and/or helmets.
H – Follow established cartridge and canister change schedules or observe ESLI to ensure that cartridge and canisters are replaced before
breakthrough occurs.
I – Contains electrical parts that may cause an ignition in ammable or explosive atmospheres.
J – Failure to properly use and maintain this product could result in injury or death.
L – Follow the manufacturer’s User’s Instructions for changing cartridges, canister and/or lters.
M – All approved respirators shall be selected, tted, used, and maintained in accordance with MSHA, OSHA, and other applicable regulations.
N – Never substitute, modify, add, or omit parts. Use only exact replacement parts in the conguration as specied by the manufacturer.
O – Refer to User’s Instructions, and/or maintenance manuals for information on use and maintenance of these respirators.
P – NIOSH does not evaluate respirators for use as surgical masks.
Intrinsic Safety Approval
3M™ Motor Blower GVP-100, 3M™ Power Cord GVP-110 and 3M™ Battery Pack GVP-111 combination has been tested and classied by
Underwrites Laboratory (UL) for intrinsic safety for the following: Division 1, Class I; Group D, Class II, Groups E, F, G and Class III.
W WARNING
Each person using this respirator assembly must read and understand the information in these User Instructions before use. Use of these
respirators by untrained or unqualied persons, or use that is not in accordance with these User Instructions, may adversely affect
respirator performance and result in sickness or death.
Do not use with parts or accessories other than those manufactured by 3M as described in these User Instructions or on the NIOSH Approval
Label for this respirator. Do not attempt to repair or modify any component of the system except as described in these User Instructions.
Failure to do so may adversely affect respirator performance and result in sickness or death.
OPERATING INSTRUCTIONS
Unpacking
Inspect the package contents for shipping damage and ensure all components are present. The product should be inspected before each use
following the procedures in the “Inspection” section of these User Instructions.
W WARNING
Always correctly use and maintain the lithium-ion battery packs. Failure to do so may cause re or explosion or could adversely affect
respirator performance and result in injury, sickness, or death.
a. Do not charge batteries with unapproved chargers, in enclosed cabinets without ventilation, in hazardous locations, or near sources
of high heat.
b. Do not immerse without the battery storage and cleaning cover installed.
c. Do not use, charge, or store batteries outside the recommended temperature limits.
d. Charge in an area free of combustible material and readily monitored.
To reduce exposure to hazardous voltage:
a. Do not attempt to service the chargers. There are no user-serviceable parts inside.
b. Do not substitute, modify or add parts to the chargers.
c. Inspect the chargers and power cords before use. Replace if any parts are damaged.
d. Do not use the chargers outdoors or in wet environments.
CAUTION
The 3M™ GVP when used with the BP-15 battery pack or the TR-630 and TR-659 battery/adapter combination IS NOT an intrinsically
safe system.
3M™ Motor Blower GVP-100, 3M™ Power Cord GVP-110 and 3M™ Battery Pack GVP-111 combination has been tested and classied by UL
for intrinsic safety for the following: Division 1, Class I; Group D, Class II, Groups E, F, G and Class III. If the GVP-111 battery case is compromised
or cracked, or if the rubber switch boot is damaged or missing, the battery pack and system should no longer be considered intrinsically safe.
To reduce the risks associated with hot surfaces:
- Do not touch pins after battery has been charged.
Assembly
Charge the battery pack:
1. Inspect the battery pack prior to each charge cycle. If the case is damaged do not charge the battery pack. Properly dispose of the battery
pack and replace.
2. Charge the battery pack in a cool, well ventilated location free of airborne contamination.
3. Plug the charger lead into the battery pack or place battery pack on charging cradle.
• BP-15 battery pack: Plug the charger power cord into an AC source (110-210 VAC). Refer to BC-210/BP-15 User Instructions. The
BP-15 battery pack should be charged immediately upon receipt and stored on the charger between uses. If the BP-15 will be stored
off the charger, it should be fully charged initially and then fully recharged once every three months if not used sooner. For long-term
storage, 3M recommends the BP-15 be stored connected on an active charger. The BC-210 charger is used to charge the BP-15
battery pack. NOTE: The BC-210 charger is discontinued and no longer available.
• GVP-111 battery pack: Plug the charger power cord into an AC source (110-120 VAC). Refer to GVP-111 User Instructions.
NOTE: The GVP-111 should be charged for a minimum of 20 hours before initial use. The GVP-111 battery pack should not be left
continuously connected to the charger for more than 1 week as over time this may damage the battery pack cells. The GVP-112
charger is used to charge the GVP-111 battery pack.
• TR-630 battery pack: Plug the charger power cord into an AC source (100-240 VAC). When using the lithium-ion battery refer to the
User Instructions provided with the battery. Refer to NIOSH Approval Label to see list of approved headgear and lter/cartridges that can
be used with this battery. The TR-630 should be charged immediately and fully upon receipt and may remain connected to the charger
indenitely. The 3M™ Versao™ Single Station Battery Charger Kit TR-641N and 4-Station Battery Charger Kit TR-644N are used to
charge the TR-630 battery pack.
Both the BP-15 and GVP-111 battery packs and the TR-659 battery adapter (used with the TR-630 battery) have a red warning light indicating
the battery pack requires recharging. The red light is not a low air ow indicator. Immediately exit the contaminated area when the visual
alarm (LED indicator light) on the adapter activates.
Users should also refer to 3M Technical Data Bulletin #178 – Maintenance and Care of 3M™ Powered Air Purifying Respirator (PAPR) Batteries
and to 3M Technical Data Bulletin #223 on Battery Maintenance for 3M™ Versao™ Respirator Systems for more information
(www.3M.com/workersafety).
Install the Battery Pack
• BP-15 battery pack: Plug the 3 prong plug end of the GVP-210 power cord into the top of the BP-15 battery pack.
• GVP-111 battery pack: Plug the single prong plug end of the GVP-110 power cord into the top of the GVP-111 battery pack.
• TR-630 battery pack: Please refer to guidance below for TR-630 battery, TR-659 battery adapter and holster assembly and installation.
• For all battery packs: Plug the socket end into the prong receptacle on the front of the GVP-100 motor blower. (See diagram in
“Components, Accessories and Replacement Parts” in these User Instructions).
NOTE: Take care to prevent the power cord from being hooked on protruding objects.
Filter/Cartridge Assembly
W WARNING
Be certain that the lter and/or cartridge that you are placing on the unit is appropriate for the contaminants to which you will be exposed.
Failure to do so may result in sickness or death.
Do not over-tighten lter/cartridge. Over-tightening may result in distortion or displacement of the seal and may allow contaminated air to
enter the respirator headpiece and may result in sickness or death.
1. Remove the plastic caps from the cartridge/lter.
2. Inspect the cartridge/lter for damage to the threads, plastic body or lter media. Discard if damaged.
3. Remove inlet and outlet motor/blower plugs as shown. Retain the plugs for used during cleaning (Fig. 1).
4. Inspect the gaskets in the inlet and outlet ports for cracks or excessive wear. Replace if missing or damaged.
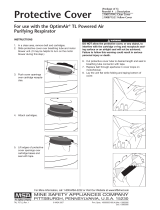
5. Secure the cartridge/lter into the inlet of the motor/blower unit by hand tightening. The spark arrestor should be used for welding and all
situations where the GVP PAPR may be exposed to sparks, molten metal or other hot particulates.
Fig. 1

5
6
Breathing Tube
GVP-122, GVP-123, H-115, L-122 breathing tubes
Screw the threaded end into the GVP PAPR outlet port (Fig. 2).
Fig. 2
BT-Series breathing tubes
1. Screw the 3M™ Adapter V-199 into the GVP PAPR outlet port.
2. Attach the BT breathing tube to the adapter by inserting the tube end with two prongs into the top of the adapter. Twist the end of the tube
to lock it in place (Fig. 3).
Fig. 3
Belt GVP-117, GVP-127 or TR-326 when used with the GVP-111 or BP-15 battery packs
If using the CB-1000 comfort belt refer to separate User Instructions for information on assembly.
1. Thread the belt through the belt slots on the back of PAPR motor blower.
2. Attach battery pack:
• GVP-111: Thread the belt into the belt slot on the back of the battery pack. (Placing the GVP-111 battery pack onto the belt last will
allow for easier removal for charging.)
• BP-15: Battery pack can slide on and off or be clipped to the belt. Ensure that the bottom edge of the belt is in the bottom of the “J”
potion of the clip.
3. Connect the power cord to the battery pack and the PAPR unit as described earlier.
4. Secure the belt to your waist and adjust for a snug t. Feed any excess belt length through the belt loop or cut to the desired length.
Belt GVP-117, GVP-127 or TR-326 when used with the TR-630 battery, TR-659 battery
Adapter and holster
1. Thread the belt through the belt slots on the back of PAPR motor blower.
Assembly of the TR-630 battery, TR-659 battery adapter and holster
Attaching the TR-630 battery to the TR-659 battery adapter:
2. Insert the TR-630 battery pack into the TR-659 battery adapter by sliding the hinged side of the battery into the corresponding side of the
adapter (side with power button) (Fig. 4).
Fig. 4
3. Push down the TR-630 battery so that it is fully seated in the adapter and the blue release tab on battery clicks into place (Fig. 5).
Fig. 5
Inserting the TR-659 battery adapter with battery into TR-656 heavy duty holster
4. If not already done, unbutton the clip holding the top ap of TR-656 heavy duty holster in place. Fold top ap of the holster back so it is
ready to accept the adapter and battery.
5. The heavy duty holster can be worn on either side of the waist belt. If choosing to wear the battery and holster on right side of waist belt,
slide the TR-659 adapter with battery into the TR-656 heavy duty holster with battery side facing belt loop (back) of the holster (Fig. 6).
Fig. 6

7
8
If choosing to wear the battery and holster on left side of waist belt, slide the TR-659 adapter with battery into the TR-656 heavy duty holster
with adapter side facing the belt loop (back) of the holster (Fig. 7).
Fig. 7
6. With the adapter and battery fully inserted into lower portion of holster, snap the buckle connecting the upper ap and lower portion of the
holster. Pull the leather strap located on the buckle to tighten top of holster for a snug t (Fig. 8). Ensure that adapter indicator light can be
seen through one of the two holes located on the strap of the holster (Fig. 9).
Fig. 8 Fig. 9
Placing on waist belt and attaching the power cord
7. Thread the belt loop of the holster onto either the right or left side of the user’s waist belt, depending on the orientation chosen.
8. Connect the GVP-610 power cord to the TR-659 adapter (Fig. 10). Plug socket end of the power cord into the prong receptacle on the front
of the GVP-100 motor/blower. To power the motor/blower on, hold the power button on the adapter down for 1/2 second. When powered
on, the indicator light on the TR-659 should blink for approximately one second and then turn off.
Fig. 10
9. Position the holster assembly close enough to the motor/blower as to not strain the power cord, at the same time ensuring that the holster
assembly is placed in a location that allows the wearer to visually see the indicator light located on the top of the adapter.
To power the motor/blower off, hold the power button on the adapter down for 3 seconds. When there is approximately 15 minutes of charge
left on the TR-630 battery pack, the LED indicator light on the battery adapter will begin blinking. Immediately exit the contaminated area
when the visual alarm (LED indicator light) on the adapter activates.
To detach the TR-630 battery from the TR-659 battery adapter, engage the blue release tab on the battery and pull upward (Fig. 11).
Fig. 11
The TR-657 easy clean holster which can be used in place of the TR-656 heavy duty holster. Please refer to the TR-659 battery adapter User
Instructions for instructions on how to assemble using this holster.
Headgear (Respiratory Inlet Cover)
H-Series, L-Series, L-SG-Series and S-Series headgear
Refer to the specic headgear User Instruction for information on attaching the breathing tube, donning and limitations of the headgear to be used.
6000DIN and 7800S full facepiece
1. Screw the threaded end without the 90 degree elbow into the GVP PAPR outlet port.
2. Remove the 3M™ Gasket Valve Plug 7890 from the center port of the full facepiece respirator (Fig. 12 and 13).
3. Ensure side inhalation ports are closed:
• 7800S Series facepiece: Ensure 7890 plugs are in place on each side port of the respirator.
• 6000DIN Series facepiece: Ensure a 6876 breathing tube gasket is in the center port and a 6895 inhalation port gasket and 6880
bayonet cap are attached and secure on each of the side bayonet ports. Replace gaskets and caps if missing or damaged.

9
10
Fig. 12 7800S Fig. 13 6000DIN
4. Screw GVP-123 breathing tube elbow adapter into the center port of the facepiece inlet of the respirator (Fig. 12 and 13).
5. Follow user donning and seal check procedures described in the User Instruction provided with the facepiece.
Motor Blower On and Off
• GVP-111: Press the gray on/off button on the top of the battery pack.
• BP-15: Turn the on/off switch on the top of the battery pack.
• TR-630 battery with TR-659 battery adapter: Press black on/off switch on side of battery adapter for 1/2 second to power on and for three
seconds to power off.
INSPECTION
Before each entry into a contaminated area, the following inspection must be performed to help ensure proper function of the respirator
system. Refer to the specic “Assembly” subsection of this User Instructions for proper assembly procedures.
NOTE: There are no user serviceable parts inside the GVP PAPR assembly. The motor/blower unit must not be opened to attempt repairs.
Visual inspection
1. PAPR system: Visually inspect the entire PAPR system including the motor/blower, power cord, lter, breathing tube, battery pack, belt and
headgear. If parts are missing or damaged, replace them only with 3M™ GVP PAPR replacement parts before proceeding.
2. Battery pack: Conrm the battery pack is fully charged and the charge is sufcient for the duration of the work period. The PAPR
assembly power cord must be securely connected to the battery pack and motor blower. Inspect the battery pack for cracks or signs of
deterioration. Replace battery pack if damaged.
3. Power cord: Inspect the power cord ensuring that both the socket and prong ends are clean and free of signs of wear and corrosion.
Replace power cord if damaged.
4. Battery adapter: If using the TR-630 battery pack, ensure that the TR-630 battery is securely connected to the TR-659 battery adapter
before use. Ensure that the TR-659 battery adapter is in good condition and free of cracks, holes or signs of deterioration. Examine battery
connection pins and power cord receptacle for signs of wear or corrosion. Replace battery adapter if damaged.
5. Holsters: If using the TR-630 battery pack with TR-659 battery adapter, ensure that the battery pack and battery adapter combination are
securely seated in the holster. Examine the outside of the TR-656 heavy duty and/or the TR-657 easy clean holster for holes, ripped seams
or any other signs of wear. Replace holster if damaged.
6. Inlet and outlet port gaskets: Inspect the inlet and outlet port gaskets for cracks or excessive wear. If needed replace with new gaskets.
7. Filter/cartridge: The lter/cartridge should be properly installed and screwed in nger tight. If sparks or other hot particles are present, the
spark arrestor must be in place over the lter and GVP PAPR. Failure to use the spark arrestor may allow the lter to be damaged
with subsequent user exposure to contaminated air.
8. Breathing tube: Examine the entire breathing tube for tears, holes or cracks. Bend the tube to verify it is exible. The breathing tube should
connect rmly to the GVP motor blower. If damage is noted, replace with the appropriate breathing tube to match the respiratory headgear.
9. Examine the headgear per the recommendations in the headgear specic User Instructions.
10. Conduct an air ow check.
Airow Check
This process should be followed prior to each use. Check the label on the air ow indicator to determine which test circle to use for the
airow check.
1. Ensure the ball in the GVP-113 ow check indicator moves freely in its tube. Rinsing with clean water may help free a stuck ball. Allow the
tube and ball to dry prior to using.
2. Ensure that the lter selected is secured to the PAPR before testing airow.
3. Attach the appropriate breathing tube to the PAPR outlet. Exceptions:
• L-122 breathing tube: The 3M™ Adapter L-181 must be used instead of the breathing tube to check the airow. The GVP-113 ow
meter will not t into the end of the L-122 breathing tube.
• BT series breathing tube: The V-199 adapter must be used instead of the breathing tube to check the air ow. The GVP-113 ow meter
will not t into the end of the BT series breathing tube.
4. Turn the PAPR motor blower on.
5. Insert the tapered end of the airow meter:
a. L-181 adapter: Insert into the vinyl connector (Fig. 14) and hold vertically.
b. GVP-122, GVP-123 or H-115: Insert into the end of the breathing tube (Fig. 15) and hold vertically.
c. V-199: Insert into the end of the adapter (Fig. 16) and hold vertically using the thumb and forenger to cover the two breathing tube
locking slots in the connector (Fig. 17).
6. Locate the position of the ball in the airow meter.
Fig. 14 Fig. 15
OK
OK
Fig. 16
OK
OK
Fig. 17
7. Tight tting facepieces: The ball should be located in or above the lower (4 cfm) tight tting ow test circle.
8. Loose tting headgear: The ball should be located in or above the higher (6 cfm) helmet and hood ow test circle (Fig. 17).
9. If the ball fails to move fully inside or above the ow test circle, insufcient airow is being provided. Refer to “Troubleshooting” section of
User Instructions.
W WARNING
Failure to pass a user performance check and complete all necessary repairs before use may adversely affect respirator performance
and result in sickness or death.
Before using a 3M™ GVP Respirator System, each person must read and understand the information in these User Instructions and the User
Instructions provided with the respirator headpiece to be used. Use of these respirator systems by untrained or unqualied persons, or use
that is not in accordance with these instructions, may adversely affect respirator performance and may result in sickness or death.
ENTERING AND EXITING THE CONTAMINATED AREA
The following instructions are intended to serve as a guideline for the use of the 3M™ GVP PAPR. It is not to be considered all-inclusive, nor is
it intended to replace the policy and procedures for each facility.
Prior to entering the contaminated area, complete the inspection procedures listed in these User Instructions.
1. Turn the motor blower on.
2. Don the GVP assembly and headgear. Enter the work area.

11
12
3. Leave the contaminated area if any of the following conditions occur:
a. Any part of the system becomes damaged.
b. Airow to the respirator decreases or stops.
c. You feel dizzy or your vision becomes impaired.
d. You taste or smell contaminants.
e. Your face, eyes, nose, or mouth becomes irritated.
f. You suspect the concentration of contaminants may have reached levels at which this respirator system may no longer provide
adequate protection.
4. Do not remove the respirator or reach your hand into the headgear in areas where the air is contaminated.
5. Follow you specic exiting and decontamination procedures for turning off the motor blower and removing the respirator system.
W WARNING
• Use of this respirator in atmospheres for which it was not NIOSH certied and designed may result in sickness or death. Do not wear
this respirator where:
a. Atmospheres are oxygen decient.
b. Contaminant concentrations are unknown.
c. Contaminant concentrations are immediately dangerous to life or health (IDLH).
d. Contaminant concentrations exceed the maximum use concentration determined using the assigned protection factor (APF)
recommended for the applicable headpiece or the APF mandated by specic government standards, whichever is lower. Refer to the
User Instructions provided with the applicable headpiece.
• Do not enter a contaminated area until properly donning the respirator system. Do not remove the respirator before leaving the
contaminated area. Doing so may result in sickness or death.
• Contaminants that are dangerous to your health include those that you may not be able to see or smell. Leave the contaminated area
immediately if any of the following conditions occur. Failure to do so may result in sickness or death.
a. Airow decreases or stops.
b. Any part of the system becomes damaged.
c. Airow into the respirator decreases or stops.
d. Breathing becomes difcult.
e. You feel dizzy or your vision is impaired.
f. You taste or smell contaminants.
g. Your face, eyes, nose or mouth become(s) irritated.
h. You suspect that the concentration of contaminants may have reached levels at which this respirator may no longer provide adequate
protection.
• Do not expose blower/lter assembly directly to sparks or molten metal spatter. Direct contact with sparks or molten metal spatter may
damage the lter, allowing unltered air into the breathing zone and may cause the lter or blower assembly to ignite, resulting in
serious injury, sickness or death.
CLEANING, STORAGE AND DISPOSAL
W WARNING
Never alter or modify this respirator. Repair or replace parts only with the 3M components approved for this assembly. Failure to do so may
adversely affect product performance and result in sickness or death.
Do not clean respirator with solvents. Cleaning with solvents may degrade some respirator components and reduce respirator effectiveness.
Inspect all respirator components before each use to ensure proper operating conditions. Failure to do so may result in sickness or
death.
Never attempt to clean lters by knocking or blowing out accumulated material. This may result in damage to the lter membrane allowing
hazardous particles to enter the breathing zone, resulting in sickness or death.
Detach the battery pack, breathing tube and headgear from the belt. Inspect all parts for damage or other signs of excessive wear. Replace all
damaged parts prior to storage or next use.
Cleaning
1. Motor/blower: Screw the blower plug and lter plug into the motor blower unit (Fig. 1). With the plugs in place the unit can be rinsed with
a mild, pH neutral cleaning solution or it can be placed in an equipment washer. Do not expose to cleaning or drying temperatures greater
than 120°F (49°C). Do not use solvents to clean the motor/blower unit. Liquid solvents may chemically weaken the plastics.
2. Battery pack: Clean the outer surface of the battery pack with a soft cloth dampened in a solution of water and mild, pH neutral detergent.
Ensure electrical contacts are clean and dry before use. Do not immerse the BP-15 or GVP-111 battery pack in water. Keep moisture out
of the GVP-111 and BP-15 battery pack cord receptacle. Do not use solvents to clean the battery pack case.
NOTE: The TR-630 battery is sealed and designed for temporary immersion for cleaning when the cleaning and storage strap is installed
(included in the TR-653 cleaning and storage kit). The TR-630 battery in a solution of water and mild, pH neutral detergent is rated to
IP67 under the Ingress Protection Standard (IEC 60529). Please see 3M™ Versao™ Battery and Charger TR-600 User Instruction and
Technical Data Bulletin #223 Battery Maintenance for 3M™ Versao™ Respirator Systems for further instruction.
3. Power cord: The power cord may be wiped down with a mild cleaning solution, taking care to avoid the socket and prong ends. Clean the
socket and prong ends of the power cord with a clean dry cloth.
4. Battery adapter: The TR-659 may be wiped down with a mild cleaning or disinfecting solution taking care to avoid the battery connection
pins and power cord connection contacts. Clean battery connection pins and power cord connection area with a clean dry cloth. Do not
immerse the TR-659 battery adapter.
5. Holsters: A soft bristle brush or damp cloth may be used to clean the TR-656 heavy duty holster. The TR-657 easy clean holster can be
wiped down with a mild cleaning solution.
6. Breathing tube: Clean the connection sites on the breathing tube with water and detergent solution. The breathing tubes can be immersed
in water for cleaning. The inside of the tube must be completely dried prior to use or storage. Air dry, or dry by connecting to the
motor/blower unit and use it to force air through the tube until dry. Optional breathing tube covers can also be used to facilitate cleaning.
7. Filter/cartridge: The lters and cartridges can not be cleaned and must be replaced. Do not use compressed air or vacuum systems to
attempt to clean the lters. Dispose of the lter/cartridge according to applicable regulations.
Storage
Motor Blower Storage
Store your respirator at room temperature in a dry area that is protected from exposure to hazardous contaminants.
Battery Pack Storage
Refer to the User Instructions for the GVP-111 and the User Instructions for the BP-15 battery packs for specic maintenance and storage
recommendations.
Refer to Technical Data Bulletin #178 Maintenance and Care of 3M™ Powered Air Purifying Respirator (PAPR) Battery Packs for general
recommendations on storage and maintenance of NiCd and NiMH battery packs.
Refer to the User Instructions for 3M™ Versao ™ TR-600 Battery and Chargers and Technical Data Bulletin #223 on Battery Maintenance for
3M™ Versao™ Respirator Systems.
Disposal
W WARNING
To reduce the risks associated with re, explosion, and environmental contamination:
Do not dispose of Li-Ion batteries in a re or send for incineration. Battery packs should be treated as special waste and in accordance with
your local environmental regulations.
In the United States and Canada, 3M participates in the Call2Recycle program which provides for 3M PAPR batteries to be dropped off (free
of charge) at participating recycling collection sites. Please dispose of batteries according to federal, state, provincial and local regulations.
Contact the Call2Recycle Hotline at 1-877-273-2925 or go to their website, www.call2recycle.org, for drop off site locations.
Used lter/cartridges should be disposed of based on the contaminants collected on it and according to local environmental regulations.
Dispose of holsters in accordance with local and government regulations for the contaminant to which they have been exposed.
The battery chargers and battery adapter contain electronic components. Dispose of according to local and government regulations.
SPECIFICATIONS
Air ow:
Battery Packs:
GVP-111:
• Chemistry: Nickel Cadmium (NiCd)
• Run Time: Approximately 8 hours¹
• Recharge Time: 14-16 hours
• Max Time on Charger: 1 week
• Operating Temperature: 10°F to 120°F (-12°C to 49°C)
• Recharging Temperature: 41°F to 77°F (5°C to 25°C)
• Voltage: 4.8 Volts DC
• Battery Pack Life: Approx. 500-1000 charge cycles²
• Charge Indicator: Indicates recharging required
BP-15:
• Chemistry: Nickel Metal Hydride (NiMH)
• Run Time: Approximately 8 hours¹
• Recharge Time: 2 hours to 90%; 4 hours to 100%
• Max Time on Charger: Store on charger when not in use
• Operating Temperature: 10°F to 120°F (-12°C to 49°C)
• Recharging Temperature: 50°F to 90°F (10°C to 32°C)
• Voltage: 6.25 Volts DC
• Battery Pack Life: Approx. 400 charge cycles²
• Charge Indicator: Recharge required. Battery pack will shut down in 15 minutes
TR-630:
• Chemistry: Lithium Ion
• Run Time: Approximately 9 hours (when used with TR-659 battery adapter)¹
• Recharge Time: Typically less than 3.5 hours
• Max Time on Charger: Battery pack may be stored indenitely on the charger
• Operating Temperature when used with the GVP PAPR: 10°F to 120°F (-12°C to 49°C)
• Recharge Temperature: Internal battery pack temperature must be between 32°F (0°C) to 104°F (40°C) when charging
• Voltage:
TR-630 battery pack: nominal 11.1 Volts DC
TR-630 battery pack with TR-659 battery adapter: 6.0 Volts DC
• Battery pack life: 250 full capacity charge/discharge cycles while maintaining 80% of the original charge capacity over the course of the
rst year of service when used under recommended conditions²
• Charge Indicator: Recharge required. Battery pack will shut down in 15 minutes.
¹ Clean lter and new, fully charged battery pack.
² Will vary depending on conditions of use, recharging and storage.

13
14
Chargers:
1. GVP-112:
- Input: 110-120 Volts AC
- Output: 7.5 VDC; 0.75 A
2. BC-210:
- Input: 100-220 VAC
- Output: 12 VDC; 4 A
3. TR-641N (TR-941N Power Supply):
- Input: 100-240V; 50-60 Hz; 1.5A
- Output: 19V; 2.37A
4. TR-644N (TR-944N Power Supply):
- Input: 100-240V; 50-60 Hz; 2A
- Output: 19V; 7.89A
Approximate Weights:
1. GVP PAPR: 1.1 lbs (0.5 kg)
2. GVP PAPR with HE lter: 1.6 lbs (0.72 kg)
3. GVP PAPR with OV cartridge: 2.6 lb (1.2 kg)
4. GVP PAPR with AG cartridge: 2.9 lbs (1.3 kg)
5. GVP PAPR with OV/HE cartridge: 3.1 lbs (1.4 kg)
6. GVP PAPR with AG/HE cartridge: 3.4 lbs (1.5 kg)
7. GVP PAPR with OV/AG cartridge: 2.6 lbs (1.2 kg)
8. GVP PAPR with OV/AG/HE cartridge: 3.1 lbs (1.4 kg)
9. GVP-111 battery pack: 2.5 lbs (1.1 kg)
10. BP-15 battery pack: 1.8 lbs (0.83 kg)
11. TR-630 battery pack with TR-659 adapter: 1.3 lb (0.6 kg)
PAPR System:
1. Noise Level (excluding exterior noise): Less than 80 dBA
2. Operating Temperature: 10°F to 120°F (-12°C to 49°C)
3. Estimated Motor Life: 2000 hours dependent on use conditions
Intrinsic Safety:
• GVP PAPR Assembly with GVP-111 battery pack is tested and classied intrinsically safe by UL for Division 1, Class I; Group D, Class II,
Groups E, F, G and Class III. If the GVP-111 battery pack case is compromised or cracked, or if the rubber switch boot is damaged or
missing, the battery pack should no longer be considered intrinsically safe.
• GVP PAPR Assembly with BP-15 battery pack is NOT intrinsically safe
• GVP PAPR Assembly with TR-630 battery pack is NOT intrinsically safe
Assigned Protection Factors (APF)
Refer to the User Instructions for the specic headgear to be used to determine the assigned protection factor for the GVP PAPR system.
Consult 3M Technical Data Bulletin #175 (www.3M.com/workersafety) for further information on APFs and supporting test data.
HE Filter Service Life
The HE lter must be changed when the air ow as shown by the air ow indicator falls below 6 cfm or the HE lter becomes excessively dirty,
damaged, or wet.
Chemical Cartridge Service Life
Service life for chemical cartridges will vary depending on the contaminant, concentration and environmental conditions (temperature,
humidity). The 3M Service Life Software can help estimate service life for chemical cartridges (www.3M.com/workersafety).
COMPONENTS, ACCESSORIES AND REPLACEMENT PARTS
GVP-1: Includes GVP-100 motor/blower, GVP-111 battery, GVP-112 charger, GVP-127 web belt, GVP-113 ow meter, GVP-181 L-Series ow
adapter, GVP-110 power cord and GVP-115 plugs
GVP-1U: GVP-1 with GVP-117 urethane belt
GVP-CB: GVP-1 with CB-1000 comfort belt
GVP-1 Intrinsically Safe System
a. PAPR Unit (Motor/Blower) GVP-100
b. Power Cord GVP-110
c. Battery Pack GVP-111
d. Charger GVP-112
e. Flow Meter GVP-113
f. Blower Plugs GVP-115 (inlet and outlet)
g. Web Belt GVP-127
h. Flow Meter Adapter L-181
GVP Series Assemblies Not Shown:
GVP-1U: GVP-1 with Urethane Waist Belt GVP-117
GVP-CB: GVP-1 with Comfort Belt CB-1000
GVP optional parts not shown:
• Urethane Waist Belt GVP-117
• Urethane Shoulder Strap GVP-118
• Web Shoulder Strap GVP-128
• Comfort Belt CB-1000
• Spark Arrest Cover GVP-146
• Adapter V-199 for approved BT series breathing tubes
d
g
f
f
a
b
c
e
h
Filters/Cartridges
GVP-441 Organic Vapor/HE (OV/HE)
GVP-442 Acid Gas/HE (HC/CL/SD/CD/HF/HE)
GVP-443 Organic Vapor/Acid Gas/HE (OV/HC/CL/CD/SD/HF/HS/HE)
GVP-444 Ammonia/Methylamine/HE (AM/MA/HE)
GVP-445 Formaldehyde/HE (FM/HE)
GVP-440 High Efciency (HE)

15
16
GVP-1 with NiMH Non Intrinsically Safe System
a. PAPR Unit (Motor/Blower) GVP-100
b. Power Cord GVP-210
c. Battery Pack BP-15
d. Charger BC-210 (Discontinued)
e. Flow Meter GVP-113
f. Blower Plugs GVP-115 (inlet and outlet)
g. Web Belt GVP-127
h. Flow Meter Adapter L-181
GVP optional parts not shown:
• Urethane Waist Belt GVP-117
• Urethane Shoulder Strap GVP-118
• Web Shoulder Strap GVP-128
• Comfort Belt CB-1000
• Spark Arrest Cover GVP-146
• Adapter V-199 for approved BT series breathing tubes
d
g
f
f
a
b
c
e
h
Filters/Cartridges
GVP-441 Organic Vapor/HE (OV/HE)
GVP-442 Acid Gas/HE (HC/CL/SD/CD/HF/HE)
GVP-443 Organic Vapor/Acid Gas/HE (OV/HC/CL/CD/SD/HF/HS/HE)
GVP-444 Ammonia/Methylamine/HE (AM/MA/HE)
GVP-445 Formaldehyde/HE (FM/HE)
GVP-440 High Efciency (HE)
GVP Assembly with Li-Ion Battery: Non Intrinsically System
a. PAPR Unit (Motor/Blower) GVP-100
b. Power Cord GVP-610
c. Battery Pack TR-630
d. Battery Adapter TR-659
e. Heavy Duty Holster TR-656
f. Charger TR-641N
g. Flow Meter GVP-113
h. Blower Plugs GVP-115 (inlet and outlet)
i. High Durability Belt TR-326
j. Flow Meter Adapter L-181
GVP optional parts not shown:
• Spark Arrest Cover GVP-146
• Adapter V-199 for approved BT series breathing tubes
• Easy Clean Holster TR-657
• Urethane Waist Belt GVP-117
• Web Belt GVP-127
• Comfort Belt CB-1000
g
a
h
h
b
i
c d e
f
j
Filters/Cartridges
GVP-441 Organic Vapor/HE (OV/HE)
GVP-442 Acid Gas/HE (HC/CL/SD/CD/HF/HE)
GVP-443 Organic Vapor/Acid Gas/HE (OV/HC/CL/CD/SD/HF/HS/HE)
GVP-444 Ammonia/Methylamine/HE (AM/MA/HE)
GVP-445 Formaldehyde/HE (FM/HE)
GVP-440 High Efciency (HE)

17
18
TROUBLESHOOTING
Use the table below to help identify possible causes and corrective action for problems you may experience.
Problem Possible Cause Corrective Action
You smell or taste contaminants or an
irritation occurs
Misuse, improper assembly or malfunction of
equipment.
Leave work area immediately and contact
your supervisor. Do not use the PAPR until
the cause is identied and corrected.
Dizziness occurs Gases or vapors broke through the chemical
cartridge.
The gas and vapor cartridge being used is
incorrect for your workplace contaminants.
Airow too low.
Inlet and outlet gaskets are in poor condition.
Leave work area immediately.
Change gas and vapor cartridge.
Refer to respirator decision logic such as
ANSI Z88.2-1992 or 3M respirator selection
guide or consult an industrial hygienist.
Perform an airow check and troubleshoot if
PAPR fails airow test.
Replace gaskets.
GVP-111 battery pack recharge light
remains “on”
The charger has malfunctioned.
The battery has a dead cell(s).
Replace charger and charge battery.
Replace battery pack.
Blower does not run when switch is
depressed
Battery is discharged.
Power cord disconnected.
Faulty power switch.
Faulty power cord.
Faulty motor.
Leave work area immediately.
Recharge battery.
Secure the power cord to the motor blower
and battery.
Replace battery pack.
Replace power cord.
Replace motor blower.
PAPR fails airow test Clogged lter.
Battery pack needs charging.
Inlet and/or outlet gaskets are worn/damaged
or missing.
Motor blower malfunction.
Breathing tube restricted.
Replace lter.
Charge battery.
Inspect and replace if necessary (GVP-101).
Replace motor blower unit (GVP-100).
Remove restriction.
BP-15 battery pack does not work after
charging
Low voltage detection circuit has not reset. Recharge for short period of time.
BC-200 or BC-210 does not work, charge
adapter indicator is steady yellow
BP-15 battery pack is too hot or too cold for
charging.
Incorrect battery pack is connected to the
charger.
Allow battery pack and charger
temperatures to moderate to between 50°F
(10°C) and 90°F (32°C).
Select the correct charger for the battery.
BC-200 or BC-210 does not work, power
base indicator is steady yellow
Too many chargers are chained together. The
maximum number allowed is ten (10).
Remove excess chargers.
BC-200 or BC-210 does not work, no
lights illuminated on power base or charge
adapter
Fuse on power base has blown. Determine cause of the blown fuse and
replace with like fuse.
BC-200 or BC-210 does not work, the
charge adapter indicator is red or is not
illuminated
Incorrect battery pack is connected to the
charger. The BC-210 is only to be used with
the BP-15 battery pack.
Select the correct charger for the battery
pack.
For troubleshooting of the TR-630 Battery and available chargers please refer to Refer to the User Instructions for 3M™ Versao™ Battery and
Chargers TR-600 and Technical Data Bulletin #223 on Battery Maintenance for 3M™ Versao™ Respirator Systems.
For troubleshooting of the TR-659 battery adapter please refer to the TR-659 battery adapter User Instructions.
IMPORTANT NOTICE
WARRANTY: In the event any 3M™ PSD Product is found to be defective in material, workmanship, or not in conformation with any express
warranty for a specic purpose, 3M’s only obligation and your exclusive remedy shall be, at 3M’s option, to repair, replace or refund the
purchase price of such parts or products upon timely notication thereof and substantiation that the product has been stored, maintained and
used in accordance with 3M’s written instructions.
EXCLUSIONS TO WARRANTY: THIS WARRANTY IS EXCLUSIVE AND IS IN LIEU OF ANY IMPLIED WARRANTY OR CONDITION OF
MERCHANTABILITY, FITNESS FOR A PARTICULAR PURPOSE OR OTHER WARRANTY OR CONDITION OF QUALITY, EXCEPT OF TITLE AND
AGAINST PATENT INFRINGEMENT.
Limitation of Liability: Except as provided above, 3M shall not be liable or responsible for any loss or damage, whether direct, indirect,
incidental, special or consequential, arising out of sale, use or misuse of 3M PSD products, or the user’s inability to use such products. THE
REMEDIES SET FORTH HEREIN ARE EXCLUSIVE.
FOR MORE INFORMATION
In United States, contact:
Website: www.3m.com/workersafety
Technical Assistance: 1-800-243-4630
For other 3M products:
1-800-3M-HELPS or 1-651-737-6501
PARA MAYORES INFORMES
En Estados Unidos:
Sitio Web: www.3m.com/workersafety
Soporte técnico: 1-800-243-4630
Para otros productos 3M:
1-800-3M-HELPS o 1-651-737-6501
RENSEIGNEMENTS SUPPLÉMENTAIRES
Aux États-Unis:
Internet: www.3m.com/workersafety
Assistance technique: 1800243-4630
Autres produits 3M :
1800364-3577 ou 1651737-6501
PARA MAIS INFORMAÇÕES
Nos Estados Unidos, entre em contato com:
Website: www.3m.com/workersafety
Assistência Técnica: 1-800-243-4630
Para outros produtos 3M:
1-800-3M-HELPS ou 1-651-737-6501
/