
P
DVD Home Theater Sound System
Operating Instructions
Model No. SC-HT67
RQT6191-P
Before connecting, operating or adjusting this product, please read
these instructions completely.
Please keep this manual for future reference.
As an ENERGY STAR
®
Partner, Panasonic has
determined that this product meets the ENERGY
STAR
®
guidelines for energy efficiency.
The servicenter list and warranty can be
found on pages 34 and 35.
The region number of this unit is “1”.
You can play DVD-Video marked “1”, “ALL”, or with a re-
gion number including “1”.
Example:
See page 5 for details.
1 ALL
2
4
1

Getting started
RQT6191
2
CAUTION!
THIS PRODUCT UTILIZES A LASER.
USE OF CONTROLS OR ADJUSTMENTS OR PERFORM-
ANCE OF PROCEDURES OTHER THAN THOSE SPECI-
FIED HEREIN MAY RESULT IN HAZARDOUS RADIATION
EXPOSURE.
DO NOT OPEN COVERS AND DO NOT REPAIR
YOURSELF. REFER SERVICING TO QUALIFIED
PERSONNEL.
CAUTION:
TO PREVENT ELECTRIC SHOCK MATCH
WIDE BLADE OF PLUG TO WIDE SLOT,
FULLY INSERT.
CAUTION!
DO NOT INSTALL, OR PLACE THIS UNIT, IN A BOOK-
CASE, BUILT-IN CABINET OR IN ANOTHER CONFINED
SPACE. ENSURE THE UNIT IS WELL VENTILATED. TO
PREVENT RISK OF ELECTRIC SHOCK OR FIRE HAZ-
ARD DUE TO OVERHEATING, ENSURE THAT CURTAINS
AND ANY OTHER MATERIALS DO NOT OBSTRUCT THE
VENTILATION VENTS.
CAUTION:
This equipment has been tested and found to comply with the
limits for a Class B digital device, pursuant to Part 15 of the
FCC Rules.
These limits are designed to provide reasonable protection
against harmful interference in a residential installation. This
equipment generates, uses and can radiate radio frequency
energy and, if not installed and used in accordance with the
instructions, may cause harmful interference to radio commu-
nications. However, there is no guarantee that interference
will not occur in a particular installation. If this equipment does
cause harmful interference to radio or television reception,
which can be determined by turning the equipment off and on,
the user is encouraged to try to correct the interference by
one or more of the following measures:
≥Reorient or relocate the receiving antenna.
≥Increase the separation between the equipment and re-
ceiver.
≥Connect the equipment into an outlet on a circuit different
from that to which the receiver is connected.
≥Consult the dealer or an experienced radio/TV technician for
help.
Any unauthorized changes or modifications to this equipment
would void the user’s authority to operate this device.
This device complies with Part 15 of the FCC Rules. Opera-
tion is subject to the following two conditions: (1) This device
may not cause harmful interference, and (2) this device must
accept any interference received, including interference that
may cause undesired operation.
The lightning flash with arrowhead symbol, within
an equilateral triangle, is intended to alert the user
to the presence of uninsulated “dangerous voltage”
within the product’s enclosure that may be of suffi-
cient magnitude to constitute a risk of electric shock
to persons.
CAUTION
CAUTION: TO REDUCE THE RISK OF ELECTRIC
SHOCK, DO NOT REMOVE SCREWS.
NO USER-SERVICEABLE PARTS
INSIDE.
REFER SERVICING TO QUALIFIED
SERVICE PERSONNEL.
The exclamation point within an equilateral triangle
is intended to alert the user to the presence of
important operating and maintenance (servicing)
instructions in the literature accompanying the ap-
pliance.
RISK OF ELECTRIC SHOCK
DO NOT OPEN
(Inside of product)
RQLS0233
-
-
-
-
-
-
-
-
-
-
VISIBLE AND INVISIBLE LASER RADIATION WHEN OPEN.
AVOID DIRECT EXPOSURE TO BEAM.
DANGER
(FDA 21 CFR)
(IEC60825-1)
VISIBLE AND INVISIBLE LASER RADIATION WHEN OPEN.
AVOID EXPOSURE TO BEAM.
CAUTION
RAYONNEMENT LASER VISIBLE ET INVISIBLE EN CAS D’OUVERTURE.
EXPOSITION DANGEREUSE AU FAISCEAU.
ATTENTION
SYNLIG OG USYNLIG LASERSTRÅLING VED ÅBNING.
UNDGÅ UDSÆTTELSE FOR STRÅLING.
ADVARSEL
AVATTAESSA OLET ALTTIINA NÄKYVÄÄ JA NÄKYMÄTÖN
LASERSÄTEILYLLE. ÄLÄ KATSO SÄTEESEEN.
VARO!
SYNLIG OCH OSYNLIG LASERSTRÅLNING NÄR DENNA DEL
ÄR ÖPPNAD. BETRAKTA EJ STRÅLEN.
VARNING
SYNLIG OG USYNLIG LASERSTRÅLING NÅR DEKSEL ÅPNES.
UNNGÅ EKSPONERING FOR STRÅLEN.
ADVARSEL
SICHTBARE UND UNSICHTBARE LASERSTRAHLUNG, WENN ABDECKUNG
GEÖFFNET. NICHT DEM STRAHL AUSSETZEN.
VORSICHT
Operations in these instructions are described mainly
with the remote control, but you can do the operations on
the main unit if the controls are the same.
Dear customer
Thank you for purchasing this product.
For optimum performance and safety, please read these instructions
carefully.
System
Main unit
Front and surround speakers
Center speaker
Subwoofer
SC-HT67
SA-HT67
SB-AFC95
SB-PC89
SB-W95
WARNING:
TO REDUCE THE RISK OF FIRE, ELECTRIC
SHOCK OR PRODUCT DAMAGE, DO NOT
EXPOSE THIS APPARATUS TO RAIN, MOIS-
TURE, DRIPPING OR SPLASHING AND THAT
NO OBJECTS FILLED WITH LIQUIDS, SUCH
AS VASES, SHALL BE PLACED ON THE
APPARATUS.

3
Getting started
RQT6191
Table of contents
Getting started
Accessories . . . . . . . . . . . . . . . . . . . . . . . . . . . . . . 13
IMPORTANT SAFETY INSTRUCTIONS . . . . . . . . 14
Disc information . . . . . . . . . . . . . . . . . . . . . . . . . . 15
Disc handling. . . . . . . . . . . . . . . . . . . . . . . . . . . . . 15
Simple setup
STEP 1
Locating and connecting the speakers. .
6
STEP 2
Television, antennas and AC power
supply cord . . . . . . . . . . . . . . . . . . . . . . . 8
STEP 3
The remote control . . . . . . . . . . . . . . . . 9
STEP 4
Quick Setup . . . . . . . . . . . . . . . . . . . . . . 9
Control reference guide . . . . . . . . . . . . . . . . . . . . 10
Disc operations
Discs—Basic play . . . . . . . . . . . . . . . . . . . . . . . . . 11
Using menus to play MP3 discs . . . . . . . . . . . . . . . . . . . . . . . 12
Resume function . . . . . . . . . . . . . . . . . . . . . . . . . . . . . . . . . . . 12
Skipping chapters or tracks . . . . . . . . . . . . . . . . . . . . . . . . . . . 13
Fast forward and rewind—SEARCH . . . . . . . . . . . . . . . . . . . . 13
Slow-motion play/Frame-by-frame viewing . . . . . . . . . . . . . . . 13
Starting play from a selected track . . . . . . . . . . . . . . . . . . . . . 13
Disc skip/Cinema . . . . . . . . . . . . . . . . . . . . . . . . . . . . . . . . . . . 13
Marking places to play again—MARKER . . . . . . . . . . . . . . . . . .
13
Discs—Convenient functions . . . . . . . . . . . . . . . 14
A-B repeat play/Repeat play . . . . . . . . . . . . . . . . . . . . . . . . . . 14
Subtitles/Soundtracks/Angles . . . . . . . . . . . . . . . . . . . . . . . . . 14
Using the disc manager . . . . . . . . . . . . . . . . . . . . . . . . . . . . . . 15
Program play/Random play . . . . . . . . . . . . . . . . . . . . . . . . . . . 15
Using On-Screen Menu Icons . . . . . . . . . . . . . . . 16
Common procedures . . . . . . . . . . . . . . . . . . . . . . . . . . . . . . . . 16
Progress indicator . . . . . . . . . . . . . . . . . . . . . . . . . . . . . . . . . . 16
Disc information/Unit information . . . . . . . . . . . . . . . . . . . . . . 17
Radio operations
The radio: manual tuning . . . . . . . . . . . . . . . . . . . 18
The radio: preset tuning . . . . . . . . . . . . . . . . . . . . 19
Sound quality/sound field operations
Sound field. . . . . . . . . . . . . . . . . . . . . . . . . . . . . . . 20
DOLBY DIGITAL/DOLBY PRO LOGIC . . . . . . . . . . . . . . . . . . 21
Changing sound field and quality . . . . . . . . . . . . . . . . . . . . . . 21
SUPER SURROUND/SEAT POSITION/CENTER FOCUS . . 22
Adjusting the bass . . . . . . . . . . . . . . . . . . . . . . . . . . . . . . . . . . 22
Other functions
Convenient functions . . . . . . . . . . . . . . . . . . . . . . 23
Muting the volume/Turning off the display . . . . . . . . . . . . . . . . 23
Timer functions . . . . . . . . . . . . . . . . . . . . . . . . . . . . . . . . . . . . 23
Using headphones . . . . . . . . . . . . . . . . . . . . . . . . . . . . . . . . . 23
Changing settings . . . . . . . . . . . . . . . . . . . . . . . . . 24
Common procedures . . . . . . . . . . . . . . . . . . . . . . . . . . . . . . . . 25
Entering a password (Ratings)/Changing the delay time . . . . 25
Using the remote control with other equipment . .
26
Operating a television/Operating a video cassette recorder . . 26
Changing the remote control code . . . . . . . . . . . . . . . . . . . . . 27
Listening to an external source/
Recording to other equipment . . . . . . . . . . . . . 28
Optional antenna connections. . . . . . . . . . . . . . . 29
Reference
Troubleshooting guide . . . . . . . . . . . . . . . . . . . . . 30
Maintenance . . . . . . . . . . . . . . . . . . . . . . . . . . . . . 31
Glossary . . . . . . . . . . . . . . . . . . . . . . . . . . . . . . . . . 32
Language code list . . . . . . . . . . . . . . . . . . . . . . . . . . . . . . . . . 32
Specifications . . . . . . . . . . . . . . . . . . . . . . . . . . . . 33
Servicenter List . . . . . . . . . . . . . . . . . . . . . . . . . . . 34
Limited Warranty . . . . . . . . . . . . . . . . . . . . . . . . . . 35
Product Service . . . . . . . . . . . . . . . . . . . . . . . . . . . 35
Accessories
Please check and identify the supplied accesso-
ries. Use numbers indicated in parentheses
when asking for replacement parts.
To order accessories contact 1-800-332-5368
or web site (http://www.panasonic.com).
∏ 1 Remote control
(EUR7502XD0)
∏ 2 Batteries
for remote control
∏ 1 AM loop antenna set
(RSA0012)
∏ 1 FM indoor antenna
(RSA0006-J)
∏ 1 AC power supply cord
(RJA0065-1D)
∏ 1 Video cable
(RJL1P016B15A)
∏ 1 Sheet of speaker feet
(RFA0631A-K)
Replacements sold in
sets of 4.
∏ 1 Sheet of speaker-cord
stickers
(12 stickers)
One set is extra.
The sheet cannot be
purchased separately.
1
1
FRONT L
FRONT L
2
2
FRONT R
FRONT R
3
3
SURROUND L
SURROUND L
4
4
SURROUND R
SURROUND R
5
5
CENTER
CENTER
6
6
SUBWOOFER
SUBWOOFER
1
1
FRONT L
FRONT L
2
2
FRONT R
FRONT R
3
3
SURROUND L
SURROUND L
4
4
SURROUND R
SURROUND R
5
5
CENTER
CENTER
6
6
SUBWOOFER
SUBWOOFER

Getting started
RQT6191
4
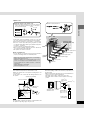
3. Power lines—Take care when setting up an outdoor antenna
that it is not near overhead power lines, electric lights, or electri-
cal circuits, and that there is no danger of the antenna falling on
power lines, electric lights, or electrical circuits. When installing
an outdoor antenna, take extreme care not to touch such power
lines or circuits, as contact with them can be fatal.
4. Outdoor antenna grounding—If you connect an outdoor an-
tenna, ground the antenna system to protect against voltage
surges and built-up static charges. Section 810 of the National
Electrical Code, ANSI/NFPA No. 70-1990, provides information
about grounding of the mast and supporting structure, ground-
ing of the lead-in wire to an antenna discharge unit, size of
grounding conductors, location of antenna-discharge unit, con-
nection to grounding electrodes, and requirements for the
grounding electrode. Refer to this diagram.
Maintenance
(See page 31 for details.)
Unplug the unit from the household AC outlet before cleaning.
Clean with a damp cloth.
Do not use abrasive pads, scouring powders, or solvents.
Service
1. Damage requiring service—The unit should be serviced by
qualified service personnel if:
(a) The AC power supply cord or the plug has been damaged;
or
(b) Objects or liquids have gotten into the unit; or
(c) The unit has been exposed to rain; or
(d) The unit does not operate normally or exhibits a marked
change in performance; or
(e) The unit has been dropped or the cabinet damaged.
2. Servicing—Do not attempt to service the unit beyond that de-
scribed in these operating instructions. Refer all other servicing
to authorized servicing personnel.
3. Replacement parts—When parts need replacing ensure the
servicer uses parts specified by the manufacturer or parts that
have the same characteristics as the original parts. Unautho-
rized substitutes may result in fire, electric shock, or other
hazards.
4. Safety check—After repairs or service, ask the servicer to per-
form safety checks to confirm that the unit is in proper working
condition.
ELECTRIC
SERVICE
EQUIPMENT
GROUND
CLAMP
ANTENNA
LEAD IN
WIRE
ANTENNA
DISCHARGE UNIT
(NEC SECTION 810-20)
GROUNDING CONDUCTORS
(NEC SECTION 810-21)
GROUND CLAMPS
POWER SERVICE GROUNDING
ELECTRODE SYSTEM
(NEC ART 250, PART H)
NEC—NATIONAL ELECTRICAL CODE
IMPORTANT SAFETY INSTRUCTIONS
Read these operating instructions carefully before using the unit. Follow the safety instructions on the unit and the safety precautions listed
below. Keep these operating instructions handy for future reference.
Safety
1. Power source—Connect the unit to a power source of the type
described in these instructions or as marked on the unit.
2. Polarization—The unit is equipped with a polarized power plug
where one blade is wider than the other. This safety feature en-
sures that the plug fits into your household AC outlet only one
way. If the plug doesn’t fit one way, try reversing it. If the plug
still doesn’t fit, contact an electrician to replace the obsolete out-
let. Do not attempt to defeat the safety purpose of the plug.
3. Power cord protection—Route the AC power supply cord so
that it will not be walked on or pinched by items placed on or
against it. Never take hold of the plug or cord with wet hands.
Always grasp the plug body firmly when connecting and discon-
necting it.
4. Overloading—When connecting the AC power supply cord, be
careful not to overload the household AC outlet, extension cord,
or outlet from any other device as this can result in fire or elec-
tric shock.
5. Nonuse periods—Turn the unit off when it is not in use. Unplug
the unit from the household AC outlet if it is not to be used for a
long time. Unplug the unit during lightning storms.
6. Attachments and accessories—Use only the attachments and
accessories recommended in these operating instructions.
Installation
Placement
1. Ventilation—Situate the unit so that it receives proper ventila-
tion. Do not install in a confined space such as a bookcase or
cabinet. Allow at least 10 cm (4 inches) clearance from the rear
of the unit. To prevent the risk of electric shock or fire due to
overheating ensure curtains and other materials do not obstruct
the unit’s ventilation.
2. Foreign material—Ensure objects and liquids do not get into
the unit. Avoid exposing the unit to excessive smoke, dust, me-
chanical vibration, and shock.
3. Magnetism—Situate the unit away from equipment and devices
that generate strong magnetic fields.
4. Stacking—Do not place heavy objects on top of this unit.
5. Surface—Place the unit on a flat, level surface.
6. Carts and stands—Use the unit only with carts
and stands recommended by the manufacturer.
Move carts with care. Sudden stops, excessive
force, and uneven surfaces can cause carts to
overturn.
7. Wall and ceiling mounting—Do not mount the unit on walls or
ceilings unless specified in the instructions.
Environment
1. Water and moisture—Do not use the unit near water, such as
near a bathtub or swimming pool. Avoid damp basements.
2. Heat—Situate the unit away from heat sources, such as
radiators.
Do not situate where temperatures fall below 5oC (41oF) or rise
above 35oC (95oF).

5
Getting started
RQT6191
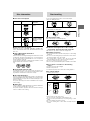
Disc information
∫ Discs that can be played
Disc handling
Do not use irregularly shaped discs, such as heart-shaped.
(These can damage the unit.)
∫ How to hold a disc
Do not touch the recorded surface.
∫ If the surface is dirty
Wipe it with a damp cloth and then wipe dry.
∫ If the disc is brought from a cold to a warm
environment, moisture may form on the disc
Wipe with a soft, dry, lint-free cloth before using the disc.
∫ Handling precautions
≥Do not write on the label side with a ball-point pen or other writing
instrument.
≥Do not use record cleaning sprays, benzine, thinner, static electric-
ity prevention liquids or any other solvent.
≥Do not attach labels or stickers to discs. (Do not use discs with
exposed adhesive from tape or left over peeled-off stickers.)
≥Do not use scratch-proof protectors or covers.
≥Do not use discs printed with label printers available on the market.
∫ Do not place or store discs in the following
places
≥Locations exposed to direct sunlight
≥Humid or dusty locations
≥Locations directly exposed to a heat vent or heating appliance
∫ To prevent damage
≥Load only 1 disc per tray.
≥Load discs as shown in figure.
≥An adaptor is not needed with 8 cm (3q) discs (singles).
≥Set the system on a flat, level surface.
Do not set it on top of magazines, inclined surfaces, etc.
≥Do not move the system while trays are opening/closing, or when
loaded.
≥Do not put anything except discs in trays.
≥Do not use cleaning discs or discs which are badly warped or
cracked.
∫ Discs that cannot be played
DVD-Audio, PAL discs, DVD-ROM, DVD-RAM, CD-ROM, CDV,
CD-G, iRW, DVD-RW, CVD, SVCD, SACD, Divx Video Discs and
Photo CD.
∫ Region Management Information
(DVD-Video only)
This unit responds to the Region Management Information recorded
on DVD-Video. This unit’s region number is “1”. You cannot play the
disc if the region number on the DVD-Video does not correspond to
the region number on the unit.
You can play discs with labels containing the region number “1” and
“ALL”. Read the disc’s instructions carefully.
e.g.
∫ Playing DVDs and Video CDs
The producer of these discs can control how they are played so you
may not always be able to control play as described in these operat-
ing instructions. Read the disc’s instructions carefully.
∫ CD-R and CD-RW discs
This unit can play CD-DA (digital audio) and video CD format audio
CD-R and CD-RW that have been finalized (a process that enables
CD-R/CD-RW players to play audio CD-R and CD-RW) upon com-
pletion of recording.
It may not be able to play some CD-R or CD-RW due to the condition
of the recording.
∫ DVD-R discs
Panasonic DVD-R recorded and finalized on a Panasonic DVD video
recorder are played as DVD-Video on this unit.
It may not be possible to play these discs in all cases due to the type
of disc or condition of the recording.
1 ALL
2
4
1
LogoDisc type
DVD-Video
DVD-R
Audio CD
Video CD
Indication used in
instructions
[DVD-V]
[CD]
(Including CD-R/RW
and discs recorded
with MP3)
[VCD]
8 cm
(3q)
12 cm
(5q)

Simple setup
RQT6191
6
6
D
I
S
C
1
2
3
4
5
120
˚
30
˚
30
˚
3
4
2
5
1
Panasonic
Panasonic
Simple setup
Attaching the speaker feet
Attach these speaker feet to prevent vibration causing the speak-
ers to move or fall over.
If irregular coloring occurs on your television
These speakers are designed to be used close to a television, but
the picture may be affected with some televisions and setup com-
binations.
If this occurs, turn the television off for about 30 minutes.
The television’s demagnetizing function should correct the
problem. If it persists, move the speakers further away from the
television.
Caution
≥Use the speakers only with the recom-
mended system. Failure to do so may lead
to damage to the amplifier and/or the
speakers, and may result in the risk of fire.
Consult a qualified service person if dam-
age has occurred or if you experience a
sudden change in performance.
≥Do not attempt to attach these speakers to
walls using methods other than those de-
scribed in this manual.
Refer also to “Speaker setup”, a separate guide included with these operating instructions.
Use only supplied speakers
Using other speakers can damage the unit and sound quality will be negatively affected.
Set the speakers up on an even surface to prevent them from falling. Take proper precautions to prevent the speakers from falling if you
cannot set them up on an even surface.
Front speakers (1 Left 2 Right) SB-AFC95
≥The left and right speakers are the same.
Surround speakers (3 Left 4 Right) SB-AFC95
Place either side of listening position, or slightly to the rear,
about 1 meter (3 feet) higher than ear level.
≥The left and right speakers are the same.
Center speaker (5) SB-PC89
≥You can also put this speaker directly under the television.
≥Do not place the center speaker on the main unit as sound quality
will be affected.
≥Vibration caused by the center speaker can disrupt the picture if it
is placed directly on the television. Put the center speaker on a
rack or shelf.
Subwoofer (6) SB-W95
Place near the television, on the floor or a sturdy
shelf so that it won’t cause vibration.
≥A woofer unit is located on the side of the subwoof-
er. Leave 10-cm (4q) clearance for it to be effective.
Main unit
Keep your speakers at
least 10 mm (
13
⁄32q)
away from the system
for proper ventilation.
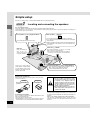
Place the front, center, and sur-
round speakers at approximately
the same distance from the seat-
ing position. The angles in the dia-
gram are approximate.
Locating and connecting the speakers
STEP1
Positioning for best effect
How you set up your speakers can affect the bass and the sound
field. Note the following points.
≥Place speakers on flat secure bases.
≥Placing speakers too close to floors, walls, and corners can result
in excessive bass. Cover walls and windows with thick curtain.
Front (12)/surround (34)
speakers
Center speaker (5)
Laying downStanding

Simple setup
7
RQT6191
Speaker cords
Attaching to a wall
Front and surround speakers can be attached to a wall.
Atttach four speaker feet to each speaker, ensuring they do not
cover the holes.
Set the speaker onto screws and slide through bracket to lock
into position.
Note
The wall or pillar on which the speakers are to be attached should
be capable of supporting 5 kg (11 Ib.) per screw.
Attaching to speaker stands
Ensure the following conditions are met when you purchase your
speaker stands.
≥Observe the diameter and length of the screws and the distance
between screws as shown in the diagram.
≥The stands must be able to support over 5 kg (11 lb.).
≥The stands must be stable even if the speakers are in a high
position.
Attach the stickers to the speaker cords.
≥Attach the numbered stickers to the end of the speaker
cords so the numbers match the positions of the speak-
ers shown in the diagram.
1
1
FRONT L
FRONT L
1
1
FRONT L
FRONT L
2
2
FRONT R
FRONT R
3
3
SURROUND L
SURROUND L
4
4
SURROUND R
SURROUND R
5
5
CENTER
CENTER
6
6
SUBWOOFER
SUBWOOFER
1
1
FRONT L
FRONT L
2
2
FRONT R
FRONT R
3
3
SURROUND L
SURROUND L
4
4
SURROUND R
SURROUND R
5
5
CENTER
CENTER
6
6
SUBWOOFER
SUBWOOFER
1
FRONT L
About 10 cm (4")
≥Connect the cords to the terminals of same color so the num-
bers on the stickers match the numbers under the terminals.
≥Never short-circuit positive (i) and negative (j) speaker wires.
≥Be sure to connect only positive (red or gray) wires to positive
(i) terminals and negative (black or gray with blue stripe) wires
to negative (j) terminals.
Incorrect connection can damage the speakers.
≥After you have completed setup and connection, wind the ex-
cess cord and keep together with string.
≥
The speaker nets cannot be removed.
Notes on speaker use
≥You can damage your speakers and shorten their useful life if
you play sound at high levels over extended periods.
R
L
R
L
1
2
3
4
5
6
FRONT
SURROUND
CENTER
SUBWOOFER
1
FRONT L
2
FRON
T R
5
C
ENTER
4
S
U
R
R
O
U
N
D
R
3
S
U
R
R
O
U
N
D
L
6
S
U
B
W
O
O
F
E
R
3
1
2
Center speaker
Front speaker (right)
Surround speaker (right)
Surround speaker (left)
Subwoofer
Front speaker (left)
Twist the vinyl tip and pull off.
Gray
+ Red
- Black
Black
Red
Blue
+ Gray (no stripe)
- Gray with blue stripe
Attach the stands
with these holes.
5 mm (
13
⁄64q),
pitch 0.8 mm
(
1
⁄32q)
Plate thickness
plus 7 to 10 mm
(plus
9
⁄32q to
25
⁄64q)
Speaker stand
(not included)
60 mm (2
23
⁄64q)
Reduce the volume in the following cases to avoid damage.
–When playing distorted sound.
–When the speakers are receiving howling from a micro-
phone or record player, noise from FM broadcasts, or con-
tinuous signals from an oscillator, test disc, or electronic
instrument.
–When adjusting the sound quality.
–When turning the unit on or off.
Screw (not included)
Speaker feet (included)
Speaker feet
(included)
30–35 mm
(1
3
⁄16q–1
3
⁄8q)
Ø7.5–9.5 mm
(
19
⁄64q–
3
⁄8q)
7–9 mm
(
9
⁄32q–
23
⁄64q)

Simple setup
RQT6191
8
FM ANT
AM ANT
AC IN~
LOOP ANT
HOLDER
VIDEO
OUT
S-VIDEO
OUT
TV
AUDIO
IN
LOOP
EXT
75 Ω
GND
VIDEO
IN
1
2
3
L
R
2
1
Simple setup
Television, antennas and AC power supply cord
STEP2
Connect directly to your television.
Do not connect the unit through a video cas-
sette recorder, because the picture may not
be played correctly due to the copy guard.
Audio cable
(not included)
Video cable
(included)
S video cable (not included)
Television (not included)
Adhesive tape
To household
AC outlet
(AC 120 V, 60 Hz)
FM indoor antenna
(included)
Fix the other end of
the antenna where
reception is best.
AM loop antenna (included)
Keep loose antenna cord away from other
wires and cords.
AC power supply cord
(included)
AM loop antenna
holder (included)
To attach to a wall or other surface
Screw
(included)
Note
The included AC power supply cord is for
use with this unit only. Do not use it with
other equipment.
Conserving power
The unit consumes power (approx. 0.25 W)
even when it is turned off with [Í]. To save
power when the unit is not to be used for a
long time, unplug it from the household AC
outlet. Remember to reset the radio stations
and any other memory items before using
the unit again.
For your reference
Information you enter into the unit’s memory
remains intact for up to a week after the AC
power supply cord is disconnected.
Turn the antenna to
the angle of best
reception and least
interference.
For better images
The S-VIDEO OUT terminal achieves a
more vivid picture than the VIDEO OUT
terminal by separating the chrominance
(C) and luminance (Y) signals before
transmitting them to the television.
(Actual results depend on the television.)
To listen to the televi-
sion through this unit
TV’s S-VIDEO IN
terminal
TV’s AUDIO OUT
terminals

Simple setup
9
RQT6191
The remote control
STEP3
Remote control only
The QUICK SETUP screen appears when you press [SETUP]
the first time after purchase and assists you to make necessary
settings.
Preparation
Turn on the television and select the appropriate video input on
the television to suit the connections for the player.
1 Press [DVD/CD] to turn on the unit.
The unit comes on automatically and “DVD/CD” is select-
ed as the source.
2 Press [SETUP] to show the QUICK
SETUP screen.
3 Press [3, 4] to select the menu lan-
guage and press [ENTER].
4 Press [3, 4] to select “Yes” to con-
tinue and press [ENTER].
5 Press [3, 4] to select the item and
press [ENTER].
≥Audio Language (For setting details ➡ page 24)
≥Subtitle Language (For setting details ➡ page 24)
≥TV Aspect (For setting details ➡ below)
6 Press [ENTER] and then [SETUP] to
end the settings.
To return to the previous screen
Press [RETURN].
∫ TV Aspect
Select “4:3” (regular) or “16:9” (widescreen) to suit your televi-
sion. If you have a regular 4:3 television, you can also select how
video on some discs is shown (➡ page 24, Video—TV Aspect).
≥4:3 Pan&Scan (Factory preset)
The pan and scan (the original widescreen
images are converted for viewing on a reg-
ular television) version of the video is auto-
matically selected if recorded on the disc.
≥4:3 Letterbox
The letterbox (the original widescreen im-
ages appear with black bands above and
below) version of the video is automatically
selected if recorded on the disc.
∫ Batteries
≥Insert so the poles (i and j) match those in the remote control.
≥Do not use rechargeable type batteries.
Do not;
≥mix old and new batteries.
≥use different types at the same time.
≥heat or expose to flame.
≥take apart or short circuit.
≥attempt to recharge alkaline or manganese batteries.
≥use batteries if the covering has been peeled off.
Mishandling of batteries can cause electrolyte leakage which can
damage items the fluid contacts and may cause a fire.
Remove if the remote control is not going to be used for a long
period of time. Store in a cool, dark place.
∫ Use
Aim at the sensor, avoiding obstacles, at a maximum range of
7 m (23 feet) directly in front of the unit.
1
4
R6, AA, UM-3
2
3
Quick Setup
STEP4
SELECT
SETUP
QUICK SETUP
Select the menu language.
ENTER RETURN
English
Français
Español
ENTER
VCR TV
TUNER/BAND
AUX
TV/VIDEO
FL DISPLAY
TOP MENU
MENU
SKIP
PLAYPAUSE
DISC SKIP CHANNEL VOLUME
SFC
MUTING
SUBWOOFER
LEVEL
STOP
RETURNDISPLAY
SLOW /SEARCH
DVD/CD
MAIN UNIT
ANGLEAUDIOSUB TITLE
SETUP
123
456
789
0
CH SELECT
TEST
MIX 2ch
DISC1 DISC2
DISC4 DISC5
DISC3
1
RETURN
3·4·5·6
2·6
SUPER
SURROUND
MARKER
SEAT
POSITION
CENTER
FOCUS
PRO LOGIC
10
/
ENTER

Getting started
RQT6191
10
POWER
VOLUME
DISC 1 2 3 4 5
/ I
OPEN/CLOSE
TUNING
DISC SKIP
MEMORY
TUNE MODE
FM MODE
SFC
SUBWOOFER LEVEL
DOWN UP
SELECTOR
PHONES
V
K
Y
Z
[ \U
^`_ab
X 8
7
WAKE
W
]
Control reference guide
Remote control
Page
1 Power button [Í] . . . . . . . . . . . . . . . . . . . . . . . . . . . . . . . . . 11
2 FL display button [FL DISPLAY] . . . . . . . . . . . . . . . . . . . . 23
3 Top menu button [TOP MENU] . . . . . . . . . . . . . . . . . . . 11, 12
4 Cursor buttons [3, 4, 2, 1]/Enter button [ENTER] . . . . . 9
5 Display button [DISPLAY] . . . . . . . . . . . . . . . . . . . . . . . . . . 16
6 Basic operation buttons
7 Disc skip button [DISC SKIP] . . . . . . . . . . . . . . . . . . . . . . . 11
8 Sound field control button [SFC] . . . . . . . . . . . . . . . . . . . . 21
9 Channel select buttons [
WW
WW
W,
XX
XX
X, CHANNEL] . . . . . . . . . 19, 26
: Initial settings button [SETUP] . . . . . . . . . . . . . . . . . . . . 9, 25
; Subtitle button [SUB TITLE] . . . . . . . . . . . . . . . . . . . . . . . . 14
< Speaker channel select button [CH SELECT] . . . . . . . . . . 21
= Test button [TEST] . . . . . . . . . . . . . . . . . . . . . . . . . . . . . . . 21
> Numbered buttons (1–9, 0, S10/ENTER) . . . . . . . . . . . . . . 11
? Disc button [DISC] . . . . . . . . . . . . . . . . . . . . . . . . . . . . . . . . 11
@ Disc manager button [DISC MANAGER] . . . . . . . . . . . . . . 15
A Play mode button [PLAY MODE] . . . . . . . . . . . . . . . . . . . . 15
B Cinema button [CINEMA] . . . . . . . . . . . . . . . . . . . . . . . . . . 13
C TV volume buttons [
ss
ss
s TV VOL
rr
rr
r] . . . . . . . . . . . . . . . . . . . 26
D Position memory button [P.MEMORY] . . . . . . . . . . . . . . . 12
E
Equipment buttons and indicators
Select the equipment you want to operate.
≥Press [DVD/CD] to operate this unit.
≥Press [VCR] to operate a video cassette recorder.
≥Press [TV] to operate a television.
These buttons light for a few seconds to indicate the remote
control mode.
F Input select buttons
[DVD/CD, MAIN UNIT, VCR, TV, TUNER/BAND, AUX]
Pressing [DVD/CD] or [TUNER/BAND] also turns the unit on.
[TUNER/BAND] also switches radio bands.
G
TV/Video
button [TV/VIDEO] . . . . . . . . . . . . . . . . . . . . . . . . .
26
H
Menu
button [MENU] . . . . . . . . . . . . . . . . . . . . . . . . . . . .
11, 12
I Return button [RETURN] . . . . . . . . . . . . . . . . . . . . . . . . 9, 25
J Muting button [MUTING] . . . . . . . . . . . . . . . . . . . . . . . . . . . 23
K Subwoofer level button [SUBWOOFER LEVEL] . . . . . . . . 22
L Volume buttons [
rr
rr
r,
ss
ss
s, VOLUME] . . . . . . . . . . . . . . . . . 11, 18
M Angle button [ANGLE] . . . . . . . . . . . . . . . . . . . . . . . . . . . . 15
N Audio button [AUDIO] . . . . . . . . . . . . . . . . . . . . . . . . . . . . . 15
O Marker button [MARKER] . . . . . . . . . . . . . . . . . . . . . . . . . . 13
P Mix 2ch button [MIX 2ch] . . . . . . . . . . . . . . . . . . . . . . . . . . 21
Q Sound field and effect buttons . . . . . . . . . . . . . . . . . . . 21, 22
R Cancel button [CANCEL] . . . . . . . . . . . . . . . . . . . . . . . . . . 13
S Repeat buttons [REPEAT, A-B REPEAT] . . . . . . . . . . . . . 14
T Timer button [TIMER] . . . . . . . . . . . . . . . . . . . . . . . . . . . . . 23
Main unit
U Standby/on switch [POWER] . . . . . . . . . . . . . . . . . . . . . . . 11
Press to switch the unit from on to standby mode or vice versa.
In standby mode, the unit is still consuming a small amount of power.
Standby/on indicator [Í/I]
When the unit is connected to the AC mains supply, this indicator
lights red in standby mode and lights green when the unit is turned on.
V Disc indicators [DISC 1–5] . . . . . . . . . . . . . . . . . . . . . . . . . 11
W Wake timer indicator [WAKE] . . . . . . . . . . . . . . . . . . . . . . . 23
X Display
Y Stop, tune mode button [∫, TUNE MODE] . . . . . . . . . 11, 18
Z Pause, FM mode button [;, FM MODE] . . . . . . . . . . . 11, 18
[ Play, memory button [1, MEMORY] . . . . . . . . . . . . . . 11, 19
\ Volume control [VOLUME, DOWN, UP] . . . . . . . . . . . . 11, 18
] Disc tray . . . . . . . . . . . . . . . . . . . . . . . . . . . . . . . . . . . . . . . . 11
^ Open/close button [< OPEN/CLOSE] . . . . . . . . . . . . . . . . 11
_ Skip/search, tuning buttons
[:/6, 5/9,
XX
XX
X TUNING
WW
WW
W] . . . . . . . . . . . . . . . 13, 18
` Headphone jack [PHONES] . . . . . . . . . . . . . . . . . . . . . . . . 23
a Remote control signal sensor
b Input select button [SELECTOR] . . . . . . . . . . . . . . . . . . . . 11
ENTER
VCR TV
TUNER/BAND
AUX
TV/VIDEO
FL DISPLAY
TOP MENU MENU
SKIP
PLAYPAUSE
DISC SKIP CHANNEL VOLUME
SFC
MUTING
SUBWOOFER
LEVEL
STOP
RETURNDISPLAY
SLOW /SEARCH
DVD/CD
MAIN UNIT
DISC
MANAGER
ANGLEAUDIOSUB TITLE
SETUP
TV VOL
123
456
789
0
PLAY MODE
CH SELECT
TEST
MIX 2ch
DISC1 DISC2
DISC4 DISC5
DISC3
CANCEL
CINEMA
P.MEMORY
TIMER
DISC
1
2
F
3H
G
4
5
6
<
7
:
9
@
B
D
A
?
;
=
I
J
8K
>
L
C
E
A-B
REPEAT
SUPER
SURROUND
MARKER
REPEAT
SEAT
POSITION
CENTER
FOCUS
PRO LOGIC
M
O
N
Q
R
T
S
P
10
/
ENTER
Buttons 7, 8, and K function the same as the controls on the re-
mote control.
How to open the remote control

11
RQT6191
Disc operations
POWER
VOLUME
DISC 1 2 3 4 5
/ I
OPEN/CLOSE
TUNING
DISC SKIP
MEMORY
TUNE MODE
FM MODE
SFC
SUBWOOFER LEVEL
DOWN UP
SELECTOR
PHONES
54
:/6, 5/9
∫
1
Í/I
POWER
Disc
indicators
;
2
3
Disc tray
ENTER
VCR TV
TUNER/BAND
AUX
TV/VIDEO
FL DISPLAY
TOP MENU
MENU
SKIP
PLAYPAUSE
DISC SKIP CHANNEL VOLUME
SFC
MUTING
SUBWOOFER
LEVEL
STOP
RETURNDISPLAY
SLOW /SEARCH
DVD/CD
MAIN UNIT
DISC
MANAGER
A-B
REPEAT
SUPER
SURROUND
ANGLEAUDIOSUB TITLE
SETUP
TV VOL
123
MARKER
456
789
0
PLAY MODE
CH SELECT
TEST
MIX 2ch
DISC1 DISC2
DISC4 DISC5
DISC3
CANCEL
REPEAT
CINEMA
P.MEMORY
TIMER
DISC
SEAT
POSITION
CENTER
FOCUS
PRO LOGIC
Í
RETURN
MENU
3, 4, 2, 1
ENTER
TOP MENU
∫
STOP
2
:
,
9
SKIP
4
1
2
; PAUSE
5
10
/
ENTER
WAKE
SUB TITLE
3 Press [<] to open the disc tray and in-
sert a disc.
Press again to close and start play.
Repeat steps 2 and 3 to insert other discs.
4 If play doesn’t start after step 3
Press [1] (PLAY).
[CD] (MP3 discs)
Group and track names are displayed on the television.
Press [SUB TITLE] to change the display.
5 Adjust the volume.
∫ To stop play
Press [∫] (➡ page 12, Resume function).
∫ To pause play
Press [;] during play.
Press [1] (PLAY) to restart play.
Note
≥If “$” appears on the television
The operation is prohibited by the unit or disc.
≥The disc continues to rotate while the menu is displayed even after
you finish playing an item. Press [∫] when you finish to preserve
the unit’s motor and your television screen.
≥Volume may be lower when playing DVDs than when playing other
discs or during television broadcasts.
If you turn the volume up, be sure to reduce the volume again be-
fore playing other sources so that a sudden increase in output does
not occur.
When a menu appears on the television
[DVD-V] [VCD]
Remote control only
Press the numbered buttons to select an item.
To select a 2-digit number
Example: To select item 23, press [S10/ENTER] ➡ [2] ➡ [3].
≥When playing DVDs, you can also use [3, 4, 2, 1] to select
items. Press [ENTER] to confirm your selection.
Play of the selected item now begins.
Other buttons used to operate menus
Read the disc’s instructions for further details about operation.
[9]: Shows the next menu.
[:]: Shows the previous menu.
[RETURN]: Shows the menu screen. [VCD]
[TOP MENU]: Shows the first menu screen. [DVD-V]
[MENU]: Shows the menu screen. [DVD-V]
[DVD-V] [CD] [VCD]
Preparation
≥Turn on the television and select the appropriate video input on the
television to suit the connections for the player.
≥Press [Í/I POWER] to turn on the unit.
1 Press [SELECTOR] to select “DVD/
CD” as the source.
Each time you press the button:
DVD/CD>FM>AM>TV>VCR>AUX
^---------------------------------------------------------}
Remote control: Press [DVD/CD].
2 Press [DISC SKIP] to select a tray.
The indicator lights.
Play starts if a disc is in the tray. (One touch play)
Remote control:
Press [DISC] and then press [1]–[5] corresponding to the re-
quired tray.
Discs—Basic play
Label must face upward.
(With double-sided discs,
load so the label for the side
you want to play faces up.)
Front
speakers
Center
speaker
Lights during play.
DIGITAL
DVD
Lights when
Dolby Digital
is detected.
Lights if
disc is DVD.
Surround speakers
Numbered
buttons

RQT6191
12
Disc operations
Using menus to play MP3 discs
[CD] (MP3 discs)
This unit can play MP3 files recorded on CD-R/RW with a computer.
Files are treated as tracks and folders are treated as groups.
Naming folders and files
At the time of recording, prefix folder and
file names with 3-digit numbers in the or-
der you want to play them (this may not
work at times).
1 Press [TOP MENU] or [MENU].
A file list appears. Group name
2 Press [3, 4] to select the track and
press [ENTER].
Play starts and continues to the last track in the last group.
“0” indicates the track currently playing.
Discs—Basic play
To show other pages
Press [3, 4, 2, 1] to select “Prev” or “Next” and press [ENTER].
After listing all the tracks in one group, the list for the next group appears.
To close the file list screen
Press [TOP MENU] or [MENU].
Using the tree screen to find a group
1 Press [1] while a track is highlighted
to display the tree screen.
You cannot select groups that contain no compatible files.
2 Press [3, 4] to select a group and
press [ENTER].
The file list for the group appears.
For your reference
≥Press [2, 1] to jump layers in the tree screen.
Refer to the glossary on page 32 for more information about MP3.
Resume function
[DVD-V] [CD] [VCD]
(When the elapsed play time is displayed)
“RESUME” lights on the display when the unit has
recorded the position at which you stopped play.
Press [1] (PLAY) to start play from that position.
(When playing DVD-Video ➡ Chapter Preview below)
≥The position is cleared when:
–The unit is turned off.
–The disc is changed or removed.
–A source other than DVD/CD is selected.
≥Press [∫] to clear the position.
Position Memory function
During play
Press [P.MEMORY] to memorize a position.
The message “Position memorized” appears on the television.
This position is saved even if you change or remove the disc, change
the source, or turn the unit off.
When you reselect or reinsert the disc, reselect DVD/CD, or turn the
unit on, “RESUME” lights on the display.
Press [1] (PLAY) to start play from the memorized position.
The position is cleared.
(When playing DVD ➡ Chapter Preview below)
To clear the position before play
Press [∫].
≥You can memorize positions on up to five different discs at a time.
When you memorize another position, the earliest position is replaced.
Chapter Preview [DVD-V]
The message “Press PLAY to Preview Chapters” appears immedi-
ately after you press [1] (PLAY).
Press [1] (PLAY) while the message is displayed and the beginning
portions of each chapter up to the current one are played.
Full play resumes from the point where you pressed [∫] or
[P.MEMORY].
(This feature works only within a title.)
If you do not press [1] (PLAY), the message disappears and play
starts from where you pressed [∫] or [P.MEMORY].
RESUME
ENTER
VCR TV
TUNER/BAND
AUX
TV/VIDEO
FL DISPLAY
TOP MENU
MENU
SKIP
PLAYPAUSE
DISC SKIP CHANNEL VOLUME
SFC
MUTING
SUBWOOFER
LEVEL
STOP
RETURNDISPLAY
SLOW /SEARCH
DVD/CD
MAIN UNIT
DISC
MANAGER
A-B
REPEAT
SUPER
SURROUND
ANGLEAUDIOSUB TITLE
SETUP
TV VOL
123
MARKER
456
789
0
PLAY MODE
CH SELECT
TEST
MIX 2ch
DISC1 DISC2
DISC4 DISC5
DISC3
CANCEL
REPEAT
CINEMA
P.MEMORY
TIMER
DISC
SEAT
POSITION
CENTER
FOCUS
PRO LOGIC
P.MEMORY
∫
STOP
6
,
5
SLOW/SEARCH
:, 9
SKIP
MENU
1 PLAY
MARKER
1–5
DISC
CINEMA
DISC SKIP
CANCEL
; PAUSE
3, 4, 2, 1
ENTER
TOP MENU
10
/
ENTER
Numbered
buttons
SELECT
File list
ENTER RETURN
G
T
Total
001 Both Ends Freezing
002 Lady Starfish
003 Life on Jupiter
004 Metal Glue
005 Paint It Yellow
006 Pyjamamama
007 Shrimps from Mars
008 Starperson
009 Velvet Cuppermine
010 Ziggy Starfish
NextPrev
1
2
3
4
5
6
7
8
9
10
No Group: 001 My Favorite Tree
1
1
1
SELECT
File list
ENTER RETURN
G 8
T 14
Total 123
Tree
G 8/16
MP3 music
001 My Favorite
001 Brazilian pops
002 Chinese pops
003 Czech pops
004 Hungarian pops
005 Liner notes
006 Japanese pops
007 Mexican pops
008 Philippine pops
009 Swedish pops
001 Momoko
002 Standard number
001 Piano solo
002 Vocal
Example: MP3
002
001001
root
001.mp3
002.mp3
003.mp3
003
001.mp3
002.mp3
003.mp3
001.mp3
002.mp3
003.mp3
004.mp3

13
RQT6191
Disc operations
Disc skip
[DVD-V] [CD] [VCD]
Press [DISC SKIP].
Play starts from the beginning of the disc in the next tray.
You will skip to tray 1 when the current tray is 5.
Note
[DISC SKIP] does not work during program and random play or while
the disc manager is on.
Cinema
[DVD-V] [VCD]
Remote control only
You can change the picture quality for movie viewing.
Press [CINEMA].
Each time you press the button:
[>Cin.1: Mellows images and enhances detail in dark scenes.
l
;
l Cin.2: Sharpens images and enhances detail in dark scenes.
l
;
{= Nor.: Normal mode (Factory preset)
For your reference
You can make finer adjustments to the picture if desired (➡ page 17,
Digital picture mode—User mode).
Marking places to play again—
MARKER
[DVD-V] [CD] [VCD]
(When the elapsed play time is displayed)
Remote control only
You can mark up to 5 points on a disc to return to later.
1 During play
Press [MARKER].
2 Press [ENTER] at the point you want
to mark.
To select another marker, press [2, 1].
To play from a marked position
Press [2, 1] to select a marker number and press [ENTER].
To clear a marker
Press [2, 1] to select a marker number and press [CANCEL].
Note
≥Some subtitles may fail to appear around the marker.
≥All the markers are cleared when:
–The unit is turned off.
–The disc is changed or removed.
–A source other than DVD/CD is selected.
✱✱✱✱✱
Cin.1
Skipping chapters or tracks
[DVD-V] [CD] [VCD]
Press [:] or [9].
≥Each press increases the number of skips.
≥Press [:/6, 5/9] on the main unit.
Fast forward and rewind—SEARCH
[DVD-V] [CD] [VCD]
During play
Press [6] or [5].
≥Press and hold [:/6, 5/9] on the main unit.
≥Audio will be heard during search. You can turn this audio off if you
want to (➡ page 24, Audio—Audio during Search).
Slow-motion play
[DVD-V] [VCD]
While paused
Press [6] or [5].
≥Press and hold [:/6, 5/9] on the main unit.
Frame-by-frame viewing
[DVD-V] [VCD]
Remote control only
While paused
Press [2] or [1].
The frame changes each time you press the button.
≥The frames change in succession if you press and hold the button.
≥Pressing [;] also activates forward frame-by-frame.
Starting play from a selected track
[CD] [VCD]
Remote control only
1 Press [DISC].
2 Press [1]–[5] to select a disc.
3 Wait for the disc to change and play to start
Press the numbered buttons to select
the track.
To select a 2-digit number
Example: To select track 23, press [S10/ENTER] ➡ [2] ➡ [3].
Play starts from the selected item.
Note
≥This works only when stopped with some discs.
≥MP3 discs
Press [ENTER] after pressing the numbered buttons. (You do not
have to press [S10/ENTER].)
Note
≥
The speed of search and slow-motion increases up to 5 steps.
≥Press [1] (PLAY) to restart play.
≥You cannot move backwards with Video CD during frame-
by-frame and slow-motion.
When playing Video CDs with playback control
Pressing buttons to perform skip, search or slow-motion may
take you to a menu screen.

RQT6191
14
Disc operations
Discs—Convenient functions
Repeat play
During play
Press [REPEAT].
Each time you press the button:
[DVD-V] [CD] (MP3 disc)
Chapter_--)Title_--)OFF Track_)Group_)OFF
^------------------------------------} ^-----------------------------------}
[CD] [VCD]
Repeat on()OFF
If the Video CD has playback control
1.
Press [∫].
2.
Press the numbered buttons to select a track to start play (➡ page 13).
3. Press [REPEAT] (➡ above).
Note
You cannot use repeat play to repeat an entire DVD-Video or an en-
tire MP3 disc.
∫ To repeat only your favorite tracks
[CD] [VCD]
Start program play (➡ page 15) and press [REPEAT] to display the
repeat mode you like.
Subtitles/Soundtracks/Angles
[DVD-V]
Some DVDs have multiple soundtracks, subtitle languages and
camera angles, and you can change these during play.
≥“–” or “– –” is displayed instead of the language number in circum-
stances such as when no language is recorded on the disc.
Subtitles
During play
Press [SUB TITLE].
The number changes each time you press the button.
≥In some cases, the subtitle language is not changed to the
selected one immediately.
≥If the subtitles overlap closed captions recorded on discs, turn the
subtitles off.
To clear/display the subtitles
1. Press [SUB TITLE].
2. Press [1].
3. Press [3, 4] to select “OFF” or “ON”.
Remote control only
A-B repeat play/Repeat play
[DVD-V] (When the elapsed play time is displayed)
[CD] [VCD]
A-B repeat play
You can repeat a section between points A and B within a title or track.
1 During play
Press [A-B REPEAT] at the starting
point (A).
2 Press [A-B REPEAT] at the finishing
point (B).
A-B repeat starts.
To cancel
Press [A-B REPEAT] until “ ” is displayed.
Note
≥Some subtitles recorded around point A or B may fail to appear.
≥The unit automatically determines the end of a title/track as point B
when the end of the title/track is reached.
A
✱
A B
C T
OFF
C
T G
OFF
T
ENTER
VCR TV
TUNER/BAND
AUX
TV/VIDEO
FL DISPLAY
TOP MENU
MENU
SKIP
PLAYPAUSE
DISC SKIP CHANNEL VOLUME
SFC
MUTING
SUBWOOFER
LEVEL
STOP
RETURNDISPLAY
SLOW /SEARCH
DVD/CD
MAIN UNIT
DISC
MANAGER
A-B
REPEAT
SUPER
SURROUND
ANGLEAUDIOSUB TITLE
SETUP
TV VOL
123
MARKER
456
789
0
PLAY MODE
CH SELECT
TEST
MIX 2ch
DISC1 DISC2
DISC4 DISC5
DISC3
CANCEL
REPEAT
CINEMA
P.MEMORY
TIMER
DISC
SEAT
POSITION
CENTER
FOCUS
PRO LOGIC
∫
STOP
1–5
PLAY MODE
DISC
MANAGER
DISC
1 PLAY
REPEAT
A-B REPEAT
:, 9
SKIP
SUB TITLE
ANGLE
AUDIO
3, 4, 1
10
/
ENTER
Numbered
buttons
I love you
Je t’aime
English
ON
French
ON
1
2
✱
✱
A T
ALL DISC
You can repeat tracks as follows depending on the DISC
MANAGER setting
(➡ page 15)
.
Normal or 1-TRACK ALL-DISC
1-DISC

15
RQT6191
Disc operations
Soundtracks
During play
Press [AUDIO].
The number changes each time you press the button.
≥You can also use this button to turn the vocals on and off on
karaoke discs. Read the disc’s instructions for details.
≥Refer to [B] on page 17 for audio signal type details.
≥[VCD]
Audio changes as follows each time you press [AUDIO]:
LR>L>R
^--------------}
This may not work with some discs.
Angles
“ANGLE” lights on the unit’s display when this is available.
During play
Press [ANGLE].
The number changes each time you press the button.
Using the disc manager
[CD] [VCD]
The disc manager allows you to choose one track or disc to play or to
play all five discs in succession.
1 While stopped
Press [DISC MANAGER] to select the
desired method.
Each time you press the button:
(1-TRACK): One track play
(1-DISC): Plays one disc.
(ALL-DISC):
Plays five discs in succession.
(NORMAL): Normal play (off)
2 Select the disc and track.
≥When selecting “1-DISC”, press [DISC] and [1]–[5].
≥When selecting “1-TRACK”, press the numbered buttons.
To select a 2-digit number
Example: To select track 23: press [S10/ENTER] ➡ [2] ➡ [3].
You can also select the track by pressing [:] and [9].
3 Press [1] (PLAY).
To cancel disc manager
Press [∫].
To play a track or disc repeatedly
Press [REPEAT] during disc manager play.
Note
≥
You cannot use the disc manager while “RANDOM” or “PRGM” are on.
≥
When playing video CDs with playback control in the “A” or “ALL DISC”
mode, you can play the disc without having to operate the disc’s menus.
≥The disc manager skips any DVD and MP3 discs that are loaded.
1
2
3/2.1 ch
Digital
Î
1 English
Program play/Random play
[CD] [VCD]
While stopped
Press [PLAY MODE] to select the play mode.
The mode changes as follows each time you press the button.
Program play Random play
Normal play All disc random play
After selecting the mode, follow the steps for the mode.
Program play
To play a maximum of 24 tracks in a programmed order
Select tracks from any disc.
1 Press [DISC] and [1]–[5] to select the
disc.
2 Press the numbered buttons to select
a track.
≥Repeat steps 1 and 2 to program other tracks.
≥Step 1 is unnecessary when programming tracks on the
same disc.
3 Press [1] (PLAY).
Play now begins in the programmed sequence.
When play is stopped and the program contents are shown on
the display, you can also do the following.
≥To add tracks
Repeat steps 1 and 2.
≥To check program contents
Press [:] or [9].
≥To clear tracks
Press [CANCEL] to clear the last track in the program, or press
[:] or [9] to select a track and press [CANCEL].
≥To clear the whole program
Press [∫] so “CLEAR” is displayed. (If “CLEAR” is not displayed,
start and stop play, then press [∫] again.)
Note
Discs or tracks the unit cannot find can be programmed but are can-
celed during play. This is also the case if you program DVD-Video
and MP3 discs.
Random play
To play tracks on the current disc randomly
Press [1] (PLAY).
Play now begins in random order.
All disc random play
To play tracks on all discs randomly
Press [1] (PLAY).
Play now begins in random order.
≥DVD and MP3 discs are skipped during all disc random play.
Normal play
The program or random mode is canceled (normal play mode is re-
stored) when:
–The unit is turned off.
–The disc is changed or removed.
–A source other than DVD/CD is selected.
The program is retained in memory.
DISC
PRGM
RANDOM
RANDOM
ALL DISC
T
A
ALL DISC

RQT6191
16
Disc operations
Using On-Screen Menu Icons
2 [Unit\information\only]
While the leftmost icon is highlighted
Press [3, 4] to select the menu.
Each time you press the button:
[>Play menu
l
l
l;:
l>Display menu
l
l
l;:
l>Audio menu
l
l
l;:
{>Video menu
3 Press [2, 1] to select the item.
4 Press [3, 4] to select the setting.
≥Items with “3” or “4” above and below can be changed by
[3, 4].
≥Press [ENTER] if the setting does not change after pressing
[3, 4].
≥Some items require different operations. Read the explana-
tions on the following pages.
For your reference
≥Depending on the condition of the unit (playing, stopped, etc.) and
the type of software you are playing, there are some items that you
cannot select or change.
≥When numbers are displayed (e.g. title No.), the numbered buttons
are also effective for setting. After entering the numbers, press
[ENTER] to register the setting.
To clear the menus
Press [RETURN] until the menus disappear.
∫ To change the position of the menus
1. Press [2, 1] to select the rightmost icon.
2. Press [3, 4] to move the menus.
(There are 5 positions.)
Progress indicator
Indicates how far you have played through an item.
a Current position
b Title number
c Chapter number
d Condition – play, pause, or slow/search
e Time (When the elapsed play time is displayed)
≥Press [3, 4] to show the elapsed play time or remaining time
for the title.
≥Select a position to start play by specifying a time with the num-
bered buttons.
[DVD-V]
Remote control only
On-Screen Menu Icons are menus that contain information about the
disc or unit. These menus allow you to perform operations by chang-
ing this information.
Common procedures
1 Press [DISPLAY].
Each time you press the button:
[>Disc information
l
l
l;
l>Progress indicator
l
l
l;
l>Unit information
l
l
l;
{=Original display
≥The screens depend on disc contents.
ENTER
VCR TV
TUNER/BAND
AUX
TV/VIDEO
FL DISPLAY
TOP MENU MENU
SKIP
PLAYPAUSE
DISC SKIP CHANNEL VOLUME
SFC
MUTING
SUBWOOFER
LEVEL
STOP
RETURNDISPLAY
SLOW /SEARCH
DVD/CD
MAIN UNIT
DISC
MANAGER
MIX 2ch
SUPER
SURROUND
TEST
PRO LOGIC
ANGLEAUDIOSUB TITLEACTION
TV VOL
123
CH SELECT
456
789
0
PLAY MODE
GROUP PAGE MARKER
DISC1 DISC2
DISC4 DISC5
DISC3
CANCEL
CENTER
FOCUS
CINEMA
P.MEMORY
TIMER
REPEAT
A-B
REPEAT
SEAT
POSITION
DISC
3, 4, 2, 1
ENTER
DISPLAY RETURN
10
/
ENTER
CANCEL
Numbered
buttons
2
C
2
1 : 46 : 50
1 ENG 3/2.1 ch
Digital
Î
ENG
ON
1
1
T
T C
22
1
1 : 23 : 54
AB
1 2 3 ✱✱
OFF
bc d e
T C
22
1
1 : 23 : 54
a
Nor.
OFF
I P B
AB
1 2 3 ✱✱
OFF
OFF

17
RQT6191
Disc operations
Disc information
T
2
C
2
1 : 46 : 50
1 ENG 3/2.1 ch
Digital
Î
ENG
ON
1
1
Unit information
.1: Subwoofer signal
(not displayed if there is no subwoofer signal)
.0: No surround
.1: Mono surround
.2: Stereo surround (left/right)
.1: Center
.2: Front leftiFront right
.3: Front leftiFront rightiCenter
[B][B]
[B][B]
[B] Signal type/data
LPCM/ÎDigital: Signal type
k (kHz): Sampling frequency
b (bit): Number of bits
ch (channel): Number of channels
Example:
3/2 .1ch
[A][A]
[A][A]
[A] Audio/Subtitle language
ENG: English
FRA: French
DEU: German
ITA: Italian
ESP: Spanish
NLD: Dutch
SVE: Swedish
NOR: Norwegian
DAN: Danish
POR: Portuguese
RUS: Russian
JPN: Japanese
CHI: Chinese
KOR: Korean
MAL: Malay
VIE: Vietnamese
THA: Thai
¢: Others
Play menu
Display menu
Audio menu
Icon Content
Title number
Chapter number
Time
≥Press [3, 4] to show the
elapsed play time or remaining
time for the title.
≥Select a position to start play by
specifying a time with the
numbered buttons.
Soundtrack
a Soundtrack language
(See [A] below for language
abbreviations.)
b Audio signal type
(See [B] below for details.)
Karaoke vocal on/off
(Karaoke DVD only)
Solo: OFF or ON
Duet: OFF, V1iV2, V1 or V2
Subtitle language
(See [A] below for language
abbreviations.)
Subtitles on/off
ON()OFF
Angle number
T
2
C
2
1 : 46 : 50
1 ✱
Vocal
OFF
ENG
ON
1
ENG
1
ON
1
1 ENG 3/2.1 ch
Digital
Î
b
a
Video menu
Digital picture mode
Nor.: Normal mode
Cin.1/Cin.2: Cinema mode (➡ page 13)
User: User mode
The following items are also displayed when
you select “User”.
Contrast (j7 to i7)
Increases the contrast between white and black
parts of the picture.
Brightness (0 to i15)
Brightens the picture.
Color (j7 to i7)
Adjust the shade of the picture’s color.
Nor.
0
0
0
(Dolby Digital, 3-channel or over only)
Dialogue Enhancer
ON()OFF
The volume of the dialogue from the center
channel is raised when you select “ON”.
OFF
I/P/B display (➡ page 32)
ON()OFF
Displays the picture type (I/P/B) in the still
picture mode.
OFF
I P B
Content
A-B repeat (➡ page 14)
[ENTER] (start point) ➡ [ENTER] (finish point)
To cancel: [ENTER]
Repeat play (➡ page 14)
Chapter (C)()Title (T)()OFF
^-----------------------------------------------J
Marker (➡ page 13)
You can mark up to 5 positions to play again.
[ENTER] (The unit is now ready to accept markers.)
To mark a position
[ENTER] (at the desired point)
To mark another position: [2, 1] ➡ [ENTER]
To recall a marker: [2, 1] ➡ [ENTER]
To erase a marker: [2, 1] ➡ [CANCEL]
Icon
AB
OFF
1 2 3 ✱✱

RQT6191
18
Radio operations
ENTER
VCR TV
TUNER/BAND
AUX
TV/VIDEO
FL DISPLAY
TOP MENU
MENU
SKIP
PLAYPAUSE
DISC SKIP CHANNEL VOLUME
SFC
MUTING
SUBWOOFER
LEVEL
STOP
RETURNDISPLAY
SLOW /SEARCH
DVD/CD
MAIN UNIT
DISC
MANAGER
ANGLEAUDIOSUB TITLE
SETUP
123
456
789
0
PLAY MODE
CH SELECT
TEST
MIX 2ch
DISC1 DISC2
DISC4 DISC5
DISC3
CANCEL
REPEAT
r, s
VOLUME
TUNER/BAND
POWER
VOLUME
DISC 1 2 3 4 5
WAKE
/ I
OPEN/CLOSE
TUNING
DISC SKIP
MEMORY
TUNE MODE
FM MODE
PROGRESSIVE OUT
SUBWOOFER LEVEL
DOWN UP
SELECTOR
PHONES
VOLUME
DOWN, UP
SELECTOR
X
TUNING
W
DISC
SUPER
SURROUND
MARKER
SEAT
POSITION
CENTER
FOCUS
PRO LOGIC
10
/
ENTER
Í
Í/I
POWER
FM MODETUNE MODE
3 Press [TUNING (
XX
XX
X or
WW
WW
W)] to select the
frequency of the required station.
Displayed when a stereo FM broadcast is being received.
Displayed when a radio station is tuned.
Press and hold [TUNING (XorW)] until the frequency starts
scrolling to start automatic tuning. Tuning stops when a sta-
tion is found.
4 Adjust the volume.
If noise is excessive in FM
Press [FM MODE] to display “MONO”.
This mode improves sound quality if reception is weak but broad-
casts are heard in monaural.
Press [FM MODE] again to cancel the mode.
The mode is also canceled when you changed the frequency.
Turn “MONO” off for normal listening.
Stereo and monaural broadcasts are automatically played as they
are received.
FM frequency step
The step is factory-set to 0.2 MHz, but you can change it to receive
broadcasts allocated 0.1-MHz steps.
1 Press [SELECTOR] to select “FM”.
2 Press and hold [SELECTOR].
After a few seconds the display changes to show the current min-
imum frequency. Continue to hold the button down. The minimum
frequency changes and the step is changed.
To return to the original step, repeat the above steps.
Note
Any FM frequencies preset in channels will be changed by this pro-
cedure. Preset them again.
The radio: manual tuning
Radio stations can be tuned manually by selecting the station’s
frequency or they can be preset into channels to make it easy to tune
(➡ page 19).
Preparation
Press [Í/I POWER] to turn on the unit.
1 Press [SELECTOR] to select “FM” or
“AM”.
Each time you press the button:
DVD/CD>FM>AM>TV>VCR>AUX
^---------------------------------------------------------}
≥Remote control: Press [TUNER/BAND].
2 Press [TUNE MODE] to select “MANU-
AL”.
Each time you press the button:
MANUAL(>PRESET
MHz
TUNED
STEREO
MHz
TUNED
MONO
MHz

19
RQT6191
Radio operations
ENTER
VCR TV
TUNER/BAND
AUX
TV/VIDEO
FL DISPLAY
TOP MENU
MENU
SKIP
PLAYPAUSE
DISC SKIP CHANNEL VOLUME
SFC
MUTING
SUBWOOFER
LEVEL
STOP
RETURNDISPLAY
SLOW /SEARCH
DVD/CD
MAIN UNIT
DISC
MANAGER
ANGLEAUDIOSUB TITLE
SETUP
123
456
789
0
PLAY MODE
CH SELECT
TEST
MIX 2ch
DISC1 DISC2
DISC4 DISC5
DISC3
CANCEL
REPEAT
DISC
TUNER/BAND
r, s
VOLUME
W, X
CHANNEL
SUPER
SURROUND
MARKER
SEAT
POSITION
CENTER
FOCUS
PRO LOGIC
10
/
ENTER
POWER
VOLUME
DISC 1 2 3 4 5
WAKE
/ I
OPEN/CLOSE
TUNING
DISC SKIP
MEMORY
TUNE MODE
FM MODE
PROGRESSIVE OUT
SUBWOOFER LEVEL
DOWN UP
SELECTOR
PHONES
VOLUME
DOWN, UP
SELECTOR
XTUNINGW
MEMORY
Manual presetting
Main unit only
Preset the stations one at a time.
1 Tune to the station (➡ page 18).
2 Press [MEMORY] twice.
3 Press [TUNING (
XX
XX
X or
WW
WW
W)] to select a
channel.
4 Press [MEMORY].
The station occupying a channel is erased if another station is preset
in that channel.
Selecting channels
1 Press [TUNER/BAND] to select “FM”
or “AM”.
≥Main unit: Press [SELECTOR].
Each time you press the button:
DVD/CD>FM>AM>TV>VCR>AUX
^---------------------------------------------------------}
2 Press the numbered buttons or
[CHANNEL (
W W
W W
W or
XX
XX
X)] to select the
channel.
To select a 2-digit number
Example: To select channel 12, press [S10/ENTER] ➡ [1] ➡ [2].
≥Main unit: Press [TUNING (XorW)] while “PRESET” is
selected.
3 Adjust the volume.
The radio: preset tuning
There are two methods of presetting stations.
Automatic presetting: The stations the tuner can receive are
preset.
Manual presetting: You can select the stations to preset and
the order they are preset in.
Up to 12 stations can each be set in the FM and AM bands.
Automatic presetting
Main unit only
1 Tune to “FM 87.9 MHz” (➡ page 18).
2 Press and hold [MEMORY].
The FM stations the unit can receive are preset.
3 Tune to “AM 520 kHz” (➡ page 18).
4 Press and hold [MEMORY].
The AM stations the unit can receive are preset.
The last station to be preset is displayed when presetting finishes.
MHz
kHz
MHz
Numbered
buttons
MHz

RQT6191
20
Sound quality/sound field operations
Sound field
Note
≥Dolby Pro Logic and Super Surround cannot be used if headphones are connected.
≥You may experience a reduction in sound quality when these sound field systems and effects are used with some sources. If this occurs, turn the
surround system or effect off.
Sound field system Features Software
SUPER
SURROUND
(➡ page 22)
Any stereo sound source.
MUSIC
MOVIE
DOLBY DIGITAL
(➡ page 21)
≥Dolby Digital is a digital encoding
system used on DVD to carry sur-
round sound. It was originally de-
veloped for use in cinemas.
≥This unit automatically recognizes
and decodes Dolby Digital.
DOLBY PRO LOGIC
(➡ page 21)
Dolby Pro Logic is a decoding sys-
tem that was developed to get a
better sense of presence from
sources encoded with Dolby Sur-
round. The feeling of position has
been improved by the addition of a
separate center speaker channel.
Software encoded with Dolby
Surround can be identified
with this mark.
≥DVD
≥CD, Video CD
≥Laser Disc
≥Video tape
≥Radio
≥This mode adds surround effects
to stereo sources.
≥You can adjust the volume of the
surround speakers to get the best
surround effect.
≥This mode adds surround effects
to movie software that hasn’t been
recorded with the above systems.
≥You can adjust the volume of the
surround speakers to get the best
surround effect.
Seat position
Center focus
Seat position
Center focus
SFC
(Sound Field Control)
(➡ page 21)
Use SFC effects to change the
sound quality and add reverbera-
tion.
Any source.
—
Other effects
Seat position (➡ page 22)
≥This mode helps maintain
the sound position even if
the listening position itself
is changed.
Center focus (➡ page 22)
≥This mode makes it seem like
the sound from the center
speaker is coming from within
the television.
≥You can select one of two levels.
≥The center speaker should be
placed above the television.
Software encoded with Dolby
Digital can be identified with this
mark.
≥DVD
—
Seat position
Page is loading ...
Page is loading ...
Page is loading ...
Page is loading ...
Page is loading ...
Page is loading ...
Page is loading ...
Page is loading ...
Page is loading ...
Page is loading ...
Page is loading ...
Page is loading ...
Page is loading ...
Page is loading ...
Page is loading ...
Page is loading ...
-
 1
1
-
 2
2
-
 3
3
-
 4
4
-
 5
5
-
 6
6
-
 7
7
-
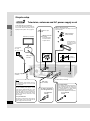 8
8
-
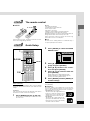 9
9
-
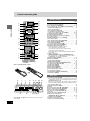 10
10
-
 11
11
-
 12
12
-
 13
13
-
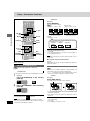 14
14
-
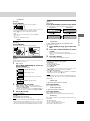 15
15
-
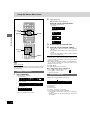 16
16
-
 17
17
-
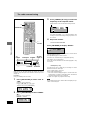 18
18
-
 19
19
-
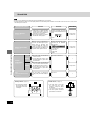 20
20
-
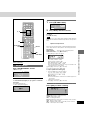 21
21
-
 22
22
-
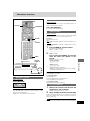 23
23
-
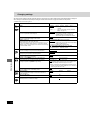 24
24
-
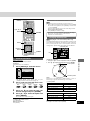 25
25
-
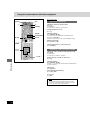 26
26
-
 27
27
-
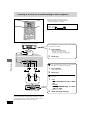 28
28
-
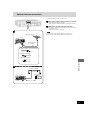 29
29
-
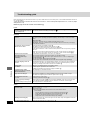 30
30
-
 31
31
-
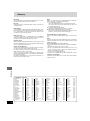 32
32
-
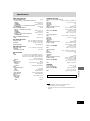 33
33
-
 34
34
-
 35
35
-
 36
36


Ask a question and I''ll find the answer in the document
Finding information in a document is now easier with AI
Related papers
-
Panasonic SA-HT95P Owner's manual
-
-
-
-
-
-
-
-
-
Other documents
-
Sharp HTDV50H Operating instructions
-
ARKROCKET AR12C User manual
-
Technics SC-S3050 Owner's manual
-
Farenheit DVD-5000 User manual
-
Yamaha NX-S100S User manual
-
-
Kenwood DP-R892 User manual
-
Technicolor - Thomson Stereo System CS300 User manual
-
-