Maytag Range AES5730BAB User manual

Category
Cookers
Type
User manual

This manual is also suitable for

Important Safety
Instructions ............................... 1-3
Surface Cooking ...................... 4-7
Surface Controls
Smoothtop Surface
Oven Cooking ......................... 8-18
Baking
Cook & Hold
Delay Cook & Hold
Keep Warm
Broiling
Sabbath Mode
Oven Racks
Table of Contents
®
Care & Cleaning ...................19-22
Self-Clean Oven
Cleaning Procedures
Maintenance .........................23-24
Oven Window
Oven Light
Troubleshooting ...................25-26
Warranty & Service.................... 27
Guide d’utilisation et
d’entretien ................................... 28
Guía de Uso y Cuidado ............. 56
1
Installer: Please leave this guide with this appliance.
Consumer: Please read and keep this guide for future
reference. Keep sales receipt and/or canceled check as
proof of purchase.
Model Number __________________________________
Serial Number __________________________________
Date of Purchase ________________________________
If you have questions, call:
Maytag Customer Assistance
1-800-688-9900 USA
1-800-688-2002 Canada
1-800-688-2080 ( U.S. TTY for hearing or speech impaired)
(Mon.-Fri., 8 am-8 pm Eastern Time)
Internet: http://www.maytag.com
In our continuing effort to improve the quality and perfor-
mance of our cooking products, it may be necessary to
make changes to the appliance without revising this guide.
For service information, see page 27.
Warning and Important Safety Instructions appearing in
this guide are not meant to cover all possible conditions
and situations that may occur. Common sense, caution,
and care must be exercised when installing, maintaining,
or operating the appliance.
Always contact the manufacturer about problems or
conditions you do not understand.
Recognize Safety Symbols, Words, Labels
WARNING – Hazards or unsafe practices which
COULD result in severe personal injury or death.
CAUTION – Hazards or unsafe practices which
COULD result in minor personal injury.
WARNING
CAUTION
• ALL RANGES CAN TIP AND
CAUSE INJURIES TO PERSONS
INSTALL ANTI-TIP DEVICE
PACKED WITH RANGE
FOLLOW ALL INSTALLATION
INSTRUCTIONS
WARNING: To reduce risk of
tipping of the appliance from
abnormal usage or by excessive
loading of the oven door, the appliance must
be secured by a properly installed anti-tip
device.
Read and follow all instructions before using this
appliance to prevent the potential risk of fire, electric
shock, personal injury or damage to the appliance as a
result of improper usage of the appliance. Use appliance
only for its intended purpose as described in this guide.
To ensure proper and safe operation: Appliance must
be properly installed and grounded by a qualified techni-
cian. Do not attempt to adjust, repair, service, or replace
To check if device is properly installed, look underneath
range with a flashlight to make sure one of the rear
leveling legs is properly engaged in the bracket slot. The
anti-tip device secures the rear leveling leg to the floor
when properly engaged. You should check this anytime
the range has been moved.
WARNING
Important Safety
Instructions
To Prevent Fire or Smoke
Damage
Be sure all packing materials are removed from the
appliance before operating it.
Keep area around appliance clear and free from
combustible materials. Flammable materials should not
be stored in an oven.
Many plastics are vulnerable to heat. Keep plastics away
from parts of the appliance that may become warm or
hot.
To prevent grease fires, do not let cooking grease or other
flammable materials accumulate in or near the appliance.
any part of your appliance unless it is specifically recom-
mended in this guide. All other servicing should be
referred to a qualified servicer.
Always disconnect power to appliance before servicing.
In Case of Fire
Use dry chemical or foam-type extinguisher or baking
soda to smother fire or flame. Never use water on a
grease fire.
1. Turn off appliance to avoid spreading the flame.
2. NEVER pick up or move a flaming pan.
3. Smother fire or flame by closing the oven door.
Turn off appliance and ventilating hood to avoid
spreading the flame. Extinguish flame then turn on
hood to remove smoke and odor.
2
Important Safety Instructions
NEVER leave children alone or unsupervised near the
appliance when it is in use or is still hot. Children should
never be allowed to sit or stand on any part of the
appliance as they could be injured or burned.
Children must be taught that the appliance and utensils in
it can be hot. Let hot utensils cool in a safe place, out of
reach of small children. Children should be taught that an
appliance is not a toy. Children should not be allowed to
play with controls or other parts of the appliance.
About Your Appliance
NEVER use aluminum foil to cover an oven rack or oven
bottom. Misuse could result in risk of electric shock, fire,
or damage to the appliance. Use foil only as directed in
this guide.
Cooking Safety
Never heat an unopened food container in the oven.
Pressure build-up may cause container to burst resulting
in serious personal injury or damage to the appliance.
Use dry, sturdy potholders. Damp potholders may cause
burns from steam. Dish towels or other substitutes should
never be used as potholders because they can trail across
hot elements and ignite or get caught on appliance parts.
Wear proper apparel. Loose fitting or long hanging-
sleeved apparel should not be worn while cooking.
Clothing may ignite and cause burns if garment comes in
contact with heating elements.
Always place oven racks in the desired positions while
oven is cool. Slide oven rack out to add or remove food,
using dry, sturdy potholders. Always avoid reaching into
the oven to add or remove food. If a rack must be moved
while hot, use a dry potholder. Do not let potholder contact
hot element in oven.
Use racks only in the oven in which they were shipped/
purchased.
Use care when opening the oven door. Let hot air or steam
escape before removing or replacing food.
PREPARED FOOD WARNING: Follow food
manufacturer’s instructions. If a plastic frozen food
container and/or its cover distorts, warps, or is otherwise
damaged during cooking, immediately discard the food
and its container. The food could be contaminated.
Do not allow aluminum foil or meat probe to contact
heating element.
Always turn off all controls when cooking is completed.
CAUTION
NEVER use an appliance as a step to reach cabinets
above. Misuse of appliance door, such as stepping,
leaning or sitting on the door, may result in possible
tipping of the appliance, breakage of door, and serious
injuries.
To prevent potential hazard to the user and damage to the
appliance, do not use appliance as a space heater to heat
or warm a room. Also, do not use the oven as a storage
area for food or cooking utensils.
Do not obstruct the flow of air by blocking the oven vent.
DO NOT TOUCH HEATING ELEMENTS OR INTERIOR
SURFACES OF OVEN. Heating elements may be hot even
though they are dark in color. Interior surfaces of any
oven become hot enough to cause burns. During and
after use, do not touch, or let clothing or other flammable
materials contact heating elements or interior surfaces of
oven until they have had sufficient time to cool. Other
surfaces of the appliance may become hot enough to
cause burns – among these surfaces are: oven vent
opening and surface near this opening, oven door,
window of oven door.
Do not touch a hot oven light bulb with a damp cloth as
the bulb could break. Should the bulb break, disconnect
power to the appliance before removing bulb to avoid
electrical shock.
CAUTION
NEVER store items of interest to children in cabinets
above an appliance. Children climbing on the appliance
or on the appliance door to reach items could be
seriously injured.
Child Safety
Utensil Safety
Follow the manufacturer’s directions when using oven
cooking bags.
This appliance has been tested for safe performance
using conventional cookware. Do not use any devices or
accessories that are not specifically recommended in this
guide. Do not use add-on oven convection systems. The
use of devices or accessories that are not expressly
recommended in this guide can create serious safety
3
Important Safety Instructions
Clean with caution. Use care to avoid steam burns if a wet
sponge or cloth is used to wipe spills on a hot surface.
Some cleaners can produce noxious fumes if applied to a
hot surface.
Clean only parts listed in this guide.
Self-Clean Oven
CAUTION
Do not leave racks, broiling pan, food or cooking
utensils, etc. in the oven during the self-clean cycle.
Do not clean door gasket. The door gasket is essential for
a good seal. Care should be taken not to rub, damage, or
move the gasket.
Do not use oven cleaners or oven liners of any kind in or
around any part of the self-clean oven.
Before self-cleaning the oven, remove broiler pan, oven
racks and other utensils, and wipe off excessive spillovers
to prevent excessive smoke or flare ups.
Important Safety Notice and
Warning
The California Safe Drinking Water and Toxic Enforcement
Act of 1986 (Proposition 65) requires the Governor of
California to publish a list of substances known to the
State of California to cause cancer or reproductive harm,
and requires businesses to warn customers of potential
exposures to such substances.
Users of this appliance are hereby warned that when the
oven is engaged in the self-clean cycle, there may be
some low-level exposure to some of the listed substances,
including carbon monoxide. Exposure to these substances
can be minimized by properly venting the oven to the
outdoors by opening the windows and/or door in the room
where the appliance is located during the self-clean cycle.
IMPORTANT NOTICE REGARDING PET BIRDS: Never
keep pet birds in the kitchen or in rooms where the fumes
from the kitchen could reach. Birds have a very sensitive
respiratory system. Fumes released during an oven
self-cleaning cycle may be harmful or fatal to birds. Fumes
released due to overheated cooking oil, fat, margarine and
overheated non-stick cookware may be equally harmful.
hazards, result in performance problems, and reduce the
life of the components of the appliance.
If pan is smaller than element, a portion of the element
will be exposed to direct contact and could ignite clothing
or potholder.
Only certain types of glass, glass/ceramic, ceramic,
earthenware, or other glazed utensils are suitable for
cooktop or oven service without breaking due to the
sudden change in temperature. Follow utensil
manufacturer’s instructions when using glass.
Turn pan handle toward center of cooktop, not out into
the room or over another surface element. This reduces
the risk of burns, ignition of flammable materials, or
spillage if pan is accidently bumped or reached by small
children.
Cooktop
NEVER leave surface units unattended especially when
using high heat. An unattended boilover could cause
smoking and a greasy spillover can cause a fire.
This appliance is equipped with different size surface
elements. Select pans with flat bottoms large enough to
cover element. Fitting pan size to element will improve
cooking efficiency.
GLASS-CERAMIC SURFACE: NEVER cook on broken
cooktop. If cooktop should break, cleaning solutions and
spillovers may penetrate the broken cooktop and create a
risk of electric shock. Contact a qualified technician
immediately.
Deep Fat Fryers
Use extreme caution when moving the grease pan or
disposing of hot grease. Allow grease to cool before
attempting to move pan.
Ventilating Hoods
Clean range hood and filters frequently to prevent grease
or other flammable materials from accumulating on hood
or filter and to avoid grease fires.
When flaming foods under the hood, turn the fan on.
Cleaning Safety
Clean cooktop with caution. Turn off all controls and wait
for appliance parts to cool before touching or cleaning.
Save These Instructions for Future Reference
4
Surface Cooking
Surface Controls
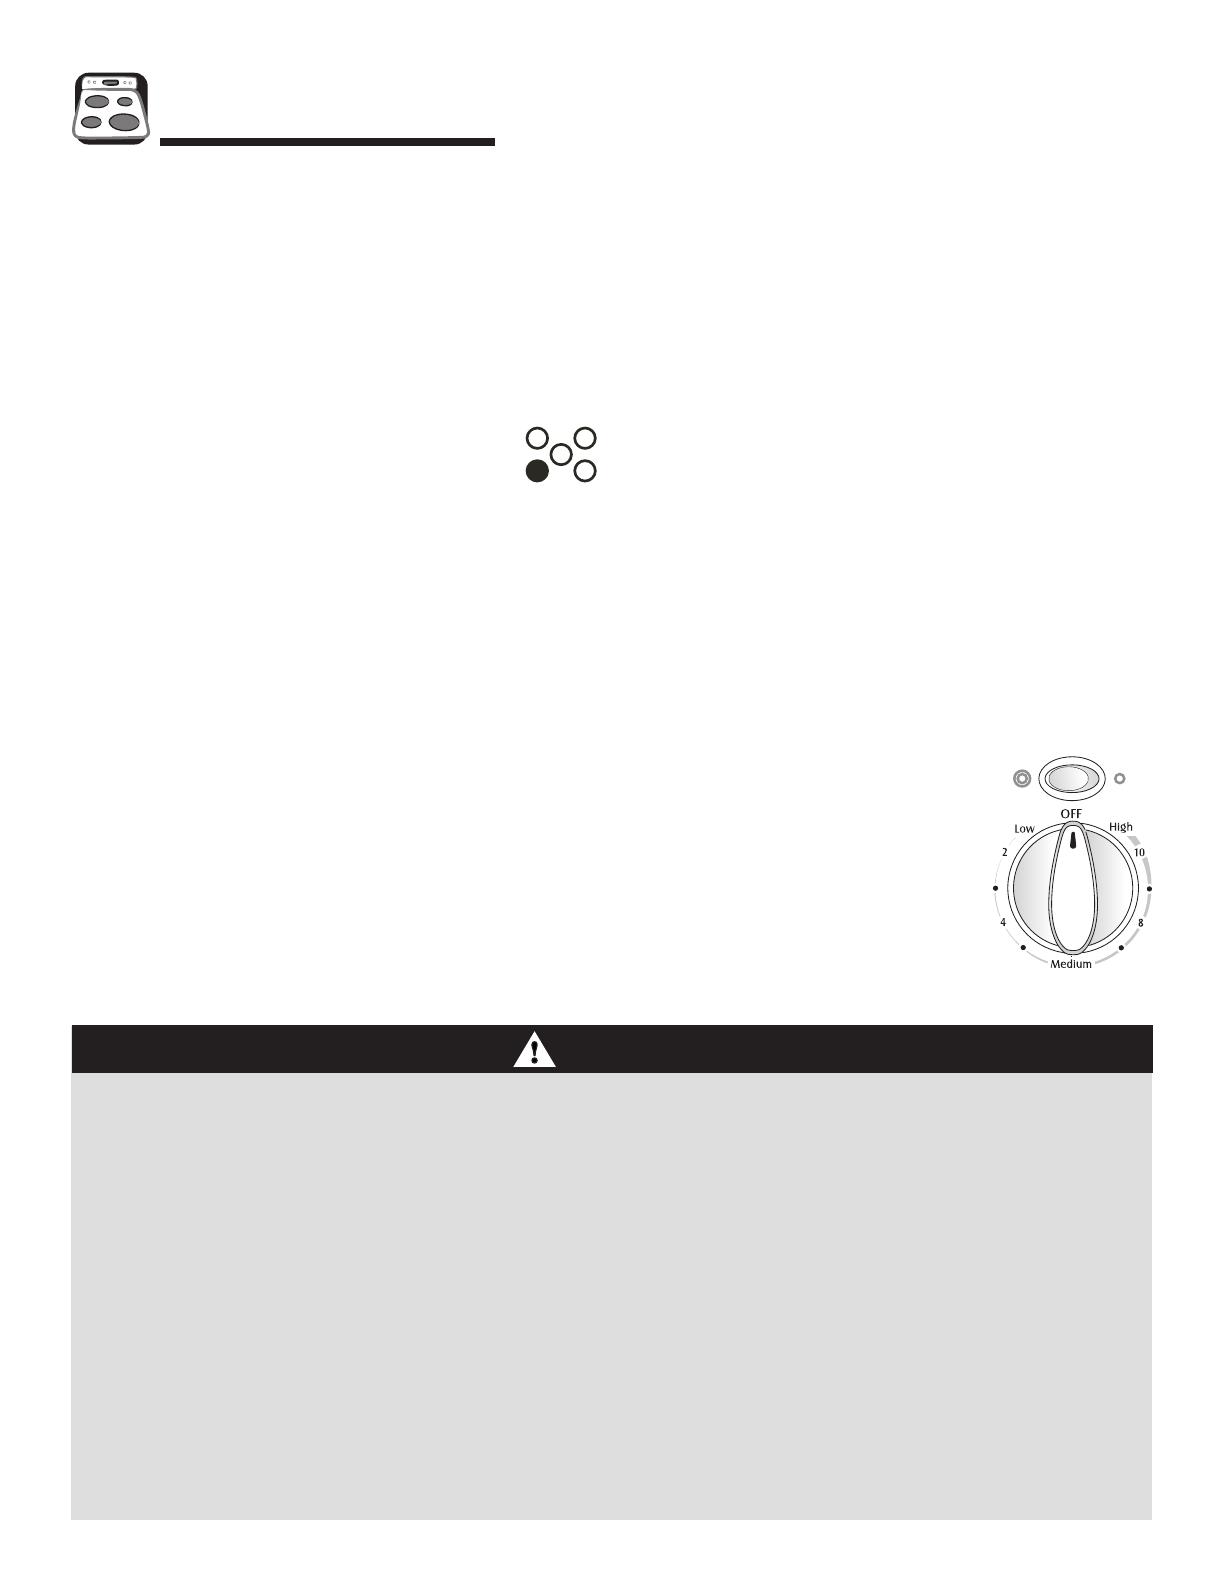
Use to turn on the surface elements. An infinite choice of
heat settings is available from Low to High. The knobs can
be set on or between any of the settings.
Setting the Controls
1. Place pan on surface element.
2. Push in and turn the knob in either direction to
the desired heat setting.
The control panel is marked to identify
which element the knob controls. For
example, the graphic at right indicates left front element.
3. There is an element indicator light on the control panel.
When any surface control knob is turned on, the light will
turn on. The light will turn off when all the surface ele-
ments are turned off.
When a control is turned on, a glow can be seen through
the smoothtop surface. The element will cycle on and off
to maintain the preset heat setting, even on High.
4. After cooking, turn knob to OFF. Remove pan.
Suggested Heat Settings
The size and type of cookware, type and amount of food
being heated, and wattage of individual elements will deter-
mine where to set the knob for cooking operations. Some
elements have a predetermined simmer and melt setting that
will require only minor adjustment up or down depending on
the food being prepared. The other elements have settings
printed around the knobs that are also unique to those
elements. Adjust the heat settings to the numbers that give
the desired cooking results. For information on cookware and
BEFORE COOKING
Always place a pan on the surface unit before you turn it
on. To prevent damage to range, never operate surface
unit without a pan in place.
NEVER use the cooktop as a storage area for food or
cookware.
DURING COOKING
Be sure you know which knob controls which surface
unit. Make sure you turned on the correct surface unit.
Begin cooking on a higher heat setting then reduce to a
lower setting to complete the operation. Never use a
high heat setting for extended cooking.
NEVER allow a pan to boil dry. This could damage the
pan and the appliance.
NEVER touch cooktop until it has cooled. Expect some
parts of the cooktop, especially around the surface units,
to become warm or hot during cooking. Use potholders
to protect hands.
CAUTION
AFTER COOKING
Make sure surface unit is turned off.
Clean up messy spills as soon as possible.
OTHER TIPS
If cabinet storage is provided directly above cooking
surface, limit it to items that are infrequently used and can
be safely stored in an area subjected to heat. Tempera-
tures may be unsafe for items such as volatile liquids,
cleaners or aerosol sprays.
NEVER leave any items, especially plastic items, on the
cooktop. The hot air from the vent may ignite flammable
items, melt or soften plastics, or increase pressure in
closed containers causing them to burst.
NEVER allow aluminum foil, meat probes or any other
metal object, other than a pan on a surface element, to
contact heating elements.
NEVER store heavy items above the cooktop that could fall
and damage it.
other factors affecting heat settings, refer to Cookware
Recommendations on page 7 or the “Cooking Made Simple”
booklet. The following descriptions will aid in choosing the
settings that will give optimum results.
Hold or Warm: Food maintains a temperature above 140°F
without continuing to cook. Food is initially hot and then heat
is reduced. Never use a hold or warm setting to reheat cold
food.
Simmer: Food forms bubbles that barely break the
surface. Foods are between 185°F and 200°F. A simmer
setting can also be used to steam or poach foods or continue
cooking covered foods.
Slow Boil: Food forms bubbles at a moderate pace. A slow
boil setting can also be used for most frying and for maintain-
ing the cooking of large amounts of liquids.
Boil: Liquid forms bubbles at a rapid pace. A fast boil setting
can also be used to brown meat, stir fry, sauté, and heat oil
for frying before turning to a lower setting. The highest 3 or 4
settings on the knob are used for these cooking
operations. The highest setting is always used to bring water
to a boil. Some elements offer an even higher speed for
boiling liquids.
Dual Element
The cooking surface has one dual
element located in the right front of the
smoothtop. This allows you to change
the size of the element.
Press the switch to the left to use the
large element or to the right to use the
small element. The selection should be
made before turning on the element.
Front
5
Smoothtop Surface Notes:
Cooktop may emit light smoke and odor the first few
times the cooktop is used. This is normal.
Smoothtop cooktops retain heat for a period of time
after the element is turned off. Turn the elements off
a few minutes before food is completely cooked and use
the retained heat to complete cooking. When the hot
surface light turns off, the cooking area will be cool
enough to touch. Because of the way they retain heat, the
smoothtop elements will not respond to changes in
settings as quickly as coil elements.
In the event of a potential boilover, remove the pan from
the cooking surface.
Never attempt to lift the cooktop.
The smoothtop surface may appear discolored when it is
hot. This is normal and will disappear when the surface
cools.
Smoothtop Surface
Cooking Areas
The cooking areas on your range are identified by permanent
circles on the smoothtop surface. For most efficient cooking,
fit the pan size to the element size.
Surface Cooking
Warming Center
Use the Warming Center to keep hot cooked foods warm, such
as vegetables, gravies and oven-safe dinner plates.
Setting the Control:
1. Push in and turn the knob. Warming
temperatures are approximate and are
indicated on the control as Min, 2-8
and Max. However, the control can
be set to any position between Min
and Max.
2. When done, turn the control to OFF and
remove food. The Hot Surface indicator light
will go off when the Warming Center surface has cooled.
Notes:
Never warm food for longer than one hour (eggs for 30
minutes), as food quality may deteriorate.
Do not heat cold food on the Warming Center.
Heat settings will vary depending on type and amount
of food. Always hold food at proper food temperatures.
USDA recommends food temperatures between
140°-170° F.
WARMING CENTER
DUAL
ELEMENT
FLEX-CHOICE
TM
ELEMENT
FLEX-CHOICE
TM
ELEMENT
TRIPLE
ELEMENT
Triple Zone Element with Power
Boost
TM
Option
The cooking surface has one triple element with Power Boost
TM
option located in the right front position. This element can be
used for larger cooking utensils when the triple element is
used, or for smaller pans when the single or dual settings are
chosen.
To operate the
single element
only, use the left
side of the
control knob and
select any setting
from Low to High.
To operate the dual or
triple elements, press the switch above the knob to the left for
the triple element or to the right for the double element. Then,
use the right side of the control knob to select any heat setting
from Low to High.
Power Boost
TM
Option
when the dual or triple elements are used, the Power Boost
TM
option can be selected. This setting offers higher speed
cooking that can be used to quickly bring water to a boil and
for large-quantity cooking.
Pans should not extend more than
1
/
2
to 1-inch beyond
the cooking area.
When a control is turned on, a glow can be seen through the
smoothtop surface. The element will cycle on and off to
maintain the preset heat setting, even on Hi.
For more information on cookware, refer to Cookware Recom-
mendations on page 7 and “Cooking Made Simple” booklet
included with your range.
Hot Surface Light
The Hot Surface indicator light is located on the control panel.
The light will be illuminated when any cooking area is hot. It
will remain on, even after the control is turned off, until the
area has cooled.
6
Tips to Protect the
Smoothtop Surface
Cleaning (see page 21 for more information)
Before first use, clean the cooktop.
Clean your cooktop daily or after each use. This will keep
your cooktop looking good and can prevent damage.
If a spillover occurs while cooking, immediately clean the
spill from the cooking area while it is hot to prevent a tough
cleaning chore later. Using extreme care, wipe spill with a
clean dry towel.
Do not allow spills to remain on the cooking area or the
cooktop trim for a long period of time.
Never use abrasive cleansing powders or scouring pads
which will scratch the cooktop.
Never use chlorine bleach, ammonia or other cleansers not
specifically recommended for use on glass-ceramic.
To Prevent Marks & Scratches
Do not use glass pans. They may scratch the surface.
Never place a trivet or wok ring between the surface and
pan. These items can mark or etch the top.
Do not slide aluminum pans across a hot surface. The pans
may leave marks which need to be removed promptly. (See
Cleaning, page 21.)
Make sure the surface and the pan bottom are clean before
turning on to prevent scratches.
To prevent scratching or damage to the glass-ceramic top,
do not leave sugar, salt or fats on the cooking area. Wipe
the cooktop surface with a clean cloth or paper towel
before using.
Never slide heavy metal pans across the surface since
these may scratch.
To Prevent Stains
Never use a soiled dish cloth or sponge to clean the
cooktop surface. A film will remain which may cause stains
on the cooking surface after the area is heated.
Continuously cooking on a soiled surface may/will result in
a permanent stain.
Surface Cooking
Flex-Choice
TM
Elements (select models)
The Flex-Choice
TM
elemenst are fully
functioning elements that provide an
ultra low Melt heat setting for melting
chocolate and butter. They are located
in the left rear and right positions.
The Melt setting is located between
2 and OFF. Heat settings outside of this
area function as a normal element, with 2
(Low) to High settings.
Note: When using the normal settings for preparing foods,
it may take a few minutes for the cooking area to cool to
the Warm heat setting.
Warming Center Notes:
Use only cookware and dishes recommended as safe for
oven and cooktop use.
Always use oven mitts when removing food from the
Warming Center as cookware and plates will be hot.
All foods should be covered with a lid or aluminum foil to
maintain food quality.
When warming pastries and breads the cover should have
an opening to allow moisture to escape.
Do not use plastic wrap to cover foods. Plastic may melt
on to the surface and be very difficult to clean.
Suggested Settings
Setting Type of food
Min - 2 Breads/Pastries Gravies
Casseroles Eggs
2 - 5 Dinner Plate with Food Sauces
Soups (Cream) Stews
Vegetables Meats
5 - Max Fried Foods Hot Beverages
Soups (Liquid)
7
Canning and Oversize
Cookware
All canners and large pots must have flat bottoms and
must be made from heavy-gauge materials. This is critical
on smoothtop surfaces. The base must not be more than
1 inch larger than the element.
When canners and pots do not meet these standards, cooking
times may be longer, and cooktops may be damaged.
Some canners are designed with smaller bases for use on
smoothtop surfaces.
When canning, use the High heat setting only until the
water comes to a boil or pressure is reached in the canner.
Reduce to the lowest heat setting that maintains the boil or
pressure. If the heat is not turned down, the cooktop may be
damaged.
See “Cooking Made Simple” booklet for more information.
Surface Cooking
Cookware Recommendations
Using the right cookware can prevent many problems, such
as food taking longer to cook or achieving inconsistent
results. Proper pans will reduce cooking times, use less
energy, and cook food more evenly.
Flat Pan Tests
See if your pans are flat.
The Ruler Test:
1. Place a ruler across the bottom of the pan.
2. Hold it up to the light.
3. Little or no light should be visible under the ruler.
The Bubble Test:
1. Put 1 inch of water in the pan. Place on cooktop and turn
control to High.
2. Watch the formation of the bubbles as the water heats.
Uniform bubbles mean good performance, and uneven
bubbles indicate hot spots and uneven cooking.
See “Cooking Made Simple” booklet for more information.
To Prevent Other Damage
Do not allow plastic, sugar or foods with high sugar content
to melt onto the hot cooktop. Should this happen, clean
immediately. (See Cleaning, page 21.)
Never let a pan boil dry as this will damage the surface and
pan.
Never use cooktop as a work surface or cutting board.
Never cook food directly on the surface.
Do not use a small pan on a large element. Not only does
this waste energy, but it can also result in spillovers burning
onto the cooking area which requires extra cleaning.
Do not use non-flat specialty items that are oversized or
uneven such as round bottom woks, rippled bottom and/or
oversized canners and griddles.
Do not use foil or foil-type containers. Foil may melt onto
the glass. If metal melts on the cooktop, do not use. Call an
authorized Maytag Servicer.
Select Avoid
Flat, smooth-bottom Pans with grooved or warped bottoms.
pans. Pans with uneven bottoms do not cook
efficiently and sometimes may not
boil liquid.
Heavy-gauge pans. Very thin-gauge metal or glass pans.
Pans that are the Pans smaller or larger than the
same size as the element by 1 inch.
element.
Secure handles. Cookware with loose or broken handles.
Heavy handles that tilt the pan.
Tight-fitting lids. Loose-fitting lids.
Flat bottom woks. Woks with a ring-stand bottom.
8
9
Oven Cooking
To recall the time of day when another time function is
showing, press the Clock pad.
Clock time cannot be changed when the oven has been
programmed for Delay Cook or Delay Clean or Cook & Hold.
To cancel the Clock display:
If you do not want the time of day to display:
Press and hold the CANCEL and Clock
pads for three seconds. The time of day
will disappear from the display.
When the clock display is canceled, press
the Clock pad to briefly display the time of
day.
When the clock display is canceled, after 15 minutes, the oven
control will go into Standby Mode to save energy. The display will
be blank and the oven light will not operate. To “wake up” the
control from Standby Mode, press any touchpad. A double beep
will sound.
To restore the Clock display:
Press and hold the CANCEL and Clock pads for three
seconds. The time of day will reappear in the display.
Timer
The timer can be set from one minute (0:01) up to 99 hours
and 59 minutes (99:59).
The timer can be used independently of any other oven
activity. It can also be set while another oven function is
operating.
The timer does not control the oven. It only controls a beeper.
To set the Timer:
1. Press the Timer pad.
0:00 and TIMER flash in the display.
2. Press the appropriate number pads until the correct time
appears in the display.
The colon and TIMER will continue to flash.
3. Press Timer pad again or wait four seconds.
The colon stops flashing and the time begins counting
down.
The last minute of the timer countdown will be displayed
in seconds.
4. At the end of the set time, one long beep will sound and
“End” will be displayed.
5. Press the Timer pad to clear the display.
To cancel the Timer:
1. Press and hold the Timer pad for three
seconds.
OR
2. Press the Timer pad and press ‘0’ using the
number pads.
Locking the Control
and Oven Door
The touchpad and oven door can be locked for safety,
cleaning, or to prevent unwanted use. The touchpads will not
function when locked.
If the oven is currently in use, the touchpads and door cannot
be locked.
The current time of day will remain in the display when the
touchpads and door are locked.
To lock:
Press and hold the CANCEL and Cook &
Hold pads for three seconds. (Press
CANCEL pad first.)
OFF appears in the display.
LOCK flashes while the door
is locking.
To unlock:
Press and hold the CANCEL and Cook & Hold pads for three
seconds. (Press CANCEL pad first.) OFF disappears from the
display.
Note: The touchpads and oven door cannot be locked if
the oven temperature is 400° F or above.
Fault Codes
BAKE or LOCK may flash rapidly in the display to alert you if
there is an error or a problem. If BAKE or LOCK flash in the
display, press CANCEL pad. If BAKE or LOCK continue to
flash, disconnect power to the appliance. Wait a few minutes,
and then reconnect power. If the flashing still continues,
disconnect power to the appliance and call an authorized
servicer.
10
Oven Cooking
Baking Notes:
To change the oven temperature during cooking, press
Bake pad, then press the Autoset 0 pad or appropriate
number pads until the desired temperature is displayed.
To change the oven temperature during preheat, press
the Bake pad twice, then press the Autoset 0 pad or
appropriate number pads until the desired temperature is
displayed.
If you forget to turn off the oven, it will automatically turn
off at the end of 12 hours. If you wish to deactivate this
feature, see page 15.
For additional baking and roasting tips, see “Cooking Made
Simple” booklet.
Baking
To set Bake:
1. Press the Bake pad.
BAKE will flash.
000 will flash in the display.
2. Select the oven temperature. Press the
Autoset 0 pad for 350° F or the appropriate
number pads.
Each additional press of the Autoset 0 pad will increase
the temperature by 25°.
The oven temperature can be set from 170° to 550°.
3. Press Bake pad again or wait four seconds.
BAKE will stop flashing and light in the display.
Baking Differences Between Your Old
and New Oven
It is normal to notice some baking time differences between a
new oven and an old one. See “Adjusting the Oven Temperature”
on page 16.
Baking with Convection
When using convection, enter your normal baking
temperature. The control will automatically reduce the set
oven temperature by 25°. The entered temperature will be
displayed.
To set Convect Bake:
1. Press the Convect Bake pad.
BAKE and the fan icon will flash.
000 will flash in the display.
2. Select the oven temperature. Press the
Autoset 0 pad for 350° F or the appropriate
number pads.
Each additional press of the Autoset 0 pad will increase
the temperature by 25 degrees. The oven temperature
can be set from 170° to 550°.
100° or the actual oven temperature if over 100° F will
display. It will rise in 5° increments until the preset
temperature is reached.
4. Allow the oven to preheat for 8-15 minutes.
When the set oven temperature is reached, one long
beep will sound.
The set temperature will display.
To recall set temperature during preheat, press Bake
pad.
5. Place food in the oven.
6. Check cooking progress at the minimum cooking time.
Cook longer if needed.
7. When cooking is finished, press CANCEL pad.
8. Remove food from the oven.
cont.
11
Oven Cooking
3. Press Convect Bake pad again or wait four seconds.
BAKE will stop flashing.
100° or the actual oven temperature if over 100° F will
display. It will rise in 5° increments until the preset
temperature is reached.
The fan icon will start to rotate.
4. Allow the oven to preheat for 8-15 minutes.
When the set oven temperature is reached, one long
beep will sound.
The set temperature will display.
To recall the set temperature during preheat, press the
Convect Bake pad.
5. Place food in the oven.
6. Check cooking progress at the minimum cooking time.
Cook longer if needed.
7. When cooking is finished, press CANCEL pad.
8. Remove food from the oven.
Roasting With Convection
When convection roasting, enter your maximum
conventional roasting time and temperature. The control
will automatically prompt you to check the food for doneness
at 75% of the set time.
2. Enter the roasting time using the number pads.
Time can be set from 10 minutes (00:10) to 11 hours,
59 minutes (11:59).
Press Convect Roast pad again or wait 4 seconds.
ROAST and the fan icon will flash in the display.
000 will flash in the display.
3. Select the oven temperature. Press the
Autoset 0 pad for 325° F or the
appropriate number pads.
Each additional press of the Autoset 0 pad will increase
the temperature by 25°.
The oven temperature can be set from 170° to 550°.
4. Press Convect Roast pad again or wait four seconds.
ROAST will stop flashing and light in the display.
100° or the actual oven temperature will display. It will
rise in 5° increments until the preset temperature is
reached.
The fan icon will start to rotate.
Roasting Notes:
When convection roasting, the cooking time must be set
before setting the temperature.
If your recipe requires a preheated oven, add 15 minutes
to the cooking time programmed.
Roasting times can vary with different cuts of meat.
It is not necessary to preheat when convect roasting
large cuts of meat.
Refer to “Cooking Made Simple” booklet for suggested
roasting temperatures and times.
To set Convect Roast:
1. Press the Convect Roast pad.
ROAST and the fan icon will flash
00:00 will flash in the display.
000 lights in the display.
Notes:
If a preheat is required, allow the oven to preheat for 8-15
minutes.
When the set oven temperature is reached, one long beep
will sound.
5. Place food in the oven.
Time will start counting down once oven starts heating
up.
To recall the set temperature during preheat, press the
Convect Roast pad.
6. When 75% of the set cooking time has elapsed, the oven
light will turn on and FOOD will flash in the display. Check
the cooking progress at this time. Cook longer if needed.
The oven light will remain on until the Oven Light pad is
pressed.
Press any pad to recall the cook time remaining.
7. When cooking is finished, press CANCEL pad.
8. Remove food from the oven.
12
Oven Cooking
Cook & Hold
When using the Cook & Hold option, the oven begins to heat
immediately after the control has been set. Then, the oven
cooks for a specified length of time. When that time has
elapsed, the oven will keep the food warm for up to an hour
then automatically turn off.
To set Cook & Hold:
1. Press the Cook & Hold pad.
HOLD will flash to indicate that you are in
Cook & Hold programming.
00:00 will flash in the display.
2. Select the amount of time you want to cook by using the
number pads.
HOLD continues to flash.
The time will light in the display.
Time can be set from ten minutes (00:10)
to 11 hours, 59 minutes (11:59).
3. While HOLD is still flashing, press Bake,
Convect Bake or Convect Roast and select
the oven temperature. Press the Autoset 0
pad for 350° F or the appropriate number pads.
The desired function word will flash.
The oven temperature can be set from
170° F to 550° F.
4. Press the desired function pad again OR wait four seconds.
The desired function word will remain lit.
The cooking time will show in the display.
The actual oven temperature will be displayed
during preheat.
The set temperature will display when the oven is
preheated.
When the cooking time has elapsed:
Four beeps will sound.
HOLD and WARM will light.
170° will display.
Time of day will display.
After one hour in HOLD WARM:
The oven turns off automatically.
HOLD and WARM go off.
Remove food from oven.
To cancel Cook & Hold at any time:
Press the CANCEL pad. Remove food from oven.
13
Oven Cooking
Do not use delayed baking for highly perishable foods such
as dairy products, pork, poultry, or seafood.
CAUTION
Notes:
Do not use Delayed Cook & Hold for items that require a
preheated oven, such as cakes, cookies, and breads.
Do not use Delayed Cook & Hold if oven is already hot.
Keep Warm
For safely keeping hot foods warm in the oven or for warming
breads and plates.
To set Keep Warm:
1. Press the Keep Warm pad.
WARM flashes.
000 flashes in the display.
2. Select the Keep Warm temperature by pressing the
Autoset 0 pad or the appropriate number pads.
170° will light when the Autoset 0 pad is pressed.
Each press of the Autoset 0 pad will increase the
temperature by 5°.
The Keep Warm temperature can be set from 145° to 190°.
WARM and the temperature will be displayed while the
function is active.
Keep Warm Notes:
For optimal food quality, oven cooked foods should be
kept warm for no longer than 1 to 2 hours.
To keep foods from drying, cover loosely with foil or a lid.
To warm dinner rolls:
- cover rolls loosely with foil and place in oven.
- press Keep Warm and Autoset 0 pads.
- warm for 15-20 minutes.
To warm plates:
- place 2 stacks of up to four plates each in the oven.
- press Keep Warm and Autoset 0 pads.
- warm for five minutes, turn off the oven and leave
plates in the oven for 15 minutes more.
- use only oven-safe plates, check with the
manufacturer.
- do not set warm dishes on a cold surface as rapid
temperature changes could cause crazing or
breakage.
To cancel Keep Warm:
1. Press the CANCEL pad.
2. Remove food from the oven.
Delay Cook & Hold
When using Delay, the oven begins to cook later in the day.
Set the amount of time that you want to delay before the oven
turns on and how long you want to cook. The oven begins to
heat at the selected time and cooks for the specified length of
time.
Delay time can be set from 10 minutes (00:10) to 11 hours, 59
minutes (11:59).
To set a Delayed Cook & Hold cycle:
1. Press the Delay 1 pad.
DELAY flashes in the display.
00:00 flashes in the display.
2. Using the appropriate number pads, enter the amount of
time you want to delay the start of the Cook & Hold cycle.
3. Press the Cook & Hold pad.
HOLD and DELAY flash in the display.
00:00 flashes in the display.
4. Enter the amount of time you want to cook using the
number pads.
5. Press Bake, Convect Bake or Convect Roast.
6. Set the oven temperature desired by
pressing the Autoset 0 pad or the
appropriate number pads.
350° will light when Autoset 0 pad is
pressed.
After four seconds, the entered delay time
will appear in the display.
HOLD turns off.
BAKE and DELAY remain lit to remind you that a delayed
Cook & Hold cycle has been programmed.
14
Oven Cooking
Broiling
RACK APPROX. TIME APPROX. TIME
FOODS POSITION FIRST SIDE SECOND SIDE
Beef
Steak, 1” thick, Medium 6 8 minutes 7 - 12 minutes
Well 6 10 minutes 8 - 14 minutes
Hamburgers, 3/4” thick, Well 6 or 7 9 minutes 6 - 9 minutes
Pork
Bacon 6 6 - 10 minutes (no turning)
Chops, 1” 6 10 - 11 minutes 12 - 14 minutes
Ham Slice 6 5 minutes 3 - 7 minutes
Poultry LO Broil LO Broil
Breast Halves 4 15 minutes 15 - 25 minutes
Seafood
Fish Steaks, buttered, 1” thick 6 10 - 15 minutes (no turning)
Lobster Tails, 3-4 oz. each 5 7 - 10 minutes (no turning)
Broiling Chart
Note: This chart is a suggested guide. The times may vary with the food being cooked.
Broil Notes:
For best results when broiling, use a pan designed for
broiling.
Expect broil times to increase and browning to be
slightly lighter if appliance is installed on a 208-volt
circuit.
HI is used for most broiling. Use LO broil when broiling
longer cooking foods. The lower temperature allows
food to cook to the well done stage without excessive
browning.
To change oven temperature during broiling, press
the Broil pad and then the Autoset 0 pad to switch
between LO and HI broil.
Broil times may be longer when the lower broiling
temperature is selected.
Most foods should be turned halfway through broiling
time.
For additional broiling tips and temperatures, refer to the
“Cooking Made Simple” booklet.
4. For optimum browning, preheat broil element for 3-4
minutes before adding food.
5. Place food in the oven. Leave oven door open about four
inches (the first stop).
6. Turn meat once about halfway through cooking.
7. When food is cooked, press the CANCEL pad.
Remove food and broiler pan from the oven.
The time of day will reappear in the display.
15
Oven Cooking
Sabbath Mode Notes:
Sabbath Mode can be turned on at any time with or
without the oven on.
Sabbath Mode cannot be turned on if the touchpads are
locked out or when the door is locked.
Most prompts and messages and all beeps are
deactivated when Sabbath Mode is active.
If the oven is baking when Sabbath Mode is set, BAKE
will go out when bake is canceled. There will be no
audible beeps.
The oven light will not automatically come on when the
oven door is opened while the oven is in Sabbath Mode.
If the oven light is desired while in Sabbath Mode, it
must be turned on before the Sabbath Mode is started.
When the Sabbath Mode is started, the temperature
display will immediately show the set temperature, rather
than the actual oven cavity temperature. No preheat
beep will sound.
The self-clean cycle and automatic door lock do not
operate during the Sabbath Mode.
Pressing CANCEL pad will cancel a Bake cycle, however
the control will stay in the Sabbath Mode.
If power fails, the oven will power up in Sabbath Mode
with 72 hours remaining and no cycle active.
Automatic Shut-Off/
Sabbath Mode
The oven will automatically turn off after 12 hours if you
accidentally leave it on. This safety feature can be turned off.
To cancel the 12-hour shut-off and run the
oven continuously for 72 hours:
1. Press and hold the Clock pad for five
seconds.
SAb will be displayed and flash for five seconds.
SAb will then be displayed continuously until turned
off or until the 72-hour time limit is reached.
BAKE will also be displayed if a bake cycle is in use
while the oven is in Sabbath Mode.
BAKE is the only function that operates during the
Sabbath Mode. All other functions (Timer, Keep Warm,
Clean, etc.) are locked out during the Sabbath Mode.
A Cook & Hold can be programmed during the Sabbath
Mode, however a Delay Cook & Hold is not allowed.
To cancel the Sabbath Mode:
1. Press the Clock pad for five seconds.
SAb will flash for five seconds.
The time of day will return to the display.
OR
2. After 72 hours, the Sabbath Mode will end.
SAb will flash for five seconds.
The time of day will return to the display.
Changing Temp °F/°C
1. The factory default setting for temperature is Fahrenheit.
2. To change the setting, press and hold the CANCEL and Bake
pads at the same time for three seconds.
3. A single beep will sound and the current setting will be
displayed (°F or °C). (If no change is made, the range will
return to the existing setting after 30 seconds.)
4. To change the setting, press the Autoset 0 pad. Press again
to return to existing setting. Wait five seconds and the setting
will be complete.
16
Oven Cooking
Favorite
The Favorite pad allows you to save the time and temperature
from Cook & Hold function.
To set a Favorite cycle, a Cook & Hold function must be either
active or just programmed.
To set a new Favorite cycle or to save a cur-
rently running Cook & Hold as a Favorite:
1. Program a Cook & Hold cycle as described in the Cook &
Hold section on page 12.
2. Press and hold the Favorite pad for three
seconds.
The newly set or currently running Cook & Hold cycle
will be saved.
A beep will sound to indicate that the control has
accepted the Favorite setting.
To start a cycle programmed into Favorite:
1. Press the Favorite pad.
Time and temperature for the set Cook & Hold cycle will
be displayed. (If no Cook & Hold cycle has been
programmed, “nonE” is displayed.)
2. Press Bake, Convect Bake or Convect Roast.
The Favorite cycle will begin immediately.
The selected cycle word will light in the display.
The cooking time will light in the display.
When the cooking time has elapsed:
The selected cycle word will turn off.
HOLD and WARM will light.
170° will display.
To cancel a Favorite cycle in progress:
1. Press the CANCEL pad.
The stored Favorite cycle will not
be affected.
2. Remove food from the oven.
Adjusting the Oven Temperature
Oven temperatures are carefully tested for accuracy at the
factory. It is normal to notice some baking or browning
differences between a new oven and an old one. As ovens
get older, the oven temperature can shift.
You may adjust the oven temperature if you think the oven is
not baking or browning correctly. To decide how much to
change the temperature, set the temperature 25° higher or
lower than your recipe recommends, then bake. The results
of the “test” should give you an idea of how much to adjust
the temperature.
To adjust the oven temperature:
1. Press the Bake pad.
2. Enter 550° by pressing the appropriate number pads.
3. Press and hold the Bake pad for several seconds or until
0° appears in the display.
If the oven temperature was previously adjusted, the
change will be displayed. For example, if the oven tem-
perature was reduced by 15° the display will show “-15°”.
4. Press the Autoset 0 pad to adjust the temperature.
Each time the Autoset 0 pad is pressed, the temperature
changes by 5°. The oven temperature can be increased or
decreased by 5° to 35°.
Pressing the Autoset 0 pad will first cycle through
increasing the oven temperature (5, 10, . . . 35). Continuing
to press the Autoset 0 pad will then cycle through
decreasing the oven temperature (-35, -30, . . . -5).
5. The time of day will automatically reappear in the display.
You do not need to readjust the oven temperature if there is a
power failure or interruption. Temperature adjustment applies
to Bake, Convect Bake and Convect Roast only. Broiling and
cleaning temperatures cannot be adjusted.
17
Do not place
plastics near the
vent opening as
heat from the vent
could distort or
melt the plastic.
OVEN VENT
LOCATION
Oven Cooking
Oven Light
The oven light automatically comes on when
the door is opened. When the door is closed,
press the Oven Light pad to turn the oven
light on and off. A beep will sound every time
the Oven Light pad is pressed.
Oven Bottom
Protect oven bottom against spillovers, especially acidic or
sugary spills, as they may discolor the porcelain enamel. Use
the correct pan size to avoid spillovers and boilovers. Do not
place utensils or aluminum foil directly on the oven
bottom.
Oven Fan
A convection fan is used to circulate hot air in the oven when
the convection feature is selected.
Note: The convection fan will automatically stop when the
oven door is opened.
Oven Vent
When the oven is in use the area near the vent may become
hot enough to cause burns. Never block the vent opening.
The oven vent is located below the backguard vent
shield on your range.
CAUTION
Oven Racks
Do not attempt to change the rack position when the oven
is hot.
Do not use the oven for storing food or cookware.
The oven has three racks. All racks are designed with a lock-
stop edge.
To remove:
1. Pull rack straight out until it
stops at the lock-stop
position.
2. Lift up on the front of the
rack and pull out.
To replace:
1. Place rack on the rack supports in the oven
2. Tilt the front end up slightly. Slide rack back until it clears
the lock-stop position.
3. Lower front and slide back into the oven.
Never cover an entire rack with aluminum foil or place
foil on the oven bottom. Baking results will be affected
and damage may occur to the oven bottom.
Rack Positions
RACK 7 (highest posi-
tion): For toasting bread or
broiling thin, non-fatty
foods.
RACK 6: Used for most
broiling.
RACK 5: For multiple rack
baking.
RACK 4: Used for most baked goods on a cookie sheet or
jelly roll pan, fruit pies, or frozen convenience foods. Also use
for broiling chicken pieces.
RACK 3: For casseroles, baking loaves of bread, bundt cakes
or custard pies.
RACK 2: Used for roasting small cuts of meat, frozen pies,
dessert souffles or angel food cake. Also use for multiple rack
baking.
RACK 1: Used for roasting large cuts of meat and poultry.
18
Oven Cooking
Note: When Convect baking on two or three racks, check
foods at the minimum suggested time to avoid over-
browning or over-cooking.
Baking Layer Cakes on Two Racks
For best results when baking cakes on two racks, use racks 2 and
4 for regular baking and racks 2 and 5 for convection baking.
Place the cakes on the rack as shown.
Oven Bottom: Place oven rack on
raised sides of oven bottom. Use for
additional space when cooking large
oven meals.
MULTIPLE RACK COOKING: Two
rack: Use rack positions 2 and 5 or 3
and 6.
Three rack (convection only): Use rack positions 2, 4 and 6
(see illustration).
Create-A-Space
TM
Half Rack
Select range models are
equipped with a convertible
half rack. The left side of
the rack can be removed
to accommodate a large
roaster on the lower
rack. The right side of
the rack is still
available to hold a
casserole dish.
Notes:
The removable section of the rack can be used as a
roasting rack in a broiling pan. Do not use the top insert
when using the rack in a broiling pan.
The removable section of the rack can be used as a
cooling rack or trivet.
Make sure oven is cool before removing or reinstalling
the half rack.
Do not use cookware that extends beyond edge of rack.
For best results, allow two inches between the pan
placed on the rack and the oven side wall.
Use caution when removing items from the half rack to
avoid burns.
Carefully remove items from the lower rack to avoid
disturbing the half rack.
19
* Brand names for cleaning products are registered trademarks of the respective manufacturers.
Self-Clean Oven
CAUTION
It is normal for parts of the range to become hot during a
self-clean cycle.
To prevent damage to oven door, do not attempt to open
the door when LOCK is displayed.
Avoid touching cooktop, door, window or oven vent area
during a clean cycle.
Do not use commercial oven cleaners on the oven finish
or around any part of the oven. They will damage the
finish or parts.
The self-clean cycle uses above-normal cooking temperatures
to automatically clean the oven interior.
It is normal for flare-ups, smoking, or flaming to occur during
cleaning if the oven is heavily soiled. It is better to clean the
oven regularly rather than to wait until there is a heavy build-
up of soil in the oven.
During the cleaning process, the kitchen should be well
ventilated to get rid of normal odors associated with cleaning.
Before Self-Cleaning
1. Turn off the oven light before cleaning. The light may burn
out during the clean cycle.
2. Remove all pans and oven racks from the oven. The oven
racks will discolor and may not slide easily after a self-
clean cycle if they are not removed.
3. Clean oven frame, door frame, area outside of gasket, and
around the opening in the door gasket with a nonabrasive
cleaner such as Bon Ami* or detergent and water. The
self-cleaning process does not clean these areas. They
should be cleaned to prevent soil from baking on during
the clean cycle. (The gasket is the
seal around the oven door and
window.)
4. To prevent damage, do not clean or
rub the gasket around the oven
door. The gasket is designed to
seal in heat during the clean cycle.
5. Wipe up excess grease or spillovers from the oven bottom.
This prevents excessive smoking, flare-ups or flaming
during the clean cycle.
6. Wipe up sugary and acidic spillovers such as sweet
potatoes, tomato, or milk-based sauces. Porcelain enamel
is acid-resistant, not acid-proof. The porcelain finish may
discolor if acidic spills are not wiped up before a self-clean
cycle.
To set Self-Clean:
Note: Oven temperature must be below 400° F to program
a clean cycle.
Care & Cleaning
1. Close the oven door.
2. Press the Clean pad.
CLEAN flashes.
SET flashes in the display.
3. Press the Autoset 0 pad.
MEd (Medium Soil, 3 hours) is displayed.
4. Press the Autoset 0 pad to scroll through the
self-cleaning settings.
HVy (Heavy Soil, 4 hours)
MEd (Medium soil, 3 hours)
LITE ( Light Soil, 2 hours)
Choosing the soil level of the oven automatically programs
the self-cleaning time.
5. After four seconds, the oven will start cleaning.
If the door is not closed, beeps will sound and “door” will
display. If the door is not closed within 30 seconds, the
self-cleaning operation will be canceled and the display
will return to the time of day.
CLEAN will appear in the display.
LOCK will flash in the display. Once the door locks, the
word will remain steady.
The cleaning time will start counting down in the display.
To Delay a Self-Clean Cycle:
1. Press the Delay 1 pad.
DELAY flashes.
00:00 will flash in the display.
2. Enter the amount of time you want to delay the cycle using
the appropriate number pads.
3. Press the Clean pad.
SET flashes in the display.
4. Press the Autoset 0 pad.
LITE (Light soil level) is displayed.
  • Page 1 1
  • Page 2 2
  • Page 3 3
  • Page 4 4
  • Page 5 5
  • Page 6 6
  • Page 7 7
  • Page 8 8
  • Page 9 9
  • Page 10 10
  • Page 11 11
  • Page 12 12
  • Page 13 13
  • Page 14 14
  • Page 15 15
  • Page 16 16
  • Page 17 17
  • Page 18 18
  • Page 19 19
  • Page 20 20
  • Page 21 21
  • Page 22 22
  • Page 23 23
  • Page 24 24
  • Page 25 25
  • Page 26 26
  • Page 27 27
  • Page 28 28
  • Page 29 29
  • Page 30 30
  • Page 31 31
  • Page 32 32
  • Page 33 33
  • Page 34 34
  • Page 35 35
  • Page 36 36
  • Page 37 37
  • Page 38 38
  • Page 39 39
  • Page 40 40
  • Page 41 41
  • Page 42 42
  • Page 43 43
  • Page 44 44
  • Page 45 45
  • Page 46 46
  • Page 47 47
  • Page 48 48
  • Page 49 49
  • Page 50 50
  • Page 51 51
  • Page 52 52
  • Page 53 53
  • Page 54 54
  • Page 55 55
  • Page 56 56
  • Page 57 57
  • Page 58 58
  • Page 59 59
  • Page 60 60
  • Page 61 61
  • Page 62 62
  • Page 63 63
  • Page 64 64
  • Page 65 65
  • Page 66 66
  • Page 67 67
  • Page 68 68
  • Page 69 69
  • Page 70 70
  • Page 71 71
  • Page 72 72
  • Page 73 73
  • Page 74 74
  • Page 75 75
  • Page 76 76
  • Page 77 77
  • Page 78 78
  • Page 79 79
  • Page 80 80
  • Page 81 81
  • Page 82 82
  • Page 83 83
  • Page 84 84

Maytag Range AES5730BAB User manual

Category
Cookers
Type
User manual
This manual is also suitable for

Ask a question and I''ll find the answer in the document

Finding information in a document is now easier with AI