Page is loading ...

High Efficiency
Water Dispenser
Use & Care Guide
Model #VWD2265W
THANK YOU
We appreciate the trust and confidence you have placed in Greenway
Home Products through the purchase of this water dispenser. We
strive to continually create quality products designed to enhance
your home. Visit us online to see our full line of products available at
www.greenwayhp.com. Thank you for choosing Vitapur!
190501
Questions, problems, missing parts?
Before returning to the store, please call
GHP Group Customer Service
Toll Free at 1-877-447-4768 between
8 a.m. - 4:30 p.m., CST, Monday - Friday
PLEASE READ THIS MANUAL
THOROUGHLY BEFORE USING THE
APPLIANCE AND KEEP THIS MANUAL
FOR FUTURE REFERENCE

Warning: Never put anything flammable close to the dispenser
Warning: This water dispenser is designed for INDOOR applications only.
Warning: Do not damage the refrigeration cooling system.
Important: Refrigerants must be handled and disposed of by
qualified service personnel only. Before discarding this water
dispenser to landfill, contact local authorities for advice on proper dis-
posal methods for refrigerants.
Safety Information
1. Never turn the dispenser upside down or tilt more than 45 degrees. If the unit has
been resting on its’ side for a long period of time, place the water dispenser in the
upright position for approximately 12 hours before turning it on.
2. For use with 3, 4 or 5 gallon (12, 15 or 19 liter) water bottles.
3. Never use this dispenser with water that is unsafe to drink or is from an unknown
source.
4. Never use any other liquid in the dispenser other than known and microbiologically
safe bottled water.
5. This water dispenser is equipped with a grounded power cord plug for your safety.
6. Keep your water dispenser in a dry place away from direct sunlight.
7. Leave a minimum of 2” (5 cm) around the back and sides of the dispenser for proper
ventilation.
8. Always install your water dispenser on a level floor. Wait 3 minutes before restarting
machine after shutting it down.
9. Always unplug the water dispenser before servicing.
10. Regular cleaning of your water dispenser is required for your warranty. Please
follow the cleaning instructions outlined in this manual and clean the dispenser
every 4 months.
Warning: This Product can expose you to chemicals including Diisononyl
phthalate (DINP) which is known to the State of California to cause cancer
and Di-isodecyl phthalates (DIDP) which is known to the State of California
to cause birth defects or other reproductive harm.
For more information go to www.p65Warnings.ca.gov

Pre-Operation
SPECIFICATIONS
Model No. VWD2265W
Dimensions W x D x H
11.4 in. x 11.8 in. x 33.9 in. • 29cm x 30cm x 86cm
Net Weight / Gross Weight
23.1 lbs / 27.5 lbs • 10.5 kg / 12.5 kg
Cooling Temp (approx.).
39 ºF / 3.8 ºC
COLD
Power Consumption
80W
GROUNDING PRECAUTIONS
ELECTRICAL REQUIREMENTS:
A 115 Volt, 60 Hz., AC only 15 amperes
fused, grounded electrical supply is
required. It is recommended that a
separate circuit serving only your Water
Dispenser be provided. Use an outlet
that cannot be turned off by a switch.
WARNING
WARNING
FAILURE TO FOLLOW THESE
INSTRUCTIONS CAN RESULT IN
DEATH, FIRE, OR ELECTRICAL SHOCK
GROUNDING INSTRUCTIONS:
• Warning: This appliance must be grounded.
In the event of an electrical short circuit,
grounding reduces the risk of electric shock by
providing an escape wire for electric current.
• Warning: Improper use of the grounding plug
can result in a risk of property damage, electric
shock causing serious injury, even death.
• Warning: This appliance is equipped with
a power cord having a grounding wire with
a grounding plug and must be connected
into a properly grounded polarized outlet.
Consult a qualied electrician if the grounding
instructions are not completely understood, or
if doubt exists as to whether the wall outlet is
properly grounded.
• Warning: If the wall outlet is a standard 2
prong outlet, it is your personal responsibility
and obligation to have it replaced with a
properly grounded 3-prong wall outlet.
• Warning: Do not under any circumstances
cut or remove the third (ground) pin from the
power cord plug.
• Warning: Do not use adapter plugs or
extension cords with this appliance.
• Warning: If the power cord is too short, have
a qualied electrician install an electrical outlet
near the appliance.
• Warning: Do NOT use the appliance if the
power cord becomes frayed or otherwise
damaged.

Warranty
Do not return this product to the store: Please contact Customer Service at
1-877-447-4768.
The supplier warrants your water dispenser to be free from manufacturing defects
in workmanship or material under normal operating conditions for one (1) year
from the original date of purchase. This warranty applies only in the country in
which it is sold and is available to the original purchaser only. This warranty is non-
transferable.
This warranty and the CSA International listing for this water dispenser are void
if the water dispenser is altered, modied, or combined with any other machine
or device. Alteration of this water dispenser may cause serious ooding and/or
hazardous electrical shock or re.
The provisions of this warranty shall not apply to:
• Water bottles
• Service trips to your home to teach you how to use the product
• Improper installation, delivery, or maintenance (Failure to maintain
the product according to the instructions outlined in the product manual
will automatically void the warranty.)
• Failure of the product due to abuse, misuse, alteration, commercial use,
or any use for which the product was not intended
• Products that are used outside a residential or ofce environment
• Replacement of house fuses or resetting of circuit breakers
• Use of this product where water is microbiologically unsafe or of
unknown quality
• Damage to the product if used to dispense anything other than water
• Damage to the product caused by accident, re, oods, or acts of God
• Any service to the product by unauthorized personnel
• Incidental or consequential damage caused by possible defects with this
appliance, its installation or repair
This warranty shall be fullled at an authorized repair facility. All warranty repairs
must be pre-authorized by the supplier. The supplier will, at its option, repair
or replace free of charge any defective part, where the purchaser has notied
their retailer within the warranty period. The obligation of the supplier under this
warranty is expressly limited to such repairs or replacement. This warranty does
not cover the freight costs to and from the authorized repair facility.
Except as set forth herein or required by law, the manufacturer makes no other
warranty, guarantee, or agreement, express, implied, or statutory, including
any implied warranty of merchantability or tness for a particular purpose.

Warranty
The manufacturer does not assume or authorize any person to assume any
obligations of liability in connection with this water dispenser. In no event will the
manufacturer be liable for indirect, special, or consequential damages (including,
without limitation, economic loss) or for any delay in the performance of this
agreement due to causes beyond its control.
Some states or provinces do not allow limitations on how long an implied
warranty lasts, so the above limitation may not apply to you. Some states or
provinces do not allow the exclusion or limitation of incidental or consequential
damages, so the above limitation or exclusion may not apply to you. This warranty
gives you specic legal rights, and you may also have other rights which vary from
state to state or from province to province.
If you require service, please rst see the “Troubleshooting” section of this
manual. Additional assistance can be found by calling our customer service line at
1-877-447-4768.
Keep this manual and your sales slip together for future reference. You must
provide proof of purchase for in-warranty service.
Write down the complete model number and serial number of your water
dispenser to better help you obtain assistance or service if your ever need it. You
can nd this information on the back of the water dispenser

Pre-Operation (continued)
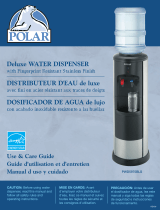
PACKAGE CONTENTS
Part Description QTY
A Bottle support collar 1
B Room temperature water
dispensing button
1
C Cold water dispensing
button
1
D Removable drip tray 1
Part Description QTY
E Adjustable cold water
thermostat
1
F Drain valve 1
G Condenser Coils 1
H Power cord 1
I Ready-to Dispense Indicator
Lights
(Green = Power On)
(Blue = Cold Water Ready)
2
B
C
D
E
F
G
H
I
A

Pre-Operation (continued)
INITIAL PRODUCT CLEANING PROCEDURE
INSTALLING THE WATER BOTTLE
1
2
1
2
3
0
m
4
5
6
7
8
11
12
1
2
13
14
3
1
4
5
6
10
9
2
Fresh Water
4 Cups
(1L)
Water Dispenser Cleaner
Vinegar
OR
4 Cups (1L) Hot Water
+ 4 Cups (1L) Vinegar
OR
Water Dispenser Cleaner

Operation
3. ADJUSTING THE COLD WATER TEMPERATURE
2. DISPENSING ROOM TEMPERATURE WATER
² By turning the thermostat (G) at the back of the unit, the temperature can be ad-
justed. Turn the dial clock wise between the Min. (cool) and Max. (colder) levels until the
desired temperature is reached.
Note: If the water dispenser is not dispensing water, there could be a possible
ice build up due to the thermostat being set too cold. If this happens, unplug the
dispenser overnight and then reset. Set thermostat to Min, slowly increasing based
on your use and need for cold water.
Max.
Min.
1. DISPENSING COLD WATER

Care and Cleaning
CLEANING THE OUTSIDE OF THE WATER DISPENSER
CLEANING THE DRIP TRAY
CLEANING THE CONDENSER
DRAINING THE RESERVOIRS
OR
1
2
1
2
1
2
3
4
2
3
5
7
8
9
6
1
10
Soap
Water
Soap
Water
Water
Dispenser
Cleaner

GOING AWAY ON VACATION
When not using the dispenser for long periods of time or when going on vacation, unplug
the dispenser and drain the reservoirs (see Draining the Reservoirs). Follow Initial Product
Cleaning Procedures upon return and startup of the dispenser.
FREQUENTLY ASKED QUESTIONS
Q: Why do I get a plastic taste from my dispenser?
A: As with most new appliances such as coffee makers and kettles, there is often a
plastic taste upon initial start-up of the unit. To remove this taste, simply follow
the cleaning instructions outlined in Cleaning the Inside of the Dispenser.
Q: What is the spike that goes into the bottle?
A: Vitapur® water dispensers feature a “piercing valve” as part of the bottle sup-
port collar, providing added convenience for water bottle installation. Depend-
ing on the water bottle supplier, some water bottles incorporate a self-piercing
membrane in the bottle cap for this specic purpose (ask your water bottle sup-
plier if your water bottle incorporates this feature). If your water bottle does not
incorporate this feature, the entire bottle cap must then be removed to eliminate
possible damage to the piercing valve.
CLEANING THE INSIDE OF THE DISPENSER
1
2
0
m
1
2
Once every 4 Months
2
3
4
5
6
7
8
9
10
11
12
13
14
1
15
Water Dispenser Cleaner
Vinegar
OR
4 Cups (1L) Hot Water
+ 4 Cups (1L) Vinegar
OR
Water Dispenser Cleaner
Fresh Water

Troubleshooting
Problem Possible Cause Suggested Solution
Water dispenser
is leaking
Drain cap and silicone seal are not
secure.
Water was poured directly into
bottle support collar and
overowed.
Ensure seal is secure in drain plug
and tighten drain cap.
Drain by pressing dispenser taps.
Water is not cold
enough
All the water in the tank has been
used.
Replace with full bottle and wait;
30 minutes for water to cool.
The unit is unplugged. Plug it into the outlet.
The circuit breaker in your home is
tripped or the fuse has blown.
Reset the breaker or replace the
fuse.
Thermostat needs to be adjusted
colder.
Adjust thermostat between “MIN”
(cool) and “MAX” (colder) levels to
achieve desired temperature.
Water dispenser
is not dispensing
water
Empty water bottle. Replace with full bottle.
Mineral deposits clogging tanks. See Cleaning the Reservoirs.
Possible air pocket. Push down on the dispenser
buttons to prime the unit.
Possible ice build up due to
thermostat set too cold.
Unplug overnight, then reset.
Set thermostat to high, slowly
increasing based on your use and
need for cold water.
Water dispenser
is noisy
Bottle making a gurgling noise as it
fills the tank.
This is normal.
Water dispenser is uneven. Make sure the dispenser is on an
even surface that can support its
full weight.
Note: Do not return this product to the store. For questions on operation, assembly or
parts, please contact us at 1-877-447-4768 for further assistance.

5
6a
7a
1-2H
OR
OU
6b
7b
8b
9b
10b
11b
14b
15b
16b
ANTI-LEAK BOTTLE SUPPORT COLLAR
The bottle support collar on your water dispenser is engineered with a special anti-leak-
proof system to prevent accidental loss of water, (ooding) as a result of inadvertently
installing a defective water bottle. Unfortunately, not all water bottles are created equal.
Almost all 3, 4 and 5 gallon (12, 15 and 19 liter) water bottles are recycled and handled
extensively during cleaning, lling, and shipping. As a result, they are very prone to
developing hairline fractures and pinhole leaks that are not always obvious to the end
user until the time of installation.
Important: Never knowingly install a defective water bottle on a water dispenser.
Return immediately for replacement. If you are experiencing a leak, this simple
test will allow you to determine whether your water bottle or dispenser is the
source of the problem.
1-877-447-4768
CUSTOMER SERVICE
13b
12b
Water Level (3/4 FULL)
Vent Tube
1
2
3
4
1
2
/