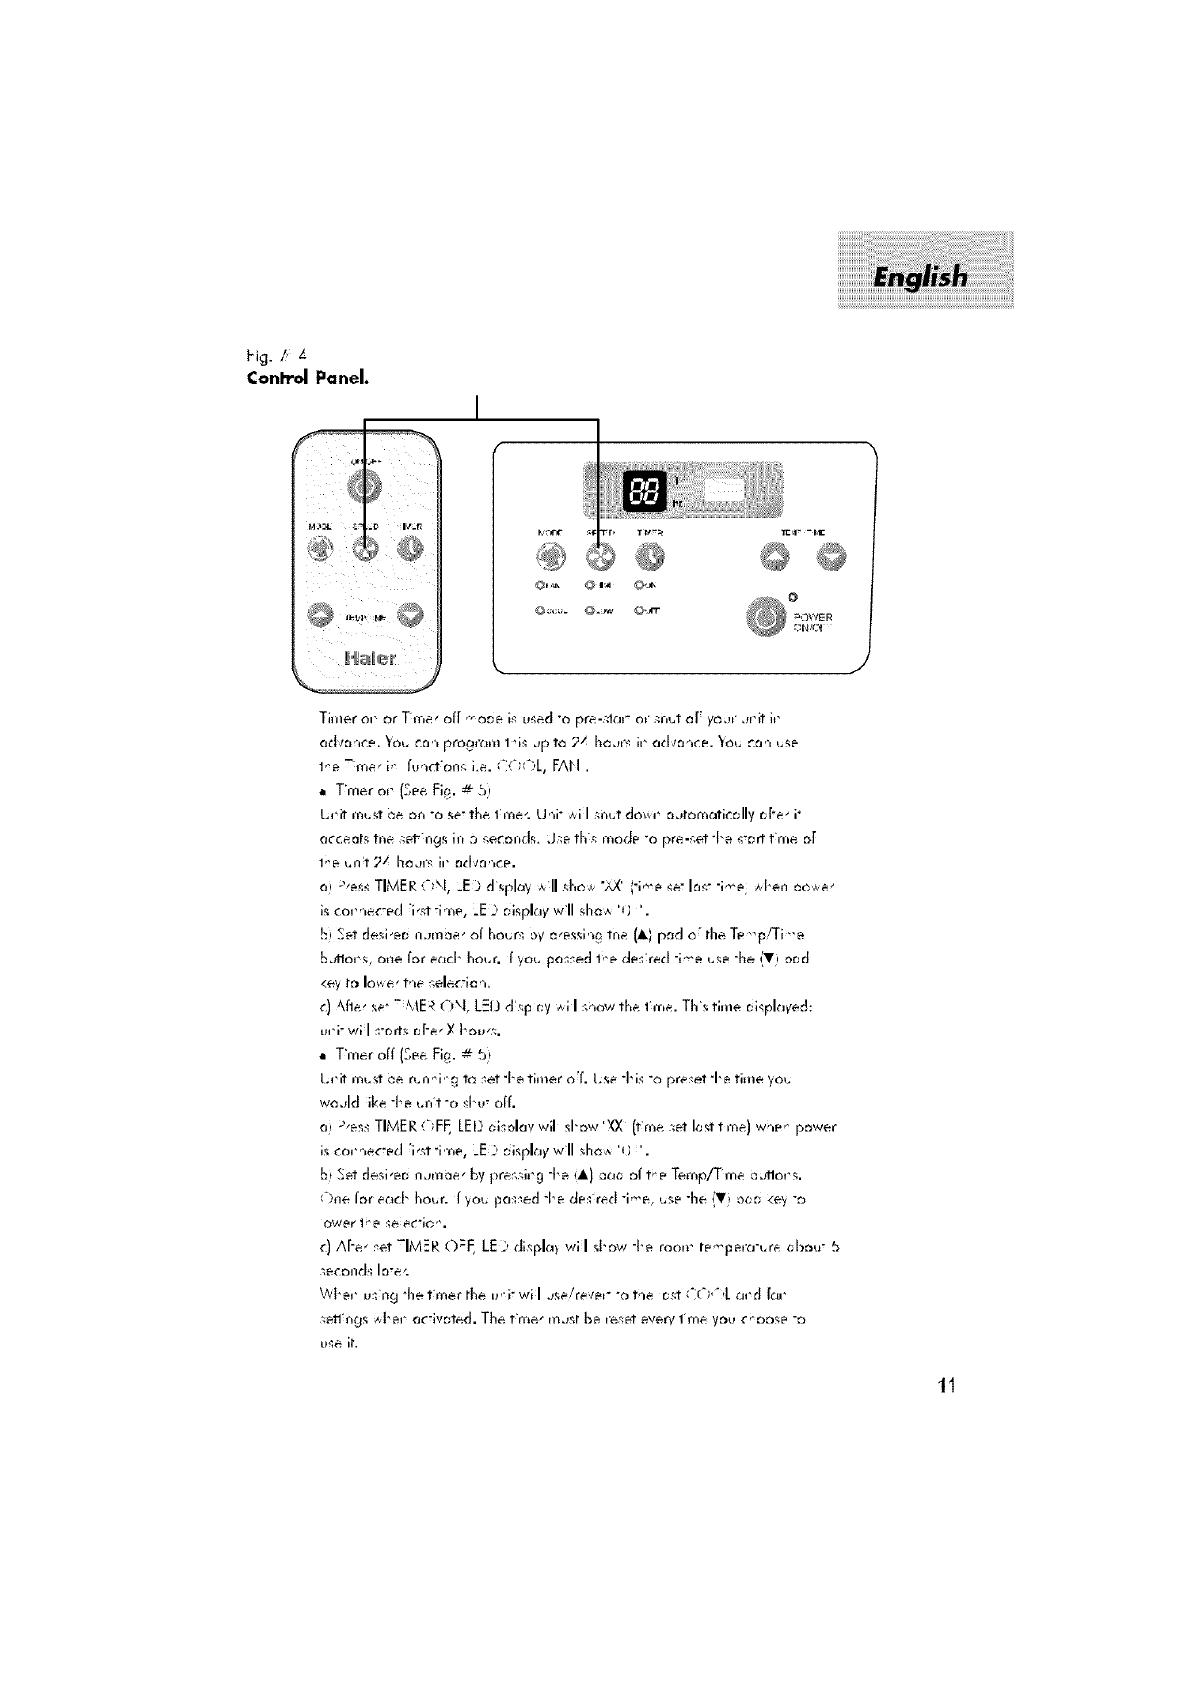
Haier 000 BTU User manual

Category
Split-system air conditioners
Type
User manual
Haier
What Th_ World Comes Home To"
RoomAir Conditioner
Clim_tisetie_@Piece
AcendkienederDeAire
HWF08XC5 HWR08XC5
ESA3065 ESA3085
e_ueid'_tiii_etio_
(ESA3065/ESA3085 Only)
_l_rae_sd 1-877-337-3_9 _ li_n_#r_rl_ s_r_ reppe_s e=_ki_
ThankYouFor buyinga dependable,er,ergysavingand easyto operate
HALER_oomair conditionenThismanualcor|tainsusefulinFon,nationfor
you tomain'lain, operate, install and safelyuseyour room air conditioner,
Yourair cor_ditionercleaas,coolsand deh,_midifiestheair in your room1o
provideyouwith the ultimatelevelof comfort.
Pleaseread instructionscarefullybefore usingtheproduct.Also, do not
Forgelto till out al_dmail tl_eProduct Regislretion Card.
Record Your Model and Serial Number.
Forall your servicecalls durin9 thewarranty periodthefollm,_,ing
in}onnationwill be needed.Attachthe salesreceiptto this guide and keep
Forfuture reference.Thisinformation canbe obtainedfror_ theserialplate,
which ison your air conditioner. Thi_i._eider on the _'abir_ (sideor hack)
or you may havetoremovethe Frontgrille 1,olocate it.
Mad_l Number:
Serial Number:...............................................................
Dateof Purchase:
Dealer'sNan_e:
Dealer'sAddress:............................................................
Dc-al_r'sPhoneNumBer:
I"ABL_
RECEPTACLE AND EUSE TYFE$
RATED V_I,T_ I_/_0 2 _d_/bO
A._ps _ 20 1_ 20 3_
.---
FUSE_ 1._ _0" iS _0" _g
TIME PlELAYFUSE
[_r clr_u_ b_:_ plug Plug _lug
SAFETYPRECAUTIONS
WARNING: Following these basic prscautlons will reduce the
risk af fire, electrical shack, injury or death
when using your air conditioner.
1} Air conditioner must be connected to proper electrlcal outlet with the
corr_st electrical supply, lsee table]
Proper grounding must be ensured to reduce the risk oFshock and }ire.
DO NOT CUT OR REMOVE THE GROUNDING PRONG. It you do
not have a three-prong electric receptacle outlet in the wall, have a
certified electrician install the proper receptacle. The wall receptacle
MUST be properly grounded.
Do not use i[ power cord is frayed or otherwise damaged.
Also avoid using it if there are cracks or abrasion damage
along the length, plug or connector.
DO NOT USEAN ADAPTER OR AN EXTENSION CORD.
When installing yaur air conditioner in a window, make sure lhe window
is strong enough to hold the welghl of the alr conditloner.
You also want to secure and correctly install your air conditioner properly
to prevent it tram falling. Extra brackets and or supporl" may be required
depending on your wlndow.
6) Do not block airflow inside or outside the air conditioner with Blinds,
drapes, protective covers, shrubs or bushes.
7) Be careJul of sharp edges on the Frontand rear fins ot the unit Ihat could
cut and cause serious injury.
8) Be careJul when lilting lhe air conditioner to install or remove the unit.
Always usetwo or more people far this,
9) Always unplug the air conditioner before servicing it or moving it.
2
PAGE
A Word From Haier .................................................................. 1
Product Registration .................................................................. 1
Safely Precautions .................................................................... 2
Warnings ................................................................................... 4
Electrical Safely .......................................................................... 4
Tips 5
Energy $_ving Guide 5
Features .................................................................................. 6-7
Operating Guide ................................................................. 8-13
Normal Operoti_g Sounds................................................................ B
Operatir_g Instructions 8=13
Installations ......................................................................... 14-18
Parts Supplied............................................................................... 15
Took........................................................................................... 15
Step_ForInslallation................................................................... 16=18
Clean and Cure Guide ......................................................... 19-20
Troubleshooting ................................................................. 20-21
Warranty Information ............................................................. 22
_gthe saFet/messages is very important.
These messages can save you fiom being injured or killed.
Warning symbols alerl you Io be careful and means Danger. Always
Follow instructions to be saFeand reduce chances of injury or death.
Warning and Danger signs will precede safety messages.
Grounding: Thisroomair conditloner mustbe grounded,
Grounding reducesthe risk of electricshc_ckby
providing an escapewire for theelectriccurrent,
Thepower cord has a grounding wire with a
grounding plug. Plug it into an outlet that is
properly installed and grounded,
WARNING:
Adapter Plug:
Improper useo| thegrounding
plug can resultin a risk of electric shock,
Calla qualifierJeledrician if you don't understand
the grounding ;nstrucClons or iJ:you are not
sureif theair conditioner isproperly grounded,
IFthewall outlet isnat grounded, plaasecontact an
eleclricianto have it replaccdwith a properly
grounded ouctet.
Do not, under any circumstances, cut or remove tile
third (ground) prong from the power cord.
We stronglyadvise against usingan adapter plug
Important: Tes powe' alug before each use:
1. Press"reset "bul an.
2. Press"esl "oullon, ,,.r_ shoulr_Pip.
3. Press"{esel" b',.Io'_ again fo' use
Do no useisabove est fd.
n he evenl lnis device Ilips, P'e cause c,i he malf_,.c ion is Io
::,ecorrecled befo,e fullhel use of P'e dev:ce.
4
AirConditionersaredesignedfor usein a double hung window or
through the wall installation only_(As applicable in your model)
While installing unit be sure to tilt air conditioner 5 degree outward to
have Ihe water drip outside the house.
g Install the unit on the north side as normally that is the shaded side. This
will enhance the operation of your unit.
_,, Window hasto be strong for installation. Extra brackets and or support
may be required depending onyour window. (Brackets and Supports
not _ncludedin all models)
Measure the window BeForeins_'alllng,if Ihe wlndow is leo b_gfor the
unlt you may requke pro|esslonal installatlon.
_- Use correct electric voltage and proper ampere for the unit to run
effedi,,dy.
_, o Only let a certified electrician do any modifications to your electrical
autlet.
Use a dedicated line [or the operation oFyaur air conditioner to avoid
the possibility oFan electrical surge.
When installing your air conditioner make sureto seal all areas where
there is a possibilily oJair leakage.
° AirJlow should not be blocked inside either by curklins, drapes ar
furniture or outside by shrubs or Bushes.
Do not needlesslyuse an electrical light or other appliances that
produce heat.
° Keep the vent closed on Ihe air conditioner when in the cooling function,
Keep the blinds and the drapes drawn on all the other windows.
° While cooking use an exhaust Fanin the kitchen to remove the excess
heat produced.
Always usethe correct BTU size air conditioner to cool the room to
attain optin_um efficiency.
cosy
filk_r,,
4 woy
MODEL: HWR08XC5
ESA3065, ESA3085
: _ahles F,u "r, '-_all h_ o, co_di':or _r ino dmsbl_
7'.Re_t_ €or_rol
{un_'o_so"FoF.'I ih¢_unB on o,oq
8. LED Displ_q¢ lele_rani_ (.'ont'rol Panel
Tqe 4 '_icn :1> display_ Room Ter-aer_ur_,,
Ternporcflur¢ _l-ir _, Ti'¢cl" So@"a nnd-it^c,
Re_o:li_€l ic_'op / S'ar,k_ ur".Fl_dronic:
9. Elettro_clatle Filler rr_t =11r_ol_)
_lect'o_a- c o¢-i_ rc,_o_ no" oqd r_hc;, mo;_'iols
ilo_,-*ic,s thr, air e={e,divo y I-_v#_y _rkdurm
ircr_cs#s "Fcropo£il'_/_ f,_:- dus"o_d _'r r,<t_
:_#di e y.I}_e ,_ ¢h_ rc¢c;qF_r o; -_ea,--livecc,._or
il -a_ : liflh oi ,"life _peed _=or,obk: d
,:a rl_n rlfthts;ac_ leffs:a_
6
easy
fihr_
¢or1"ro
f_nel
MODEL: HWFOSXC5
1, l"etnperal'ure Set Kt_ob
Thiskn_k_adjuststheternperalare of theair.
High._r t_ ._i_g _e cadet 1he_ir temtoer_iure.
With "hi_I<,nobyou ccm_e'tthe."tvl_pc:r_urc to your
desiree<ore[or lev,_lMin Cod beit_gt,'e w_lrrnest
ond Max, CaJ b_ir_gl-e c::Id_L
2. Functian Sot Knob
Wit" th_ knobye_J,:an _ontrol the fan _la_d as
wel :_sII_ {._x_ir_9_Fee,d. The,f_ _:r_.2 b_o_J
a_sition:,on th,_A/C ['oryou ÷c,_clcc_from HI and LO.
Yo_ hnve 2 r_ Only _pe.ed_to _hoa,_e[rnm HI _d
I0
3, 4 Way Air Flaw
Th_:s__:i_di,_:Ik:n_l Io,,_ I_:Iyou ::_r,lr_l lhe
d'redion o_the _irflow "nyour m_,Jred _rec_io,',
lhe airflow can k,_.d:rectc-d
up - dc_'n - right :-idc- Ic_ s'de
4. window I_stall KII_
Enoohs you to it_Call"lheoir c_nditio_e, i_ a
dou_le hung window Exlro Bra_:ket__:_r_uppod
rncry be needeo depending on y,:,urw'n&:,w
Nor aJ Ope tlng Sounds
Thefollowingsoundsere normallyheardduring 1lieopcmt;onof al_air condltio_cr.
= Thermostatclicks. As the thermostatcTcleson/off you will
hear this sound,
Cool airflow movementas dictated by the set Fanspeed,
Water sounds,This is normal since your air conditioner actsas a
deh_midiF;eralso. Thusyou will hear water soundsfrom water drops
Fallingon the condenser.
" As the refrigerant flows through the inner sealedtubing a
rushing noisemay be heard.
Rattlingor vibraiing noisesmay beheard due to poor wall
or window ir_stallalion_
'* High pitch compressorsound may Beheard.
Operating instructions
Followingore the operating insiructions of your electronic air conditioner.
MODEL: HWROSXCS, ESA3065, ESA3085
Remote control and control panel operations
Attar in_allln9your QlrcandltionerplucjiI in totheproper electricaloL,H_
in thewall.Keepthevent in thedosedposition.No,_settheair
conditioneratyour comfortlevel,ThisFullFunctionalwirele_ remoteallows
you to operate your air conditioner -,,¢ithout having t_ get up and Oo to th_
unit.Thgfull fuacl;on_alure allowsyouIo chrJnge Ihe selllngsand lure Ihe
unitonor off 5amth_ r_nlot_itself.Thiscenlrolpad worksthesameas
thecontrolpad onthe air conditioner,
(,%eFig,# 1)
Fig.# l
Remote Control
8
After you plug in the unit it will p_rrorrr_ a self test. All the display lights
will turn on for 3 seconds. The LEDdisplay will read "88". If any display
light fails to turn on you may ned service on the unit. Alter the 3 seconds
self testthe _nit will automatically go t'o Ihe stand by mode, Now all lights
will Be off and you will have to urn "ON" by pressing re On/OfF key.
After pressing "On/Off", the urlit starts to work anal enters the status oF
"Fan" with low setting. You will have to press the (A) ar _r) key on the
Te_llpiTime to setthe temperature at your desird comfort. You can choose
bet,,veer_61 _Fa_cl 86°P.Once the temperature is setyou can raise or
lower it by pressing the (A) or (v) keys. (OnlX when the unit is cooling,
can the temperature setting be adjusted.)(See Fig, # 2)
Hav:r_ settqctar"pc-cturc ya., wiI so""kc ÷.m,:'ion_ the a:r conditioner.
Fig.# 2
Control Panel.
@@@
Every "ime you press "he_VIODE cJ'tc_r, f wil _ksntle aetween FAXl, COOL. S_.
F:rJ. # 3_
Fig,# 3
Control F_nel.
ht_ _E=
O'A_ © _ ©_
Eveq rim_.?ao a,ess rl'e SFF.EI; bul'on, \-_qsoeed wil _haqge be-_e_q LO&, IGI I.
I) Ir vo_ cl,_ose th_ C(')OL n',_c_ you car, nm "1_ [_ n o_÷ a t'_ z sp_.÷ds IGI I,
b-)N,
21Fer teal days you may wart te rut the '--AN' :_rdi,gq. Here -ke },'_q,t,ns _t one.
o} 2 sp_es, -IGH c,rLOW.
10
l-ig.b L
Conh'ol Panel,
I
0
Timer o," or Tree, of[ .'_oo÷ i_ u_ed "o pre-;.iar or ._n_,t_[ ym," <miti_-
_dvrma-. _ou _rJ.'_progrnrn I g_ Jp I"_2/ he..,'_ ir _J_l_rJqc_._ou _.'J,',u_
I_ -me, i,: fuqct on_ Le. C'.'_£;,L,FAH .
T:mer o__ (See,Fi0. _ b)
acceafs the ;;el<ngs in 3 ;,econcls.J._eth:_ mode""o pra-_.et"l'e +_'e.rftree. _[
_i _,_s_TIMERO\I, _E) d'_plm, *II @,_.+<";,X' _'i_ _." Ir_¢ "i_: #l-en _owe,
!_i_t de_i,_ nJm.qe, of hour_ oV o'_s_i'_0 the (i_ prodo_H_eTP-.p/Ti.-÷
h._"io,'_,one f_r enc[" hour. f you po_ed 1i._ de_rect "i_ t._e "he {Vi oc;d
_) Afla, _" -\IE_ 0% L_I3d_.p cy _i I :-_qowtha Im_. Th_ time okplaved:
T:mer off (SeaFla. _ 5}
t,rit museae mn_i,'(,:1"oset "k÷ timer o1".t;se "I'i_ "o pre:'et "1"_time you
w_.,Id ike -V_ ,.n_t"o _I-,,, dL
o_ _,es_TIMER_-'}FEEEl]'olsolav wil _l'_w '_X (t:m_.set k;_t t me) wgP,' p_wer
_iSe_desi,er; msnlae,Ey pre_qi*{l"l'e _Ai)acla ,_I"l'_eTemp/T me a.ri'lot,s.
i",ne far e_JcFhour. f you pcl:_ed "l'e dt_sre_l"i,'e, use "he {_) _cr; <eV-o
OW_l + I_P S_. eCiO'%
+) Af'e, _1" -IM-R O:F, LE;, di_ph_ wll d'_w "l-e roo_i" le-pera-_,re cb_<r 5
_econd_ In,e _.
Wl'ei" us:ng *1_÷t:mer the. is'_Pwil a_elrever "otqe cs¢i';('), ",L ard far
:;ell ngs _l'er ee,ivr;ted. Th_ f:rne-i/_,_sr he i'e_;ef every 1me y_u ¢_o.,b_e -_
1t
Control Panel.
Operating ln rucl'ions
MODEL; HWF08XC5
(S_ Fig.# 1)
HI
LO FAN LO
FAN A/C
OFF A_
fig, # 1
4
3
FUNCTION
5 6
8
9
12
MIN MAX
COOL COOL
TEM PEI:b_'TURE
AFter[nstall;ngyour air condlt[oner, pltJg_tiota the proper
eledrical outlet in the wall.
1) SelectM_t. A/C on the Fenclio_ Setkno6.
2) Setthe Temperc_tureSetknob a_"the mid level setting_Thiswill t_rrl on
your air conditioner.
3) You can set the Ihermostat|ram Mir_Cool to Max Cool. Min Cool being
the warmest sellir*j Max Coolbeing the coldosl sellil_.
4) Your air conditioner has 1 or 2 Fan sl_eds clepe_clingon your model
purchased and 2 A!C selfings.
5) IFyour air conditioner has a Vent control make serethat it isan close.
Leaveit open only if you need to recyclethe stale room air. By leaving it
closed you will mtai_ the cool air in II_croom.
6) Letyour e_r conditioner ran _r e few koursbefore edjustlag to the
desired seffings,
7) Relrnelrnl_elrthe compressor of your air conditioner will net work
when t6e temperature goes below65°E
8) Also when you shut off the air condilioner wait for 3 minutes
bsfare turning it on again. This is ltle compressorcycle _ime.
9) IFyou have any trouble in operating your air conditioner pleaserefer to
the TroubleShaotir_gsedion.
13
Beforeyouinstallyourairconditionercheckthefollowing:
1) The unit is fr_eofall obstructionsinsid_ and outside Ihe roam e.g. drapes,
curtains, furnlt_re, plants, shrubs, bushes,trees, other"structuresllke building,
garage etc, Air conditioner rnuslhaveclear unobstructedairflow through the
condenser to remove the heat.
2) Thewindow is strong eeaugh to hold theweight of the air co, rill'loner,
Extra Iorackel_or supports may Joeneededdepending on your windows,
(Bracketsor Supports net provided in all models)
3) Thewlndaw sill and track ar_ strong enough to hold the weight of the
air conditioner.
4) Thewall is strong enough to hold the unit. Extra brackets or supports may
neededdependlncd on the wc,ll, lBracketsor Supports not prav_dedin all models).
5) There is adequate and proper power supply near the air conditioner.
__ 61DO NOT useadapter plugs_
_7) DO NOT use exlension cords.
_- 8) DO NOT cutor removethe ground prong.
,_ 9} DO NOT modiF/the plucd or the electrical wall outlet in any way.
I| plug doesnot fit the eledrical outlet have a certified electrician dothe
necessarychange.
__10) DO NOT connect electrical power to l_e unit before installation.
__11 ) DO NOT useif power cord isworn out, frayed or otherwise damaged.
Avoid using if there are cracksor abrasion damage along the leng_,
plug or connection.
__ 12) DO NOT install into any existing cabinet or sleevewhich does not have side
and lop air vants.
_1_13) Recareful o[ exposed shoro eoges o[ Ihe cobinel ana sho,p coils(fins)on Ihe
back of the unit the" c_ulo cu- and cause serim___injur.
14
PQrts
._ ,_ o_ri'c_in 31f32_ ::,,.I_,I
_r_',v_13132' I_ ard fah?
_de o.,to[,ls
I_pa_ 0rige
T_$
You will need to hava the following tools to helpyou i_ the installalier, oF
your air conditioner.
"Scissors
PhillipsScrewdriver
Standard Screwdriver
Pliers
,Wrench
Drill _nd Drill Bits
TapeMeasure
,Gloves
,Level
,Sockets
15
InstallingUnitintoA Window
Window Opening Requirements
Theair conditioner i_designedtofit intodouble or sirgle hung sashb'pe windows, Eachof the
units comeswith an installation kit that provides cdjustablemounting louvers,to Fillthegaps
betweenthe sideso[ th_ unit, and the window [rame_Th_ chart bdow reflectsthe dimen_ions
d:lha unilswilh, ar'_wilhoul irl_lallalionkib. Mcasur'cy_,,.,iwirld___wopcningwidlhand_npa=_
it tothechart b_lawtoensur_thatit m_etsth_minimumand maximumwindow width raquiram_nts.
A(i_ch) _'
B(inch) 1,1_'
Cfinchl 14_'
D_inchlMO× 3ZT'
Dlinch)Mir :_'
Cas_High _'
-,/
/
/I
16
Mobile k_ne windgw ir_tollgaion
Add wv_ slrip _ulI_:_11 1/2" wide)
o _'_'j en-irt_widtF o 4vi _dc,_ si
-nickr_s+ o[weed ++ripshould m_c'_
heg _'of _rcn' lip an wi_dow t,ome,
kz/str'nweod st,ip to s: wih a
n"nirn_n c[ I}'e_ cuunls_vrk wc_e_.t
scr_¢s (,tol supphc:rt will" _it} This
o,,_4¢J_ _1*,'_oo',t st,t_-_ fc.t
irol.'_llnElulr co'ldlF,_r:
I I/2"._.__ _ '¢¢i',Ib_
Mii ...... F/F_:at_
c_
INSTCdJ.UNrl IN
WINDOW
Pluc_ vi7in w:_do'_. Lavvgl _<ssn
roll, Bottom roll r_,s- _st bek,iro
wln'J_ sill
$
_ tlcito,n ,,,ll
C_rmi_ ess_rrbly o!
awr_ [_'_rd:F7.
!
t-
17
SECURESIDECURTAINS
AND TOPMOUNTING PAIL
18
_!iii_!iii_!iiii!iiii!iiii!iiii!iiii!iiii!iiii!iiii!iiii!iiii!iiii!iiii!iiii!iiii!iiii!iiii!iiii!iiii!iiii!iiii!iiii!iiii!iiii!iiii!iiii!iiii!iiii!iiii!iiii!iiii!iiii!iiii!iiii!iiii!iiii!iiii!
Always unplug your air conditioner before cleaning.
" The air filter behind the front grille should be checked and
cleaned at least once every 2 weeks or more oflen if necessary.
I0 F_IT_OW3:
If Ope_ the :nlet grille downwcrd by pJling out the -ap ofPe idet grille.
2. Remove the a:_-'ilte_:raft t_e front grlle ass_rr c,y oy pui_a t_e air filter
sp slighlly,
3. Cleon lhe iler wilh wurrn, soo_)y wulel bel_¢_ 40'C(I04'_Fi,
4. Rinseand gcn-v s_okc-qc wcltor :'o'n the "ltcr o_d let i-dry bofo'c r_plac ng
DO NOT use your air conditioner without the air filter in place.
To clean the front panels or the cabinet DO NOT use harsh
chemicals, abrasives, ammonia, chlorine, bleach, concentrated
detergents, solvents or melul scouring pads. Some o[ th_sP,cnemicc;k
rra d'ssolwg, aoqlclg_ and/or discolor you, a:, co_d:-ianer.
Always use a soft cloth dampened with water or mild soap
and water solution to wipe lhe front of the cabinet.
Wipe _rj with a soft do-h.
lg
  • Page 1 1
  • Page 2 2
  • Page 3 3
  • Page 4 4
  • Page 5 5
  • Page 6 6
  • Page 7 7
  • Page 8 8
  • Page 9 9
  • Page 10 10
  • Page 11 11
  • Page 12 12
  • Page 13 13
  • Page 14 14
  • Page 15 15
  • Page 16 16
  • Page 17 17
  • Page 18 18
  • Page 19 19
  • Page 20 20
  • Page 21 21
  • Page 22 22
  • Page 23 23

Haier 000 BTU User manual

Category
Split-system air conditioners
Type
User manual

Ask a question and I''ll find the answer in the document

Finding information in a document is now easier with AI

in other languages