Amplicom AB900 User manual
- Category
- Answering machines
- Type
- User manual
This manual is also suitable for
Page is loading ...

2
CONTENTS
Important Safety Instructions ...........5
Getting Started ...................................7
Answering Machine Functions ..........9
Remote Access .................................. 15
Help and Support .............................. 21
Technical details ................................20
Maintenance and Warranty ..............20
Instructions available in other languages at
www.amplicomusa.com.
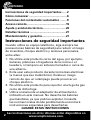
Important Safety Instructions
When using your telephone equipment, basic safety
precautions should always be followed to reduce the risk
of re, electric shock and injury to persons, including the
following:
1. Do not use this product near water, for example, near
a bath tub, wash bowl, kitchen sink or laundry tub, in a
wet basement or near a swimming pool.
2. Avoid using this product (other than a cordless type)
during an electrical storm. There may be a remote risk
of electric shock from lightning.
3. Do not use this product to report a gas leak in the
vicinity of the leak.
4. Use only the power adapter indicated in this manual.
Do not dispose of batteries in a re. They may
explode. Check with local codes for possible special
disposal instructions.
SAVE THESE INSTRUCTIONS

3
The FCC requires that you are to be advised of certain requirements involving the use of this equipment.
1. This equipment complies with Part 68 of the FCC rules and the requirements adopted by the ACTA. On the bottom of
this equipment is a label that contains, among other information, a product identi er in the format US:AAAEQ##TXXXX. If
requested, this number must be provided to the telephone company.
2. An applicable certi cation jacks Universal Service Order Codes (USOC) for the equipment is provided (e.g., RJ11C) in the
packaging with each piece of approved terminal equipment.
3. A plug and jack used to connect this equipment to the premises wiring and telephone network must comply with the
applicable FCC Part 68 rules and requirements adopted by the ACTA. A compliant telephone cord and modular plug
is provided with this product. It is designed to be connected to a compatible modular jack that is also compliant. See
installation instructions for details.
4. The REN is useful to determine the quantity of devices you may connect to your telephone line and still have all of those
devices ring when your number is called. In most, but not all areas, the sum of the REN of all devices should not exceed ve
(5.0). To be certain of the number of devices you may connect to your line, as determined by the REN, you should call your
local telephone company to determine the maximum REN for your calling area.
NOTICE: If your home has specially wired alarm equipment connected to the telephone line, ensure the installation of this
equipment does not disable your alarm equipment. If you have questions about what will disable alarm equipment, consult
your telephone company or a quali ed installer.
5. If your product equipment causes harm to the telephone network, the telephone company may discontinue your service
temporarily. If possible, they will notify you in advance. But if advance notice is not practical, you will be noti ed as soon as
possible. You will be advised of your right to le a complaint with the FCC.
6. Your telephone company may make changes to its facilities, equipment, operations or procedures that could affect
the proper operation of your equipment. If they do, you will be given advance notice so as to give you an opportunity to
maintain uninterrupted service.
7. If you experience trouble with this equipment, please contact the Amplicom Service Center at 1-866-AMPLICOM (267-
5426) for repair/warranty information. The telephone company may ask you to disconnect this equipment from the network
until the problem has been corrected or you are sure that the equipment is not malfunctioning.
8. This equipment may not be used on coin service provided by the telephone company. Connection to party lines is
subject to state tariffs. (Contact your state public utility commission or corporation commission for information.)
This device complies with Part 15 of the FCC Rules. Operation is subject to the following two conditions: (1) This device
may not cause harmful interference, and (2) this device must accept any interference received, including interference
that may cause undesired operation. Privacy of communications may not be ensured when using this phone. Changes or
modi cations not expressly approved in writing by Amplicom may void the user’s authority to operate this equipment.
NOTE: This equipment has been tested and found to comply with the limits for a Class B digital device, pursuant to
Part 15 of the FCC rules. These limits are designed to provide reasonable protection against harmful interference in a
residential installation. This equipment generates, uses, and can radiate radio frequency energy and, if not installed and
used in accordance with the instructions, may cause harmful interference to radio communications. However, there is no
guarantee that interference will not occur in a particular installation. If this equipment does cause harmful interference
to radio or television reception, which can be determined by turning the equipment off and on, the user is encouraged to
try to correct the interference by one or more of the following measures: (1) Reorient or relocate the receiving antenna. (2)
Increase the separation between the equipment and receiver. (3) Connect the equipment into an outlet on a circuit different
from that to which the receiver is connected. (4) Consult the dealer or an experienced radio TV technician for help.
FCC Compliance
CONTENTS

Service Center
4
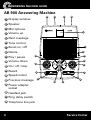
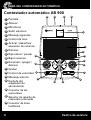
AB 900 Answering Machine
1
4
6
7
8
10
11
12
13
14
15
16
17
18
2
5
3
9
1
Display window
2
Speaker
3
Microphone
4
Volume up
5
Next message
6
Tone control
7
Boost on / off
8
Delete
9
Play / pause
10
Volume down
11
On / off / stop
12
Record
13
Speed control
14
Previous message
15
Power adapter
socket
16
Headset jack
17
Ring delay switch
18
Telephone line jack
ANSWERING MACHINE GUIDE

1-866-AMPLICOM (267-5426)
5
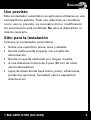
Intended use
This answering machine is suitable for use on a public
telephone network. Any other use is considered
unintended use. Unauthorized modi cation or
reconstruction is not permitted. Do not open the device
and attempt any repair work yourself.
Installation location
Locate answering machine:
• On a dry, at and stable surface
• Where the power cable will not be a trip hazard
• Where it is not obstructed by furniture
• At least three feet from other electrical appliances
• Away from smoke, dust, vibration, chemicals, moisture,
heat or direct sunlight
SAFETY

Service Center
6
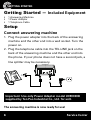
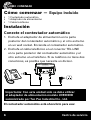
Getting Started — Included Equipment
• 1 Answering Machine
• 1 Power Adapter
• 1 Telephone Cable
Setup
Connect answering machine
1. Plug the power adapter into the back of the answering
machine and the other end into a wall socket. Turn the
power on.
2. Plug the telephone cable into the TEL.LINE jack on the
back of the answering machine and the other end into
the phone. If your phone does not have a second jack, a
line splitter may be necessary.
Important: Use only Power Adapter model U090030D
supplied by Ten Pao Industrial Co., Ltd. for unit.
The answering machine is now ready for use!
GETTING STARTED

1-866-AMPLICOM (267-5426)
7
GETTING STARTED
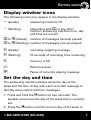
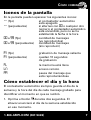
Display window icons
The following icons may appear in the display window:
-- (steady) answering machine off
-- ( ashing) alternating with 00 or any other
number: answering machine is on, day
and time are not set
00 to 99 (steady) number of messages (already played)
00 to 99 ( ashing) number of messages (not yet played)
R1 (steady) recording outgoing message
R1 ( ashing) 10 seconds of recording time remaining
FL memory is full
L
n
Remote access
PA Pause of currently playing message
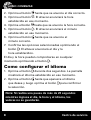
Set the day and time
The answering machine always saves the day of the
week and the time of day with each recorded message to
identify when callers left their messages.
1. Press and hold the
button for two seconds. The
speaker announces the day of the week that is currently
set.
2. Press the
button until the correct day of the week is

Service Center
8
announced.
3. Press the
button. The speaker announces the hour
that is currently set.
4. Press the
button until the correct hour is announced.
5. Press the
button. The speaker announces the minute
that is currently set.
6. Press the
button until the correct minute is
announced.
7. Con rm the selection by pressing the
button. The
complete day and time setting is announced.
The day and time can be checked at any time by pressing
the button.
Set the language
1. Press and hold the
button for two seconds. The
display shows the language currently set.
2. Press the
button until the desired language is
displayed and press the
button to con rm the
selection.
Note: If there is a pause of more than 20 seconds
while entering the day, time, and language, the set-
tings will not be saved.
GETTING STARTED

1-866-AMPLICOM (267-5426)
9
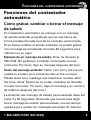
Answering machine functions
Record, change, or delete the greeting
message
The answering machine comes with a pre-recorded,
standard greeting message that will play by default
when the answering machine picks up a call. Otherwise,
a custom greeting of up to 60 seconds can be recorded to
replace the standard greeting.
Example of a greeting message: Hello, you have reached
555-1234. We are unavailable to take your call at the
moment. Please leave a message after the tone.
Wording of the standard greeting: Hello. I am sorry but we
are unable to answer your call personally at the moment.
Please leave your message and telephone number after
the tone.
The length of any custom greeting must be at least three
seconds and must not exceed 60 seconds. Please note that
the longer the custom greeting is, the less recording time
will be available for incoming messages. The maximum
recording time available, including messages and the
custom greeting, is approximately 15 minutes.
ANSWERING MACHINE FUNCTIONS

Service Center
10
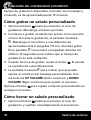
Recording a custom greeting
1. Press and hold the button until the recording tone
sounds. Continue holding down the button.
2. Start the greeting immediately after hearing the
tone. The display will show R1 during the recording.
Keep a distance of approximately six inches from the
microphone while recording. The display will ash
R1
during the last ten seconds available for recording to
indicate that recording time is nearly over.
3. Release the
button when nished recording. The
greeting is played back automatically.
4. The display will show
R1 to indicate that the volume
for the custom message can be adjusted. Use the UP
VOLUME and DOWN VOLUME buttons to adjust the
volume.
Play back the custom greeting at any time by brie y
pressing the
button.
Deleting the custom greeting
1. Press and hold the button until the recording tone
sounds, and immediately release the button.
2. The pre-recorded standard greeting will play, indicating
that the custom greeting has been deleted.
ANSWERING MACHINE FUNCTIONS

1-866-AMPLICOM (267-5426)
11
Setting up the ring delay
Use the slide switch on the back of the answering machine
to set how many times the phone rings before incoming
calls are answered.
2 The call is answered after two rings.
6 The call is answered after six rings.
TS (Toll Saver) Incoming calls are answered after six
rings until the rst new message has been recorded. Once
a message has been recorded the answering machine will
answer after approximately two rings.
Note: The Toll Saver function enables the user to check
remotely whether any new messages are available on
the answering machine without incurring a toll charge.
See “Toll-free remote pre-access” for more information.
General operation
Switch the answering machine off (standby) or on using
the
button. When the answering machine is off, the
display shows
-- for standby and no messages will be
recorded.
The maximum length for incoming messages is 120
seconds. If the caller speaks for longer, a signal tone
sounds and the call is cut off. If there is a pause of
ANSWERING MACHINE FUNCTIONS

Service Center
12
more than seven seconds during recording, the call is
automatically terminated with a signal tone. If memory is
full, the display window shows
FL and no more calls will
be recorded unless existing messages are deleted.
Listen to incoming messages
The integrated speaker makes it possible to listen to
incoming calls as they are being recorded. Use the UP
VOLUME and DOWN VOLUME buttons to adjust the
speaker volume. To mute the incoming call volume, press
the DOWN VOLUME button repeatedly.
Interrupt the answering machine
To intervene while a message is recording, pick up
the telephone receiver. The answering machine will
immediately stop recording.
Listen to messages
The display window shows the total number of messages
recorded, including notes (MEMO) and recorded telephone
calls.
1. To listen to messages, press the
button once.
The answering machine will begin playing any newly
recorded messages. If there are no new messages, all
recorded messages will play. If no messages have been
saved, several signal tones will sound.
ANSWERING MACHINE FUNCTIONS

1-866-AMPLICOM (267-5426)
13
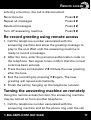
2. Press the button while messages are playing to
pause the playback. If the button is pressed again within
seven seconds, playback will resume. After the last
message is played, the unit will respond with two signal
tones.
3. Stop listening to messages at any time by pressing the
button.
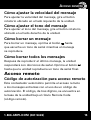
The speaker volume can be boosted up to +40dB max
while a message is playing by pressing the
button. The
BOOST LED will light up. Pressing the button again at any
time will revert the speaker volume back to normal level.
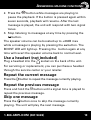
Use a headset (not included)
Plug a headset into the
socket on the back of the unit.
For servicing or replacement, you can purchase a headset
through the service center or your retailer.
Repeat the current message
Press the button to repeat the message currently playing.
Repeat the previous message
Press and hold the button until a signal tone is played to
repeat the previous message.
Skip one message
Press the button once to skip the message currently
playing. The unit will play the next message.
ANSWERING MACHINE FUNCTIONS

Service Center
14
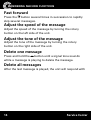
Fast forward
Press the button several times in succession to rapidly
skip several messages.
Adjust the speed of the message
Adjust the speed of the message by turning the rotary
button on the left side of the unit.
Adjust the tone of the message
Adjust the tone of the message by turning the rotary
button on the right side of the unit.
Delete one message
Press and hold the button until a signal tone sounds
while a message is playing to delete the message.
Delete all messages
After the last message is played, the unit will respond with
ANSWERING MACHINE FUNCTIONS

1-866-AMPLICOM (267-5426)
15
two signal tones. Press the button and hold until the
unit plays a nal signal tone.
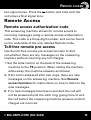
Remote Access
Remote access authorization code
This answering machine allows for remote access to
incoming messages using a remote access authorization
code. This code is a three-digit number, and can be found
on the underside of the unit, labeled Remote Code.
Toll-free remote pre-access
Use the toll-free remote pre-access function to nd
out whether there are any messages on the answering
machine without incurring any toll charges.
1. Set the slide control on the back of the answering
machine to the TS position. When calling the machine
while away, the machine answers as follows:
A. If the call is answered after two rings, there are new
messages on the answering machine. See Remote
access functions for instructions on how to listen to the
new messages.
B. If no new messages have been recorded, the call will
not be answered until the sixth ring, giving time to end
the call before the answering machine answers and toll
charges are incurred.
REMOTE ACCESS

Service Center
16
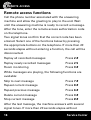
Remote access functions
Call the phone number associated with the answering
machine and allow the greeting to play to the end. Wait
until the answering machine is ready to record a message.
After the tone, enter the remote access authorization code
on the telephone.
Two signal tones con rm that the correct code has been
entered. Select one of the functions below by pressing
the appropriate buttons on the telephone. If more than 20
seconds elapse without entering a function, the call will be
disconnected.
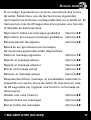
Replay all recorded messages Press 2 #
Replay newly recorded messages Press 2 5
Room monitoring Press 0 #
While messages are playing, the following functions are
available:
Skip to next message Press 7 #
Repeat current message Press 8 #
Repeat previous message Press 6 #
Delete current message Press 3 #
Stop current message Press # #
After the last message, the machine answers with several
signal tones. If more than 20 seconds elapse without
REMOTE ACCESS

1-866-AMPLICOM (267-5426)
17
entering a function, the call is disconnected.
Record memo Press 8 #
Repeat all messages Press 2 #
Delete all messages Press 3 #
Turn off answering machine Press 9 #
Re-record greeting using remote access
1. Call the telephone number associated with the
answering machine and allow the greeting message to
play to the end. Wait until the answering machine is
ready to record a message.
2. After the tone, enter the personal authorization code on
the telephone. Two signal tones con rm that the correct
code has been entered.
3. Press the key combination 7 #. Dictate the new greeting
after the tone.
4. End the recording by pressing 7 # again. The new
greeting will repeat automatically.
5. Finish the call by hanging up the telephone receiver.
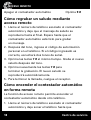
Turning the answering machine on remotely
Using the remote access function, the answering machine
may be turned on from another telephone.
1. Call the telephone number associated with the
answering machine and let the phone ring until the call
REMOTE ACCESS

Service Center
18
is answered by the machine (approximately ten
rings).
2. After the tone, enter the remote access authorization
code on the telephone. Two signal tones con rm that
the correct code has been entered.
3. Press 9 # and the answering machine will be turned on.
4. Hang up the call or make use of the other remote
access functions.
Remote access with insuf cient memory
capacity
If there is no memory left for new messages, the
answering machine will no longer accept calls. To access
messages remotely in this case, proceed as follows:
1. Call the telephone number associated with the
answering machine.
2. Let the phone ring approximately ten times and the
answering machine will respond with several signal
tones.
3. Enter the remote access authorization code. Two signal
tones con rm that the correct code has been entered.
Remote access functionality is now available (see
Remote access functions).
4. Create more memory space by deleting messages.
REMOTE ACCESS

1-866-AMPLICOM (267-5426)
19
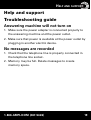
Help and support
Troubleshooting guide
Answering machine will not turn on
1. Make sure the power adapter is connected properly to
the answering machine and the power outlet.
2. Make sure that power is available at the power outlet by
plugging in another electric device.
No messages are recorded
1. Check that the telephone line is properly connected in
the telephone line socket.
2. Memory may be full. Delete messages to create
memory space.
HELP AND SUPPORT

Service Center
20
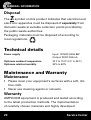
Disposal
The
symbol on this product indicates that electrical and
electronic apparatus must be disposed of separately from
domestic waste at suitable collection points provided by
the public waste authorities.
Packaging materials must be disposed of according to
local regulations.
Technical details
Power supply Input: 120VAC 60Hz 8W
Output: 9VDC 300mA
Optimum ambient temperature 32˚F to 113˚F (0˚C to 45˚C)
Optimum relative humidity 30% to 80%
Maintenance and Warranty
Maintenance
• Please clean your equipment’s surfaces with a soft, lint-
free cloth.
• Never use cleaning agents or solvents.
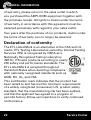
Warranty
AMPLICOM equipment is produced and tested according
to the latest production methods. The implementation
of carefully chosen materials and highly developed
GENERAL INFORMATION

1-866-AMPLICOM (267-5426)
21
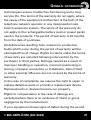
technologies ensure trouble free functioning and a long
service life. The terms of the warranty do not apply where
the cause of the equipment malfunction is the fault of the
telephone network operator or any interposed private
branch extension system. The terms of the warranty do
not apply to the rechargeable battery pack or power packs
used in the products. The period of warranty is 24 months
from the date of purchase.
All de ciencies resulting from material or production
faults which occur during the period of warranty will be
eliminated free of charge. Rights to claims under the terms
of warranty are annulled following intervention by the
purchaser or third parties. Damage caused as a result of
improper handling or operation, incorrect positioning or
storing, improper connection or installation, Acts of God
or other external in uence are not covered by the terms of
warranty.
In the case of complaints, we reserve the right to repair or
replace defective parts or provide a replacement device.
Replaced parts or devices become our property.
Rights to compensation in the case of damage are
excluded where there is no evidence of intent or gross
negligence by the manufacturer.
If your equipment shows signs of defect during the period
GENERAL INFORMATION
Page is loading ...
Page is loading ...
Page is loading ...
Page is loading ...
Page is loading ...
Page is loading ...
Page is loading ...
Page is loading ...
Page is loading ...
Page is loading ...
Page is loading ...
Page is loading ...
Page is loading ...
Page is loading ...
Page is loading ...
Page is loading ...
Page is loading ...
Page is loading ...
Page is loading ...
Page is loading ...
Page is loading ...
Page is loading ...
Page is loading ...
Page is loading ...
Page is loading ...
Page is loading ...
Page is loading ...
Page is loading ...
-
 1
1
-
 2
2
-
 3
3
-
 4
4
-
 5
5
-
 6
6
-
 7
7
-
 8
8
-
 9
9
-
 10
10
-
 11
11
-
 12
12
-
 13
13
-
 14
14
-
 15
15
-
 16
16
-
 17
17
-
 18
18
-
 19
19
-
 20
20
-
 21
21
-
 22
22
-
 23
23
-
 24
24
-
 25
25
-
 26
26
-
 27
27
-
 28
28
-
 29
29
-
 30
30
-
 31
31
-
 32
32
-
 33
33
-
 34
34
-
 35
35
-
 36
36
-
 37
37
-
 38
38
-
 39
39
-
 40
40
-
 41
41
-
 42
42
-
 43
43
-
 44
44
-
 45
45
-
 46
46
-
 47
47
-
 48
48
-
 49
49


Amplicom AB900 User manual
- Category
- Answering machines
- Type
- User manual
- This manual is also suitable for
Ask a question and I''ll find the answer in the document
Finding information in a document is now easier with AI
in other languages
- español: Amplicom AB900 Manual de usuario
Related papers
-
Amplicom AB900 Quick start guide
-
Amplicomms PowerTel 30 User guide
-
Amplicom PowerTel 720 Assure + Twin User manual
-
-
Amplicom PowerTel 58 User guide
-
Amplicom NL 100 Induction Neckloop for PowerTel Series User guide
-
-
Amplicomms PowerTel 700 User guide
-
Amplicomms PowerTel M5000 Owner's manual
-
Amplicomms PowerTel M5010 Owner's manual
Other documents
-
AUDIOLINE PowerTel 500 User guide
-
AUDIOLINE AB 900 User guide
-
Philips SJA9190/17 User manual
-
AUDIOLINE 592773 Datasheet
-
Sony SPP-A1070 User manual
-
AUDIOLINE PowerTel 68 Plus User guide
-
-
-
-