Kompernass PFBS 6 V User manual
- Category
- Toy vehicles
- Type
- User manual
Page is loading ...
Page is loading ...

5 GB/IE/CY
Introduction
For your safety ..............................................................................................................Page 6
Proper use .....................................................................................................................Page 6
Features and equipment ...............................................................................................Page 6
Included items ...............................................................................................................Page 7
Technical information ...................................................................................................Page 7
Safety
Safety advice ...............................................................................................................Page 7
Operation
Charging the battery pack ..........................................................................................Page 8
Inserting / removing the battery pack into / out of the drill / grinder .........................Page 9
Changing a collet .........................................................................................................Page 9
Inserting / changing tools .............................................................................................Page 9
Switching on and off / Setting the speed range .........................................................Page 9
Advice on working with materials / Tools / Speed ranges ...........................................Page 9
Tips and tricks ...............................................................................................................Page 11
Maintenance and cleaning
Maintenance .................................................................................................................Page 11
Cleaning ........................................................................................................................Page 11
Disposal ......................................................................................................................Page 11
Information
Service ...........................................................................................................................Page 11
Manufacturer’s Declaration of Conformity / Manufacturer ......................................Page 11
Table of content

6 GB/IE/CY
Multi-purpose precision
rotary tool PFBS 9.6
Q
Introduction
Q
For your safety
Please make sure you familiarise your-
self fully with the way the device works
before you use it for the first time and
that you understand how to handle electrical power
tools correctly. Further details can be found in the
operating instructions. In addition to the above, you
must also observe the general safety advice con-
tained in the accompanying booklet. Keep these
instructions in a safe place. If you pass the device
on to anyone else, please ensure that you also pass
on all the documentation.
Q
Proper use
The multi-purpose precision rotary tool is intended
to be used for drilling, milling, engraving, polishing,
cleaning, grinding, cutting and sawing wood, metal,
plastic, ceramics or stone in dry environments. Any
other use or modification to the drill / grinder shall
be considered as improper use and could give rise
to considerable dangers. The manufacturer will not
accept liability for loss or damage arising from
improper use. Not intended for commercial use.
Q
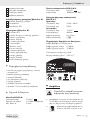
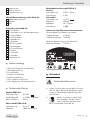
Features and equipment
Multi-purpose precision rotary tool:
1
On / Off switch / Rotational speed control
2
Battery pack release button
3
Battery pack
4
Metal stirrup hanger
5
Clamping nut
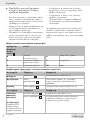
Introduction
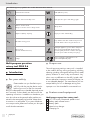
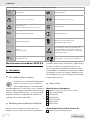
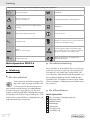
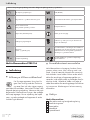
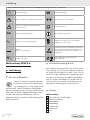
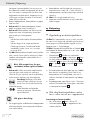
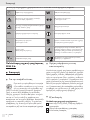
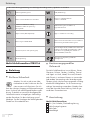
The following icons / symbols are used in this instruction manual:
Read instruction manual!
W
Watts (Effective power)
Observe caution and safety notes!
Wear protective gloves and safety goggles
Caution – electric shock!
Dangerous electric current – danger to life!
Safety class II
Ah
Amp-hours (Battery capacity)
Proper procedure and handling.
n
0
Rated idle running speed
Keep children and other unauthorised personnel
at a safe distance when using electrical tools.
Direct current
(Current and kind of tension)
Damaged appliances, power cables and power
plugs mean potentially fatal risks from electric
shock. Regularly check the condition of the appli-
ance, the power cables and the power plugs.
V
~
Voltage
Dispose packaging and appliance in an
environmentally-friendly way!

7 GB/IE/CY
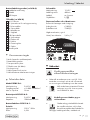
6
Spigot nut
7
Spindle lock
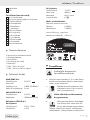
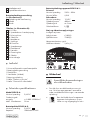
Battery charger (see Fig. A):
8
Charging cradle with connector
9
Mains adapter
10
LED
Accessories (see Fig. B):
11
6 HSS drills
12
2 Mandrels for mounting tools
13
3 Polishing wheels
14
4 Grinding wheels
15
1 Metal brush
16
1 Saw blade
17
10 Cutting wheels
18
4 Collets
19
2 Plastic brushes
20
3 Milling bits
21
2 Engraving bits
22
5 Grinding bits
23
Combination tool
Q
Included items
1 Multi-purpose precision rotary tool
with rechargeable battery pack
1 Battery charger
1 Plastic case
1 Accessory kit (44-piece)
1 Operating instructions
1 Booklet “Guarantee and service”
1 Booklet “General safety advice”
Q
Technical information
Model PFBS 9.6:
Rated voltage: 9.6 V DC
No-load speed: n
0
5000 - 25 000 min
-1
Max. disc ø: 25 mm
Rechargeable battery pack PFBS 9.6-2:
Rated voltage: 9.6 V DC
Capacity: 1000 mAh NI-MH
Battery charger PFBS 9.6-1:
Primary:
Rated voltage: 230 V
~
50 Hz
Rated output: 8.5 W
Secondary:
Rated voltage: 12 V DC
Charging current: 400 mA
Charging duration: approx. 3 hours
Protection class: II / &
Noise and Vibration Informationen:
Determined noise level with A evaluation.
Sound pressure level: 61 dB (A)
Acoustic power level: 75 dB (A)
Evaluated acceleration, typical.
Hand-arm vibration: 2,63 m / s
2
Q
Safety
Safety advice
J Ensure that the drill / grinder is always used in
accordance with the advice in these operating
instructions and only by persons over 16 years
of age.
J
Keep children away from the drill /
grinder. Store the drill / grinder
indoors in an enclosed, dry place
where it cannot be reached by children.
Introduction / Safety

8 GB/IE/CY
To avoid danger to life from
electric shock:
J
A damaged drill / grinder, mains
lead or plug presents a serious dan-
ger to life from electric shock. Check
the condition of the drill / grinder, charger, mains
lead, mains plug and battery pack at frequent
intervals. Do not use a drill / grinder with dam-
aged parts. If a dangerous situation arises pull
out the mains plug from the socket immediately.
Never open up the
drill / grinder or equipment.
Always have any repairs
carried out or replace-
ment parts fitted at the service
centre or by an
electrical equipment repair specialist.
J Protect the charger, battery pack and the drill /
grinder from moisture.
J Warning! Do not use the drill / grinder with
chargers or batteries other than the charger /
battery pack supplied.
J Warning! Never short circuit the battery
pack. Overheating, fire or destruction of the
battery pack may result.
Therefore:
- Do not connect any wires to the battery
pack poles.
- Take care that no metal objects (nails,
screws,
etc.) can short circuit the battery pack
connectors.
J m Attention! Never throw the battery pack
into fire or water. Danger of explosion! Handle
the battery pack with care, protect it from im-
pacts and sharp blows!
Attention! To avoid the danger
of injury, burning and damage
to health:
J Warning! If you come into contact with the
acid from the battery pack, wash off the acid
thoroughly with water immediately. If acid
should enter your eyes, flush them immediately
with water and find a doctor immediately.
J
Caution! The tool continues to
rotate after it has been switched off!
Avoid contact with rapidly rotating
drill / grinder components.
J When you use the drill / grinder wear
the following protective equipment:
safety glasses and protective gloves.
To work safely:
J
Before cleaning or maintaining the charger or
battery
pack always pull the plug out of the
mains socket.
J Never charge the battery pack if the ambient
temperature is below 10 °C or above 40 °C.
m Attention! To avoid damaging the tool or
workpiece.
J Do not allow the tool to come to a standstill by
overloading it!
Q
Operation
Q
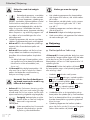
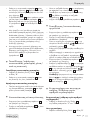
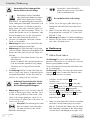
Charging the battery pack
m Attention! A battery pack that has been
unused for a while or never been charged must be
charged before reuse or first use. The battery pack
requires about 3-5 cycles before it can reach its
full charge.
m
Attention!
Always pull out the mains plug
(
mains adapter
9
) before you
insert the battery
pack into or take it out of the charger.
j Connect the adapter
9
to a mains socket.
j Insert the battery pack
3
into the charging
cradle
8
. Make sure that the polarity of the
battery pack matches that of charging cradle
8
.
j The LED
10
lights up green whenever the bat-
tery pack
3
is in the charging cradle
8
and
the adapter
9
is connected to a mains socket.
J Do not use the quick-charge process to charge
a battery pack for a second time in close suc-
cession. Otherwise there is the danger that the
battery pack will become overcharged and its
useful life and that of the charger reduced.
Safety / Operation

9 GB/IE/CY
J Switch the charger off for at least 15 minutes
between successive charging processes. To do
this pull the mains plug
(
mains adapter
9
)
out
of the socket.
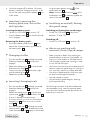
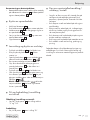
Q
Inserting / removing the
battery pack into / out of the
drill / grinder
Inserting the battery pack:
j Set the On / Off switch
1
to position “0”.
j Insert the battery pack
3
into the drill / grinder
until it engages.
Removing the battery pack:
j Pressing the battery pack buttons
2
at the
sides at the same time allows you to remove
the battery pack
3
.
Q
Changing a collet
j Press the spindle lock
7
and keep it pressed.
j Rotate the clamping nut
5
until the lock
engages.
j Release the clamping nut
5
from the thread
and remove the collet
18
.
j Insert the correct collet
18
and screw it tight
with the clamping nut
5
.
j Release the spindle lock
7
.
Q
Inserting / changing tools
j Press the spindle lock
7
and keep it pressed.
j Rotate the clamping nut
5
until the lock
engages.
j Release the clamping nut
5
using the open
spanner end
of the combination tool
23
.
j If a tool is already inserted remove it.
j First insert the tool you wish to use though the
clamping nut
5
before you insert it into the
collet
18
.
j Press the spindle lock
7
and keep it pressed.
j
Insert the collet
18
into the threaded insert and
screw
the clamping nut
5
tightly on the thread
using the
open spanner end of the
combination tool
23
.
Note: Use the screwdriver end of the
combination tool
23
to release or tighten the
screw of the mandrels
12
.
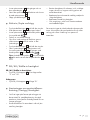
Q
Switching on and off / Setting
the speed range
Switching on / Setting the speed range:
j Set the On / Off switch
1
to a position
between “2” and “10”.
Switching off:
j Set the On / Off switch
1
to position “0”.
Q
Advice on working with
materials / Tools / Speed ranges
j Make sure that no debris from working the
material adheres to the tool. Use paraffin, cut-
ting oil or similar medium to lubricate the tool.
j Use the highest speed when working on steel
or iron with the milling bits.
j Use a short trial on a test piece to determine the
optimum rotational speed range for working on
zinc, zinc alloy, aluminium, copper and lead.
j Use the low speed range for working on plas-
tics and low-melting point materials.
j Use high speeds on wood.
j Use the medium speed range for cleaning,
polishing and buffing.
The following information shall be considered as
recommendatory only. Learn by practical experi-
ence which tools and settings are the best for the
materials you work with.
Operation

10 GB/IE/CY
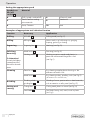
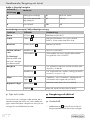
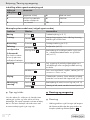
Operation
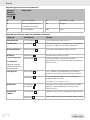
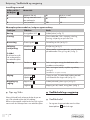
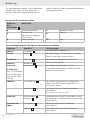
Setting the appropriate speed
Symbols on
On / off
switch
1
Material
0
(Drill / grinder switched off)
6
Softwood, metal
2
Plastics and low melting
point materials
8
Hardwood
4
Stone, Ceramics
10
Steel
Examples of appropriate tool selection Function
Function Accessory Application
Drilling
HSS drill
11
Drilling wood (see Fig. C)
Milling
Milling bits
20
Various tasks, e.g. hollowing out, gouging,
shaping, grooving or slotting
Engraving
Engraving bits
21
Markings (see Fig. D)
Polishing,
derusting
mAttention!
Use only the lightest
contact pressure of
the tool on the work-
piece.
Metal brush
15
Derusting (see Fig. E)
Polishing wheel
13
Working on various metals and plastics, in
particular noble metals like gold or silver
(see Fig. F)
Cleaning
Plastic brush
19
E.g. cleaning complex plastic housings or the
area around a door lock
Metal brush
15
E.g. cleaning cutlery, jewellery, tools (see Fig. E)
(The metal brush is softer than steel)
Grinding
Grinding wheels
14
,
grinding bits
22
Grinding of stone, precise tasks on hard materials,
such as ceramics or alloy steel (see Fig. G)
Cutting and
sawing
Cutting discs
17
Cutting metal, plastic or wood (see Fig. H)
Saw blade
16
Saw blade Sawing steel, metal, wood or plastic
(see Fig. I)

11
GB/IE/CY
Q
Tips and tricks
If you use press too hard you run the risk of break-
ing the tool or damaging the workpiece. You will
achieve the best results by operating the tool at a
constant rotational speed and using a low contact
pressure on the workpiece.
Q
Maintenance and cleaning
Q
Maintenance
j Before and after a prolonged period of
non-use fully charge the battery pack
3
.
Q
Cleaning
j Clean all the dirt off the drill / grinder. Use a
dry cloth for cleaning.
Q
Disposal
The packaging is wholly composed of
environmentally-friendly materials that can
be disposed of at a local recycling centre.
Do not dispose of electric tools in
the household waste!
In accordance with European Directive
2002 / 96 / EC about waste electrical and elec-
tronic equipment and its transposition into national
legislation, worn out electric tools must be collected
separately and taken for environmentally compatible
recycling.
Faulty or used rechargeable batteries must be recy-
cled in accordance with Directive 91 / 157 / EEC.
Return the appliance with integrated rechargeable
battery via the available collection facilities.
Contact your local refuse disposal authority for
more details of how to dispose of your eletric tools.
Q
Information
Q
Service
Please see the warranty documents for details of
the Service Office responsible for your country.
Q
Manufacturer’s Declaration of
Conformity / Manufacturer
We, Kompernaß GmbH, Burgstr. 21,
D-44867 Bochum, Germany, declare that this
product complies with the following EU directives:
Machinery Directive (98 / 37 / EC)
EU Low Voltage Directive (2006 / 95 / EC)
Electromagnetic compatibility
(89 / 336 / EEC), (92 / 31 / EEC)
Type / Device description:
Multi-purpose precision rotary tool PFBS 9.6
Bochum, 31.10.2007
Hans Kompernaß
- Managing Director -
We reserve the right to make technical modifications in the course
of further development.
Operation / Maintenance and cleaning / Disposal / Information
Page is loading ...
Page is loading ...
Page is loading ...
Page is loading ...
Page is loading ...
Page is loading ...
Page is loading ...
Page is loading ...
Page is loading ...
Page is loading ...
Page is loading ...
Page is loading ...
Page is loading ...
Page is loading ...
Page is loading ...
Page is loading ...
Page is loading ...
Page is loading ...
Page is loading ...
Page is loading ...
Page is loading ...
Page is loading ...
Page is loading ...
Page is loading ...
Page is loading ...
Page is loading ...
Page is loading ...
Page is loading ...
Page is loading ...
Page is loading ...
Page is loading ...
Page is loading ...
Page is loading ...
Page is loading ...
Page is loading ...
Page is loading ...
Page is loading ...
Page is loading ...
Page is loading ...
Page is loading ...
Page is loading ...
Page is loading ...
Page is loading ...
Page is loading ...
Page is loading ...
Page is loading ...
Page is loading ...
Page is loading ...
Page is loading ...
-
 1
1
-
 2
2
-
 3
3
-
 4
4
-
 5
5
-
 6
6
-
 7
7
-
 8
8
-
 9
9
-
 10
10
-
 11
11
-
 12
12
-
 13
13
-
 14
14
-
 15
15
-
 16
16
-
 17
17
-
 18
18
-
 19
19
-
 20
20
-
 21
21
-
 22
22
-
 23
23
-
 24
24
-
 25
25
-
 26
26
-
 27
27
-
 28
28
-
 29
29
-
 30
30
-
 31
31
-
 32
32
-
 33
33
-
 34
34
-
 35
35
-
 36
36
-
 37
37
-
 38
38
-
 39
39
-
 40
40
-
 41
41
-
 42
42
-
 43
43
-
 44
44
-
 45
45
-
 46
46
-
 47
47
-
 48
48
-
 49
49
-
 50
50
-
 51
51
-
 52
52
-
 53
53
-
 54
54
-
 55
55
-
 56
56
-
 57
57
-
 58
58


Kompernass PFBS 6 V User manual
- Category
- Toy vehicles
- Type
- User manual
Ask a question and I''ll find the answer in the document
Finding information in a document is now easier with AI
in other languages
- Deutsch: Kompernass PFBS 6 V Benutzerhandbuch
- dansk: Kompernass PFBS 6 V Brugermanual
- svenska: Kompernass PFBS 6 V Användarmanual
- suomi: Kompernass PFBS 6 V Ohjekirja
Related papers
-
Kompernass PFBS 9.6 V - 2 User manual
-
-
-
Kompernass PFS 710 A - MANUAL 2 User manual
-
-
-
TRONIC KH 3157 - T4X Owner's manual
-
-
Kompernass XQ90 - MANUEL 2 Operating And Safety Instructions Manual
-
Other documents
-
Parkside PFBS 9.6 A1 Operation and Safety Notes
-
Parkside PFBS 9.6 V - 2 User manual
-
-
Parkside PFBS 12 A1 Translation Of The Original Instructions
-
-
-
Parkside PFBS 12 B2 Instructions Manual
-
Parkside PFBS 12 B3 User manual
-
FLORABEST PRC 9.6 User manual
-