Mr. Coffee BVMC-KG1 User manual

Category
Coffee makers
Type
User manual

This manual is also suitable for

Mr. Coffee BVMC-KG1 Single Serve Brewer is an easy-to-use coffee maker that brews a fresh cup of coffee in less than a minute. It features a variety of brewing options such as regular, bold, and iced coffee, and it can also be used to make tea and hot chocolate. The BVMC-KG1 is also easy to clean, with a removable drip tray and a self-cleaning function.

Mr. Coffee BVMC-KG1 Single Serve Brewer is an easy-to-use coffee maker that brews a fresh cup of coffee in less than a minute. It features a variety of brewing options such as regular, bold, and iced coffee, and it can also be used to make tea and hot chocolate. The BVMC-KG1 is also easy to clean, with a removable drip tray and a self-cleaning function.

User Manual /
Manual del Usuario
Single Serve Brewer / Cafetera individual
BVMC-KG1
www.mrcoffee.com
© 2010 Sunbeam Products, Inc. doing business as Jarden Consumer Solutions. All rights reserved.
Distributed by Sunbeam Products, Inc. doing business as Jarden Consumer Solutions,
Boca Raton, Florida 33431.
U.S. 1-877-517-6400
Canada 1-877-517-6400
Visit us at www.mrcoffee.com
You will find exciting and entertaining tips and ideas,
including great recipes!
Keurig, the Cup and Star logo, Keurig Brewed and K-Cup are trademarks or registered trademarks
of Keurig, Incorporated used under license.
SPR-062310
© 2010 Sunbeam Products, Inc. operando bajo el nombre de Jarden Consumer Solutions.
Todos los derechos reservados. Distribuido por Sunbeam Products, Inc. operando bajo el nombre
de Jarden Consumer Solutions, Boca Raton, Florida 33431.
EE.UU. 1-877-517-6400
Canada 1-877-517-6400
Visítenos en www.mrcoffee.com
Ahí encontrará consejos e ideas excitantes y entretenidos,
¡incluyendo excelentes recetas!
Keurig, el logo de Taza y Estrella, “Keurig Brewed” y “K-Cup” son marcas registradas o marcas registradas
de la Corporación Keurig usadas bajo licencia.
Printed in China/Impreso en China P.N. 138998
2 3
IMPORTANT SAFEGUARDS
When using electrical appliances, basic safety precautions should be
followed, including the following:
1. Read all instructions before using.
2. Do not touch hot surfaces. Use handles and knobs when available.
3. This appliance must be properly installed and located in accordance with
these instructions before it is used.
4. The use of accessory attachments not recommended by the appliance
manufacturer may result in fire, electrical shock or injury to persons.
5. Do not place on or near a hot gas or electric burner, or in a heated oven.
6. Do not use outdoors.
7. To protect against fire, electric shock and injury, do not immerse cords,
plugs or the appliance in water or any other liquid.
8. Use only water in this appliance! Do not put any other liquids or foods
in the Water Reservoir.
9. Unplug the coffee brewer when not in use and before cleaning. Allow
to cool before attaching or removing parts and before cleaning the
appliance.
10. Do not operate any appliance with a damaged cord or plug or after
the appliance malfunctions or is damaged in any manner. Contact your
Mr. Coffee
®
Customer Service to arrange for replacement or repair.
11. Do not let the cord hang over the edge of the table or counter, or touch
hot surfaces.
12. Close supervision is necessary when any appliance is used by or near
children.
13. Do not open the brewer while brewing is in progress.
14. Do not use appliance for other than intended use.
CAUTION: There are two sharp needles that puncture the K-Cup
®
portion
pack, one above the K-Cup Holder and the other in the bottom of the K-Cup
Holder. To avoid risk of injury, do not put your fingers in the K-Cup Assembly
Housing.
CAUTION: There is extremely hot water in the K-Cup Holder during the brew
process. To avoid risk of injury, do not lift the Handle or open the K-Cup
Assembly Housing during the brewing process.
WARNING! To reduce the risk of fire or electric shock, do not
remove any service covers. There are no user serviceable parts
inside the coffeemaker. Only authorized personnel should repair the
coffeemaker.
Please read ALL of the instructions in this manual carefully before you begin
to use this appliance. Proper care and maintenance will ensure a long life and
a trouble-free operation for this appliance. Please save these instructions and
refer to them for cleaning and care tips.
SAVE THESE INSTRUCTIONS
SPECIAL CORD SET INSTRUCTIONS
1. A short power supply cord is provided to reduce the hazards resulting
from a person or pet becoming entangled in, or tripping over, a longer
cord.
2. An extension cord may be purchased and used if care is exercised
in its use.
3. If an extension cord is used, the marked electrical rating of the
extension cord must be at least 10 amps and 120 volts. The resulting
extended cord must be arranged so that it will not drape over a
countertop or tabletop where it can be pulled on by children or
tripped over accidentally.
4. This appliance has a polarized plug (one blade is wider than the other).
To reduce the risk of electric shock, this plug will fit in a polarized outlet
only one way. If the plug does not fit fully in the outlet, reverse the
plug. If it still does not fit, contact a qualified electrician. Do not modify
the plug in any way.
THIS PRODUCT IS FOR HOUSEHOLD USE ONLY
4 5
Table of Contents
Important Safeguards . . . . . . . . . . . . . . . . . . . . . . . . . . . . . . . . . . . . . . . . . . . . .2
Special Cord Set Instructions ........................................3
Parts Diagram ................................................... 5
Set-Up & How to Brew . . . . . . . . . . . . . . . . . . . . . . . . . . . . . . . . . . . . . . . . . . . . 6
Helpful Hints . . . . . . . . . . . . . . . . . . . . . . . . . . . . . . . . . . . . . . . . . . . . . . . . . . . . 9
Cleaning and Maintaining ......................................... 10
Troubleshooting .................................................12
Service and Maintenance ..........................................12
Warranty Information ............................................ 13
PARTS DIAGRAM
1
7
2
3
4
5
6
Welcome and congratulations on the purchase of your new MR. COFFEE
®
Single Serve Brewer. Your new brewer will wake up with you in the morning
and provide you breaks and treats during your hectic daily activities.
How you enjoy your MR. COFFEE
®
Single Serve Brewer is up to you!
1 Brew Now / Off
2 Heating Indicator (Red)
3 Brewing Indicator (Green)
4 Drip Tray Plate
5 Drip Tray
6 Lift Handle & Insert K-Cup
®
portion pack
7 Hot Water Tank
SET-UP & hOw TO bREw
1. Place Brewer upright on a flat surface, remove
protective sheet and plug into outlet.
6 7
2. DO NOT remove or puncture the foil lid of
the K-Cup
®
portion pack.
3. Lift front facing of the brewer to insert
a K-Cup.
4. Place chosen K–Cup into the K-Cup
Assembly Housing.
CAUTION: There are two sharp needles
that puncture the K-Cup, one above
the K-Cup Holder and the other in the
bottom of the K-Cup Holder. To avoid risk
of injury, do not put your fingers in the
K-Cup Housing Assembly.
5. Lower the front facing completely and
firmly to close the Lid and puncture the
K-Cup portion pack.
6. Depress the water marking button and the
hot water tank will open automatically.
7. Fill the Hot Water tank with filtered
or bottled water up to the FILL LEVEL
indicator.
8. Close the Hot Water Tank cover.
8 9
9. Place a coffee cup in the dispense area on
the drip tray. Press the BREW NOW button.
NOTE: Drip Tray can be removed to
accommodate larger mugs.
10. When the water reaches temperature, the
HEATING light will go off and the brewing
light will turn on.
NOTE: Pump will remain on for up to 90
seconds to dry the K-Cup.
11. Enjoy!
helpful hints
Initial Cleansing Brew – Before you use your Brewer for the first time, perform
an initial cleansing brew by running clean water through the brew cycle without
using a K-Cup® portion pack.
One Cup at a Time – Your new Brewer makes one fresh beverage at a time.
You’ll need to add fresh water each time you brew.
The Right Water Makes a Difference – For the best tasting gourmet coffee,
tea or hot cocoa, we recommend using bottled or filtered water. We do not
recommend using distilled or reverse osmosis water. Water quality varies from
place to place. If you notice an undesirable taste in your cup of coffee such
as chlorine or other mineral taste, we recommend you consider using bottled
water or water from a filtration system.
Customize Your Flavor & Brew – With the choice of over 200 varieties of K-Cups,
your Brewer gives you endless options to customize the flavor and strength
that’s perfect for you. For a strong, intense cup, select an Extra Bold K-Cup (with
up to 30% more ground coffee than regular varieties). Fill the Hot Water Tank
with filtered or bottled water up to the FILL LEVEL indicator and brew normally.
Brewing Into a Tall Mug – To brew into a tall mug, simply remove the Drip Tray
Assembly and place the tall mug on the Drip Tray Base.
The Drip Tray – Any liquid overflow (from your cup or the Cold Water Reservoir)
will be caught in the Drip Tray. Be sure to empty the Drip Tray. The Drip Tray has a
snug fit to ensure it stays put in transit.
Clean Your Brewer Regularly – To keep your Brewer looking and performing its
best, be sure to clean the external and internal components on a regular basis.
See page 10 for more information.
De-Scaling – Mineral content in water varies from place to place. Depending
on the mineral content of the water in your area, calcium deposits or scale may
build up in your Brewer. Scale is non-toxic, but left unattended, it can hinder
Brewer performance. De-scaling your Brewer helps maintain the heating element
and other internal parts of the Brewer that come in contact with water. See
page 11 for more information.
Storing – When storing your Brewer, carefully empty the Drip Tray and make sure
the Internal Hot Water Tank is empty. Store your Brewer upright in a safe, dry,
frost-free environment.
Cleaning the Hot Water Tank
To access the Hot Water Tank, press the Water Marking Button and the Water Fill
Lid will pop open. Inspect the Hot Water Tank area and clean with a damp lint free
cloth as necessary. Close the Water Fill Lid when finished.
Emptying the Hot Water Tank
1. Ensure that the Water Fill Lid is closed.
2. Place a cup on the Drip Plate then press and hold the BREW Button until all
the water has been dispensed. Note, there will be a delay of 4-5 seconds
until water starts to dispense.
Storage
Empty the Hot Water Tank before storing and take care to ensure that you store
your Brewer in a safe and frost free environment. It is suggested to store your
Brewer in the upright position. If you store the Brewer in a cold environment,
you run the risk of condensation freezing inside the Brewer and causing damage.
When you prepare to use it after storage, we recommend wiping the Hot Water
Tank with a damp lint-free cloth and running three cleansing brews without a
K-Cup.
If your Brewer has been in an environment below freezing, please be sure to let it
warm to room temperature for 2 hours before using.
De-Scaling Your Brewer
Mineral content in bottled or filtered water varies. Depending on the mineral
content of the water, calcium deposits or scale may build up in your Brewer. Scale
is non-toxic but left unattended, it can hinder Brewer performance. Descaling
your Brewer helps maintain the heating element, and other internal parts of the
Brewer that come in contact with water.
The Brewer should be de-scaled every 3-6 months to ensure optimal performance
or when there are white deposits in the Hot Water Tank. It is possible for calcium
deposits to build up faster, making it necessary to de-scale more often.
Step 1: Make sure you have at least 8 ounces of undiluted white vinegar on hand.
You will also need a 10 oz ceramic cup (do not use a paper cup) and
access to a sink.
Step 2: Fill Hot Water Tank with 8 ounces of undiluted white vinegar up to the FILL
LEVEL mark, place a ceramic cup on the Drip Tray Plate.
Step 3: Close the lid, and perform a brew into the ceramic cup without adding
a K-Cup.
Step 4: Pour the contents of the ceramic cup into the Hot Water Tank, careful the
liquid will be hot, close the lid. Start a brew but power off the Brewer just
after it starts to dispense and then allow it to sit for at least 30 minutes.
Step 5: After the prescribed period of time, perform a brew without adding a
K-Cup. Empty the contents of the ceramic cup into the sink, be careful as
contents may be hot.
Step 6: Fill the Hot Water Tank with 8 ounces of bottled water, close the water fill
lid, place a cup on the Drip Tray Plate and perform a brew.
Step 7: Repeat Step 6 three times using bottled water (with no K-Cup in place)
to cleanse the Brewer plumbing and get rid of any residual taste from the
vinegar. The Brewer is now ready for normal use again.
10 11
CLEANING AND MAINTAINING
YOUR SINGLE SERVE BREWER
Cleaning External Parts
IMPORTANT: Make sure the Brewer is unplugged before cleaning Regular
cleaning of the Brewer’s external components is recommended.
1. Never immerse the Brewer in water or other liquids. The Housing and other
external components may be cleaned with a soapy, damp, non-abrasive
cloth.
2. The Drip Tray can accumulate liquids. The Drip Tray and Drip Tray Plate should
be periodically inspected and cleaned with a damp soapy nonabrasive
lint free cloth. The Drip Tray and Drip Tray Plate should not be put into the
dishwasher. To remove the Drip Tray Assembly, simply slide it toward you,
keeping it level at all times to avoid spilling.
Cleaning the K-Cup Holder Assembly
1. Cleaning the Parts – The K-Cup Holder Assembly can be placed onto the top
shelf of a dishwasher. NOTE: Use low temperature cycles in the dishwasher. To
remove from the Brewer, lift the front face of the Brewer. Grasp the top of the
K-Cup Holder with one hand while pushing up on the bottom of the K-Cup
Holder from underneath with the other until it releases. After cleaning, align
the K-Cup Holder with the opening using the two front
ribs as a guide, and snap into place from the top.
2. Cleaning the Funnel – The Funnel can be removed
from the K-Cup Holder by pulling on it until it snaps off
(fig. 1). The Funnel is dishwasher safe. To replace it,
just snap it back onto the K-Cup Holder Assembly.
3 Cleaning the Exit Needle – The Exit Needle is located
on the inside bottom of the K-Cup Holder Assembly.
Should a clog arise due to coffee grinds, it can be
cleaned using a paper clip or similar tool. Remove
K-Cup Holder assembly and detach Funnel. Insert
the paper clip (as shown in fig. 1) into the Needle to
loosen the clog and push it out. The K-Cup Holder is
dishwasher safe.
CAUTION: There are sharp needles that puncture the
K-Cup above the K-Cup Holder and in the bottom of the K-Cup Holder. To avoid
risk of injury, do not put your fingers in the K-Cup Assembly Housing.
NOTE: Over time, discoloration, spotting or staining may appear in the Hot
Water Tank. This is normal and will vary depending on the mineral content
of the bottled or filtered water used in the Brewer and will not affect the
operation of the Brewer.
!
FIGURE 1
12 13
TROUBLESHOOTING YOUR SINGLE SERVE BREWER
Beyond these recommended cleaning and maintenance procedures this Brewer is not
user serviceable, for service please refer to the Warranty section in this guide.
PROBLEM SOLUTION
Brewer does not have power Make sure the Power Button is pressed and is illuminated.
Plug Brewer into an independent outlet.
Check to be sure that it is plugged in securely.
Plug into a different outlet.
Brewer will not brew when If Brewer is cold/frozen, wait for at least two hours
used for the first time for it to reach room temperature before powering on.
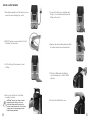
Brewer will not brew Check to make sure there is water in the Hot Water Tank.
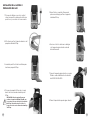
Brewing a partial cup The Exit Needle may be clogged (refer to page 10).
Clean K-Cup Holder if necessary and rinse under faucet
(refer to page 10).
De-scale the Brewer (refer to page 11).
If you have repeated the de-scale procedure on your Brewer
two times and the Brewer is still not brewing, contact
Customer Service.
Repairs
If your coffeemaker requires service, do not return it to the store where you
purchased it. All repairs and replacements must be made by Sunbeam or an
authorized Sunbeam Service Center. If you live in the U.S. or Canada, please call
us at the following toll-free telephone numbers to find the location of the nearest
authorized service center:
U.S. 1-877-517-6400
Canada 1-877-517-6400
You may also visit our web site at www.mrcoffee.com for a list of service centers.
To assist us in serving you, please have the coffeemaker model number and date of
purchase available when you call. The model number is stamped on the bottom metal
plate of the coffeemaker.
We welcome your questions, comments or suggestions. In all your communications,
please include your complete name, address and telephone number and a description
of the problem.
Visit our web site at www.mrcoffee.com and discover the secret to brewing the
perfect cup of coffee. You will also find a rich blend of gourmet recipes, entertaining
tips and the latest information on MR. COFFEE
®
products.
WARRANTY INFORMATION
1-YEAR LIMITED WARRANTY
Sunbeam Products, Inc. doing business as Jarden Consumer Solutions or if in Canada, Sunbeam
Corporation (Canada) Limited doing business as Jarden Consumer Solutions (collectively “JCS”)
warrants that for a period of one year from the date of purchase, this product will be free from
defects in material and workmanship. JCS, at its option, will repair or replace this product or
any component of the product found to be defective during the warranty period. Replacement
will be made with a new or remanufactured product or component. If the product is no longer
available, replacement may be made with a similar product of equal or greater value. This is your
exclusive warranty. Do NOT attempt to repair or adjust any electrical or mechanical functions on
this product. Doing so will void this warranty.
This warranty is valid for the original retail purchaser from the date of initial retail purchase and is
not transferable. Keep the original sales receipt. Proof of purchase is required to obtain warranty
performance. JCS dealers, service centers, or retail stores selling JCS products do not have the
right to alter, modify or any way change the terms and conditions of this warranty.
This warranty does not cover normal wear of parts or damage resulting from any of the following:
negligent use or misuse of the product, use on improper voltage or current, use contrary to
the operating instructions, disassembly, repair or alteration by anyone other than JCS or an
authorized JCS service center. Further, the warranty does not cover: Acts of God, such as fire,
flood, hurricanes and tornadoes.
What are the limits on JCS’s Liability?
JCS shall not be liable for any incidental or consequential damages caused by the breach of any
express, implied or statutory warranty or condition.
Except to the extent prohibited by applicable law, any implied warranty or condition of
merchantability or fitness for a particular purpose is limited in duration to the duration of the
above warranty.
JCS disclaims all other warranties, conditions or representations, express, implied, statutory
or otherwise.
JCS shall not be liable for any damages of any kind resulting from the purchase, use or misuse of,
or inability to use the product including incidental, special, consequential or similar damages or
loss of profits, or for any breach of contract, fundamental or otherwise, or for any claim brought
against purchaser by any other party.
Some provinces, states or jurisdictions do not allow the exclusion or limitation of incidental
or consequential damages or limitations on how long an implied warranty lasts, so the above
limitations or exclusion may not apply to you.
This warranty gives you specific legal rights, and you may also have other rights that vary from
province to province, state to state or jurisdiction to jurisdiction.
How to Obtain Warranty Service
In the U.S.A.
If you have any question regarding this warranty or would like to obtain warranty service, please
call 1-877-517-6400 and a convenient service center address will be provided to you.
In Canada
If you have any question regarding this warranty or would like to obtain warranty service, please
call 1-877-517-6400 and a convenient service center address will be provided to you.
In the U.S.A., this warranty is offered by Sunbeam Products, Inc. doing business as Jarden
Consumer Solutions located in Boca Raton, Florida 33431. In Canada, this warranty is offered by
Sunbeam Corporation (Canada) Limited doing business as Jarden Consumer Solutions, located
at 20 B Hereford Street, Brampton, Ontario L6Y 0M1. If you have any other problem or claim in
connection with this product, please write our Consumer Service Department.
PLEASE DO NOT RETURN THIS PRODUCT TO ANY OF THESE ADDRESSES
OR TO THE PLACE OF PURCHASE.
  • Page 1 1
  • Page 2 2
  • Page 3 3
  • Page 4 4
  • Page 5 5
  • Page 6 6
  • Page 7 7
  • Page 8 8
  • Page 9 9
  • Page 10 10
  • Page 11 11
  • Page 12 12
  • Page 13 13
  • Page 14 14

Mr. Coffee BVMC-KG1 User manual

Category
Coffee makers
Type
User manual
This manual is also suitable for

Mr. Coffee BVMC-KG1 Single Serve Brewer is an easy-to-use coffee maker that brews a fresh cup of coffee in less than a minute. It features a variety of brewing options such as regular, bold, and iced coffee, and it can also be used to make tea and hot chocolate. The BVMC-KG1 is also easy to clean, with a removable drip tray and a self-cleaning function.

Ask a question and I''ll find the answer in the document

Finding information in a document is now easier with AI

in other languages