Samsung NX58H9500WS User manual

Category
Cookers
Type
User manual

This manual is also suitable for

NX58H9500WS
NX58H9950WS
Slide-In Gas Range
User manual
imagine the possibilities
Thank you for purchasing this Samsung product.
Manual User_NX58H9500WS_DG68-00566A-01_EN_NonPF.indd 1 2014-07-30  1:01:25
English - 2
WARNING: If the information in this manual is not followed
exactly, a fire or explosion may result causing property damage,
personal injury, or death.
DO NOT store or use gasoline or other flammable vapors and
liquids in the vicinity of this or any other appliance.
WHAT TO DO IF YOU SMELL GAS:
- DO NOT try to light any appliance.
- DO NOT touch any electrical switch.
- DO NOT use any phone in your building.
- Immediately call your gas supplier from a neighbors phone.
Follow the gas suppliers instructions.
- If you cannot reach your gas supplier, call the fire
department.
Installation and service must be performed by a qualified
installer, service agency, or the gas supplier.
Anti-tip device
WARNING
ALL RANGES CAN TIP, RESULTING IN PERSONAL INJURY.
TIPPING RANGES CAN CAUSE BURNS FROM SPILLS,
PERSONAL INJURY, AND/OR DEATH.
INSTALL AND CHECK THE ANTI-TIP BRACKET USING THE
INSTRUCTIONS AND TEMPLATE SUPPLIED WITH THE
BRACKET.
To prevent accidental tipping of the range, attach an approved
anti-tip device to the floor. (See Installing the Anti-Tip Device
in the Installation Instructions.) Check for proper installation by
carefully tipping the range forward. The anti-tip device should
engage and prevent the range from tipping over.
Manual User_NX58H9500WS_DG68-00566A-01_EN_NonPF.indd 2 2014-07-30  1:01:25
English - 3
If the range is pulled out away from the wall for any reason, make
sure the anti-tip device is reengaged after the range has been
pushed back into place.
Follow the installation instructions found in the Installation
Manual. Failure to follow these instructions can result in death,
serious personal injury, and / or property damage.
To prevent the range from tipping, do not step/sit/lean on the
door or drawer.
Key features
Bigger is better
With a capacity of 5.8 cubic feet, this Samsung gas oven range offers more space than many other
leading brands in the United States and Canadian markets. The enhanced capacity means a better
cooking experience.
A cooktop with 5 burners
Power burners, simmer burners, as well as a center oval burner provide flexible cooktop heat for a
variety of cookware. The center oval burner delivers heat evenly over a large area, and provides the
optimum temperatures for griddle cooking.
Enhanced convenience with easy maintenance
The Samsung gas oven range combines all the benefits of 3 separate home appliances - gas range,
gas oven, and warming drawer - to maximize customer convenience with its careful, stylish design.
Manual User_NX58H9500WS_DG68-00566A-01_EN_NonPF.indd 3 2014-07-30  1:01:26
English - 4
Contents
Overview
14
14 Layout
15 What’s included
16 Control panel
Maintenance
51
51 Cleaning
58 Replacement
59 Reinstallation
Important safety
information
5
5 Symbols used in this manual
5 State of California Propositoin 65 Warning
5 Commonwealth of Massachusetts
6 General safety
7 Fire safety
7 Gas safety
8 Electrical and grounding safety
9 Installation safety
10 Location safety
10 Cooktop safety
12 Oven safety
13 Warming drawer/lower drawer safety
13 Self-cleaning oven safety
Before you start
17
17 Display mode
18 Clock
19 Kitchen timer
19 Oven vent/cooling vent
Gas range
20
21 Cookware
22 Wok grate
23 Griddle
24 Gas burners
25 Ignition
Gas oven
26
27 Cooking mode
32 Recipe guide
34 Racks
36 Cooking options
38 Special features
43 Changing option settings
48 Others
Warming drawer
49
50 Warming drawer
Troubleshooting
61
61 Checkpoints
67 Information codes
Manual User_NX58H9500WS_DG68-00566A-01_EN_NonPF.indd 4 2014-07-30  1:01:26
English - 5
01 IMPORTANT SAFETY INFORMATION
Important safety information
READ ALL INSTRUCTIONS BEFORE USING THIS APPLIANCE
All electrical and gas equipment with moving parts can be dangerous. Please read the important
safety instructions for this appliance in this manual. The instructions must be followed to
minimize the risk of injury, death, or property damage.
Save this manual. Please Do Not Discard.
Symbols used in this manual
WARNING: Hazards or unsafe practices that may result in severe personal injury or death.
CAUTION: Hazards or unsafe practices that may result in electric shock, personal injury, or
property damage.
NOTE: Useful tips and instructions
These warning icons and symbols are here to prevent injury to you and others. Please follow them
explicitly. After reading this section, keep it in a safe place for future reference.
State of California Propositoin 65 Warning
This product contains chemicals known to the State of California to cause cancer and
reproductive toxicity.
Gas appliances can cause low-level exposure to Proposition 65 listed substances, including but
not limited to, benzene, carbon monoxide, formaldehyde and soot, substances resulting from the
incomplete combustion of natural gas or LP fuels.
Commonwealth of Massachusetts
This product must be installed by a licensed plumber or gas fitter qualified or licensed by the
State of Massachusetts. When using ball-type gas shut-off valves, you must use the T-handle type.
Multiple flexible gas lines must not be connected in series.
Manual User_NX58H9500WS_DG68-00566A-01_EN_NonPF.indd 5 2014-07-30  1:01:26
English - 6
General safety
WARNING To reduce the risk of fire, electric shock, personal injuries, and/or death, obey the
following precautions.
Do not touch any part of the range, including but not
limited to, oven burners, surface burners, or interior
surfaces during or immediately after cooking.
Know the location of the gas shut-off valve and how
to shut it off.
Make sure the anti-tip device is properly installed
on the range. See the installation instructions for more
information.
Do not let children near the range. Do not let children go into the range or onto the range. Do
not let children play with the range or any part(s) of the range. Do not leave children unattended
in an area where the range is in use. For childrens safety, we recommend utilizing the control/
door lockout feature.
Remove all packaging materials from the range before operating to prevent ignition of these
materials. Keep all packaging materials out of childrens reach. Properly dispose the packaging
materials after the range is unpacked.
Do not store any object of interest to children on the cooktop or backguard of the range.
Children climbing on the range to reach items could be killed or seriously injured.
Do not operate the range if the range or any part of the range is damaged, malfunctioning, or
missing parts.
Do not use the range as a space heater. Use the range for cooking only.
Do not use oven cleaners or oven liners in or around any part of the oven.
Use only dry pot holders.
Do not use the range to heat unopened food containers.
Do not strike the oven glass.
When disposing of the range, cut o the power cord and remove the door.
Unplug or disconnect power before servicing.
Make sure all meat and poultry is cooked thoroughly. Meat should always be cooked to
an internal temperature of 160 °F (71 °C). Poultry should always be cooked to an internal
temperature of 180 °F (82 °C).
Manual User_NX58H9500WS_DG68-00566A-01_EN_NonPF.indd 6 2014-07-30  1:01:26
English - 7
01 IMPORTANT SAFETY INFORMATION
Fire safety
WARNING To reduce the risk of fire, electric shock, personal injuries, and/or death, obey the
following precautions.
Do not store, place, or use flammable or
combustible materials such as paper, plastic, pot
holders, linens, curtains, gasoline or other flammable
vapors or liquids near the range.
Do not wear loose fitting or hanging garments while
using the range.
To avoid grease buildup, regularly clean the vents.
Do not let pot holders or other flammable materials
touch a heating element. Do not use a towel or other bulky cloths in place of a pot holder.
Do not use water on a grease fire. To put out a grease fire, turn off the heat source and smother
the fire with a tight-fitting lid or use a multipurpose dry chemical or foam-type fire extinguisher.
If a grease fire should occur in the oven, turn o the oven by pressing the OFF/CLEAR button.
Keep the oven door closed until the fire goes out.
If necessary, use a multipurpose dry chemical or foam-type re extinguisher.
Do not heat unopened food containers - buildup of pressure may cause container to burst and
result in injury.
Gas safety
WARNING To reduce the risk of fire, electric shock, personal injuries, and/or death, obey the
following precautions.
If you smell gas:
Close the valve and do not use the range.
Do not light a match, candle, or cigarette.
Do not turn on any gas or electric appliances.
Do not touch any electrical switches or plug a power
cord into an outlet.
Do not use any phone in your building.
Evacuate the room, building, or area of all occupants.
Immediately call your gas supplier from a neighbor’s phone. Follow the gas supplier’s
instructions.
If you cannot reach your gas supplier, call the fire department.
Checking for gas leaks
Leak testing of the appliance shall be conducted according to the manufacturers instructions.
Do not use a flame to check for gas leaks. Use a brush to spread a soapy water mixture around
the area you are checking. If there is a gas leak, you will see small bubbles in the soapy water
mixture at the leak point.
Manual User_NX58H9500WS_DG68-00566A-01_EN_NonPF.indd 7 2014-07-30  1:01:27
English - 8
Electrical and grounding safety
WARNING To reduce the risk of fire, electric shock, personal injuries, and/or death, obey the
following precautions.
Plug into a grounded 3-prong outlet.
Do not remove the ground prong.
Do not use an adapter or an extension cord.
Do not use a damaged power plug, power cord, or
loose power outlet.
Do not modify the power plug, power cord, or power
outlet in any way.
Do not put a fuse in a neutral or ground circuit.
Use a dedicated 120-volt, 60-Hz, 20-amp, AC, fused electrical circuit for this range. A time-delay
fuse or circuit breaker is recommended. Do not plug more than one appliance into this circuit.
Do not connect the ground wire to plastic plumbing lines, gas lines, or hot water pipes.
This range must be Earth grounded. In the event of a malfunction or breakdown, grounding
will reduce the risk of electrical shock by providing a path for the electric current. This range is
equipped with a cord having a grounding plug. The plug must be firmly plugged into an outlet
that is properly installed and grounded in accordance with the local codes and ordinances. If
you are unsure whether your electrical outlet is properly grounded, have it checked by a licensed
electrician.
The range is supplied with a 3-pronged grounded plug. This cord must be plugged into a mating,
grounded 3-prong outlet that meets all local codes and ordinances. If codes permit the use of a
separate ground wire, we recommend that a qualified electrician determine the proper path for
this ground wire.
Electrical service to the range must conform to local codes. Barring local codes, it should meet
the latest ANSI/NFPA No. 70 – Latest Revision (for the U.S.) or the Canadian Electrical Code CSA
C22.1 – Latest Revisions.
It is the personal responsibility of the range owner to provide the correct electrical service for this
range.
Manual User_NX58H9500WS_DG68-00566A-01_EN_NonPF.indd 8 2014-07-30  1:01:27
English - 9
01 IMPORTANT SAFETY INFORMATION
Installation safety
WARNING To reduce the risk of fire, electric shock, personal injuries, and/or death, obey the
following precautions.
Have your range installed and properly grounded by a
qualied installer, in accordance with the installation
instructions. Any adjustment and service should be
performed only by qualified gas range installers or
service technicians.
Do not attempt to service, modify, or replace your
range or any part of your range unless it is specifically
recommended in this manual. All other service should
be referred to a qualified technician.
Always use new flexible connectors when installing a gas appliance. Do not use old flexible
connectors.
Make sure the anti-tip device is properly installed on the range. See the installation instructions
for more information.
Due to the size and weight of the range, have two or more people move the range.
Remove all tape and packaging materials.
Remove all accessories from the cooktop, oven, and/or lower drawer. Grates and griddles are
heavy. Use caution when handling them.
Make sure no parts came loose during shipping.
Make sure your range is correctly installed and adjusted by a qualified service technician or
installer for the type of gas (natural or LP) you will use. For your range to utilize LP gas, the installer
must replace the 5 surface burner orifices and 2 oven orifices with the provided LP orifice set, and
reverse the GPR adapter. These adjustments must be made by a qualified service technician in
accordance with the manufacturer’s instructions and all codes and requirements of the authority
having jurisdiction. The qualified agency performing this work assumes the gas conversion
responsibility.
Installation of this range must conform with local codes or, in the absence of local codes, with
the National Fuel Gas Code, ANSI Z223.1/NFPA.54, latest edition. In Canada, installation must
conform with the current Natural Gas Installation Code, CAN/CGA-B149.1, or the current Propane
Installation Code, CAN/CGA-B149.2, and with local codes where applicable. This range has been
design-certified by ETL according to ANSI Z21.1, latest edition, and Canadian Gas Association
according to CAN/CGA-1.1, latest edition.
Manual User_NX58H9500WS_DG68-00566A-01_EN_NonPF.indd 9 2014-07-30  1:01:27
English - 10
Location safety
WARNING To reduce the risk of fire, electric shock, personal injuries, and/or death, obey the
following precautions.
This range is for indoor, household use only.
Do not install the range in areas exposed to the
weather and/or water.
Do not install the range in a place which is exposed
to a strong draft.
Select a level, well-constructed floor that can support
the range’s weight. Synthetic flooring, such as
linoleum, must withstand 180 °F (82 °C) temperatures
without shrinking, warping, or discoloring. Do
not install the range directly over interior kitchen
carpeting unless a sheet of ¼ inch plywood or a similar
insulator is placed between the range and carpeting.
Select a location where a grounded, 3- prong outlet is easily accessible.
If the range is located near a window, do not hang long curtains or paper blinds on that
window.
For the range to ventilate properly, make sure the ranges vents are not blocked, and that there
is enough clearance at the top, back, sides, and underneath the range. The vents allow the
necessary exhaust for the range to operate properly with correct combustion.
Make sure the wall coverings around the range can withstand heat up to 200 °F (93 °C)
generated by the range.
Cabinet storage above the surface of the range should be avoided. If cabinet storage above
the range is necessary: allow a minimum clearance of 40 inches (102 cm) between the cooking
surface and the bottom of cabinets; or install a range hood that projects horizontally a minimum
of 5 inches (12.7 cm) beyond the bottom of the cabinets.
Cooktop safety
WARNING To reduce the risk of fire, electric shock, personal injuries, and/or death, obey the
following precautions.
Make sure all burners are off when not in use.
Do not use aluminium foil to line the grates or any
part of the cooktop.
Do not leave burners unattended on medium or high
heat settings.
Before igniting, make sure all burner caps are properly
in place and all burners are level.
Always use the LITE position when igniting the burners and make sure the burners have ignited.
If ignition fails, turn the knob to OFF and wait until the gas has dissipated.
Manual User_NX58H9500WS_DG68-00566A-01_EN_NonPF.indd 10 2014-07-30  1:01:27
English - 11
01 IMPORTANT SAFETY INFORMATION
When you set a burner to simmer, do not turn the knob quickly. Make sure the flame stays on.
Do not place any objects other than cookware on the cooktop.
This cooktop is designed to cook with a wok or wok ring attachment. If foods are flamed, they
should only be flamed under a ventilation hood that is on.
Before removing or changing cookware, turn off the burners.
Remove food and cookware immediately after cooking.
Before removing any parts of the burner for cleaning, make sure the range is off and completely
cool.
After cleaning the burner spreader, make sure it is completely dry before re-assembling.
Make sure the spark mark on the dual burner spreader is placed beside the electrode when it is
assembled.
To avoid carbon monoxide poisoning, do not pour water into the cooktop well while cleaning.
Select cookware that is designed for top-range cooking. Use cookware that is large enough to
cover the burner grates. Adjust the burner flames so that the flames do not extend beyond the
bottom of the cookware.
To avoid cookware discoloration, deformity, and/or carbon monoxide poisoning, do not use
cookware that is substantially larger than the grate.
Make sure cookware handles are turned to the side or rear of the cooktop, but not over other
surface burners.
Stand away from the range while frying.
Always heat frying oils slowly, and watch as they heat. If you are frying foods at high heat,
carefully watch during the cooking process. If a combination of fats or oils is to be used during
frying, mix them together before heating.
Use a deep-fryer thermometer whenever possible. This prevents overheating the fryer beyond
the smoking point.
Use a minimum amount of oil when shallow pan-frying or deep-frying. Avoid cooking unthawed
food or food with excessive amounts of ice.
Before moving cookware full of fats or oils, make sure it has completely cooled.
To prevent delayed eruptive boiling, always allow heated liquids to stand at least 20 seconds after
you have turned off the burner so that the temperature in the liquid can stabilize. In the event of
scalding, follow these first aid instructions:
1) Immerse the scalded area in cool or lukewarm water for at least 10 minutes.
2) Do not apply any creams, oils, or lotions.
3) Cover with a clean, dry cloth.
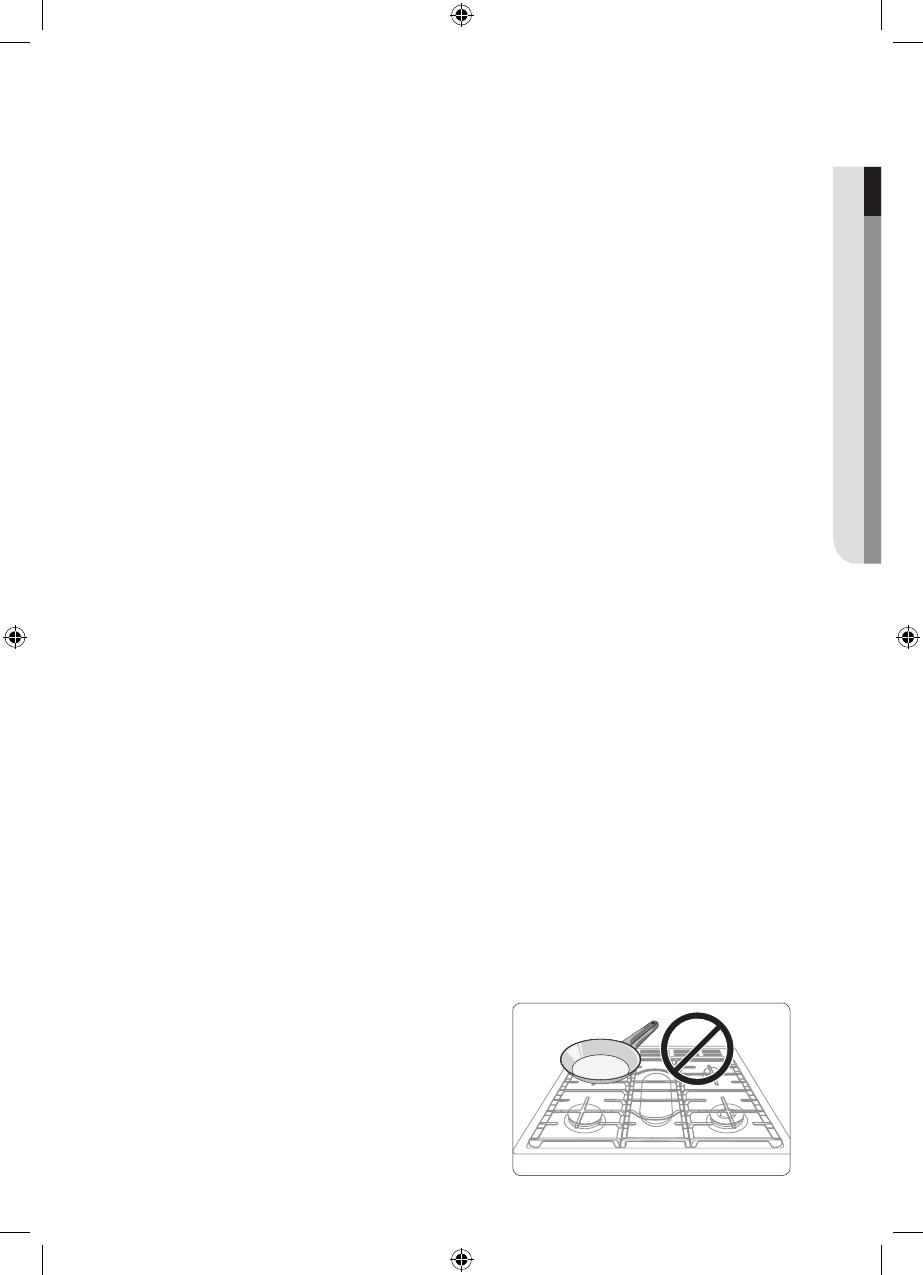
Place the pot on ther center of the grate. On ther Left
Rear burner, do not place a pot more than 9” diameter.
If you place a oversized at a wrong position, It might
disturb the cooling air discharge or make flame on the
burner undesired.
Manual User_NX58H9500WS_DG68-00566A-01_EN_NonPF.indd 11 2014-07-30  1:01:28
English - 12
Oven safety
WARNING To reduce the risk of fire, electric shock, personal injuries, and/or death, obey the
following precautions.
Do not use the oven for non-cooking purposes such
as drying clothes or storage. Use the oven for cooking
only.
Make sure the inner portion of the split oven-rack is
in the proper position within the outer rack.
Make sure the oven racks are placed on the same
level on each side.
Do not damage, move, or clean the door gasket.
Do not spray water on the oven glass while the oven
is on or just after you have turned it off.
Do not use aluminium foil or foil liners anywhere in the oven. Do not use aluminium foil or like
material to cover any holes or passages in the oven bottom or to cover an oven rack.
Stand away from the oven when opening the oven door.
Keep the oven free from grease buildup.
When repositioning the oven racks, make sure the oven is completely cool.
Only use cookware that is recommended for use in gas ovens.
To avoid damaging the burner control knobs, always bake and/or broil with the oven door closed.
Do not broil meat too close to the burner flame. Trim excess fat from meat before cooking.
When using cooking or roasting bags in the oven, follow the manufacturer’s directions.
Manual User_NX58H9500WS_DG68-00566A-01_EN_NonPF.indd 12 2014-07-30  1:01:28
English - 13
01 IMPORTANT SAFETY INFORMATION
Warming drawer/lower drawer safety
WARNING To reduce the risk of fire, electric shock, personal injuries, and/or death, obey the
following precautions.
The warming drawer is designed to keep hot foods
at serving temperature. Always start with hot food.
Cold or room-temperature foods cannot be heated,
warmed, or cooked in the warming drawer.
Bacteria will grow very rapidly in food that is between
40 and 140 °F.
Do not use the drawer for non-cooking purposes
such as drying clothes or storage. Use the drawer for
cooking purposes only.
Do not touch the interior drawer surface or heating element.
To avoid steam burns, use caution when opening the drawer.
Do not use aluminium foil to line the drawer.
Do not use the drawer in the oven. Do not put the drawer in the oven during a self-cleaning
cycle.
Do not leave containers of fat drippings in or near the drawer.
Self-cleaning oven safety
WARNING To reduce the risk of fire, electric shock, personal injuries, and/or death, obey the
following precautions.
The self-cleaning feature operates the oven at
temperatures high enough to burn away food soils
in the oven. The range is extremely hot during a
self-cleaning cycle. Do not touch any surfaces of the
range during a self-cleaning cycle.
Keep children away from the oven during a self-
cleaning cycle.
Before starting a self-cleaning cycle, remove all racks,
cookware, and utensils from the oven. Only porcelain-coated oven racks may be left in the oven.
Before starting a self-cleaning cycle, wipe grease and food soils from the oven.
Do not self-clean with the lower/warming drawer placed in the oven.
When opening the door after a self-cleaning cycle, stand away from the oven.
If the self-cleaning cycle malfunctions, turn off the oven, disconnect the power supply, and
contact a qualified service technician.
Manual User_NX58H9500WS_DG68-00566A-01_EN_NonPF.indd 13 2014-07-30  1:01:28
English - 14
Overview
Layout
9
10
11
12
7
4
5
6
1
8
3
2
13
1 Touch display 8 Warming drawer
2 Surface burner knobs (5 pcs) 9 Broil oven burner
3 Warming drawer knob (1 pc) 10 * Oven light
4 Surface burners 11 Convection fan / Convection heater
5 Oven vent 12 Oven rack system
6 Cooling vent 13 Bake oven burner
7 Removable oven door
Manual User_NX58H9500WS_DG68-00566A-01_EN_NonPF.indd 14 2014-07-30  1:01:28
English - 15
02 OVERVIEW
What’s included
* Surface burner grates (3) * Surface burners and caps (5)
* Flat rack (2) * Temp probe (1)
* Griddle (1) * Wok grate (1)
* Gliding rack (1)
NX58H9950WS Only
* Split rack (1)
NX58H9500WS Only
If you need an accessory marked with a *, you can buy it from the Samsung Contact Center (1-800-
726-7864).
Manual User_NX58H9500WS_DG68-00566A-01_EN_NonPF.indd 15 2014-07-30  1:01:30
English - 16
Control panel
9 10 11 12 13 18 19
15
5 6 7 8
1 2 3 4 14 1617
1 Convection Bake
Activate convection baking for large amounts of food on multiple
racks.
2 Convection Roast Activate convection roasting for large cuts of meat.
3 Bake Bake food evenly using the lower oven burner.
4 Broil Broil food using the upper oven burner only.
5 Healthy Cook
Bring up the Healthy Cook recipes that are specially designed for
different food types.
6 Conv. Convert Switch between baking mode and convection baking mode.
7 Keep Warm
Keep cooked food warm at lower temperatures between 150 °F and
200 °F (66 °C and 93 °C).
8 Self-Clean Burn off food residues at very high temperatures.
9 Touch to Wake-Up Activate the control panel display.
10 Delay Start Set the oven to start at a certain time.
11 Cooking Time Set the cooking time.
12 Temp Probe Activate the temperature probe mode.
13 Numbers Use to set the time, temperature, or preset.
14 Clock Set the clock time.
15 Options Display the user 9 options available.
16 OFF/CLEAR (Lock)
Cancel the current operation but not the timer.
Lock the control panel and the door to prevent accidents.
17 START/SET Start a function or set the time.
18 Timer Activate or deactivate the timer.
19 Oven Light Turn on/off the oven light.
Manual User_NX58H9500WS_DG68-00566A-01_EN_NonPF.indd 16 2014-07-30  1:01:31
English - 17
03 BEFORE YOU START
Before you start
You should know about the following features and components before you use your range for the
first time.
Display mode
Sleep
After 2 minutes of inactivity (or 1 minute when the oven is in standby mode), the control panel
enters Sleep mode. In Sleep mode, the control panel stays inactive with just the time display until it is
reactivated by the user.
Wake-Up
1
To activate the control panel, press Touch to
Wake-Up. User preferences are available in this
mode including the timer, oven light, and/or
control lock.
Manual User_NX58H9500WS_DG68-00566A-01_EN_NonPF.indd 17 2014-07-30  1:01:31
English - 18
Clock
It is important to set the clock correctly to ensure automatic features work properly. This product
supports two time formats: 12-hour (default) and 24-hour.
To set the clock time
2
1
3
1. Press the Clock button.
To select AM/PM, press it again.
2. Enter the current time using the number pad.
3. Press the START/SET button to confirm the
settings.
To change the time format
2
3
11
1. Press the Options button and then 5 on the
number pad.
2. Press 1 for the 12-hour format or 2 for the
24-hour format.
3. Press the START/SET button.
You can set/change the clock or the kitchen timer before you start a cooking mode or while
most cooking modes are operating. However, you cannot set or change the time if a time
based function is operating (Time Bake, for example) or the Sabbath option is enabled.
Manual User_NX58H9500WS_DG68-00566A-01_EN_NonPF.indd 18 2014-07-30  1:01:31
English - 19
03 BEFORE YOU START
Kitchen timer
The kitchen timer gives you an extra timer you can use to time cooking tasks such a boiling eggs.
It does not, however, start or stop any cooking operation. You can set the timer from 1 minute to 9
hours and 99 minutes.
2
3
1
4
1. Press the Timer button.
2. Enter a desired time using the number pad.
3. When done, press the START/SET or Timer
button.
To cancel the Timer settings, press the Timer
button again.
4. When the set time elapses, the oven beeps
and displays the “End” message. Press the
Timer button to delete the message.
Oven vent/cooling vent
Cooling vent Oven vent
Both the oven vent and the cooling vent are
located at the back of the oven range. Proper air
circulation prevents combustion problems and
ensures good performance.
Do not block the vent or its surroundings
with objects.
Use caution when placing items near the
vent. Hot steam can cause them to overheat
or melt.
Manual User_NX58H9500WS_DG68-00566A-01_EN_NonPF.indd 19 2014-07-30  1:01:32
English - 20
Gas range
Step 1
Step 2
Step 3
Put all ingredients into a cooking container (pan, pot, etc).
Place the container on a surface burner.
Ignite the surface burner.
Manual User_NX58H9500WS_DG68-00566A-01_EN_NonPF.indd 20 2014-07-30  1:01:33
  • Page 1 1
  • Page 2 2
  • Page 3 3
  • Page 4 4
  • Page 5 5
  • Page 6 6
  • Page 7 7
  • Page 8 8
  • Page 9 9
  • Page 10 10
  • Page 11 11
  • Page 12 12
  • Page 13 13
  • Page 14 14
  • Page 15 15
  • Page 16 16
  • Page 17 17
  • Page 18 18
  • Page 19 19
  • Page 20 20
  • Page 21 21
  • Page 22 22
  • Page 23 23
  • Page 24 24
  • Page 25 25
  • Page 26 26
  • Page 27 27
  • Page 28 28
  • Page 29 29
  • Page 30 30
  • Page 31 31
  • Page 32 32
  • Page 33 33
  • Page 34 34
  • Page 35 35
  • Page 36 36
  • Page 37 37
  • Page 38 38
  • Page 39 39
  • Page 40 40
  • Page 41 41
  • Page 42 42
  • Page 43 43
  • Page 44 44
  • Page 45 45
  • Page 46 46
  • Page 47 47
  • Page 48 48
  • Page 49 49
  • Page 50 50
  • Page 51 51
  • Page 52 52
  • Page 53 53
  • Page 54 54
  • Page 55 55
  • Page 56 56
  • Page 57 57
  • Page 58 58
  • Page 59 59
  • Page 60 60
  • Page 61 61
  • Page 62 62
  • Page 63 63
  • Page 64 64
  • Page 65 65
  • Page 66 66
  • Page 67 67
  • Page 68 68
  • Page 69 69
  • Page 70 70
  • Page 71 71
  • Page 72 72
  • Page 73 73
  • Page 74 74
  • Page 75 75
  • Page 76 76
  • Page 77 77
  • Page 78 78
  • Page 79 79
  • Page 80 80
  • Page 81 81
  • Page 82 82
  • Page 83 83
  • Page 84 84
  • Page 85 85
  • Page 86 86
  • Page 87 87
  • Page 88 88
  • Page 89 89
  • Page 90 90
  • Page 91 91
  • Page 92 92
  • Page 93 93
  • Page 94 94
  • Page 95 95
  • Page 96 96
  • Page 97 97
  • Page 98 98
  • Page 99 99
  • Page 100 100
  • Page 101 101
  • Page 102 102
  • Page 103 103
  • Page 104 104
  • Page 105 105
  • Page 106 106
  • Page 107 107
  • Page 108 108
  • Page 109 109
  • Page 110 110
  • Page 111 111
  • Page 112 112
  • Page 113 113
  • Page 114 114
  • Page 115 115
  • Page 116 116
  • Page 117 117
  • Page 118 118
  • Page 119 119
  • Page 120 120
  • Page 121 121
  • Page 122 122
  • Page 123 123
  • Page 124 124
  • Page 125 125
  • Page 126 126
  • Page 127 127
  • Page 128 128
  • Page 129 129
  • Page 130 130
  • Page 131 131
  • Page 132 132
  • Page 133 133
  • Page 134 134
  • Page 135 135
  • Page 136 136
  • Page 137 137
  • Page 138 138
  • Page 139 139
  • Page 140 140
  • Page 141 141
  • Page 142 142
  • Page 143 143
  • Page 144 144

Samsung NX58H9500WS User manual

Category
Cookers
Type
User manual
This manual is also suitable for

Ask a question and I''ll find the answer in the document

Finding information in a document is now easier with AI

in other languages