De Dietrich DPI7884XT Important information

Category
Hobs
Type
Important information
FR GUIDE D’UTILISATION
EN USER GUIDE
ES MANUAL DE USO
PT MANUAL DE UTILIZAÇÃO
NL GEBRUIKSHANDLEIDING
TABLE INDUCTION
INDUCTION HOB
PLACA DE INDUCCIÓN
PLACA DE INDUÇÃO
INDUCTIEKOOKPLAAT
ES MANUAL DE USO
PLACA DE INDUCCIÓN
DEAR
CUSTOMER,
EN
Discovering a De Dietrich product means experiencing a range of unique
emotions.
The attraction is immediate, from the moment you set eyes on the product.
The sheer quality of the design shines through, thanks to the timeless style
and outstanding nishes which make each component an elegant and
rened masterpiece in its own right, each one in perfect harmony with the
others. Next, comes the irresistible urge to touch it.
De Dietrich design makes extensive use of robust and prestigious
materials, where the accent is placed rmly upon authenticity. By combining
state-of-the-art technology with top quality materials, De Dietrich produces
beautifully crafted products to help you get the most from the culinary arts,
a passion shared by all lovers of cooking and ne food. We hope that you
enjoy using this new appliance.
Thank you for choosing a De Dietrich product.
www.dedietrich-electromenager.com
Follow us on
2
CONTENTS
Important safety advice and precautions.........................................3
Presentation ........................................................................................ 7
Installation ...........................................................................................8
Unpacking ............................................................................................8
Fitting .................................................................................................... 8
Connection .........................................................................................10
Use ..................................................................................................... 11
Control panel glossary ........................................................................11
Choice of cookware ............................................................................12
Cooking zone selection ......................................................................12
Powering On / Off ...............................................................................12
Power setting ...................................................................................... 12
Horizone .............................................................................................13
Setting the timer .................................................................................13
Locking the controls............................................................................13
Clean lock function .............................................................................14
Recall function ....................................................................................14
Perfect Sensor function ......................................................................15
Cooking instructions ...........................................................................19
Safety and recommendations ............................................................. 21
Care ...................................................................................................22
Problems ........................................................................................23
Environment ......................................................................................24
Customer service ..........................................................................25
Perfect Sensor Collection ................................................................ 26
EN
3
IMPORTANT SAFETY ADVICE AND PRECAUTIONS
This user guide is also available on the brand's web site.
Please read these instructions before installing and using your appliance. They have
been written for your safety and the safety of others. Keep this user guide with your
appliance. If the appliance is ever sold or given to another person, ensure that the
new owner receives the accompanying guide.
With a view to constantly improving our products, we reserve the right to make
changes to their technical, functional or aesthetic characteristics in line with
technological progress.
To easily locate the make, model number, etc. of your appliance, we recommend
that you note this information on the “After-Sales Service Department and Customer
Support” page.
This appliance may be
used by children aged 8
years and older, and by
persons with impaired
physical, sensory or mental
capacities, or without
experience or knowledge, if
they are supervised or have
received prior instructions
on how to use the appliance
safely and have understood
the risks involved.
Children must not be allowed
to play with the appliance.
Cleaning and maintenance
operations must not be
carried out by children
without supervision.
Children under 8 years of age
should not be allowed near
the appliance, unless they
are constantly supervised.
The appliance and its
accessible parts become
hot during use.
Precautions must be taken
to avoid touching the heating
elements.
Metal objects such as
knives, forks, spoons and
lids must not be placed on
the cooking surface as they
may become hot.
Your hob is equipped with
a child safety device that
locks its operation after
use or during cooking (See
"Child Safety use" section).
Your appliance complies
with applicable European
Directives and regulations.
In order to avoid interference
between your cooking hob
and a heart pacemaker,
4
the pacemaker must be
designed and programmed
in compliance with the
regulations that apply
to it. Ask the pacemaker
manufacturer or your GP.
Leaving oil or fat to cook
unattended on a hob can
be dangerous and lead
to re. NEVER attempt
to extinguish a re with
water. Instead, switch off
the appliance and cover the
ame with a lid or a re
blanket.
CAUTION: cooking must
be monitored. Short
cooking requires constant
surveillance.
Danger of re: do not store
objects in the cooking zones.
If the surface is cracked, turn
off the appliance to avoid
the risk of electric shock.
Do not use your hob until
you have replaced the glass
top.
Avoid impact with
cookware: the vitroceramic
glass worktop is very
sturdy; however, it is not
unbreakable.
Do not place any hot lids
at on your cooking hob. A
suction effect may damage
the vitroceramic surface.
Avoid dragging cookware
across the surface, which
could damage the decorative
nish on the vitroceramic
top in the long term.
Never use aluminium foil for
cooking. Never place items
wrapped in aluminium foil
or packaged in aluminium
dishes on your cooking hob.
The aluminium will melt and
permanently damage your
appliance.
Do not store cleaning
products or inammable
products in the cabinet
underneath the hob.
These hobs must be
connected to the mains via
an all-pole cut-off device
that complies with current
IMPORTANT SAFETY ADVICE AND PRECAUTIONS
5
installation regulations. A
disconnection device must
be incorporated into the
xed wiring.
If the power cable is
damaged, it should
be replaced by the
manufacturer, its after-sales
service department or a
similarly qualied person,
so as to avoid danger.
Ensure that the power
cables of any electrical
appliances plugged in close
to the hob are not in contact
with the cooking zones.
Never use a steam cleaner
to clean your cooking hob.
The appliance is not
designed to be switched
on using an external timer
or separate remote control
system.
After use, turn off the hob
using its control device
and do not rely on the pan
sensor to do this.
WARNING: Only use hob
protectors designed by
the manufacturer of the
cooking appliance or listed
as suitable in the user
guide, or included with
the appliance. The use of
unsuitable protectors could
cause accidents.
Sensor
The sensor is tted with a
CR2032 battery (only use
the specied battery).
To insert the battery, unscrew
the cover on the back of the
sensor using a coin. Insert
the battery following the
polarity (+ upwards), then
screw the cover back on.
Replace the battery when it
is worn out or if it leaks.
The battery must be
removed from the appliance
before disposing of the
appliance.
IMPORTANT SAFETY ADVICE AND PRECAUTIONS
The battery must be
disposed of in battery
containers or taken back to
your shop (in compliance
with regulations in force).
– different types of batteries
or new and used batteries
must not be mixed;
– if the appliance has to be
stored without being used
for a long period, remove
the batteries;
– the supply terminals must
not be short-circuited.
- Non-rechargeable batteries
must be not recharged.
- The sensor is not designed
to go in an oven.
We, Brandt France, declare that
the appliance equipped with the
Perfect Sensor complies to directive
2014/53/EU. The full EU declaration
of compliance is available on the
following website: www.dedietrich-
electromenager.com.
6
IMPORTANT SAFETY ADVICE AND PRECAUTIONS
7
0 PRESENTATION
This hob is supplied with a connected temperature sensor and specic stand that can
be easily positioned on any type of cookware. This sensor can be used on all cooking
zones.
Thanks to the De Dietrich Perfect Sensor hob with its connected temperature sensor,
you can perform every culinary gesture expertly and accurately, cook all meats and
sh according to your tastes and succeed in your preparations, by adjusting the core
temperature of your preparations.
Respecting the cooking temperature of the ingredients to the nearest degree allows
for perfect cooking and culinary excellence.
The following functions are available with temperature feedback:
Thermometer / Melt / Warm / Vacuum cook / Slow cook / Boil
8
1 INSTALLATION
1.1 UNPACKING
Remove all the protective elements from
the hob, the sensor and the sensor
stand.
Your sensor is delivered with a battery
that you have to install (1.0). To insert
the battery, unscrew the cover on the
back of the sensor using a coin. Insert
the battery following the polarity (+
upwards), then screw the cover back on.
Check and respect the characteristics
of the appliance on the manufacturer's
nameplate (1.1.1).
Note the service and standard references
shown on this plate in the boxes below
for future reference.
1. 2 BUILDING INTO A BASE UNIT
Check that the air intakes and outlets are
free of obstruction (1.2.1). Comply with
the information concerning the tting
dimensions (in millimetres) of the base
unit destined to receive the hob.
- Fitting into the worktop
See diagram (1.2.2)
Service:
Type:
S
E
R
V
I
C
E
:
T
Y
P
E
:
X
X
X
X
X
X
X
x
x
x
-
x
x
x
V
x
x
/
x
x
H
z
X
X
X
X
W
-
X
X
X
X
X
X
X
X
X
X
X
X
X
X
X
Nr
SERVICE:
TYPE
:
CC
XXXXXXX
xxx-x xxV xx/xxHz
XXXX W-
XXXXX
XXXXXXXX
XXXXXXXXX
XX XX XXXXX
ISM GROUPE 2 CLASSE B
XXXXXXX
515
650
55
55
64
1.2.2
515
650
518
653
R 3
R 3
490
560
5
10
10
64
25
1.2.3
1.2.1
1.1.1
1.0
9
- Fitting ush with the worktop See
diagram (1.2.3)
Check that air can ow correctly between
the front and back of your hob.
If you are installing the hob above a
drawer (1.2.6) or above a built-in oven
(1.2.7), comply with the dimensions
provided on the illustrations to ensure
a sufcient air outlet at the front. Apply
the seal all around the edge of the hob
(1.2.8).
Fit the hob into the base unit (1.2.9).
If your hob is located above your
oven, the hob’s thermal safety devices
can impede the simultaneous use of the
hob and the oven’s pyrolysis programme.
Your hob is equipped with an overheating
prevention safety system. This safety
device can trigger, for example, when
the hob is installed over an oven that is
not sufciently insulated. The code "F7"
then appears in the control zone. In such
circumstances we recommend that you
increase the hob’s ventilation by creating
an opening in the side of the cabinet
(8cm x 5cm).
20
40
4
40
1.2.8
1.2.7
1.2.6
1.2.9
1 INSTALLATION
10
1. 3 ELECTRICAL CONNECTIONS
This hob must be connected to the
mains via an all-pole cut-off device
that complies with current installation
regulations. A disconnection device must
be incorporated into the xed wiring.
Identify the type of cable of your hob
according to the number of wires and
colours:
- 5-wire cable (1.3.1):
a) green/yellow, b) blue, c) brown, d)
black, e) grey.
When power is rst supplied to your hob,
or after an extended power cut, a light
code will appear on the control panel.
Wait approximately 30 seconds or press
any key on the control panel to make the
information disappear and use your hob
(this display is normal and is reserved
for use by After-Sales Service, where
applicable). In all cases, it should be
disregarded.
1.3.1
1 INSTALLATION
2 USE
11
Control panel glossary
a
= Switch on and off
b
= Locking / Clean Lock (locks the hob during cleaning)
c
= Choice of cooking zone
d
= Horizone
e
= Display (Power / minutes)
f
= Thermometer function (temperature display)
g
= Sensor adjustment
h
= Cooking functions
Expert / Melt
/
Vacuum cook / Warm
/ Slow cook
/ Boil
i
= Timer setting
j
= Power setting
k
= Boost (maximum power)
l
= Recall function (Reminder of power & timer settings)
k
a
b
c
d
e
i
j
l
g
h
d
f
Puissance - MinutePuissance - Minute
12
2 USE
2.1 CHOICE OF COOKWARE
Most cookware is compatible with
induction. Only glass, terracotta,
aluminium without a special base, copper
and some non-magnetic stainless steels
do not work with induction cooking.
We suggest that you choose
cookware with a thick, at bottom.
The heat will be distributed better and
cooking will be more uniform. Never
leave an empty pan to heat unattended.
Avoid putting cookware on the
control panel.
2.2 COOKING ZONE SELECTION
There are several cooking zones
available. Select one which is suitable,
based on the size of the pan. If the
base of the cookware is too small, the
power indicator will start to ash and the
cooking zone will not work, even if the
cookware's material is recommended
for induction. Take care not to use pans
which are smaller in diameter than the
cooking zone (see table)
Diameter of bot-
tom of cookware
18 cm, oval,
sh pan
Maximum power
of cooking zone
(Watts)
3700
Diameter of
cooking zone
Horizone
When several cooking zones are used
at the same time, the hob manages the
power distribution, so as not to exceed
its total power.
2.3 SWITCHING ON/OFF
Press the On/Off touchkey . A "0"
ashes in each zone for 8 seconds.
If no pan is detected, select a zone
.
If a pan is detected, the "0" ashes with
a dot.
You can then adjust the power. If you
do not select a power level, the cooking
zone will automatically turn itself off.
Switching off a zone on the hob
Press and hold the key for the zone
,
a long beep sounds and the display goes
off or an “H” appears (residual heat).
Press the On/Off key
to switch the
hob off completely.
2.4 SETTING THE POWER
Press the key When switching
on, you can go directly to maximum
power (apart from boost) by pressing the
-” key.
13
2 USE
2.5 HORIZONE
Horizone
tech
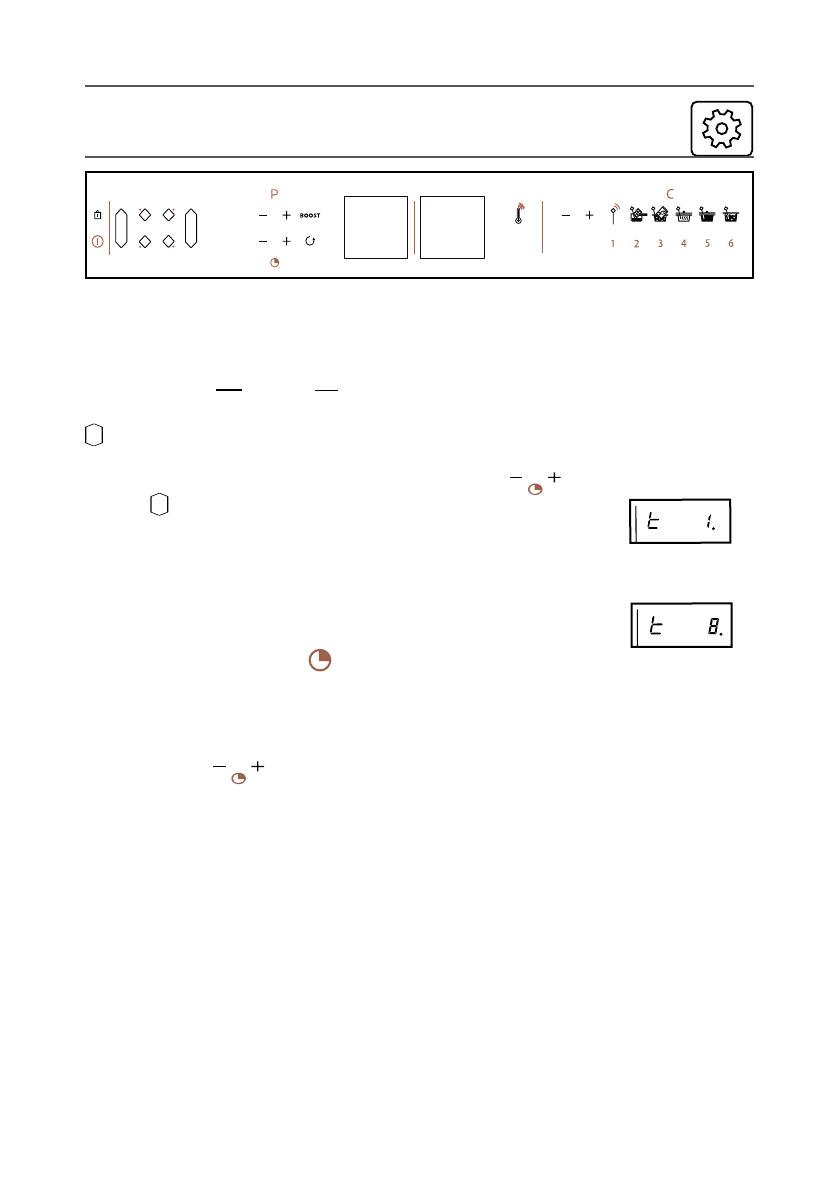
The free zone is selected with touchkey
. The power and timer are adjusted as
for a normal cooking zone.
To switch the zone off, press and hold
the key
; a long beep sounds and the
displays go off or the "H" symbol appears.
Pressing the touchkey in front of or
behind the zone deactivates the function
and transfers the settings to the selected
zone.
2.6 SETTING THE TIMER
Each cooking zone has a dedicated
timer. This can be set once the relevant
cooking area is in operation.
To turn it on or change the timing, press
the timer button
. To make it easier
to set a very long time, you can directly
reach 8 hours by pressing the touchkey
-; each additional press changes the
timer to 7h, 6h, 5h, 4h , 3h, 2h, 99 min,
etc.
At the end of cooking, the display
indicates 0 and a warning beep sounds.
To cancel this information, press any
button for the particular cooking zone
being used. Otherwise, they will switch
off after a few seconds.
To stop the timer during cooking, press
the + and - keys or return to 0 using
the - key.
Independent timer
With this function, you can time an event
without cooking.
- Select a zone that is not in use
- Press
+
; a “twith a dot is shown
- Set the time with - or +.
- the display of the remaining time is
xed.
- You can stop a countdown that has
started by holding the cooking zone
selection key.
- At the end of the countdown, a double
beep sounds for 20 seconds.
2.7 LOCKING THE CONTROLS
Child safety
Your hob has a child safety device which
locks the controls when the hob is not in
use or during cooking (to maintain the
current settings). For safety reasons,
only the stop key and the zone selection
keys are still active and allow the hob or
a cooking zone to be switched off.
After a predened time, the lock will
automatically disengage. Two beeps
sound and "bloc" switches off. You can
stop the Clean
Lock at any moment by pressing and
holding the key
.
2.8 RECALL FUNCTION
This function lets you display the last
"power and timer" settings for all the
burners which were switched off less
than 3 minutes previously.
To use this function, the hob must be
unlocked. Press the On/Off key and then
give a short press on the key
.
When the hob is in operation (at least
one burner on), give a short press on the
key
. This function reminds you of the
power and timer settings for the burner(s)
which have been switched off for less
than 30 seconds.
When the hob is switched off (all burners
off), press the On / Off button
, then
give a short press on the button
. The
function reminds you of the power and
timer settings for the burner(s) which
have been switched off for less than 3
minutes.
Advice on how to save energy
Cooking with the correctly sized lid
saves energy. If you use a glass lid, you
can control your cooking perfectly.
Locking
Press and hold the key until the
"bloc" locking symbol appears in the
displays and a short beep conrms the
operation.
Table locked in operation
The display of cooking zones in
operation alternately indicates power
and the locking symbol .
When you press the power or timer keys
for the zones which are "on":
"bloc" appears for 2 seconds and then
switches off.
Unlocking
Press the key
until the "bloc" locking
symbol disappears from the display and
a beep conrms the operation.
CLEAN LOCK function
This function locks the hob off while it is
being cleaned.
To activate Clean lock:
Give a short press on the key
(padlock). A beep sounds and the "bloc"
symbol ashes in the display.
2 USE
14
15
2 USE
2.9 PERFECT SENSOR FUNCTION
There are three ways of using the
function
- View the temperature measured in the
dish directly on the hob's display.
- Programme a temperature setpoint to
be reached in the dish (Expert)
- Set the temperature thanks to the 5
cooking functions proposed.
Pairing the sensor with the hob
Pairing takes place only once when
using the sensor for the rst time or when
replacing it.
The hob must be off.
1 - Press the on / off button on the back
of the sensor for 3 seconds; the sensor
gives off a blue ash and then ashes
green
2 - Hold down ; is
displayed and the sensor ashes green.
3 - Give a short press on ; the hob gives
a conrmation beep;
ashes to conrm the pairing. The
sensor ashes blue (this step may take
up to 15 seconds).
the sensor is not designed to go
in an oven.
Positioning of the sensor
There are 3 recommended positions:
-
Vertical
- Intermediate (adjustable)
- Slanted
It is not recommended to use the sensor
in its stand.
2 USE
Using the sensor
To operate the sensor, you need
to switch it on (press the button for
several seconds); switch on the hob
and then select a burner. When setting
the temperature, the hob automatically
adjusts the necessary power which may
cause a difference in boiling.
Thermometer function
This function shows on the hob display
the temperature measured by the sensor
(range 5° - 180°C).
This function provides temperature
information.
This function can be used to measure
the temperature of a dish being cooked
on the hob or of a roast taken out of the
oven, for example.
If there is no cookware, the temperature
and “°C” ash on the burner's display.
The sensor temperature is refreshed
every 1.5 seconds.
Cooking functions
To access the different cooking functions,
turn on the hob, select the burner (if there
is no cookware, a 0 ashes), then press
the symbol of the required pre-dened
function.
In these functions, cooking is driven by
the sensor.
16
For all functions, except the melting
function:
- the sensor must be at least 1 cm from
the base of the pan.
- the sensor must be immersed by at
least 1 cm in the food to be cooked.
1 cm
1 cm
If this is not possible, adapt the diameter
of the pan and the burner to the quantity
to be cooked.
It is recommended to regularly stir
the contents of your cookware during
cooking.
To access the different functions:
Press the specic key for the function
(then on
+ or - if you want to modify
the recommended temperature). The
temperature is displayed for 5 seconds,
then the “°” is shown until the setpoint
temperature is reached. The selected
function is shown alternately with the
temperature. There is a beeping sound
to indicate that the “°” has been set. The
temperature will be maintained until you
switch off the burner.
Expert mode
This function allows you to cook food
by directly selecting the required
temperature using the keys
+ / -. The
temperature can be adjusted between 40
and 180°C.
Melt
This function allows you to melt food
at a temperature that can be adjusted
between 40 and 70°C. The setpoint
temperature is 50°C. During this type of
cooking, the sensor must be vertical and
the tip of the sensor must touch the base
of the pan.
Mix well during cooking to homogenise
the mix.
During this type of cooking, the sensor
must touch the base of the pan.
This function is available only on the 16
cm, 23 cm or 1/2 Horizone burners on
your hob.
Vacuum cooking
This function allows you to cook food
at a temperature that can be adjusted
between 45 and 85°C. The setpoint
temperature is 60°C.
17
2 USE
Warm
This function allows you to warm food
at a temperature that can be adjusted
between 65 and 80°C. The setpoint
temperature is 70°C.
Slow cooking
This function allows you to simmer food
at a temperature that can be adjusted
between 80 and 90°C. The setpoint
temperature is 80°C.
When setting the temperature, there
may be a variation in boiling.
Boil
This function allows you to boil water at a
temperature of 100°C.
You can partially cover your cookware
with a lid; we recommend you do this
from the start of cooking.
This function is not intended to boil
milk. In this case, use the slow cooking
function.
18
Warning:
- You can programme a time in sensor
mode. In this case, the time is displayed
alternately with the temperature.
-
The sensor can only be used on one
burner at a time.
- At the end, do not forget to switch off
the sensor with a long press on the
sensor; the LED lights up in red for a
few seconds.
- The sensor turns off automatically 1
minute after the hob is turned off.
- To avoid damaging your sensor, do not
put the electronic box of the sensor
directly above the cooking fumes.
- The boiling temperature of water
may vary depending on the altitude
and atmospheric conditions of your
geographical situation.
- A loss of communication may be caused
by a weak battery.
2 USE
Technical information regarding the
sensor:
Parameter Specications Notes
Voltage 2.5 - 3V CR2032 battery
Autonomy
300 hours
with new battery
LED colour White
Green
Blue
Red
On
Awaiting connection
Connected
Off
Operating
temperature
0 - 85°C
Sensor's box
Temperature
measurement
range
5° - 180°C
Working
frequency
2402 - 2480
MHz
Reach of the
sensor
2 metres
Maximum
power
< 10 mW
  • Page 1 1
  • Page 2 2
  • Page 3 3
  • Page 4 4
  • Page 5 5
  • Page 6 6
  • Page 7 7
  • Page 8 8
  • Page 9 9
  • Page 10 10
  • Page 11 11
  • Page 12 12
  • Page 13 13
  • Page 14 14
  • Page 15 15
  • Page 16 16
  • Page 17 17
  • Page 18 18
  • Page 19 19
  • Page 20 20
  • Page 21 21
  • Page 22 22
  • Page 23 23
  • Page 24 24
  • Page 25 25
  • Page 26 26
  • Page 27 27
  • Page 28 28
  • Page 29 29
  • Page 30 30
  • Page 31 31
  • Page 32 32
  • Page 33 33
  • Page 34 34
  • Page 35 35
  • Page 36 36
  • Page 37 37
  • Page 38 38
  • Page 39 39
  • Page 40 40
  • Page 41 41
  • Page 42 42
  • Page 43 43
  • Page 44 44
  • Page 45 45
  • Page 46 46
  • Page 47 47
  • Page 48 48
  • Page 49 49
  • Page 50 50
  • Page 51 51
  • Page 52 52
  • Page 53 53
  • Page 54 54
  • Page 55 55
  • Page 56 56
  • Page 57 57
  • Page 58 58
  • Page 59 59
  • Page 60 60
  • Page 61 61
  • Page 62 62
  • Page 63 63
  • Page 64 64
  • Page 65 65
  • Page 66 66
  • Page 67 67
  • Page 68 68
  • Page 69 69
  • Page 70 70
  • Page 71 71
  • Page 72 72
  • Page 73 73
  • Page 74 74
  • Page 75 75
  • Page 76 76
  • Page 77 77
  • Page 78 78
  • Page 79 79
  • Page 80 80
  • Page 81 81
  • Page 82 82
  • Page 83 83
  • Page 84 84
  • Page 85 85
  • Page 86 86
  • Page 87 87
  • Page 88 88
  • Page 89 89
  • Page 90 90
  • Page 91 91
  • Page 92 92
  • Page 93 93
  • Page 94 94
  • Page 95 95
  • Page 96 96
  • Page 97 97
  • Page 98 98
  • Page 99 99
  • Page 100 100
  • Page 101 101
  • Page 102 102
  • Page 103 103
  • Page 104 104
  • Page 105 105
  • Page 106 106
  • Page 107 107
  • Page 108 108
  • Page 109 109
  • Page 110 110
  • Page 111 111
  • Page 112 112
  • Page 113 113
  • Page 114 114
  • Page 115 115
  • Page 116 116
  • Page 117 117
  • Page 118 118
  • Page 119 119
  • Page 120 120
  • Page 121 121
  • Page 122 122
  • Page 123 123
  • Page 124 124
  • Page 125 125
  • Page 126 126
  • Page 127 127
  • Page 128 128
  • Page 129 129
  • Page 130 130
  • Page 131 131
  • Page 132 132
  • Page 133 133
  • Page 134 134
  • Page 135 135
  • Page 136 136

De Dietrich DPI7884XT Important information

Category
Hobs
Type
Important information

Ask a question and I''ll find the answer in the document

Finding information in a document is now easier with AI