Page is loading ...

Owner's Manual:
Stainless Steel Rotisserie Kit for
Kenmore Elite & Kenmore Premium Grills
141.158031 for 3/4 Burner Kenmore and Kenmore Elite Grills:
141.15804 for 5/6 Burner Kenmore and Kenmore Elite Grills:
CAUTION: It is recommended that you do not exceed 7 pounds when using your rotisserie.
Heavier foods can cause the rotisserie spit to flex excessively causing the rotisserie motor to be
overloaded due to imbalanced operation. Foods heavier than 7 pounds can be cooked by the
indirect method instead of using the rotisserie.
1. Read all instructions before initial use.
2. Always attach the assembled Rotisserie to your grill first, then plug the Cord into an
outlet. To disconnect, turn the Rotisserie "OFF" then remove the Plug from outlet.
3. Most grill surfaces and Rotisserie parts are hot during and after cooking. Use
reasonable care around your grill and Rotisserie and wear insulated cooking mitts.
Only maneuver the Rotisserie by its black Handle.
4.
5.
To protect against electrical shock, do not immerse Electrical Cord, Plug or Motor in
water or expose to rain. Protect electrical elements from burners, hot grill surfaces
and grease.
Do not operate the Rotisserie if the cord or plug becomes damaged, or if the
Rotisserie malfunctions or has been damaged in any manner.
6.
7.
Do not let children operate your grill or Rotisserie. Do not let children play nearby.
Unplug the Rotisserie from electrical outlet when not in use and before cleaning.
Allow to cool before adding or removing parts. When the Rotisserie is not in use,
store it indoors in a dry place.
8. The use of accessory attachments (baskets, rib racks, etc) is not recommended by
the manufacturer and may cause injuries. Do not use Rotisserie for other than
intended use.
9. When rotisserie cooking place a Cooking Pan under the food to be cooked. This will
capture the drippings and keep your grill clean of excess grease which could cause
a fire. Use caution when moving a Cooking Pan containing hot oils.
10. Never line the bottom of your grill bowl with aluminum foil, sand or any grease
absorbent substance.
11. Should a grease fire occur, turn the burners and gas off and leave the grill lid
CLOSED until the fire is out.
12. The Rotisserie Motor is set for 110/120V, 60 Hz AC current.
13. This Rotisserie is for outdoors use only.
Z_ WARNING
Your grill and rotisserie will get very hot. Never lean over the cooking area
while using your grill. Do not touch cooking surfaces, grill housing, grill lid or any
other grill parts or accessories while the grill is in operation, or until you are certain
the grill has cooled down after use. Failure to comply with these instructions may
result in serious bodily injury.
Save this Owner's Manual for future reference
P80132079B Rev:2003/08/08

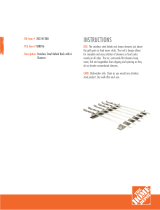
Stainless Steel Rotisserie
Assembly Instructions
Tools required for assembly:
Adjustable wrench or pliers and either a fiat head or Phillips head screwdriver,
Pre-Assembly Instructions
Before assembling your Rotisserie, use the parts list below to check that all necessary parts
have been included. Inspect parts for damage as you proceed. Do not assemble or operate
your Rotisserie if it appears damaged. If you are miesinq parts or have questions durinq the
assembly process, call 1-888-317-7642, 8am - 8 pm CST, Monday throuqh Friday.
REF # PART DESCRIPTION
1 Motor Bracket
2 #10-24x3/4" UNC Screws with washers and nuts
3 Stainless Steel Spit:
For 3 or 4 Burner Gas Grill Models
For 5 or 6 Burner Gas Grill Models
PART # QTY
PO3308028A 1
P5595A 2
P80D3A
P80D3B
4" Extension Stainless Steel Spit:
For 16690/17690 Models
PO5508132A
6-1/2" Extension Stainless Steel Spit: 1
For 16680/17680, 16228/17228 Models
4 Food Skewers P5556A 2
5 Thumbscrews 1/4"x1/2" P5595B 2
6 Collar P8021A 1
7 Bushing P8019A 1
8 Handle PO244A 1
9 AC Rotisserie Motor P80J2B 1
10 Thumbscrew #10xl/2" P5595C 1
11 Lock Washer for 4", 6-1/2" Extension Stainless Steel Spit: P55K1A 1
PO5508027A
No.10-?4x3/4"UNC 1/4"xl/2" #10xl/2"
REF#2 REF#5 REF #10

Assembling The Motor Bracket
Attach the Motor Bracket on the outside of the left grill bowl panel. Align the two holes of the
Bracket with the holes on the grill bowl. Tighten securely using two #10-24 x 3/4" UNC screws,
washers and nuts provided.
Motor
#10-24x3/4"
UNC Screws
with washers
and nuts
%
Assembling The Rotisserie
Slide a Food Skewer onto each end of the Rotisserie Spit. Adjust spacing between Skewers
to accommodate your food, then tighten the Thumbscrews to keep the Food Skewers in
position. Slide the Collar and Bushing onto the threaded end of the Spit. Do not tighten
the Collar Thumbscrew until the Rotisserie is placed into your grill. Screw the Handle
onto the threaded end of Rotisserie Spit as shown.
Food Skewers
Spit
Thumbscrew
Thumbscrew #10Xl/2"
1/4"xl/2"
Bushing
Thumbscrew
1/4"xl/2"
Collar
Handle
<

For Grill Models 16690/17690
Add the Extra 4" Extension Spit
For Grill Models 16680/17680, 16228/17228
Add the Extra 6-1/2" Extension Spit
Screw the two Spit sections together using one Lock Washer. Tighten the sections together
using two wrenches. Slide a Food Skewer onto each end of the assembled Rotis Spit. Adjust
spacing between Skewers to accommodate your food, then tighten the Thumbscrews to keep
the Food Skewers in position. Slide the Collar and Bushing onto the threaded end of the Spit.
Do not tighten the Collar Thumbscrew until the Rotisserie is placed into your grill. Screw the
Handle onto the threaded end of assembled Rotisserie Spit as shown below.
Spit
Thumbscrew
1/4"X1/2"
Thumbscrew
1/4"Xl/2"
\
\
\
\
\
Lock Washer
\
Food Skewers
Extension Spit
Thumbscrew Handle
#10X1/2" /
Collar Bushing
Installing The Rotisserie Motor
install the AC (alternating current) Rotisserie Motor onto the Motor Bracket as shown below.
On your grill the Motor attaches to the Bracket with the electrical cord UP, not down. This installation
insures that once the Spit is inserted into the Motor it will also rest securely into the slot of your
clrill bowl.
Rotisserie Motor
with electrical
cord UP
Motor
Bracket_
Stainless Steel Spit must rest
securely into this slot of your
grill bowl.

Installing The Rotisserie
Insert the assembled Rotisserie into the Motor as shown below. The Motor should be on the
left side of your grill and the Handle on the right side. Place the Bushing into the slot
opening on the right side of your grill bowl, then tighten the Collar Thumbscrew to the left of
the Bushing. The Collar will stabilize the Rotisserie during the cooking process and the
Bushing allows the Rotisserie Spit to turn smoothly. Plug the Rotisserie into an outlet and turn
on to test.
Thumbscrew Food Skewers
Thumbscrew
Bushing
Spit Collar
Handle
The bushin,q and collar must always be used with this Rotisserie.
BASIC TIPS FOR ROTISSERIE COOKING:
When Rotisserie cooking, use the Indirect Cooking Method, In other words, the burners at each end
of the grill are lit and the food is placed centrally on the Rotisserie, with no direct heat source
underneath. Some grill models offer a Rotisserie / Back Burner. To catch any drips from the rotisserie
cooked food it will be necessary to remove the cooking grid(s) then place a drip pan directly under
the food. These drippings can be used for making gravies and other sauces to accompany the cooked
meats. This drip pan also collects greases which could otherwise collect in your grill bowl and cause
a grease fire.
Once your Rotisserie, food and drip pan are in position with the indirect heat source on, close the
grill lid. Cooking times on a rotisserie will be approximately the same as for oven cooking. However,
temperature factors can affect actual cooking times. Watch the temperature carefully and monitor
your food frequently for best results. It is recommended that you use a meat thermometer to test
for the desired well-doneness of any foods prepared on a rotisserie.
ROTISSERIE COOKING CAN BE CONSIDERABLY SLOWER THAN DIRECT HEAT COOKING, BUT
THE RESULTS CAN BE WELL WORTH THE TIME AND EFFORT
Use caution and wear insulated cooking mitts when using your grill, rotisserie or optional cooking
accessories.
For more comprehensive information, refer to the Cooking Instructions and Cooking Guide in your
Owner's Manual.
Customer Service Helpline
8am - 8pm CST, Monday through Friday at:
1-888-317-7642.
/