Sanyo VPC T700 - Digital Camera - Compact Owner's manual

Category
Action sports cameras
Type
Owner's manual
EN-1
FCC STATEMENT
This device complies with Part 15 of the FCC Rules. Operation is subject to the following two conditions:
(1) This device may not cause harmful interference, and
(2) This device must accept any interference received, including interference that may cause undesired
operation.
Note:
This equipment has been tested and found to comply with the limits for Class B digital devices, pursuant to Part
15 of the FCC rules. These limits are designed to provide reasonable protection against harmful interference in
a residential installation. This equipment generates, uses and can radiate radio frequency energy and, if not
installed and used in accordance with the instructions, may cause harmful interference to radio communications.
However, there is no guarantee that interference will not occur in a particular installation. If this equipment does
cause harmful interference to radio or television reception, which can be determined by turning the equipment off
and on, the user is encouraged to try to correct the interference by one or more of the following measures:
Reorient or relocate the receiving antenna.
Increase the separation between the equipment and receiver.
Connect the equipment into an outlet on a circuit different from that to which the receiver is connected.
Consult the dealer or an experienced radio/TV technician for help.
Use of shielded cable is required to comply with Class B limits in Subpart B of Part 15 of the FCC rules.
Do not make any changes or modifications to the equipment unless otherwise specified in the manual.
If such changes or modifications should be made, you could be required to stop operation of the
equipment.
Notice:
If static electricity or electromagnetism causes data transfer to discontinue midway (fail), restart the
application or disconnect and connect the communication cable (USB, etc.) again.
EN-2
TRADEMARK INFORMATION
J Microsoft
®
and Windows
®
are U.S. registered trademarks of Microsoft Corporation.
J Pentium
®
is a registered trademark of Intel Corporation.
J Macintosh
®
is a trademark of Apple Computer, Inc.
J SD
TM
is a trademark.
J Other names and products may be trademarks or registered trademarks of their respective
owners.
READ THIS FIRST
Notice:
J Product design and specifications are subject to change without notice. This includes primary
product specifications, software, software drivers, and user’s manual. This User Manual is a
general reference guide for the product.
J The product and accessories that come with your camera may be different from those described
in this manual. This is due to the fact that different retailers often specify slightly different product
inclusions and accessories to suit their market requirements, customer demographics, and
geographical preferences. Products very often vary between retailers especially with accessories
such as batteries, chargers, AC adapters, memory cards, cables, pouches, and language support.
Occasionally a retailer will specify a unique product color, appearance, and internal memory
capacity. Contact your dealer for precise product definition and included accessories.
J The illustrations in this manual are for the purpose of explanation and may differ from the actual
design of your camera.
J The manufacturer assumes no liability for any errors or discrepancies in this user manual.
EN-3
Safety Instructions
Read and understand all Warnings and Cautions before using this product.
WARNING
If foreign objects or water have entered the camera, turn the power OFF and remove
the battery and the AC power adapter.
Continued use in this state might cause fire or electric shock. Consult the store of purchase.
If the camera has fallen or its case has been damaged, turn the power OFF and
remove the battery and the AC power adapter.
Continued use in this state might cause fire or electric shock. Consult the store of purchase.
Do not disassemble, change or repair the camera.
This might cause fire or electric shock. For repair or internal inspection, ask the store of
purchase.
Use the specified AC power adapter only with the indicated power supply voltage.
Use with any other power supply voltage might cause fire or electric shock.
Do not use the camera in areas near water.
This might cause fire or electric shock. Take special care during rain, snow, on the beach,
or near the shore.
Do not place the camera on inclined or unstable surfaces.
This might cause the camera to fall or tilt over, causing injury.
Keep the battery out of the reach of children.
Swallowing battery might cause poisoning. If the battery is accidentally swallowed, immediately
consult a physician.
Do not use the camera while you are walking, driving or riding a vehicle.
This might cause you to fall over or result in traffic accident.
EN-4
CAUTION
Insert the battery paying careful attention to the polarity (+ or –) of the terminals.
Inserting the battery with its polarities inverted might cause fire and injury, or damage to the
surrounding areas due to the battery rupturing or leaking.
Do not fire the flash close to anyone’s eyes.
This might cause damage to the person’s eyesight.
Do not subject the LCD monitor to impact.
This might damage the glass on the screen or cause the internal fluid to leak. If the internal
fluid enters your eyes or comes into contact with your body or clothes, rinse with fresh water.
If the internal fluid has entered your eyes, consult a physician to receive treatment.
A camera is a precision instrument. Do not drop it, strike it or use excessive force when
handling the camera.
This might cause damage to the camera.
Do not use the camera in humid, steamy, smoky, or dusty places.
This might cause fire or electric shock.
Do not remove the battery immediately after long period of continuous use.
The battery becomes hot during use. Touching a hot battery might cause burns.
Do not wrap the camera or place it in cloth or blankets.
This might cause heat to build up and deform the case, resulting in fire. Use the camera in a
well-ventilated place.
Do not leave the camera in places where the temperature may rise significantly, such as
inside a car.
This might adversely affect the case or the parts inside, resulting in fire.
Before you move the camera, disconnect cords and cables.
Failure to do this might damage cords and cables, resulting in fire and electric shock.
EN-5
Warning:
TO PREVENT THE RISK OF FIRE OR ELECTRIC SHOCK, DO NOT EXPOSE THIS APPLIANCE TO
RAIN OR MOISTURE
FOR AMERICAN USERS
The following advisory is included in accordance with the laws of the State of California (USA):
WARNING:
This product contains chemicals, including lead, known to the States of California to cause cancer,
birth defects or other reproductive harm. Wash hands after handling.
z This equipment has been tested and found to comply with the limits for a Class B digital device,
pursuant to Part 15 of the FCC Rules. These limits are designated to provide reasonable
protection against harmful interference in a residential installation. This equipment generates,
uses and can radiate radio frequency energy and, if not installed and used in accordance with
instructions, may cause harmful interference to radio communications. However, there is no
guarantee that interference will not occur in a particular installation. If this equipment does cause
harmful interference to radio or television reception, which can be determined by turning the
equipment off and on, the user is encouraged to try to correct the interference by one or more of
the following measures:
* Reorient or relocate the receiving antenna.
* Increase the separation between the equipment and receiver.
* Connect the equipment into an outlet on a circuit different from that to which the receiver is
connected.
* Consult the dealer or an experienced radio/TV technician for help.
z Changes or modifications not expressly approved by the party responsible for compliance could
void the user’s authority to operate the equipment.
EN-6
FOR CANADIAN USERS
z This Class B digital apparatus complies with Canadian ICES-003
FOR EU USERS
Note:
z This symbol mark and recycle system apply to EU countries and do not apply to
countries in other areas of the world.
Your SANYO product is designed and manufactured with high quality materials and
components which can be recycled and reused.
This symbol means that electrical and electronic equipment, at their end-of-life, should
be disposed of separately from your household waste.
Please dispose of the equipment at your local community waste collection/recycling
centre.
In the European Union there are separate collection systems for used electrical and
electronic products.
Please help up to conserve the environment we live in!
EN-7
Symbols used in this manual
Points giving some extended instructions or special points to pay attention to.
You many find the answers to questions or problems concerning camera operation in the sections
“Troubleshooting”.
FCC information
Tested To Comply
With FCC Standards
FOR HOME OR OFFICE USE
Declaration of Conformity
Model number: VPC-T700
Trade Name: SANYO
Responsible party: SANYO FISHER COMPANY
Address: 21605 Plummer Street
Chatsworth, California 91311
Telephone No.: (818) 998-7322
This device complies with Part 15 of the FCC Rules. Operation is subject to the following two
conditions:
(1) this device may not cause harmful interference, and
(2) this device must accept any interference received, including interference that may cause
undesired operation.
Canadian ICES-003 information
This class B digital apparatus complies with Canadian ICES-003.
EN-8
Notes on Battery Usage
When you use the battery, carefully read and strictly observe the Safety Instructions and the notes
described below:
J Use only the specified battery (3.7V).
J Avoid using the battery in extremely cold environments as low temperatures can shorten the
battery life and reduce camera performance.
J When you are using the new rechargeable battery or rechargeable battery that has not been
used for an extended period of time (the battery that passed the expiry date is an exception)
might affect the number of images that can be captured. Therefore, to maximize its performance
and lifetime, we recommend that you fully charge the battery and discharge it for at least one
complete cycle before use.
J The battery may feel warm after long period of continuous use of the camera or the flash. This is
normal and not a malfunction.
J The camera may feel warm after long period of continuous use. This is normal and not a malfunction.
J If the battery is not to be used for a long period of time, remove it from the camera to prevent
leakage or corrosion.
J If the battery is not to be used for a long period of time, store it after no battery power left. If the
battery is stored for a long time in a fully charged state, its performance may be impaired.
J Always keep the battery terminals in a clean state.
J Risk of explosion if battery is replaced by an incorrect type.
J Dispose of used batteries according to the recycle instructions.
J We recommend the battery should be charged 8 hours as first time use.
CAUTION
J Danger of explosion if battery is incorrectly replaced.
J Replace only with the same or equivalent type.
EN-9
CONTENTS
INTRODUCTION
11 Overview
12 Package Contents
GETTING TO KNOW THE CAMERA
13 Front View
14 Rear View
16 LCD Monitor Icons
GETTING STARTED
18 Attaching the Camera Strap
18 Inserting and Removing the Battery
19 Charging the Battery
20 Inserting and Removing the SD/SDHC
Memory Card (Optional Accessory)
21 Setting the Date and Time
22 Formatting the SD/SDHC Memory Card
or Internal Memory
23 Setting Image Resolution and Quality
PHOTOGRAPHY MODE
26 [ ] Capture Mode
27 Recording Voice Memos
28 Using the Digital Zoom
29 Setting the Flash
30 Setting the Focus
31 Setting the Self-timer
32 Exposure Compensation/Backlight
Correction
33 Setting the Scene Mode
35 Setting the Panorama Mode
35 [
] Video Mode
[ ] PLAYBACK MODE
36 Playing Back Still Images
37 Playing Back Video Clips
37 Playing Back Still Images/Video Clips
on a TV
38 Attaching Voice Memos
38 Slideshow Display
39 Zoom Playback
40 Protecting Images
42 DPOF Settings
43 Resizing an Image
44 Erasing Images
MENU OPTIONS
46 Capture Menu (Capture)
48 Capture Menu (Function)
50 Video Menu (Capture)
51 Video Menu (Function)
52 Playback Menu
53 Setup Menu (In Photography Mode)
54 Setup Menu (In Playback Mode)
EN-10
CONNECTING TO A PICTBRIDGE COMPLIANT
PRINTER
TRANSFERRING RECORDED IMAGES AND
VIDEOS TO YOUR COMPUTER
57 Connecting the Camera to Your Computer
58 Downloading Images and Video Files
USING THE CAMERA AS A PC CAMERA
59 Install the PC Camera Driver
6 0 Connect the Camera to Your Computer
60 Run Your Application Software (i.e. Windows
NetMeeting)
EDITING SOFTWARE INSTALLATION
61 Installing Photo Explorer
61 Installing Photo Express
62 Installing Cool 360
CAMERA SPECIFICATIONS
TROUBLESHOOTING
EN-11
INTRODUCTION
Overview
Congratulations on your purchase of the new digital camera.
Capturing high-quality digital images is fast and easy with this state-of-the-art smart camera. Equipped
with a 7.0 megapixel CCD, this camera is capable of capturing images with a resolution of up to 3072
x 2304 pixels.
Other features provided by the camera include the following:
LCD monitor - 2.5" full color LTPS-TFT LCD (230K pixels) monitor makes it easy to frame your
subject when capturing images. It also displays the images you have captured.
Recording media - 32 MB internal memory (approx. 27 MB for image storage). External memory
supports SD/SDHC memory card.
Optical zoom - 3x optical lens allows you to capture telephoto and wide-angle images.
Digital zoom - 4x digital zoom and 3x optical zoom permit zoom photography of up to 12
times; 4x playback captured images to enlarge a selected portion of an
image.
Voice memo - A voice memo can be recorded once for 30 seconds at photography
mode immediately following a still image captured or at playback mode
while viewing the images.
Thumbnail display - Display in sets of nine images on the LCD monitor for easier and quicker
selection of images.
Scene mode - Simply select the scene mode that suits specific shooting conditions and subjects.
This lets you shoot for the results you desire without complicated settings.
EN-12
Package Contents
Carefully unpack your camera and ensure that you have the following items.
Common Product Components:
J Digital camera
J User’s manual
J Software CD-ROM
J USB cable
J AV cable
J Camera strap
J Camera pouch
J AC power adapter
J Adapter converter (for “DC Jack to mini USB cable”)
J Rechargeable lithium-ion battery
Common (Optional) Accessories:
J SD/SDHC memory card
EN-13
GETTING TO KNOW THE CAMERA
Front View
1. Shutter button
2. ON/OFF button
3. Self-timer LED
4. Flash
5. Lens
6. Microphone
1
5
3 42
6
EN-14
Rear View
1. LCD monitor
2. Mode switch
Capture mode
Video mode
Playback mode
3. DISPLAY button
4. Status LED
5.
Zoom in button
Zoom out button
6. MENU button
1 2 3
4
5
6
11
9
8
7
13
12
10
7. Erase button
8. Speaker
9. SET /Direction button
10. PC/AV terminal
11. Strap holder
12. Battery/SD/SDHC memory
card cover
13. Tripod socket
EN-15
SET /Direction button
1. S button
Focus button
2. X button
Flash button
3. T button
Self-timer button
4. W button
Exposure/ Backlight correction button
5. SET button
EN-16
LCD Monitor Icons
Capture mode [ ]
1. Zoom status
2. Voice memo
3. Remaining battery status
[
] Full battery power
[
] Medium battery power
[
] Low battery power
[
] No battery power
*[
] AC adapter icon (if used)
4. Flash mode
[ Blank]Auto Flash
[
] Red-eye Reduction
[
] Forced Flash
[
] Flash Off
5. [
] Histogram
6. Focus area (When the shutter
button is pressed halfway)
7. Capture mode
[Blank] Single
[
] Continuous
[ AEB] AEB
8. Image size
[
] 3072 x 2304
[
] 2560 x 1920
[
] 1600 x 1200
[
] 640 x 480
9. Possible number of shots
10. Quality
[
] Fine
[
] Standard
[
] Economy
P
18. Scene mode
[
P
] Program AE
[
] Panorama
[
] Portrait Man
[
] Portrait Lady
[
] Landscape
[
] Sport
[
] Night Portrait
[
] Night Scene
[
] Candlelight
[
] Firework
[ TEXT ] Text
[
] Sunset
[
] Sunrise
[
] Splash Water
[
] Flow Water
[
] Sepia
[
] Monochrome
[
] Snow
[
] Beach
[
] Pets
[
] User Setting
J Each press of the DISPLAY button switches one step in the sequence of OSD full display, OSD full
with Histogram, OSD display off.
11. Date and time
12. Self-timer icon
[
10s] 10 sec.
[
2s ] 2 sec.
[
10+2s ] 10+2 sec.
13. Unsteady hold warning icon
14. [
] Exposure compensation
[
] Backlight correction
15. Metering
[Blank] Average
[
] Spot
16. White balance
[Blank] Auto
[
] Incandescent
[
1
] Fluorescent 1
[
2
] Fluorescent 2
[
] Day Light
[
] Cloudy
[
] Manual
17. Focus mode
[Blank] Auto focus
[
] Macro
[
] Infinity
EN-17
Video mode [ ]
1. [ ] Video mode
2. Zoom status
3. Remaining battery status
4. Image size
5. Possible recording time / elapsed time
6. Quality
7. Recording indicator
8. Self-timer icon
9. Focus icon
Playback mode [ ] -Still image playback
1. Playback mode
2. File number
3. Folder number
4. Protect icon
5. Voice memo
6. DPOF icon
Playback mode [ ]-Video playback
1. Video status bar
2. Elapsed time
3. File number
4. Folder number
5. Protect icon
6. Video mode
7. Playback mode
8. Sound off icon (When the S button is pressed during video playback.)
9. Total recorded time
00:07:30
10S
6
1
100-0011
35 46
Total
Play
00:00:10 00:00:
06
1
2
9
78
EN-18
GETTING STARTED
Attaching the Camera Strap
Attach the camera strap as shown in the illustration.
Inserting and Removing the Battery
We highly recommend using specified rechargeable lithium-ion battery (3.7V) to fully demonstrate
this camera’s function. Charge the battery before using the camera. Make sure that the power of the
camera is off before inserting or removing the battery.
Inserting the Battery
1. Open the battery/SD/SDHC memory card cover.
2. Insert the battery in the correct orientation shown.
Tilt the battery lock lever in the direction of the arrow and
orient the battery so that its label is facing to the rear side
of the camera, and then insert the battery.
3. Close the battery/SD/SDHC memory card cover.
Removing the Battery
Open the battery/SD/SDHC memory card cover and then release
the battery lock lever. When the battery has come out a little, slowly
pull it out the rest of the way.
EN-19
Charging the Battery
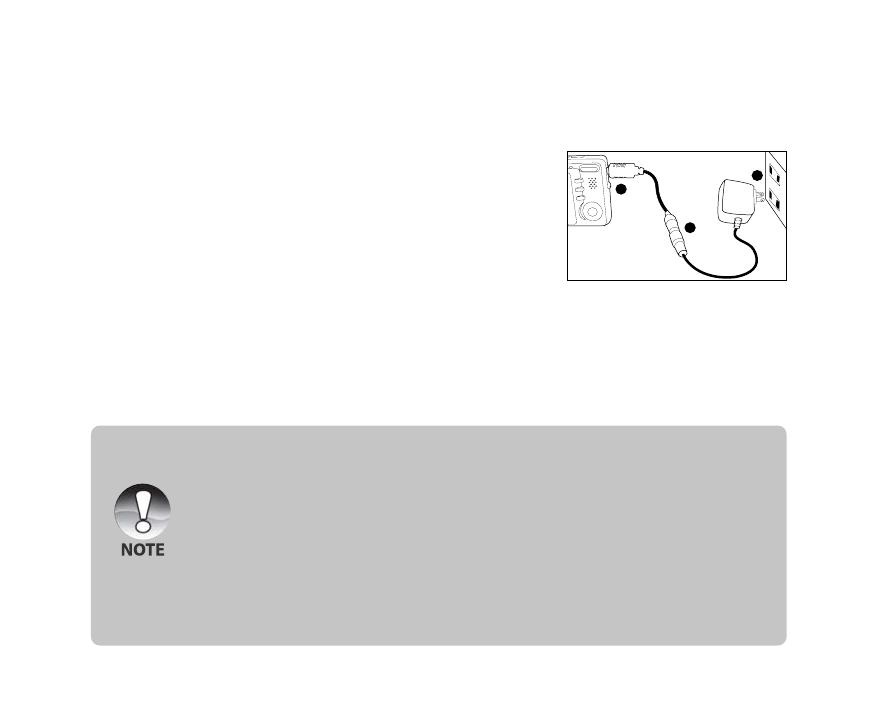
The AC power adapter may charge the battery or operate the camera as power supply. Make sure
that the power of the camera is off and then insert the battery before starting.
1. Connect one end of the adapter converter to the end of the AC
power adapter.
J The camera need to be power off when charging the
battery.
2. Insert the other end of the adapter converter to the PC/AV
terminal on the camera.
3. Insert the other end of the AC power adapter into a wall
outlet.
J The status LED lights green when charging is started and
lights off when charging is completed. The LED lights red
when a charging error has occurred or no battery is
inserted inside the camera.
J It is recommended to fully discharge the battery before recharging.
J Charging time varies according to the ambient temperature and the status of battery.
1
2
3
J This camera must be used with specified AC power adapter. Damage caused by the use of an
incorrect adapter is not covered under the warranty.
J Always make sure that the camera is off before removing the battery.
J The battery may feel warm after it has been charged or immediately after being used. This is
normal and not a malfunction.
J When using the camera in cold conditions, keep the camera and battery warm by storing it in
a warm place such as an interior pocket between shots.
J If you open the battery cover without removing the battery, the battery power will not be
disconnected.
J If you remove the battery, you have to insert the battery within 2 hours in order to make sure
that the date and time will not be reset.
J When charging the battery, do not place the camera at the high temperature condition, such
as inside the quilt, under sunshine…etc.
EN-20
Inserting and Removing the SD/SDHC Memory Card (Optional
Accessory)
The digital camera comes with 32 MB of internal memory (approx. 27 MB for image storage), allowing
you to store captured still images or video clips in the digital camera. However, you can also expand
the memory capacity by using an SD/SDHC memory card so that you can store more files.
Inserting the SD/SDHC memory card
1. Open the battery/SD/SDHC memory card cover.
2. Insert the SD/SDHC memory card in the correct orientation
shown.
J Hold the SD/SDHC memory card with its front side of the
SD/SDHC memory card (printed arrow) facing the rear
side of the camera, and then insert the card as far as it
can go.
3. Close the battery/SD/SDHC memory card cover.
Removing the SD/SDHC memory card
Open the battery/SD/SDHC memory card cover, press lightly on the edge of the SD/SDHC memory
card and it will eject.
J To prevent valuable data from being accidentally erased
from an SD/SDHC memory card you can slide the write-
protected tab (on the side of the SD/SDHC memory card)
to “LOCK”.
J To save, edit or erase data on an SD/SDHC memory card,
you must unlock the card.
J Be sure to format an SD/SDHC memory card with this digital camera before using it.
  • Page 1 1
  • Page 2 2
  • Page 3 3
  • Page 4 4
  • Page 5 5
  • Page 6 6
  • Page 7 7
  • Page 8 8
  • Page 9 9
  • Page 10 10
  • Page 11 11
  • Page 12 12
  • Page 13 13
  • Page 14 14
  • Page 15 15
  • Page 16 16
  • Page 17 17
  • Page 18 18
  • Page 19 19
  • Page 20 20
  • Page 21 21
  • Page 22 22
  • Page 23 23
  • Page 24 24
  • Page 25 25
  • Page 26 26
  • Page 27 27
  • Page 28 28
  • Page 29 29
  • Page 30 30
  • Page 31 31
  • Page 32 32
  • Page 33 33
  • Page 34 34
  • Page 35 35
  • Page 36 36
  • Page 37 37
  • Page 38 38
  • Page 39 39
  • Page 40 40
  • Page 41 41
  • Page 42 42
  • Page 43 43
  • Page 44 44
  • Page 45 45
  • Page 46 46
  • Page 47 47
  • Page 48 48
  • Page 49 49
  • Page 50 50
  • Page 51 51
  • Page 52 52
  • Page 53 53
  • Page 54 54
  • Page 55 55
  • Page 56 56
  • Page 57 57
  • Page 58 58
  • Page 59 59
  • Page 60 60
  • Page 61 61
  • Page 62 62
  • Page 63 63
  • Page 64 64
  • Page 65 65
  • Page 66 66

Sanyo VPC T700 - Digital Camera - Compact Owner's manual

Category
Action sports cameras
Type
Owner's manual

Ask a question and I''ll find the answer in the document

Finding information in a document is now easier with AI