Page is loading ...

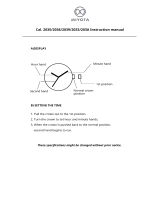
CAL. V091
DUO-DISPLAY QUARTZ
● Analogue time display
● Digital time and calendar
● 100-hour stopwatch
with lap time signal function
● Memory recall function
● Countdown timer
● 5-channel daily alarm
● Illuminating light (electroluminescent panel)

2
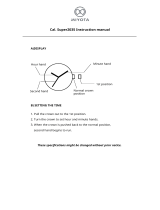
DISPLAY AND MODE CHANGE
a: Normal position
b: Extended position
B
A
C
D
b a
CROWN
D
With each press, the mode
in the digital display
changes in the following
order:
TIME/CALENDAR
STOPWATCH
➡
MEMORY RECALL
➡
TIMER
➡
ALARM
➡
➡

3
SCREW DOWN CROWN
[for models with screw down crown]
Locking the crown
1 Turn Crown counterclockwise until you no
longer feel the threads turning.
2 Crown can be pulled out.
1 Push Crown back in to normal position.
2 Turn Crown clockwise while pressing it lightly
until tight.
Unlocking the crown

4
TIME/CALENDAR SETTING
B
A
C
D
D
Press to show TIME/
CALENDAR mode.
C
▲
Press for 2 to 3 seconds.
▲
A
▲
Select the digits to be
adjusted.
B
D
or
Set the flashing digits.
(Increasing digits)
Set the flashing digits.
(Decreasing digits)
▲
▲
● Before setting the analogue time, be sure to set the digital time.
DIGITAL TIME/CALENDAR SETTING

5
C
Return to TIME/CALENDAR
mode.
Selection of the digits
Seconds ➾ Minutes ➾ Hour ➾ Date ➾ Month ➾ Year
➾
12-/24-hour indication
➾
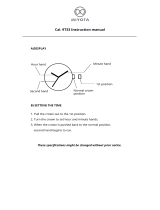
ANALOGUE TIME SETTING
1 Pull out when the second hand is
at the 12 o’clock position.
2 Turn to set the hour and minute
hands.
3 Push back in to normal position
when the second digits count “00”
in the digital time display.
CROWN
➠
➠
Second hand
Minute
hand
Hour
hand

6
TURNING ON/OFF OF HOURLY TIME SIGNAL AND
BUTTON OPERATION CONFIRMATION SOUND
A
With each press in TIME/
CALENDAR mode, the hourly
time signal and sound for button
operation confirmation are
alternately switched on and off.
A
Hourly time signal mark
* When the hourly time signal mark is
displayed, the hourly time signal rings
every hour on the hour and the
confirmation sound beeps with each
press of the buttons.

7
STOPWATCH MODE
Lap No.
1/1000 seconds
Hour, minutes and seconds
● The stopwatch measures up to 100 hours in 1/1000 second increments.
● The first 100 lap times are automatically stored in memory.
B
A
Start / Stop / Restart
Lap / Reset
* With each press of button A or B, the light
illuminates the digital display for 3 seconds.

8
Lap time measurement
START LAP 1
A
B
▲
▲
B
LAP 2
▲
• • • • •
STOP
A
B
RESET
▲
●
Lap time signal function:
Starting from 10 seconds before the current lap time measurement reaches the
previous lap time, the watch beeps at 1-second intervals. When the measurement
reaches the previous lap time, the watch gives out a long beep.
To stop it manually, press button C or D.
* The watch does not beep if the previous lap time is 10 seconds or less.

9
MEMORY RECALL MODE
● The stored data can be recalled either during or after the measurement.
B
Lap No.
1/1000 seconds
B
With each press, stored data
are recalled from the oldest to
the newest. **
Hour, minutes and seconds
**In memory recall after measurement, the oldest
measurement in memory is displayed first. In
memory recall during measurement, the newest
one is displayed first.
* With each press of button B, the light illuminates the
digital display for 3 seconds.

10
TIMER MODE
B
A
C
D
No. of times the
coundown was
repeated
Set time
No. of times the
coundown is to be
repeated
● The timer can be set up to 9 hours and 59 minutes in minute increments.
● The number of times the timer repeats the countdown can be set from 1 to 99
times.

11
TIMER SETTING
C
Press for 2 to 3 seconds.
▲
▲
A
▲
B
D
or
Set the flashing digits. (Increasing digits)
Set the flashing digits. (Decreasing digits)
▲
C
Return to TIMER mode.
Select the digits to be adjusted.
Selection of the digits
➾
Hour ➾ Minutes ➾
No. of times the countdown is to be
repeated

12
B
A
Start / Stop / Restart
Reset
* At 3, 2 and 1 seconds before the set time is up, a beep sounds and the digital display
is illuminated. When the set time is up, a warning sound beeps for 6 seconds as the
light illuminates the digital display.
To stop them manually, press any of the buttons. While the stopwatch is counting,
press button C or D to stop the timer warning sound.
TIMER OPERATION
* With each press of
button A or B, the light
illuminates the digital
display for 3 seconds.

13
ALARM MODE
● The alarm can be set to ring daily at five different times a day.
● The alarms can be engaged and disengaged independently of one another.
ALARM TIME SETTING
B
Press to select the desired
alarm channel.
▲
C
Press for 2 to 3 seconds.
▲
A
Select the digits to be adjusted
(hour/minutes).
▲
▲
B
D
or
Set the flashing digits.
(Increasing digits)
Set the flashing digits.
(Decreasing digits)
▲
A
B
C
D
Alarm channel

14
C
Return to ALARM mode.
* “on” and the alarm marks appear
and the alarm is automatically
engaged.
ALARM ENGAGEMENT/DISENGAGEMENT
B
Press to select the desired
alarm channel.
▲
A
With each press, the selected
alarm is engaged and
disengaged alternately.
* At the designated time, the alarm rings
for 20 seconds.
To stop it manually, press any of the
buttons. While the stopwatch is
counting, press button C or D to stop
the alarm.
A
B
“on”/“off” mark
Alarm mark

15
ILLUMINATING LIGHT (Electroluminescent panel)
B
Turn on the illuminating light.
B
* The digital display is evenly
illuminated for 3 seconds.

16
NOTES ON OPERATING THE WATCH
DISPLAY AND MODE CHANGE
● When the confirmation sound is turned on, a beep sounds with each press of button D
to change over the mode. It sounds in a different tone when the TIME/CALENDAR
mode appears, so that you can easily know the mode shown.
TIME/CALENDAR SETTING
[DIGITAL TIME/CALENDAR SETTING]
● The calendar automatically adjusts for odd and even months including February of leap
years from 1998 to 2047.
● Once the year, month and date have been set, the day of the week is automatically set.
● Setting the seconds:
• With the second digits flashing, press button B in accordance with a time signal. The
second digits are reset to “00”.
• When the seconds count any number from “30” to “59” and button B is pressed, one
minute is added and the seconds are reset to “00”.
● The flashing digits except the seconds and 12-/24-hour indication move quickly if button
B or D is kept pressed.
● When setting the hour digits in the 12-hour indication, check that AM/PM is properly set.
Only the “P” (PM) mark is displayed. For the AM setting, there is no indication.

17
● If the watch is left untouched with the digits flashing, it will automatically return to the
TIME/CALENDAR mode in 2 to 3 minutes.
● Note on unusual display:
While setting the time/calendar, all the segments of the display will light up if both
buttons A and B are pressed at the same time. This is not a malfunction. Press any one
of the buttons to return to the TIME/CALENDAR mode, and then set the time/calendar
again.
[ANALOGUE TIME SETTING]
● When setting the minute hand, first advance it 4 to 5 minutes ahead of the desired time
and then turn it back to the exact minute.
● When the crown is pulled out or pushed in for time setting, the minute hand may move
slightly. However, this is not a malfunction.
[TURNING ON/OFF OF HOURLY TIME SIGNAL AND BUTTON OPERATION
CONFIRMATION SOUND]
● If the hourly time signal coincides with the timer warning sound, the lap time signal or
the alarm, the hourly time signal will not ring.
STOPWATCH MODE
● After measuring 100 hours, the stopwatch will automatically be reset to “00”.
● Restart and stop of the stopwatch can be repeated by pressing button A.
● Lap time measurement can be repeated by pressing button B.
● Lap time measured remains displayed for 5 to 6 seconds. Then, the display automatically

18
returns to the measurement in progress.
● The lap number counts up to “199”. After “199”, the number is displayed in two digits
such as “00” for 200, “01” for 201, and so on.
● When button A is pressed to stop the lap time measurement, the lap number is
increased by one. After 5 to 6 seconds, the total time is displayed in place of the lap time.
● Even if the STOPWATCH mode is changed to another while the measurement is in
progress, it continues counting properly and the flashing STOPWATCH mode mark
indicates that the stopwatch is in use. After the stopwatch is used, however, be sure
to reset it as the battery energy is consumed enormously to shorten the battery life.
MEMORY RECALL MODE
● Even if the digits are reset to “00” in the stopwatch measurement, the stored data is
not erased and can be recalled unless a new measurement is started.
● The stored data is recalled quickly if button B is kept pressed.
TIMER MODE
[TIMER SETTING]
● The flashing digits move quickly if button B or D is kept pressed.
● If the watch is left untouched with the digits flashing, it will automatically return to the
TIMER mode in 2 to 3 minutes.
[TIMER OPERATION]
● Restart and stop of the timer can be repeated by pressing button A.

19
● If the timer warning sound and the lap time signal coincide with each other, the beeping
sound starting first will stop when the other starts.
● Even if the TIMER mode is changed to another while the measurement is in progress,
it continues counting properly and the flashing TIMER mode mark indicates that the
timer is in use. After the timer is used, however, be sure to reset it as the battery energy
is consumed enormously to shorten the battery life.
ALARM MODE
[ALARM TIME SETTING]
● When the time function is displayed in the 24-hour indication, the alarm will also be
displayed in the 24-hour indication.
● The flashing digits move quickly if button B or D is kept pressed.
● When setting the hour digits in the 12-hour indication, check that AM/PM is properly set.
Only the “P” (PM) mark is displayed. For the AM setting, there is no indication.
● If the watch is left untouched with the digits flashing, it will automatically return to the
ALARM mode in 2 to 3 minutes.
[ALARM ENGAGEMENT/DISENGAGEMENT]
● When any of the alarms is engaged, the alarm mark is displayed.
● The alarm of channel 5 rings differently from that of the other channels, so that channel
5 can be used for a particular purpose.
● If the alarm coincides with the timer warning sound, the alarm stops ringing while those
beeps are ringing.

20
● Alarm test: The alarm can be tested by keeping buttons A and B pressed in the TIME/
CALENDAR mode.
ILLUMINATING LIGHT (Electroluminescent panel)
● The electroluminescent panel loses its luminance as the battery voltage gets lowered.
Also, its luminance level decreases gradually with use. After 200 hours of use, the level
decreases by about half.
● When the illuminating light becomes dim, replace the battery with a new one. If the light
remains dim after the battery is replaced, have the electroluminescent panel replaced
with a new one by the retailer from whom the watch was purchased. It will be replaced
at cost.
● While the illuminating light is used, the watch gives out a slight noise. However, this
is not a malfunction.
/