
XSLATE B10
Model iX101B2
User’s Guide

Copyright © 2003-2015 Xplore Technologies Corp. All
rights reserved.
No part of this publication may be copied,
reproduced, or translated, without the prior written
consent of Xplore Technologies. No part of this
publication may be stored or transmitted in any
electronic form without the prior consent of Xplore
Technologies. Any unauthorized use is a violation of
copyright laws.
Xplore and the Xplore logo are registered trademarks
of Xplore Technologies Corp. of America; iX104,
iX104C5, BOBCAT, iX104C5 Lite, iX104C5 Dual Mode,
RangerX, and XSLATE-B10 are trademarks of Xplore
Technologies Corp. Kensington and MicroSaver are
registered trademarks of the Kensington Technology
Group. Android is a registered trademark of Google
Corporation. MicroSD is registered trademark of the
Personal Computer Memory Card International
Association. Wi-Fi is a trademark of the Wireless
Ethernet Compatibility Alliance (WECA). HDMI is a
trademark of HDMI Licensing, LLC. All other brands,
product names, company names, trademarks and
service marks used herein are property of their
respective companies.
Xplore Technologies
®
has made every effort to ensure
the accuracy and completeness of this document;
however, because ongoing development efforts are
made to continually improve the capabilities of our
products, we cannot guarantee the accuracy of the
contents of this document. We disclaim liability for
errors, omissions, or future changes herein.
DECLARATION OF CONFORMITY according to FCC Part
15, IC ICES-003, and RTT&E directives Responsible
Party Name: Xplore Technologies Corp. of America
Address: 8601 Ranch Road 2222, Bldg 2
Austin, TX 78730 USA
Telephone: 512-637-1100
Fax: 512-637-1199
Declares that product: Model Series: iX101B2 complies
with Part 15 of the FCC Rules. This device complies
with Part 15 of the FCC rules. Operation is subject to
the following two conditions: (1) This device may not
cause harmful interference, and, (2) This device must
accept any interference received, including
interference that may cause undesired operation.
WARNING: Changes or modifications to this unit not
expressly approved by the party responsible for
compliance may void the user’s authority to operate
this equipment. For more information about FCC, IC,
and EU rules and their applicability to the iX101B2,
see, “Agency Notes” on page 21.
The iX101B2 is backed by a standard 36-month
International Limited Warranty. An extended
International Limited Warranty is available. Check the
service kit included with your computer for warranty
terms and conditions.
PN 95-01211 Rev. A
Revision Date: 15 August 2015

Contents iii
Contents
Chapter 1 Welcome . . . . . . . . . . . . . . . . . . . . . . . . . . . . . . . . .1
Welcome. . . . . . . . . . . . . . . . . . . . . . . . . . . . . . . . . . . . . . . . . . . . . . . . . . . . . . . . . . . . . . . . . . . . . . . . 1
Important Safety Information . . . . . . . . . . . . . . . . . . . . . . . . . . . . . . . . . . . . . . . . . . . . . . . . . . . . 1
ENERGY STAR® . . . . . . . . . . . . . . . . . . . . . . . . . . . . . . . . . . . . . . . . . . . . . . . . . . . . . . . . . . . . . . . . . . 3
About Your Computer . . . . . . . . . . . . . . . . . . . . . . . . . . . . . . . . . . . . . . . . . . . . . . . . . . . . . . . . . . . 4
Package Contents . . . . . . . . . . . . . . . . . . . . . . . . . . . . . . . . . . . . . . . . . . . . . . . . . . . . . . . . . . . . . . . 4
Optional Accessories . . . . . . . . . . . . . . . . . . . . . . . . . . . . . . . . . . . . . . . . . . . . . . . . . . . . . . . . . 4
Contacting Xplore: Service and Questions . . . . . . . . . . . . . . . . . . . . . . . . . . . . . . . . . . . . . . . . 5
Chapter 2 Getting Started . . . . . . . . . . . . . . . . . . . . . . . . . . .6
System Overview . . . . . . . . . . . . . . . . . . . . . . . . . . . . . . . . . . . . . . . . . . . . . . . . . . . . . . . . . . . . . . . . 6
LED and Camera Status Indicator Table. . . . . . . . . . . . . . . . . . . . . . . . . . . . . . . . . . . . . . . . . . 10
Chapter 3 Using the Tablet . . . . . . . . . . . . . . . . . . . . . . . . .11
Suspend Operation. . . . . . . . . . . . . . . . . . . . . . . . . . . . . . . . . . . . . . . . . . . . . . . . . . . . . . . . . . . . . 11
Resume Operation . . . . . . . . . . . . . . . . . . . . . . . . . . . . . . . . . . . . . . . . . . . . . . . . . . . . . . . . . . . . . 11
Touch Screen Input Operation . . . . . . . . . . . . . . . . . . . . . . . . . . . . . . . . . . . . . . . . . . . . . . . . . . 12
EMR Pen Operation. . . . . . . . . . . . . . . . . . . . . . . . . . . . . . . . . . . . . . . . . . . . . . . . . . . . . . . . . . . . . 12
Using the EMR Pen to Perform Mouse Functions. . . . . . . . . . . . . . . . . . . . . . . . . . . . . . 13
Changing the EMR Pen Double-Click Speed . . . . . . . . . . . . . . . . . . . . . . . . . . . . . . . . . . 13
Calibrating the EMR Pen and Touch Input . . . . . . . . . . . . . . . . . . . . . . . . . . . . . . . . . . . . 13
Chapter 4 Maintaining the Tablet. . . . . . . . . . . . . . . . . . .15
Caring for the Tablet. . . . . . . . . . . . . . . . . . . . . . . . . . . . . . . . . . . . . . . . . . . . . . . . . . . . . . . . . . . . 15
Checking Power Cords and Connectors . . . . . . . . . . . . . . . . . . . . . . . . . . . . . . . . . . . . . . 15
Protecting the Computer from Damages . . . . . . . . . . . . . . . . . . . . . . . . . . . . . . . . . . . . . 15
Storing the Computer . . . . . . . . . . . . . . . . . . . . . . . . . . . . . . . . . . . . . . . . . . . . . . . . . . . . . . . 15
Caring for the Display Screen . . . . . . . . . . . . . . . . . . . . . . . . . . . . . . . . . . . . . . . . . . . . . . . . 16
Protecting the Computer Screen . . . . . . . . . . . . . . . . . . . . . . . . . . . . . . . . . . . . . . . . . . . . . 16
Removing the Screen Protector . . . . . . . . . . . . . . . . . . . . . . . . . . . . . . . . . . . . . . . . . . . . . . 16
Installing a New Screen Protector . . . . . . . . . . . . . . . . . . . . . . . . . . . . . . . . . . . . . . . . . . . . 16

Contents iv
Chapter 5 Troubleshooting. . . . . . . . . . . . . . . . . . . . . . . . .17
Chapter 6 Hardware Specifications . . . . . . . . . . . . . . . . .19
Chapter 7 Agency Notes . . . . . . . . . . . . . . . . . . . . . . . . . . .21
FCC Notices . . . . . . . . . . . . . . . . . . . . . . . . . . . . . . . . . . . . . . . . . . . . . . . . . . . . . . . . . . . . . . . . . . . . 21
WLAN: (Wi-Fi) . . . . . . . . . . . . . . . . . . . . . . . . . . . . . . . . . . . . . . . . . . . . . . . . . . . . . . . . . . . . . . . 21
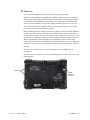
RF Exposure . . . . . . . . . . . . . . . . . . . . . . . . . . . . . . . . . . . . . . . . . . . . . . . . . . . . . . . . . . . . . . . . . 22
Health and Safety Information . . . . . . . . . . . . . . . . . . . . . . . . . . . . . . . . . . . . . . . . . . . . . . . . . . 23
Exposure to Radio Frequency (RF) Signals . . . . . . . . . . . . . . . . . . . . . . . . . . . . . . . . . . . . 23
5G Functionality. . . . . . . . . . . . . . . . . . . . . . . . . . . . . . . . . . . . . . . . . . . . . . . . . . . . . . . . . . . . . . . . 23
WLAN BGN Functionality . . . . . . . . . . . . . . . . . . . . . . . . . . . . . . . . . . . . . . . . . . . . . . . . . . . . . . . 24
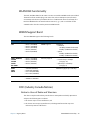
WWAN Support Band. . . . . . . . . . . . . . . . . . . . . . . . . . . . . . . . . . . . . . . . . . . . . . . . . . . . . . . . . . . 24
DOC (Industry Canada Notices) . . . . . . . . . . . . . . . . . . . . . . . . . . . . . . . . . . . . . . . . . . . . . . . . . 24
Notice to Users of Radio and Television . . . . . . . . . . . . . . . . . . . . . . . . . . . . . . . . . . . . . . 24
UL Notice . . . . . . . . . . . . . . . . . . . . . . . . . . . . . . . . . . . . . . . . . . . . . . . . . . . . . . . . . . . . . . . . . . . . . . 26
System Disposal . . . . . . . . . . . . . . . . . . . . . . . . . . . . . . . . . . . . . . . . . . . . . . . . . . . . . . . . . . . . . . . . 26
Chapter 8 Environment . . . . . . . . . . . . . . . . . . . . . . . . . . . .27
Environmental Policy . . . . . . . . . . . . . . . . . . . . . . . . . . . . . . . . . . . . . . . . . . . . . . . . . . . . . . . . . . . 27
Compliance . . . . . . . . . . . . . . . . . . . . . . . . . . . . . . . . . . . . . . . . . . . . . . . . . . . . . . . . . . . . . . . . . 27
Risk Reduction and Prevention Management. . . . . . . . . . . . . . . . . . . . . . . . . . . . . . . . . 27
Communication . . . . . . . . . . . . . . . . . . . . . . . . . . . . . . . . . . . . . . . . . . . . . . . . . . . . . . . . . . . . . 28
Continuous Improvement . . . . . . . . . . . . . . . . . . . . . . . . . . . . . . . . . . . . . . . . . . . . . . . . . . . 28
Take Back and Recycling Program. . . . . . . . . . . . . . . . . . . . . . . . . . . . . . . . . . . . . . . . . . . . . . . 28
Environmental and Sustainability Corporate Report . . . . . . . . . . . . . . . . . . . . . . . . . . . . . 29
Contacting Xplore: Service and Questions . . . . . . . . . . . . . . . . . . . . . . . . . . . . . . . . . . . . . . . 29

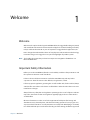
Chapter 1 Welcome 1
Welcome
1
Welcome
Welcome to the Xplore Technologies XSLATE B10 tablet, the rugged tablet designed, tested,
and manufactured to meet the environmental and physical real-world challenges faced by
today’s mobile workers. Based on years of experience in rugged mobile applications, the
B10 is designed to withstand the abuses of everyday wear and tear. Advanced technology,
innovative design, and a rugged case are just a few highlights of your B10 system.
NOTE: This handbook assumes that you have basic experience using Microsoft Windows 7 or
Microsoft Window 8.1.
Important Safety Information
Before you use the XSLATE B10 (referred to as the tablet), read these safety instructions and
the operation instructions in this handbook.
Failure to observe all these instructions voids the Limited Warranty and may lead to
suspension or denial of services to the offender, or legal action, or both.
Follow any special regulations governing the use of the tablet and, if radio-enabled, always
switch it off in areas where radio devices are forbidden or when the radio device can cause
interference or danger.
Always follow any safety laws and regulations pertaining to the use of cell phones and two-
way radios, because these laws and regulations typically apply to the use of the wireless-
enabled tablet.
Observe all restrictions on the use of radio equipment in fuel depots (fuel storage and
distribution areas), chemical plants, and wherever blasting operations are in progress or in
any area in which restrictions on radio transmissions are imposed. When flying in an aircraft,
turn off the tablet PC prior to take-off and landing. As of this writing, the FAA has approved

Chapter 1 Welcome Important Safety Information 2
the use of personal electronic devices on commercial aircraft when flying above 10,000ft
(3,048m). The tablet PC should only be turned on only when directed by the flight crew
members as FAA regulations are subject to change.
Operating the wireless-enabled tablet may interfere with the functioning of inadequately
protected medical devices such as pacemakers. Consult a physician or the manufacturer of
the medical device if you have any questions.
Radio signals from your tablet will not affect the operation of most modern equipment, but
certain electronic equipment, including automotive systems, may not be shielded against
radio signals from your tablet. Check with the manufacturer of your motor vehicle or the
manufacturer’s representative to determine whether using the tablet will present any safety
issues.
Avoid using the tablet in any environment that requires your full attention, such as when
driving a vehicle. If you need to use your tablet while driving, have a passenger use it for you
or find a safe location to halt your vehicle.
WARNING: Use only battery types specified in this handbook. Using any other type of
battery can be dangerous and can disable the tablet. Do not drop or mishandle the
batteries, immerse them in water, or subject them to high heat. Doing so could increase the
risk of explosion or leakage, and possibly cause injury. The lithium-ion batteries used in this
equipment contain material that is hazardous to your health. If battery contents come in
contact with the eyes, IMMEDIATELY flush the affected area with clean water for 15 minutes
and have someone else summon medical attention for you. Unaffected persons should
assist the affected individual in the vital first flushing of the eyes. RECHARGING THE
BATTERY MUST ONLY BE CARRIED OUT IN A NON-HAZERDOUS AREA USING THE SUPPLIED
AC ADAPTOR. The definition of hazardous areas can be found in Standard EN 60079-10.
WARNING: When operating the tablet in a known explosive environment do not remove
or replace the battery while the circuit is live. Before removing the battery verify that the
area is known to be free of ignitable concentrations of flammable substances. EXPLOSION
HAZARD – DO NOT DISCONNECT WHILE CIRCUIT IS LIVE UNLESS AREA IS KNOWN TO BE
NON-HAZERDOUS.
AVERISSEMENT – RISQUE D’EXPLOSION. NE PAS DÉBRANCHER TANT QUE LE CIRCUIT EST
SOUS TENSION, À MOINS QU’IL NE S’AGISSE D’UN EMPLACEMENT NON DANGEREUX.
WARNING: EXPLOSION HAZARD - DO NOT REPLACE THE BATTERY UNLESS POWER HAS
BEEN SWITCHED OFF OR THE AREA IS KNOWN TO BE NON-HAZARDOUS;
AVERTISSEMENT - RISQUE D’EXPLOSION - COUPER LE COURANT OU S’ASSURER QUE
L’EMPLACEMENT EST DESIGNE NON DANGEREUX AVANT DE REPLACER LE BATTERY.
WARNING: EXPLOSION HAZARD - SUBSTITUTION OF COMPONENTS MAY IMPAIR
SUITABILITY FOR CLASS I, DIVISION 2;
AVERTISSEMENT - RISQUE D’EXPLOSION - LA SUBSTITUTIOND E COMPOSANTSP EUTR
ENDRE CE MATERIEL INACCEPTABLE POUR LES EMPLACEMENTS DE CLASSE I, DIVISION 2;
WARNING: EXPLOSION HAZARD - DO NOT DISCONNECT EQUIPMENT UNLESS POWER HAS
BEEN SWITCHED OFF OR THE AREA IS KNOWN TO BE NON-HAZARDOUS.
AVERTISSEMENT - RISQUE D’EXPLOSION - AVANT DE DECONNECTER L’EQUIPEMENT,
COUPER LE COURANT OU S’ASSURER QUE L’EMPLACEMENT EST DESIGNE NON DANGEREUX.

Chapter 1 Welcome ENERGY STAR® 3
WARNING: THIS INFORMATION TECHNOLOGY EQUIPMENT IS SUITABLE FOR USE IN CLASS
I, DIVISION 2, GROUPS A, B, C, AND D OR NON-HAZARDOUS LOCATIONS ONLY;
AVERTISSEMENT - CET ÈQUIPMENT INFORMATIQUE CONVIENT Á UNE UTILISATION AUX
EMPLACEMENTS DE CLASSE I, DIVISION 2, GROUPES A, B, C, ET D OU AUX EMPLACEMENTS
NON DANGEREUX SEULEMENT.
WARNING: Do not use any dock or any other accessory or attachment that is not
manufactured or supplied by Xplore or an authorized Xplore accessories supplier. Use of
any accessory or attachment that is not supplied or approved for use with the tablet by
Xplore is not permitted because it may cause hazards.
Operate the tablet only from Xplore approved power sources. (See Power on page 20 for
more information about the battery and power supply.) Route power supply cords so that
they are not likely to be walked on or pinched by items placed upon or against them. Pay
particular attention to cords at plugs and convenience receptacles, and at the point where
cords exit from the tablet or its dock. Do not overload wall outlets, extension cords, or
integral convenience receptacles because this can cause fire or electric shock.
Unplug the tablet and refer the tablet and dock for service to qualified service personnel if
any of the following conditions occur:
• The power supply cord or plug is damaged.
• The tablet or dock does not operate normally when you follow the instructions in this
book.
• The tablet or dock exhibits a distinct change in performance.
Adjust only controls for which there are instructions in this book. An improper adjustment
of other controls can result in damage and may require extensive work by a qualified
technician to restore the tablet or dock to normal operation.
CAUTION: Avoid prolonged physical contact with the exposed metal surfaces on the front
and back of the tablet. While the tablet may not feel hot to the touch, prolonged physical
contact with the tablet surface may cause low-heat injury.
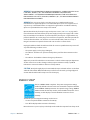
ENERGY STAR®
This PC is ENERGY STAR® compliant. The power management settings
enabled by default on this PC have been selected for compliance with the
current ENERGY STAR requirements. For optimal energy savings, ENERGY
STAR recommends that Sleep mode is entered within 30 minutes of user
inactivity, and the display is turned off within 15 minutes of user
inactivity.
The default power management settings on this PC are:
• Go into Sleep mode within 15 minutes of inactivity.
• Turn off the display within 5 minutes of inactivity.
Move the mouse or press any key on the keyboard to wake this computer from Sleep mode.

Chapter 1 Welcome About Your Computer 4
To learn more about effective power management for computers and the financial savings
potential, energy savings potential, and environmental benefits, please visit http://
www.energystar.gov/powermanagement.
To learn more about how your organization can benefit by reducing the energy
consumption of their IT equipment, please visit the Low Carbon IT Campaign website.
About Your Computer
The XSLATE B10 is a high-performance tablet that runs on Microsoft® Windows® operating
system. The method you use to control the tablet is as follows:
Tablet Model:
• iX101B2
Tablet Name:
• XSLATE B10
Input Technology:
• Electro-Magnetic Resonance (EMR) Technology Pen
• Capacitive Touch
NOTE: In this handbook, all information applies to all models unless otherwise noted.
All B10 tablets have been engineered and tested to meet Military Standards for
Environmental Extremes (MIL STD 810G). Your tablet includes the following features that
make it exceptionally rugged and durable:
• Durable, long-lasting, plastic enclosure
• Interior magnesium alloy frame
• Corner bumper system and gasket protection mechanisms
• Solid State mass storage
• Chemically treated rugged Display Glass
Package Contents
Check to make sure your package includes the following items:
• Quick Start Guide
• AC adapter
• XSLATE B10 tablet
• Warranty information kit
Optional Accessories
Your package may also include any optional accessories you ordered.

Chapter 1 Welcome Contacting Xplore: Service and Questions 5
Docking Options:
• Vehicle Docking Station
• Desktop Docking Station
Carrying Options:
• Carrying handle with Stylus and Shoulder Strap
• Tablet backside hand-strap
Additional Accessories (Optional):
• CAC reader expansion bay
• 1D2D bar code scanner
• Auto adapter (cigarette lighter adapter)
• Extended Battery
• Extended Battery Bracket with Kickstand
• Kensington Lock Slot
• Screen Protector
• True Serial Cable
Contacting Xplore: Service and Questions
NOTE: To troubleshoot problems, before you call, read the FAQ page of the Xplore Technologies
web site. Go to http://www.xploretech.com; then select Customer Support; then FAQ.
If you purchased your tablet from an authorized Xplore dealer, contact the dealer for service
and support.
If you purchased your tablet directly from Xplore, use any of the following methods to
contact Xplore for service and support:
Website: http://www.xploretech.com
E-mail: [email protected]
Toll free: 1-866-296-8541
Fax: 1-512-336-7791
Before you contact Xplore, have the following information ready so that the customer
support representative can quickly provide a solution:
• Product name: XSLATE B10
• Product serial number (located on the back of the tablet)
• Conditions under which the problem occurred
• Any error messages that were displayed
• Type of device connected, if any

Chapter 2 Getting Started 6
Getting Started
2
System Overview
This chapter gives you an overview of your tablet and includes a quick-start guide.
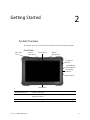
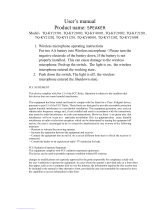
Front View
Built-in Microphone Enables audio input
Front Camera HD Video front-facing camera for video conferencing, video capture or
still picture capture
System Status Indicator Indicates the computer status (on, off) and battery status (charging)
Auto Light
Front Camera
Built-in
System/Battery
Home Button
Reset Switch
Built-in
Microphone
Microphone
Sensor
Status Indicator
Fingerprint
Reader
SSD Activity
Indicator

Chapter 2 Getting Started System Overview 7
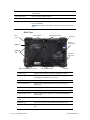
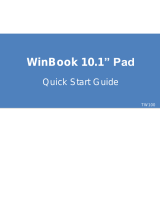
Back View
Home Button Home Button for easy navigation within the Microsoft Windows
environment
Auto Light Sensor Detects ambient light conditions
SSD Access Indicator Indicates SSD activity
Reset Switch Enables you to turn off the computer when using the Power/Resume
key is not effective
WARNING: Use of the reset switch could cause software corruption to
occur.
Camera Flash Light for the rear-facing camera for dim light conditions
Rear-facing Camera 8 Mega Pixel rear-facing camera with flash, for high quality still
photography or HD Video environment
Fan Inlet Allows for intake of air into the system - Do not block
Device Information Provides user with Model Number and other regulatory
information
I/O Port Door Input/Output door
Speaker Integrated speaker for audio playback
Expansion Port Cover Enables connection of expansion modules with additional
functionality
Expansion Battery Port
Cover
Exposes interface to expansion battery
EMR Pen Clips Allows for secure placement of the pen when not in use
Rear Cover Provides access to the internal battery, WWAN module, and
SSD
Camera Flash Rear-facing Camera
Device
Information
Expansion
Speaker
Serial Number Label
EMR Pen
Rear
Cover
Fan Inlet
Expansion Battery Port Cover
Port Cove
EMR Pen
Clips

Chapter 2 Getting Started System Overview 8
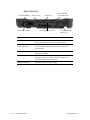
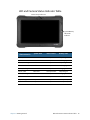
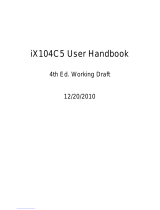
Right Side View
Ethernet LAN Port RJ45 for Ethernet LAN data connection
Volume Up/ Down Press top of rocker button to increase Audio volume Press
bottom of rocker button to decrease Audio volume
Power (On/Off )
Suspend/Resume
Press to power computer, press and hold for 4 seconds to
force power off use. Momentarily depress to enter/exit
Suspend mode.
Serial Port RS-232 Serial port expansion area – uses dongle cable for full
serial device interface
Screen Orientation Lock Locks the screen in current position regardless of tablet
orientation when pressed. Press again to un-lock screen
orientation (for Windows 8 or higher).
19V DC Power Input Connector Jack for AC power supply
Ethernet LAN Port
Volume Down
Volume Up
Power (On/Off)
Suspend/Resume
19V DC Power Input Screen Orientation Lock Serial Port (RS-232)
Access Door

Chapter 2 Getting Started System Overview 9
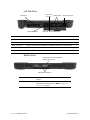
Left Side View
Bottom View
Fan Outlet Allows for movement of heat out of the system
Micro SIM Slot Wireless Data Provider SIM card (insert contacts facing up)
USB Ports Two full size USB 3.0
Audio Connector Headset connector for smartphone compatible earphones and microphone
Micro SD Card Slot Micro SDXC memory card slot for user memory expansion (insert contacts facing up)
Micro HDMI Output Micro HDMI out connector for connection to External Monitor or HDTV device
Dock Connector Enables you to connect the G2 xDock Vehicle Docking
Stations
Guide Pin Receptacles Help assure a secure connection of the optional G2
xDock Vehicle Docking Stations. Note: See “
Optional
Accessories on page 4.
Micro SIM
USB 3.0 Ports
Audio Connector
Micro HDMI Out Micro SD Card Slot
Fan Outlet
Card Slot
Docking Connector for Optional
Xplore Tablet Dock
Guide Pin Receptacles

Chapter 2 Getting Started LED and Camera Status Indicator Table 10
LED and Camera Status Indicator Table
System/Battery
Status Indicators
System State Power Source Battery State
Green, Solid ON State DC Input Power Fully Charged
ON State Battery Power Discharging
Green, Breathing SLEEP State DC Input Power Fully Charged
SLEEP State Battery Power Discharging
Green, Blinking ON or SLEEP State DC Input Power Charging
Yellow, Solid OFF State DC Input Power Fully Charged
Yellow, Blinking OFF State DC Input Power Charging
Off OFF State Battery Power
Red, Blinking Any State Battery Power Battery Low (<15%)
Red, Solid Any State Battery Power Battery Low (<7%)
Camera Status Indicator
System/Battery
LED Status
Indicator

Chapter 3 Using the Tablet 11
Using the Tablet
3
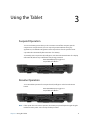
Suspend Operation
To conserve battery power when you do not want to turn off the computer, put the
computer into Suspend mode. (You can suspend operation without closing any
applications). The default configuration at time of purchase is for the system to enter
suspend mode automatically after 5 minutes of no activity.
To manually enter suspend mode, briefly press and release the Power button. The display
will switch off, without any confirmation menu being presented.
Resume Operation
To resume tablet operation from Suspend mode, briefly press and release the Power
button.
NOTE: If the system does not resume operation, the battery may have fully discharged. Plug the
tablet into an AC power source and repeat the procedure.
Power (On/Off) Display Toggle and
Suspend/Resume Button
Power (On/Off) Display Toggle and
Suspend/Resume Button

Chapter 3 Using the Tablet Touch Screen Input Operation 12
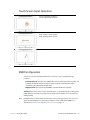
Touch Screen Input Operation
EMR Pen Operation
You can use any of the following methods to select items and to navigate through
programs.
• Auto-Sense mode: Use either the multifunction pen or your finger interchangeably. The
computer distinguishes between the two input modes and automatically adjusts
accordingly. This is the tablet’s default state.
• Digitizer mode: Use only the special EMR pen provided with the computer.
WARNING: Do not use items such as a ball point pen or a screwdriver that can damage the
tablet. Damage caused by using items not provided with the tablet is not covered by the
tablet warranty.
NOTE: During the first use of the tablet, or if the action you are trying to perform does not occur
when using the EMR pen or your finger to touch the screen, calibrate the EMR pen as
described in
Calibrating the EMR Pen and Touch Input on page 13.
Touch- Select Item or Option
Touch and Hold- Open Special
Drag- Scroll the screen
Flick- Scroll the screen quickly
Drag and drop- Move an item
Pinch-Zoom

Chapter 3 Using the Tablet EMR Pen Operation 13
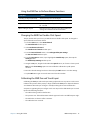
Using the EMR Pen to Perform Mouse Functions
Changing the EMR Pen Double-Click Speed
The pen double-click speed is in sync with the mouse double-click speed. To change the
speed, follow the instructions below.
1. From the Start menu, select Control Panel.
The Control Panel window opens.
2. Select Hardware and Sound.
The Hardware and Sound window opens.
3. From the Pen and Touch section, select Change tablet pen settings.
The Pen and Touch window opens.
4. From the Pen actions section, tap to highlight the Double-tap option, then tap the
Settings button.
The Double-Tap Settings window opens.
5. Using the EMR pen, drag the slider within the Speed section, to a faster or slower speed.
Note: Use the Test settings option to test and further calibrate the speed options
selected.
6. Once the desired settings have been selected, tap the OK button to save the settings.
7. Tap the OK button again to save the action and close the window.
Calibrating the EMR Pen and Touch Input
Calibrating the EMR pen and touch input settings adjusts the cursor position on the screen
relative to the position of the pen tip or finger. Calibrate the EMR pen to adjust the distance
error between where the pen or finger is actually touching the screen and where the
computer is registering the pen or finger touch. You may need to calibrate the pen or touch
input in the following situations:
• The tablet is being used for the first time.
• The previous user of the tablet writes with the opposite hand or at a different pen angle.
• The tablet has not been used for some time.
• The tablet has been serviced.
Function Action
Selecting an object (Left-click) Tap the pen tip once on the object
Double-click Quickly tap the pen tip twice on the object
Right-click Hold the pen tip (or finger) directly on the object
for 1 second
Move or drag an object Place the pen tip (or finger) on the object and move
or drag the content to the desired location

Chapter 3 Using the Tablet EMR Pen Operation 14
To calibrate the EMR pen, perform the following steps:
1. From the Start menu, select Control Panel.
The Control Panel window opens.
2. Select Hardware and Sound.
3. In the Tablet PC Settings section, select Calibrate the screen for pen or touch input
and follow the instructions for calibrating the pen or touch input settings.

Chapter 4 Maintaining the Tablet 15
Maintaining the Tablet
4
Caring for the Tablet
This section provides information about how to keep your tablet in top working condition.
Checking Power Cords and Connectors
Check AC and DC power cords and power connectors periodically for damage. Replace the
power cord immediately if you find any damage.
Protecting the Computer from Damages
• Do not intentionally drop the computer because the cumulative effects of multiple
drops may damage the computer.
• Do not place heavy objects on the computer.
• Do not disassemble the computer.
• Keep the computer at least 5 inches (13 centimeters) away from any electrical appliance
that generates a strong magnetic field, such as a motor, magnet, TV, refrigerator, or large
audio speakers.
Storing the Computer
You can store the computer in the Off state for about 30 days with a fully charged battery
installed. After this period, recharge the battery or replace it with a charged battery.

Chapter 4 Maintaining the Tablet Caring for the Tablet 16
Caring for the Display Screen
To clean the display screen, a soft cotton cloth dampened with water can be used to gently
wipe the screen surface. Additionally, the following disinfecting agents can also be used
with no long-term exposure:
• Isopropyl Alcohol (70% Concentration)
• Denatured Alcohol
• Hydrogen Peroxide (50% Concentration)
• Bleach (50% Concentration)
• Disinfectant Cleaner such as Lysol® and Amphyl®
NOTE: For best results, clean the display using any household glass cleaner.
Protecting the Computer Screen
The screen protector is a durable, replaceable writing surface that protects the display
screen from abrasion.
To obtain screen protectors, check with your reseller, or go to the Xplore Web site at
www.xploretech.com for ordering information. Additional information about installation is
included with the screen protectors.
Removing the Screen Protector
Slide your fingernail under the edge of the screen protector and pull the protector away
from the screen.
Installing a New Screen Protector
Follow the instructions included with your screen protector replacement kit.
NOTE: If a screen protector is already installed on the display screen, remove it before installing the
new screen protector.
Page is loading ...
Page is loading ...
Page is loading ...
Page is loading ...
Page is loading ...
Page is loading ...
Page is loading ...
Page is loading ...
Page is loading ...
Page is loading ...
Page is loading ...
Page is loading ...
Page is loading ...
Page is loading ...
Page is loading ...
-
 1
1
-
 2
2
-
 3
3
-
 4
4
-
 5
5
-
 6
6
-
 7
7
-
 8
8
-
 9
9
-
 10
10
-
 11
11
-
 12
12
-
 13
13
-
 14
14
-
 15
15
-
 16
16
-
 17
17
-
 18
18
-
 19
19
-
 20
20
-
 21
21
-
 22
22
-
 23
23
-
 24
24
-
 25
25
-
 26
26
-
 27
27
-
 28
28
-
 29
29
-
 30
30
-
 31
31
-
 32
32
-
 33
33
-
 34
34
-
 35
35


Ask a question and I''ll find the answer in the document
Finding information in a document is now easier with AI
Related papers
-
Zebra XSLATE User guide
-
Xplore Zebra XSlate R12 Windows 10 User guide
-
-
-
-
-
-
-
-
Xplore RangerX Operating instructions
Other documents
-
AYANEO Air Plus User manual
-
 TQL TRADING 2AKNJ-TQ-LT1203 User manual
-
 Winbook TW801 Quick start guide
-
Amazon P8AT8Z User manual
-
Amazon P5N8EC User manual
-
 Winbook TW100 Specification
-
Amazon GA5Z9L Fire TV Cube Handsfree Streaming Device User manual
-
MSI S80 Note Operating instructions
-
 Xplore Technologies Q2GGOBI2K-XPL User manual
-
 XTREME-GAMING Dual Charge Dock User manual


