Page is loading ...

INSTALLATION AND
OPERATION INSTRUCTIONS FOR
WALL- MOUNT AND BUILT- IN UNITS
09 13-01
WM-BI-26-3623 WM-BI-26-3623-WHTGLS
WM-BI-34-4423 WM-BI-34-4423-WHTGLS
WM-BI-48-5823 WM-BI-48-5823-WHTGLS
WM-BI-72-8123 WM-BI-72-8123-WHTGLS
BI-50-FLUSHMT-BLKGLS BI-50-FLUSHMT-WHTGLS
WM-BI-FI-34-4423-BLKGLS WM-BI-FI-48-5823-BLKGLS
BI-50-FI-FLUSHMT-BLKGLS
operation

2
TABLE OF CONTENTS
CONGRATULATIONS!
In selecting this Amantii Wall Mount OR Built-in electric fireplace, you have chosen the
finest and most dependable fireplace on the market today. A beautiful and functional
addition to the finest homes. Welcome to the family of satisfied Amantii electric fireplace
owners.
Please read and carefully follow all of the instruction sfound in this manual. Please pay
special attention to the safety instructions provided in this manual. The instructions
included here will as sure that you have many years of dependable and enjoyable service
from your Amantii product.
Important instructions Page 3
WM-BI-26-3623-/WHTGLS Page 4
WM-BI-34-4423-/WHTGLS
Page 5
WM-BI-48-5823-/WHTGLS Page 6
WM-BI-72-8123-/WHTGLS
Page 7
BI-50-FLUSHMT-BLKGLS/WHTGLS Page 8
Installation Overview Page 9
Package Contents
Page 10
Built-In Installation Page 11
Wall Mount Installation Page 14
Fire Glass Media Installation Page 16
Front Installation Page 17
Operating the Unit Page 18
Replacing The Remote Control Battery Page 24
Care And Maintenance Page 25
Fireplace Maintenance Page 26
Trouble Shooting Page 27
Service History Page 28
Warranty Page 29
Dealer Contact Information Back Page
Page 15
Media options
(WM-BI-FI-34-4423-BLKGLS)
(WM-BI-FI-48-5823-BLKGLS)
(BI-FI-50FLUSHMT-BLKGLS)

IMPOR
TANT INSTRUCTIONS
WARNING!
SAVE THESE INSTRUCTIONS
B
A
C
D
Fig. 1
Grounding Pin
Cover Of Grounded
Outlet Box
Metal
Screws
Adapter
Grounding
Means
Grounding
Pin
15.
5. Do not use outdoors.
3
properly grounded outlet box. The adapter should not be used if a three-slot grounded receptacle is available.

27” 22” or 68.60 cm 55.9 cm
55.68 lbs or 25.31kg
1500W
19W
6 1/8” or 15.5 cm
25 1/2” or 64.9 cm
21 1/8” or 53.6 cm
25W
sideLeft
t
Appliance Width
750W
1500W
12A
WM-BI-26-3623
WM-BI-26-3623-/WHTGLS
NO
TE: This appliance must be electrically
wired and grounded in accordance with
local codes. In the absence oflocal codes,
us the current CSA C22.1 Canadian Elec-
trical Code in Canada or the ANSI/NFPA
St
ates.
120V AC,60Hz
Model Number
V
oltage
Amps
Appliance Heigh
Appliance Depth
Gr
oss Weight
Cord Len
gth
Rough Wall Opening Size
74.81” or 190.00 cm
HEATER
HIGH
LOW
NO HEATER
MOTOR HEATER
MOTOR FLAME 4W
This appliance has been tested in accor-
dance with the UL Standand 2021 for
appliances in the United States and Cana-
da. If you need assistance during installa-
23
10
21 1/8
1/2
23 1/2
35 1/2
25 1/2
-/WHTGLS
Built-In or Wall Mount Appliance
6 3/4
4

35” 22“ or 88.9 cm 55.9 cm
65.78 lbs or 29.90kg
33 1/2” or 852 cm
WM-BI-34-4423
NO
TE: This appliance must be electrically
wired and grounded in accordance with
local codes. In the absence oflocal codes,
us the current CSA C22.1 Canadian Elec
-
trical Code in Canada or the ANSI/NFPA
St
ates.
This appliance has been tested in accor-
dance with the UL Standand 2021 for
appliances in the United States and Cana-
da. If you need assistance during installa-
1500W
19W
6 1/8” or 15.5 cm
21 1/8” or 53.6 cm
25W
sideLeft
t
Appliance Width
750W
1500W
12A
120V AC,60Hz
Model Number
V
oltage
Amps
Appliance Heigh
Appliance Depth
Gr
oss Weight
Cord Len
gth
Rough Wall Opening Size
74.81” or 190.00 cm
HEATER
HIGH
LOW
NO HEATER
MOTOR HEATER
MOTOR FLAME 4W
WM-BI-FI-34-4423-BLKGLS
6 3/4
33 1/2
43 1/2
31 1/2
21 1/8
1/2
10
23
-/WHTGLS
Built-In or Wall Mount Appliance
5
WM-BI-34-4423-/WHTGLS

49” 22“ or 124.46 cm 55.9 cm
82.17 lbs or 37.35kg
47 1/2” or 120.6 cm
WM-BI-48-5823
NO
TE: This appliance must be electrically
wired and grounded in accordance with
local codes. In the absence oflocal codes,
us the current CSA C22.1 Canadian Elec-
trical Code in Canada or the ANSI/NFPA
St
ates.
This appliance has been tested in accor-
dance with the UL Standand 2021 for
appliances in the United States and Cana-
da. If you need assistance during installa-
1500W
19W
6 1/8” or 15.5 cm
21 1/8” or 53.6 cm
25W
sideLeft
t
Appliance Width
750W
1500W
12A
120V AC,60Hz
Model Number
V
oltage
Amps
Appliance Heigh
Appliance Depth
Gr
oss Weight
Cord Len
gth
Rough Wall Opening Size
74.81” or 190.00 cm
HEATER
HIGH
LOW
NO HEATER
MOTOR HEATER
MOTOR FLAME 4W
21 1/8
1/2
23
10
45 1/2
57 1/2
47 1/2
6 3/4
WM-BI-FI-48-5823-BLKGLS
-/WHTGLS
Built-In or Wall Mount Appliance
6
WM-BI-48-5823-/WHTGLS

72 1/2” 22“ or 184 cm 55.9 cm
NO
TE: This appliance must be electrically
wired and grounded in accordance with
local codes. In the absence oflocal codes,
us the current CSA C22.1 Canadian Elec-
trical Code in Canada or the ANSI/NFPA
St
ates.
This appliance has been tested in accor-
dance with the UL Standand 2021 for
appliances in the United States and Cana-
da. If you need assistance during installa-
133.12 lbs or 52.41kg
71” or 180.4 cm
WM-BI-72-8123
1500W
19W
6 1/8” or 15.5 cm
21 1/8” or 53.6 cm
25W
sideLeft
t
Appliance Width
750W
1500W
12A
120V AC,60Hz
Model Number
V
oltage
Amps
Appliance Heigh
Appliance Depth
Gr
oss Weight
Cord Len
gth
Rough Wall Opening Size
74.81” or 190.00 cm
HEATER
HIGH
LOW
NO HEATER
MOTOR HEATER
MOTOR FLAME 4W
WM-BI-72-8123-/WHTGLS
69
81
71
6 3/4
10
21 1/8
23
1/2
-/WHTGLS
Built-In or Wall Mount Appliance
7

49” 22“ or 124.46 cm 55.9 cm
80lbs or 36.35kg
47 1/2” or 120.6 cm
NO
TE: This appliance must be electrically
wired and grounded in accordance with
local codes. In the absence oflocal codes,
us the current CSA C22.1 Canadian Elec-
trical Code in Canada or the ANSI/NFPA
St
ates.
This appliance has been tested in accor-
dance with the UL Standand 2021 for
appliances in the United States and Cana-
da. If you need assistance during installa-
BI-50-FLUSHMT-BLKGLS/WHTGLS
1500W
19W
6 1/8” or 15.5 cm
21 1/8” or 53.6 cm
25W
sideLeft
t
Appliance Width
750W
1500W
12A
120V AC,60Hz
Model Number
V
oltage
Amps
Appliance Heigh
Appliance Depth
Gr
oss Weight
Cord Len
gth
Rough Wall Opening Size
74.81” or 190.00 cm
HEATER
HIGH
LOW
NO HEATER
MOTOR HEATER
MOTOR FLAME 4W
21 1/8
1/2
23
10
45 1/2
51
47 1/2
6 3/4
BI-50-FLUSHMT
-BLKGLS/WHTGLS
Built-In or Wall Mount Appliance
8
BI-FI-50-FLUSHMT-BLKGLS

i
INS
TALLATION OVERVIEW
N
OTE: BEFORE YOU INSTALL
SITE SELECTION
wall.
Review and c
onsider all of the following condi-
r r w
o (2) wall
ethods:
t-In (pa
ge 11)
W n
t (Page 14)
r
e the power cord is so
pinched or againstasharp edge
and power cord is stored
or
r
ed to avoid tripping or snagging
ry to persons.
s
t c
with
local
c
odes
-
ry to persons.
rapes, pillow -
r
e etc.
dir ht and a
way fr
ov
erhead light-
ing.
electric et for ease of electric
and all hardware fr ox and r ove
all
packaging relat
a
terials prior to installa-
WARNING
:
T
Phillip r
ewdriver
aw and/ aw
Level
Tape
Plier
s
r
e
Gloves
E
Fr a
terials
Wall Finishing Mar-
terials
a
terials
s
table)
T
OOLS & BUILDING SUPPLIES
NORMALLY REQUIRED
Volt cir r red.
ca
ted cir
refer
r
-
P
ower supply Wire Gage
Voltage Wire Gage Fuse
120 v 14 G .
15
MP
W
all switch / t hermostat Wire Gage
V
oltage Wire Gage
5 Volts 18 Gage
P
ACKAGING LIST
with:
r t
e control
To re
duce the risk of fire, do not store or
use gasoline or other flammable vapors
and liquids in the vicinity of the heater.
not installed
that it is
ensure that the
Decorative media (See page 15)
9

PACKAGE CONTENTS
A
E
B
C
D
Part
1s
salGA
B
1
C Wall Mount Bracket 1
D 1
E
Decorative Media
1
CONTENTS
Part
Descriptio
n Quantity
Picture
Screw
0.16 in. x 1.0 in.
W
all Plug
0.3 in. x 1.5 in.
20
20
B
A
0.16 in. x 0.6 in.
18
C
Wood Screw
10

NE
W CONSTRUCTION OR
RENOVATION
CAUTION:
Tw
o people may be needed to
mois
ture and is located at least 0.91 m or
-
als such as curtains or drapes, furniture,
beddin
g, paper, etc.
2. Place the appliance in selected loca-
and s
tore appliance in a safe, dry and
4. Prepar
e a wall with a framed open-
ing to accomodate the size of your unit.
Leave at least 1/4” (6mm) around the
edge of the appliance. Any new wiring
must be done in compliance with local
and national codes and other applicable
outlet
s or circuits. To reduce the risk
licensed electrician.
WARNI
NG:
T
o prevent contact with sagging or
-
ance mus
t not be installed against
r
esult.
WARNING
:
Sides ---------------------- 2 in / 5 cm
Floor ---------------------- 13 3/4 in / 35 cm
Top ---------------------- 2 in / 5 cm
Back ---------------------- 0 in / 0 cm
min. 5 cm
2 in
min. 5 cm
2 in
min. 35 cm
13 3/4 in
WALL
FLOOR
11

FIREPLA
CE INSTALLATION
B
UILT
I
N
k r o
w
w
N
OTE
BEFORE
YOU INSTALL
W
all
2
1
4
" [58mm]
Units (models listed in table below) must
stick out of the wall a minimum of
2 1/4" or 5.8 cm
W
D
H
W(") D(") H(")
WM-BI-26-3623 27 5 22
WM-BI-34-4423 35 5 22
WM-BI-48-5823 49 5 22
WM-BI-72-812372 1/2 5 22
The rough wall opening size of the fireplace.
12
-
and the
wall studs.

BI-50-FLUSHMT INSTALLATION
k r o
w
w
N
OTE
BEFORE
YOU INSTALL
W
all
1
2
" [13mm]
BI-50-FLUSHMT units must stick out
of the wall a minimum of 1/2" or 1.3 cm.
B
UILT
I
N
W
D
H
W(") D(") H(")
BI-50-FLUSHMT 49 5 22
The rough wall opening size of the fireplace.
13
4. Drive mounting screws through the holes
located on the top and both sides of the
unit into the wall studs.

the bottom of unit.
4. Drive mounting screws into the mounting bracket on
Floor
It is
strongly recommended that the screws be
screwed into the wall studs where possible. If
anchor
s are used.
ke sur
e it is level.
hanging i
nto the keyholes on the back of the unit.
3. Check the appliance for stability ensuring that
the appliance will not pull free from the wall.
N
OTE: BEFORE YOU INSTALL
St
akes for hanging
wall b
racket
Back of unit
Stakes for hanging
Side view
Wa
ll
13 3/4 inch
14

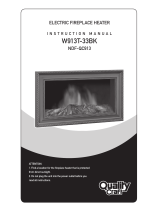
Media opons
Models WB-BI-26-3623, WM-BI-34-4423, WM-BI-48-5823, WM-BI-72-8123, BI-50-FLUSHMT-BLKGLS are
shipped with an LED ember log that is pre-installed. 3 colours of fire glass media are also included.
See page 16 for log removal instrucons.
See page 16 for media installaon instrucons.
Models WB-BI-26-3623-WHTGLS, WM-BI-34-4423-WHTGLS,
WM-BI-48-5823-WHTGLS, WM-BI-72-8123-WHTGLS,
diamond shaped media.
See page 16 for media installaon instrucons.
Clear
Glass nuggets, clear and
blue diamond shaped media
Harvest Moon Sun Tea
LED log
15
WM-BI-FI-34-4423-BLKGLS, WM-BI-FI-48-5823-BLKGLS
BI-50-FLUSHMT-WHTGLS, BI-FI-50-FLUSHMT-BLKGLS
are shipped with 3 large glass nuggets, clear and blue

Fire Glass Media - Log Installaon
1. Removing the log
Unplug the unit from wall and make sure controls are switched off. The LED log is shipped in place. The log has
tabs on each side that hold it secure. Remove the side panel to remove the log set and the LED strip.
. Installing the fire glass media
Pour the fire glass media into the tray as shown below. Fee free to use any combinaon of fire glass media that
you find most appealing.
16
2

ear s
a
NOTE: BEFORE YOU INSTALL
F
RONT INSTALLATION
It is
recommended that two people install the
front onto the appliance, w fety glasses and
gloves when handling glass.
appliance body
Wall
Unit
Shoulder Scr
ew
Wall
Mount
Unit
Shoulder Screw
Screw
NOTE: Before you lift the front glass. Unscrew
two screws on both side of the fireplace as
below shown.
1.Lift fireplace front and line up the brackets
with the four (4) shoulder screws on the side of
17

Fix plate
3. Put the plate back and screw back.
appliance directly to the house hold wiring.
electrician may remove the cord connection, and wire the
If it is necessary to hard wire this appliance, a qualified
HARD-WIRE INSTALLATION
OPERATING THE UNIT
1. Make sure the appliance is switched OFF (refer
on the right hand side of the unit.
3. Plug unit into electrical outlet.
Wall
outlet
s or circuits. To reduce the risk of
licensed electrician.
WARNING
:
Pow
er adaptor port
Appliance has overheated and safety
device has cause the thermal switch to
discount. Unplug the appliance, allow
appliance to cool for 15 minutes, then
plug back in.
Inspect for an objects on or adjacent to
the heater that may have locked the
airflow or otherwise caused high
temperatures to have occurred.
plate and the power cord fix piece, remove power cord.
Remove the knockout.
2. Attach the wiring to the junction block
1. Unscrew two screw show in the below. Remove the cover
19
18

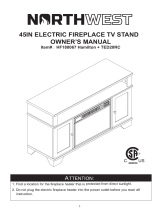
and ember will be on. The heater will be off. Press again, the fireplace will turn off.
The button located at the top position of the remote control is ON/OFF. Press it, the flame
Switching flash kind of mood light. There are 4 different flash styles.
Switching the color of mood light. There are 16 different colors.
Switching the fireplace mood light ON/OFF.
The heater not working if the room temperature higher than 25 .
The heater keep working if the room temperature lower than 22 .
The heater works at 750W.
The heater works at 1500W.
Switching the fireplace flame and ember bed light ON/OFF. It has functions of
setting memory.
When using remote control, always point it at the middle of the fireplace, and keep not far away
and “ O ” indicates OFF. When the unit is turned on, there will be chiming sound.
Plug the fireplace in and turn the power switch to “ I “ to turn the power on. The “ I ” indicates ON
OPERATING
THE UNIT
than 6 metres.
NOTE: The power switch is located at the bottom left hand side of the unit.
Adjust the brightness of flame.
Adjust the brightness of ember.
Switching the fireplace heater ON/OFF. It has functions of setting memory.
19
This remote control will be used on :
WM-BI-26-3623, WM-BI-34-4423 , WM-BI-48-5823, WM-BI-72-8123

and ember will be on. The heater will be off. Press again, the fireplace will turn off.
The button located at the top position of the remote control is ON/OFF. Press it, the flame
Switching flash kind of mood light. There are 4 different flash styles.
Switching the color of mood light. There are 16 different colors.
Switching the fireplace mood light ON/OFF.
The heater not working if the room temperature higher than 25 .
The heater keep working if the room temperature lower than 22 .
The heater works at 750W.
The heater works at 1500W.
Switching the fireplace flame and ember bed light ON/OFF. It has functions of
setting memory.
Figur
e 20
This remote control will be used on :
Adjust the blue colour brightness of flame and ember.
Adjust the yellow colour brightness of flame and ember.
Switching the fireplace heater ON/OFF. It has functions of setting memory.
20
WM-BI-72-8123-WHTGLS, WM-BI-FI-34-4423-BLKGLS, WM-BI-FI-48-5823-BLKGLS
WM-BI-26-3623-WHTGLS, WM-BI-34-4423-WHTGLS, WM-BI-48-5823-WHTGLS
/