Page is loading ...

1
© NAPCO 2006 PATENTED OI320A 9/06
R
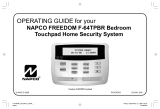
OPERATING GUIDE for your
NAPCO FREEDOM F-64TPG Garage Touchpad
Home Security System
Freedom F-64TPG Touchpad
SYSTEM READY
10/15/06 12:05PM
F-64TPG_OI320A.03_USER_2...
page 1
Friday, September 15, 2006 11:40
Composite

2
Congratulations on your purchase of a
new Freedom Garage Door Security Sys-
tem. This revolutionary new concept in
residential security makes using your sys-
tem easier than ever before possible, be-
cause the system uses its computerized
control panel to continually monitor the
status of your garage door. It actually
anticipates what command it should ex-
pect from you next--simply requiring just
one button to press to effortlessly operate
your security system, whether you’re go-
ing, returning or staying in for the night.
Now everyone in your family, young and
old alike, will enjoy the true peace-of-mind
you would expect from a quality, state-of-
the-art NAPCO Security System, without
the fuss of remembering confusing nu-
merical codes to operate it.
Simplicity and convenience begin with
your System’s one-touch STAY or AWAY
buttons, then just open or close the garage
door as usual! Day in and day out, that’s
all there is to it.
This booklet contains important in-
formation about the operation of your
NAPCO Freedom Security System.
Please read it through and retain it for
handy reference. Because your system is
customized for your home and lifestyle,
you may find subjects mentioned here,
that do not apply to your system. Rest
assured your security system has been
configured by your Security Professional
to best suit you and the system itself has
been meticulously designed and engi-
neered to the highest industry standards.
Please test your system at least once a
week as described below.
INTRODUCTION
1 Test your sounding device and backup battery
(Perform these tests only on weekends or at a time designated by your
alarm company)
1. W hile disarmed, press MENU.
2. Press MENU until ACTIVATE SIREN TEST appears in the display.
3. Press YES to execute the test. The alarm will sound for about two
seconds.
• If the alarm does not sound, call f or service.
• If the battery is lo w, LOW BATTERY E02-00 SERVICE will a ppear
in the display indicating a low battery condition. Allow 24 hours for
the battery to recharge. If the tr ouble continues, call for service.
2 Test your central station communicator
(Activate Dialer Test programmed? YES NO)
1. Notify your Central Station of the impending test.
2. While disarmed, insert your I-FOB into the Touchpad. Press MENU.
3. Press MENU until ACTIVATE DIALER TEST appears in the display.
4. Press YES to send a test code to the central station.
• If the test is not successful, COMM FAIL E03-00 SERVICE will
display, indicating a communication failure. Call for service.
Note: Any subsequent successful transmission will clear a Failure to
Communicate system trouble.
IMPORTANT - TEST YOUR SYSTEM WEEKLY
From a Ready Condition (Disarmed State)
F-64TPG_OI320A.03_USER_2...
page 2
Friday, September 15, 2006 11:40
Composite

3
TABLE OF CONTENTS
TABLE OF CONTENT S
INTRODUCTION. ........... ............. ............ ........... ........... ........... .......... 2
TESTING THE SYSTEM .... ............ .. .. ........... ... .. .. ........... ... .. ........... .. . 2
GARAGE TOUCHPAD INDICATORS AND CONTROLS ........... .. .. .. . 4
ARMING W HEN LEAVING ............ ........... ............. ............ ........... ..... 6
BYPASSING FAULTED ZONES ............ ........... ............. ............ ....... 7
ARMING STAY: PROTECTING YO URSELF AT HOME..... ........... .. . 8
ARMING AND LEAVING WITH OTHERS STAYING ........... .. ........... . 9
EXITING W ITH THE SYSTEM ALREADY ARMED ............ ........... . 10
EMERGENCY BUTTONS ....... .. .............. .. ............. ............ .. .. .. ... ..... 12
DISARMING THE SYSTEM ............................................................. 13
SILENCING AN ALARM............ .............. ............. .............. ............. . 14
FIRE PROTECTION................ .. .. ... ........... .. .. ... .. .. ........... ... .. .. .. ........ 15
TOUCHPAD MENU MODE .............................................................. 17
USER PROGRAM MODE .............. ............. .............. ........... ............ 21
SYSTEM TROUBLE ERROR CODES .... ........... .. .. ... ........... .. .. ... ..... 24
USER I-FOB LIST ............ .............. ............. ........... .............. ............ 29
LOST GARAGE DOOR OPENER MODE ............ .............. ............. . 30
FCC PART 68 STATEMENT ........... ............. ............ ............. .......... 31
LIMITATIONS OF THIS ALARM SYSTEM ......... ........... .............. ..... 32
LIMITED WARRANTY............... ........... .............. ............. ............ ..... 34
FCC PART 15 STATEMENT. ........... ............. ............ ............. .......... 36
ALARM TIME OUT: _________ Minutes
FOR SERVICE, CALL: _____________________
TO CANCEL AN
ALARM REPORT, CALL: ___________________ _
IF THE ALARM IS SOUNDING:
To sile nce an a lar m, in -
sert your I-FOB key into
the sl ot on t he To uchp ad
and remove when alarm
has sil enced . Proc eed
with c au tio n! (See
pages 13 & 14).
R
F-64TPG_OI320A.03_USER_2...
page 3
Friday, September 15, 2006 11:40
Composite

4
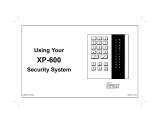
F-64TPG TOUCHPAD CONTROLS & INDICATORS
1
4
5
6
7
8
9
13
14
20
15
17
18
19
21
22
10
11
12
16
4
SYSTEM READY
10/15/06 12:05PM
BYPASS
FIRE
FIRE TBL
SYS TBL
2
3
F-64TPG_OI320A.03_USER_2...
page 4
Friday, September 15, 2006 11:40
Composite

5
F-64TPG TOUCHPAD CONTROLS & INDICATORS
LCD Window – 3 2 c harac ter LC D displays
system status m essages, zone
descripti ons, system tr oubles, e tc.
STATUS Light. Lights ( green) to i ndicate
that the syst em is ready for arm ing. If a
zone is not s ecured, the l ight will be off
and the zone will display in the window. If
a zone has been bypas sed, the ST ATUS
light will blin k while armed.
ARMED Light. Lights (r ed) to i ndicate that
the system is arm ed. If an al arm has
occurr ed, the ARM ED LED wil l be
flashi ng.
Alarm Speaker – Will sound a LOUD
steady s weep tone when in trusion is
detected or a dis tinct p ulsati ng ton e f or a
fire alar m condition. Also chirps to
indicate ar med AW AY, and provi des for
audible v oice prompts.
STAY Button – Press once to ini tiate the
arm Stay s equence. Stay Mode
bypasses all interior zones
simul taneously to allow f ree mov ement
within th e premis es. Hold d own f or 2
seconds if all zones secure to eli minate
60-second pr e-arm delay.
AWAY Button – Press to initiate arm
AW AY sequence w hen no one is t o
remain hom e. Exi t and clos e garage
door f rom outside the prem ise s. System
will be f ully armed wit h all perim eter and
interior devices activated.
BYPASS Button – Press to enter the
Bypass Menu, where s ystem f unctions
are displ aye d i n th e LCD wi nd ow. Pr ess
YES to select the des i red f uncti on; pr ess
RESET to exit. Bypassing a zone
deactivat es the zone f rom the system.
MENU Button – Press to enter F unction
Mode, in which av ailable s ystem
functions are displa yed in the LCD
window. T he desired func tion is then
selected by pressi ng the YES butto n.
Press R ESET to exi t.
RESET Button – Press to s ilence Fir e
alarms , troubles and exits F unction Mode
(see MENU Button) .
YES Button – Press to sel ect the desired
function i n menus (see ME NU Button ,
above).
NO Button – Press to answer no to menu
questions a nd proce ed to the next
question (s ee MENU Button, above) .
ENTER Button – Press to accept dis played
value and to move cursor to next
posi tio n.
Integral PIR – Us ed to det ect i ntruders and
your prese nce near th e T ouc h pad d ur i ng
arming and disarm ing. Do not block.
FIRE Button – Press and hold dow n for
2 seconds to alert t he Centr al Station of a
fire emer gency.
+ AUX Button – Press and hold do wn for 2
seconds to alert the C entral S tation of a
auxil iary emergency .
Police Button – Press and hol d down
for 2 sec onds to alert the C entral Station
of a polic e emergency.
I-FOB – The I-F OB is a uniquel y coded
digital key. Ins ert the I-FOB i nto its
keyhole to disarm the syst em and s ilence
the siren i n case of an alarm .
Slide Plate – Lift to v iew brie f descriptions
of Touchpa d butto ns and proce dures.
Bypass Icon – Appears as a rem inder that
zones h ave been b ypassed ( by pres sing
the BYPASS button) . If it is necessar y to
bypass an y inoperati ve zones, i t is
impor tant to have t he zones r epaired as
soon as possible.
Fire Icon – Steady in dicates a f ire alarm
condition. F lashing i ndicates fire alar m
sounding.
Fire TBL Icon – Indicat es a problem on a
fire zone i s detected.
System TBL Icon – Indicat es a tr ouble
condition exists on the system. Press
SILENCE to s ilence s ounder and displa y
the trouble.
1
20
2
3
4
5
6
7
8
9
10
11
12
13
14
16
15
17
18
19
21
22
F-64TPG_OI320A.03_USER_2...
page 5
Friday, September 15, 2006 11:40
Composite

6
ARMING WHEN LEAVING
If you are leav ing with no other family members remaining home:
1
Check the Touchpad indicators. The gree n STATUS light must be ON- STEADY, and the LCD
display will read "SYSTEM READY", indicating that the system is read y to arm.
• If the green STATUS light is off and zones are sc rolling in the display, a perimeter zone is faulted or a
monitored d eadbolt (other than your exit door) is u nlocked. Check the open zon es listed and close the
door, window, o r lock the deadbolt s as needed. If you cannot immedia tely secure the zones or lock the
deadbolts , they may be bypass ed (see page 7).
2
Press the AWAY button.
The Touchpad will voice prompt the correct action.
•
If you change your mind after pressing AWAY, press RESET to clea r armi ng.
3
Open the garage door and exit within 3 minutes. (Note: I f y our garage do or motor fails, see page
13).
4
When the garage door closes, the Touchpad will s ound one chirp indicating t he system is armed.
If the garage door has not been closed within the pre-exit delay time, the sys tem will revert
back to a disarm ed state.
If the system detects movement inside the premises during the exit delay time, it will automati-
cally revert to Stay m ode, providing perim eter protection with the interior protection (motion
sensor s) tu rn ed o ff. (See ARMING STAY: PROTECTING YOURSELF AT HOME- pa ge 8).
SYSTEM READY
AWAY
"To arm Away, exit and
close garage door."
F-64TPG_OI320A.03_USER_2...
page 6
Friday, September 15, 2006 11:40
Composite

7
BYPASSING FAULTED ZONES
If you are trying to arm with a faulted zone or zones, the LCD display will cl earl y indicate which zone(s) are faulted. If you
cannot repair the zone(s), they ma y be temporarily removed from the system, or bypassed, using the f ollowing procedure:
1
Press the BYPASS button.
2
The LCD window will list all zones in your system. Scroll f orward or backward through the zone list
using the YES × and NO Ø buttons. As you scroll through your zones, the Bypass or Trouble
icons will appear (or not appear) depending on the status of each zone.
3
As you scroll through the zone list using the YES × and NO Ø butt ons, when the zone that you
wish to bypass appears on the Touchpad LCD screen, press BYPASS. The Bypass icon will
appear on the LCD screen.
4
Press either the STAY or AWAY button. If arming AWAY, open the garage door and exit.
(Note: See page 13 if your gar age door m otor fails).
The system will arm with the faulted zones bypassed.
When the garage door closes, the Garage Touchpad will give one chirp to indicate the system has
armed. Warning: Bypassed zones ar e unprot ect ed. If a fau lted zone ca nnot be secured, have the
system checked as soon as possible.
BYPASS
"Press down arrow to scroll through zone list
and press BYPASS to select zone to bypass"
NOØ
YES×
BYPASS
"Please exit and lock
door to arm system"
F-64TPG_OI320A.03_USER_2...
page 7
Friday, September 15, 2006 11:40
Composite

8
ARMING STAY: PROTECTING YOURSELF AT HOME
Arming in the Stay mode a llows you to rem ain home with the perim eter protection active but with the interior protection off,
so that you may move freely within the premises. Arm Stay at the Gara ge Touchpad as follows:
1
Check the Touchpad indicators. The green STATUS light must be ON-STEADY, and the LCD dis-
play will read "SYSTEM READY", indicating that the system is ready to arm.
• If the green STATUS light is off and zones are scrolling in the display, a perimete r zone is faulted or a moni-
tored deadbolt (other than your exit door) is u nlocked. Check the open zo nes listed and clo se the door,
window, or lock the dea dbolts as needed. If you cannot immediat ely secure the zones or lock the deadbol ts,
they may be bypassed (see page 7).
2
Press the STAY button.
The Touchpad will voice prompt the correct action.
•
If you change your mind after pressing AWAY, press RESET to clear arming.
3
If the garage door is already closed, the ARMED indicator will light and the LCD display will read
"ARMING STAY". The system w ill arm in the Stay mode within 3 minutes.
4
If the garage door is NOT closed, close the garage door from the inside to arm the system.
If the garage door has not been closed withi n the exit delay time period (usually within 3 min-
utes of pressing STAY, but this time period can be changed by your installer), the system will
revert back to a disarmed state. (Note: See page 13 if your garage door motor fails).
SYSTEM READY
STAY
ARMED
"The system is arm-
ing in Stay mode"
F-64TPG_OI320A.03_USER_2...
page 8
Friday, September 15, 2006 11:40
Composite

9
ARMING AND LEAVING WITH OTHERS STAYING
1
Check the Touchpad indicators. The green STATUS lig ht m us t be ON- STE ADY, and the LCD dis-
play will read "SYSTEM READY", indicating that the system is ready to arm.
• If t he green STATUS light is off and zone s are scrollin g in the display, a perimeter zone is fau lted or a moni-
tored deadbolt (other than your exit do or) is unlocked. Check the open zones listed and close the door,
window, or lock the deadbolts as n eeded. If you cannot immedi ately secure t he zones or lo ck the dead-
bolts, the y may be bypasse d (see page 7).
2
Press the STAY button.
The Touchpad will voice prompt the correct action.
•
If you change your mind after pressing AWAY, pr ess RESET to clear arming.
3
Open the garage door and exit. (Note: See page 13 if your garag e door motor fails).
4
Close the garage door from the out sid e to arm the syste m (wit h you r e xis ti ng g ara ge door opener
remote control).
If the garage door has not been clos ed within the exit delay time per iod (usuall y within 3
minutes of pressing STAY, but this tim e period can be changed by your installer), the sys-
tem will revert back to a disarmed state.
If you are arm ing and lea ving with other fam ily members rem aining home:
The red ARMED light will turn on steady, indicating the 3 minute exit delay period.
STAY
SYSTEM READY
ARMED
"The system is arm-
ing in Stay mode"
F-64TPG_OI320A.03_USER_2...
page 9
Friday, September 15, 2006 11:40
Composite

10
EXITING WITH THE SYSTEM ALREADY ARMED
1
Press the STAY button.
The Touchpad will voice prompt the correct action.
The red ARMED light will tur n on st ead y, i n dicat ing that you hav e up to 3 m inutes to exit t hr o ugh
the garage and close the door.
2
Open the garage door from the inside. System will disarm.
3
Exit the garage.
If the system is Armed STAY and y ou are leaving with other family members remaining home:
4
Close the garage door from the outside to arm the system (with your existing garage door opener
remote control).
If the garage door has not been closed (usually within 3 minutes of arming, but this time pe-
riod can be changed by your installer), the system will revert back to a disarmed state.
(Note: See page 13 if your garage door motor fails).
STAY
"The system is arming
in Stay mode"
ARMED
F-64TPG_OI320A.03_USER_2...
page 10
Friday, September 15, 2006 11:40
Composite

11
EXITING WITH THE SYSTEM ALREADY ARMED
1
Press the AWAY button.
The Touchpad will voice prompt the correct action.
•
If you change your mind af ter pressing AWAY, pr ess SILENCE to clear arming.
The red ARMED light will turn on steady, indicating that you have up to 3 minutes to exit through the
garage and close the door.
2
Open the garage door from the inside. System will disarm.
3
Exit the garage.
If the s ystem is Armed STAY and you are leavin g with NO other family members remaining home:
4
Close the garage door from the outside (with your existing garage door opener rem ote control) to arm
the system. The Garage Touchpad will give one chirp to indicate the system has armed.
If the gara ge door ha s not bee n clos ed with in the exit de lay time period, the system will revert
back to a disa rm ed state.
If the system detects m ovement inside the premises (usually within 3 minutes of arming, but this
time period can be changed by your installer), it will automatically revert to Armed STAY mode,
providing perim eter protection with the interior protection (motion sensors) turned off. (See
ARMING STAY: PROTECTING YOURSELF AT HOME- page 8). (Note: See pa ge 13 if your
garage door motor fails).
AWAY
ARMED
F-64TPG_OI320A.03_USER_2...
page 11
Friday, September 15, 2006 11:40
Composite

12
EMERGENCY BUTTONS
Emergency Buttons (Only availa ble if programm ed).
Fire Emergency Hold down the Fire butto n to alert the ce ntral st ation of a fire
emergency. *
(Fire Emer ge nc y programmed? YES NO)
Auxiliary Emergency H old down this b utton to alert the central station of an auxiliary
emergency. *
(Auxiliar y Emergenc y programmed? YES NO)
Auxiliary Emergency: _______________________________________
Police Emergency Hold down the Police Emergency button to alert the central station of
a police emergency. *
(Polic e Emergenc y programmed? YES NO)
The Emergency Buttons, if programmed, are always active, whether the system is armed or disarmed. The Emergency
Button must be Held Down for 2 seconds to activate the emerge ncy alarm and transmit the signals to central station.
F-64TPG_OI320A.03_USER_2...
page 12
Friday, September 15, 2006 11:40
Composite

13
DISARMING THE SYSTEM
DISARMING WHEN RETURNING HOME:
W hen returning home, open your garage door from the out side to automatically disa rm the system. The red
ARMED light turn off and the green STATUS light will turn on.
If an alarm has occurred while you were away, opening the garage door will initiat e an entry delay sequence. The
I-FOB must be used to disarm the syst em or an alarm will be initiated within a short interval . If the delay is com-
pleted without the I-FOB use d to disarm the system, the alarm will sound and the I-FOB must be inserted to silence
the alarm. Proceed with caution! If you suspect that an intrud er may still be in the premises, leav e immediately
and call a uthorities from a neighbor's telepho ne.
DISARMING WHEN HOME (ARMED STAY):
W hen home with the system armed in t he Stay mode, opening the garage door from the inside will disarm the
system*. The red ARMED light will go out and the green STATUS light will turn on.
*If you have an inside doo r protected b y the Freedom system, you can unlock the deadbolt on this door to disarm the s ystem
instead of opening the outside garage door.
The system may always be disarmed with the I-FOB. To disarm the system, insert your I-FOB key into the I-FOB
slot on the Garage Touchpad and remove when the system is disarmed.
GARAGE DOOR MOTOR FAILURE
In the event your garage doo r motor fails, the procedure for arming the system does not change (except of course
that your garage door will need to be op ened and closed manuall y). However, to DISARM the s ystem without the
garage door mot or, you MUST use the I-FOB to disarm within 30 seconds of manually opening the outside
garage door.
F-64TPG_OI320A.03_USER_2...
page 13
Friday, September 15, 2006 11:40
Composite

14
SILENCING AN ALARM
If an alarm occurs while you are at home:
The Touchp ad siren will sound an d the red ARMED light will flash. The LCD display will read
"ALARM". Proceed with caution! If you suspect that an intruder may still be in the premises, leave
immedi ately and call auth orities f rom a neig hbor's teleph one.
To silence the alarm , insert your I-FO B key into t he I-FOB slot on the f ace of the Touchpad an d re-
move when alarm has silenced.
The LCD window will continue to display the names of the zone(s) on which the alarm occurred. De-
termine which zone caused the alarm and then press
RESET to clear the alarm memory.
If an alarm occurs while you are away:
When you unlock the deadbolt to enter, the Garage Touchpad sounder will activate and the red
ARMED light will be f lashing to warn you that an alarm had occurred while you were away.
Proceed with caution! If you suspect that an intruder may still be on the premises, leave
immediately and call a uthorities from a neighbor's phone.
To disarm the system, you must insert your I-FOB key into the I-FOB slot on the Touchpad. If the
system is not disarmed in 30 seconds, the alarm will sound.
The LCD window will continue to display the names of the zone(s) on which the alarm occurred. De-
termine which zone caused the alarm and then press
RESET to clear the alarm memory.
RESET
ARMED
RESET
ALARM
F-64TPG_OI320A.03_USER_2...
page 14
Friday, September 15, 2006 11:40
Composite

15
If a fire is detected, the siren will sound a distinct pulsating tone and the LCD window will flash the
word FIRE. If a Fire Alarm does occur:
1
If a fire is in progress, evacuate the premises immediately! Call the Fire Depa rt m ent from an outsid e phone.
2
If there is no ev idence of a fire , press RESET OR insert your I-FOB key into the Touchpad.**
The siren will silence, and the word FIRE in the Touchpad LCD window will stop flashing.
3
Determ ine which device wen t into alarm . If you are pr otected b y smoke detectors, the light on th e
active detector will be lit. Once it is determined which smoke detector is in alarm, press
RESET to
reset the smoke detector.
4
If the Fire Zone has reset properl y, the words SYSTEM READY should appe ar in approxim ately 30
seconds. If the words SYSTEM READY do not app ear, press RESET again in a few minutes. If the
wor ds SYSTEM READY still do not appear, call for service.
Fire-Zone Trouble
The system is constantly monitoring the Fire Zone to insure the connections to the protective devices
are in good working order.
• If a problem on a Fire Zone is detected, a S ystem Trouble will display. The sounder will activate
and LCD window will display the name of the zone in trouble.
Press the RESET button to silence the sounder. Call f or service immediately.
*Consult your installer to determine if your system includes fire protection.
**Check if only I-FOB can silence fire alarm: YES NO
FIRE PROTECTION*
FIRE
RESET
RESET
F-64TPG_OI320A.03_USER_2...
page 15
Friday, September 15, 2006 11:40
Composite

16
FIRE PROTECTION
Preparing a Fire Escape Plan
Even with the most adv anced fi re
alarm system, adequate protection
requires an escape plan.
To prepare your plan, draw floor
plans of your buildi ng. S how two exits
- a front or back door and a window
fr om e ach room . ( Mak e s ure the
window works. You may need a
special fire-escape ladder if the
window is high up). W rite down your
outside meeting place.
Family Rehearsal
Rehearse each of the following
activities:
1. Ev eryone in his r oom with t he
doors closed.
2. One person sounds the alarm.
3. Each pe rson tests his door.
4. Pretend the door is hot and use the
alternate escape exit.
5. Everyone meets outdoors at
the assigned location.
Important! - Read Carefully
Discuss these escape procedures
with all those who use the building:
1. In a residence, s leep with the
bedroom door closed. A closed
door will hold back deadl y smoke
while you escape.
2. When th e fi re alar m si gnal s,
escape quickly. Do not stop to
pack.
3. Test the door. If it is hot, use your
alternate route through the window.
If the door is co ol, brace your
shoulder against it and open it
cautiously. Be ready to slam the
door if smoke or hea t rushes in.
Crawl through smoke, holding your
breath. Close the doors again on
leaving to help prevent the fire from
spreading.
4. Go to your specif ic outdoor me eting
place so you can s ee th a t ev er yone
is safe.
5. Assign someone to make sure
nobod y return s to the bu rning
building.
6. Call the Fire Department from a
neighbor's telephone.
Would You Like More Safety Information?
For more information on home fire detection, burn safety, and home fire safety, write to the National Fire Protection
Association, Public Affairs Dept. 05A, Batterymarch Plaza, Quin cy, MA 02269.
F-64TPG_OI320A.03_USER_2...
page 16
Friday, September 15, 2006 11:40
Composite

17
TOUCHPAD MENU MODE
The Touchpad c an provide access t o a wide as sortment of utility functio ns, each d isplayed on the Touchpad LCD window in a
prompting “YES/N O” form at.
1 To ent er Touchpad Menu Mode, press MENU.
2 To sk ip a function, press NO.
3 To select and e xecute a f unction, ans wer YES.
• Press RESET to return t o norm al Touchpad operatio n. The Touch pad will aut omaticall y return to it s norm al operating m ode if
no activity is d etected for longer than one minute.
• W hen the last function i n the menu appears , press MENU again to repeat the m enu.
Note: All f unctions in the menu appear if the Master I-FOB is inse rted into the Touchpad before pressing MENU; if a User I-FO B is
inserted or if an I-FOB i s NOT inserted , only a limited num ber of functions will be displa yed. Limited functio ns are not ed below.
ENTER BYPASS MENU - The Bypass Menu p rovi d es a l ist of item s to b ypass. The
first Menu item is "BYPASS ALL OPEN ZONES" allows you to bypass all open
perimeter zone s (excluding the primary exit/en try door). The Bypass icon will ap-
pear for each b ypassed zone li sted. The next Bypass Menu selection "DISPLAY
ZN BYPASSED " appears only if zones are b ypassed and allows you to display
those bypassed zones. The next Bypass Menu select ion "DISPLAY ZN DIREC-
TORY" al lows you to d ispla y a listing of all zones in t he Area. Press YES an d NO
to scroll t hrough each of these lists.
ACTIVATE CHIME - The Chime Mode will sound a tone at the Touchpad when the
programmed zone is f aulted while disarmed. T o deactivate the Chim e Mode, re-
enter Tou chpad Menu Mode a nd when “D EACTIVAT E CHIME“ is displa yed, pr ess
YES. Note: The Chim e Mode is disabled while ar med. C hime is di sabled fo r Pro-
tected zones while arm ed, Never Armed zones (such as a drivewa y sensor) will
ENTER BYPASS
MENU Y/N
ACTIVATE
CHIME Y/N
F-64TPG_OI320A.03_USER_2...
page 17
Friday, September 15, 2006 11:40
Composite

18
continue to chim e when s ystem is armed.
CHANGE KEYPAD BEEP VOLUME - W hen the Touchpad b uttons are pressed o r
when an entry warning activates , the Touch pad be eper sounds. This f unction allows
the Touchpad beep er volume to be adjusted. Press YES to i ncrease, press NO to
decrease. Sele ctions are HIGH, MED-HIGH, MED, LOW and OFF.
CHANGE VOICE VOLUME - All Touchpad f unctions ar e displayed in the LC D window
and are accom panied by a voice prom pt. This fun ction allows th e Touchpad voice
prompt volum e to be adju sted. Press YES to increase, press NO to decrease. Se-
lections are HIG H, MED-HIGH, ME D, LOW and OFF.
ACTIVATE SIREN TEST - Activates the alarm (while dis armed) for abo ut 2 seconds
and performs a bat tery test. If the ala rm does not sound, call f or service. Note: If
the battery is lo w, a “LOW BATTERY E02-00 SERVICE” will appear in the display
indicating a low batt ery conditio n. Firs t allo w 24 hou rs for th e batter y to rec harge. If
the trouble cont inues, call for serv ice.
DISPLAY FIRE ALARM - Displ ays alarms t hat have occurred on the Fir e Zone(s).
Press the YES and NO buttons to scroll zones. Note: This selection onl y appears
with a Master I- FOB inserted in the Touchpad.
DISPLAY FIRE TROUBLE - Dis plays trouble conditions that have been detect ed on t he
Fire Zone(s). Press the YES and NO buttons to scroll zones. Note: This selection
only appears with a Master I-FOB inserted in the T ouchpad.
TOUCHPAD MENU MODE
ACTIVATE
SIREN TEST Y/N
DISPLAY
FIRE ALARM Y/N
DISPLAY
FIRE TROUBLE Y/N
CHANGE KEYPAD
BEEP VOLUME Y/N
CHANGE VOICE
VOLUME Y/N
F-64TPG_OI320A.03_USER_2...
page 18
Friday, September 15, 2006 11:40
Composite

19
ACTIVATE FAULT FIND - Activ ates a multipl e diagnostic test rep ort. For installer's use
only. If accidental ly enabled, press RESET to exit. Note: This selectio n only appears
with a Master I- FOB inserted in the Touchpad.
RESET SYSTEM TBL - S ystem troubles displa y and sound at the Touc hpad. Corr ect-
ing the troubl e will clear most indicat ions, ho wever the following error codes will require
manual reset: E13; E1 9; E20 and E22. (See SYSTEM TROUBLE E RROR CODES f or
a description of error code s). Note: This select ion only appe ars with a Ma ste r I-FOB
inserted in the Touchpad .
ACTIVATE DIALER TEST – Allo ws a central station comm unication test to be ini tiated,
transmitting a T est Timer signal. For installer's use only. If ac cidentall y enabled,
press RESET to exit. Note: Thi s selection o nly appears with a Master I-FOB inserted
in the Touchpad .
ENTER LOG MENU – The Log Menu pro vides a list of logged events. DISPLAY
ALARM LOG displays the most recen t alarm events. DISPLAY TOTAL LOG dis-
plays the m ost recent events of all t ypes. DISPLAY FIRE LOG displa ys the most re-
cent fire events. DISPLAY OP/CL LOG disp la ys the m ost recent o penings and c los-
ings and DISPLAY SYSTEM LOG displays the m ost recent system even ts. Note:
This selection only appear s with a Master I-FOB inserted in the Touchpa d.
ACTIVATE PROGRAM - Activates the Us er Progra m Mode. See page 2 1 for more infor-
mation. Note: This feature is disabled while arm ed. Note: This selection only ap-
pears with a Mas ter I-FOB inserted in th e Touchpad.
TOUCHPAD MENU MODE
ACTIVATE
FAULT FIND Y/N
RESET
SYSTEM TBL Y/N
ACTIVATE
DIALER TEST Y/N
ENTER LOG
MENU Y/N
ACTIVATE
PROGRAM Y/N
F-64TPG_OI320A.03_USER_2...
page 19
Friday, September 15, 2006 11:40
Composite

20
ACTIVATE DOWNLOAD - For installer' s use onl y. If accidentall y enabled, press RESET
to exit. Note: This feature is disable d while armed. Note: This selectio n only ap-
pears with a Mas ter I-FOB insert ed in the Tou chpad.
ACTIVATE LOST KEY MODE - In the event that the ke ys to your deadbolt are los t or
stolen, the s ystem may still be used by arming in t he Lost Key Mode. In L ost Key
Mode, the system ma y be armed as usual, h owever unlocking the deadbolt will not
disarm the system . The system ma y only be disarmed with the I-FOB dig ital key.
W hen Lost Ke y Mode is a ctive and you wish to deac tivate , this m enu item cha nges t o
DEACTIVATE LOST KEY MODE. NOTE: If your deadbolt key is lost, it is impor-
tant that you have your locksmith re-key the deadbolt, or have the deadbolt re-
placed as soon as possible . In additi on, we str ongl y recomm end keeping your I-
FOB on a different key ring as your deadbolt key. Note: This selection o nly ap-
pears with a Mas ter I-FOB insert ed in the Tou chpad.
ACTIVATE PIR TEST - Allo ws a passive infrared / m otion detector test to be initiated
within the s ystem. For installer's use only. If accidentall y enabled, press RESET to
exit. Note: This select ion only appe ars with a Ma ster I-FOB inserte d in the Touch-
pad.
TOUCHPAD MENU MODE
ACTIVATE
DOWNLOAD Y/N
ACTIVATE
LOST KEY MODE Y/N
ACTIVATE
PIR TEST Y/N
F-64TPG_OI320A.03_USER_2...
page 20
Friday, September 15, 2006 11:40
Composite
/