Sharp AQUOS LC-40LE700 User manual

Category
LCD TVs
Type
User manual
SHARP
AQU
OS
LC-40LE700
LC-46LE700
LC-52LE700
LiQUiD CRYSTAL TELEVISION
Ti_L_:VISE
TELE_
DE C
MODE
MAN[
NYCE
[][] DOLBY
DIGITAL 1
1.41E:IlITII!TM
HIGH DEFINITaON MULTIMEDaA INTERFACE
IMPORTANT Please read this operation manual before starting operating the equipment.
IMPORTANT Veuillez lire ce mode d'emploi avant de commencer & utiliser I'appareil.
IMPORTANTE Lea este manual de operaci6n antes de comenzar a operar el equipo.
LC-40LE700U
LC-46LE700U
LC-52LE700U
LiQUiD CRYSTAL TELEViSiON
ENGLISH
OPERATION MANUAL
IMPORTANT:
To aid reporting in case of loss or theft, please record the
TV's model and serial numbers in the space provided. The
numbers are located at the rear of the TV.
Model No.:
Serial No.:
iMPORTANT INFORMATION
WARNING: TO REDUCE THE RISK OF FIRE OR ELECTRIC SHOCK, DO
NOT EXPOSE THIS PRODUCT TO RAIN OR MOISTURE.
RISK OF ELECTRIC SHOCK
DO NOTOPEN
CAUTION: TO REDUCE THE RISK OF ELECTRIC SHOCK,
DO NOT REMOVE COVER (OR BACK).
NO USER-SERVICEABLE PARTS INSIDE.
REFER SERVICING TO QUALIFIED SERVICE
PERSONNEL.
The lightning flash with arrow-head
symbol, within an equilateral triangle,
is intended to alert the user to the
presence of uninsulated "dangerous
voltage" within the product's
enclosure that may be of sufficient
magnitude to constitute a risk of
electric shock to persons.
The exclamation point within a
triangle is intended to alert the user
to the presence of important
operating and maintenance
(servicing) instructions in the
literature accompanying the product.
CAUTION: TO PREVENT ELECTRIC SHOCK, MATCH WIDE BLADE OF PLUG TO WIDE
SLOT, FULLY INSERT.
Q-1
iMPORTANT iNFORMATiON
WARNING: FCC Regulations state that any unauthorized changes or modifications to this equipment not expressly
approved by the manufacturer could void the user's authority to operate this equipment.
CAUTION:
This product satisfies FCC regulations when shielded cables and connectors are used to connect the unit to other
equipment. To prevent electromagnetic interference with electric appliances such as radios and televisions, use shielded
cables and connectors for connections.
DECLARATION OF CONFORMITY:
SHARP MQUID CRYSTAL TELEVISION, MODEL LC-40LE700UN/LC-46LE700UN/LC-52LE700UN
This device complies with Part 15 of the FCC Rules. Operation is subject to the following two conditions:
(1) This device may not cause harmful interference, and (2) this device must accept any interference
received, including interference that may cause undesired operation.
RESPONSIBLEPARTY:
SHARPELECTRONICSCORPORATION
Sharp Plaza, Mahwah, New Jersey07495-1163
TEL: 1-800-BE-SHARP
For BusinessCustomers: URLhttp://www.sharpusa.com
INFORMATION:
This equipment has been tested and found to comply with the limits for a Class B digital device, pursuant to Part 15 of the FCC
Rules. These limits are designed to provide reasonable protection against harmful interference in a residential installation. This
equipment generates, uses and can radiate radio frequency energy and, if not installed and used in accordance with the
instructions, may cause harmful interference to radio communications. However, there is no guarantee that interference will not
occur in a particular installation. If this equipment does cause harmful interference to radio or television reception, which can be
determined by turning the equipment off and on, the user is encouraged to try to correct the interference by one or more of the
following measures:
-- Reorient or relocate the receiving antenna.
-- Increase the separation between the equipment and receiver.
i Connect the equipment into an outlet on a circuit different from that to which the receiver is connected.
i Consult the dealer or an experienced radio/TV technician for help.
"Note to CATV system installer: This reminder is provided to call the CATV system installer's attention to Article 820-40 of the National
Electrical Code that provides guidelines for proper grounding and, in particular, specifies that the cable ground shall be connected to the
grounding system of the building, as close to the point of cable entry as practical."
Trademarks
Manufactured under license from Dolby Laboratories. "Dolby" and the double-D symbol are trademarks of Dolby
Laboratories.
"HDMI, the HDMI logo and High-Definition Multimedia Interface are trademarks or registered trademarks of HDMI
Licensing LLC."
Products that have earned the ENERGY STAR_>are designed to protect the environment through superior energy
efficiency.
L C _ _ _ I_ , L C F O N T, _T_)L,'_--_ _ _' I" and LC logo mark are registered trademarks of SHARP Corporation.
This product is embedded with LC Font technology, which was developed by SHARP Corporation for clearly
displaying easy-to-read characters on LCD screens. However, other fonts are used for some screen pages, too.
Q-2
DEAR SHARP CUSTOMER
Thank you for your purchase of the Sharp Liquid Crystal Television. To ensure safety and many years
of trouble-free operation of your product, please read the important Safety instructions carefully before
using this product.
iMPORTANT SAFETY iNSTRUCTiONS
Electricity is used to perform many useful functions, but it can also cause personal injuries and property damage
if improperly handled. This product has been engineered and manufactured with the highest priority on safety.
However, improper use can result in electric shock and/or fire. In order to prevent potential danger, please
observe the following instructions when installing, operating and cleaning the product. To ensure your safety
and prolong the service life of your Liquid Crystal Television, please read the following precautions carefully
before using the product.
1)
2)
3)
4)
5)
6)
7)
8)
9)
lo)
11)
12)
13)
14)
Read these instructions.
Keep these instructions.
Heed all warnings.
Follow all instructions.
Do not use this apparatus near water.
Clean only with dry cloth.
Do not block any ventilation openings. Install in accordance with the manufacturer's instructions.
Do not install near any heat sources such as radiators, heat registers, stoves, or other apparatus (including
amplifiers) that produce heat.
Do not defeat the safety purpose of the polarized or grounding-type plug. A polarized plug has two blades
with one wider than the other. A grounding type plug has two blades and a third grounding prong. The
wide blade or the third prong are provided for your safety. If the provided plug does not fit into your outlet,
consult an electrician for replacement of the obsolete outlet.
Protect the power cord from being walked on or pinched particularly at plugs, convenience receptacles,
and the point where they exit from the apparatus.
Only use attachments/accessories specified by the manufacturer.
Use only with the cart, stand, tripod, bracket, or table specified by the manufacturer, or sold
with the apparatus. When a cart is used, use caution when moving the cart/apparatus
combination to avoid injury from tip-over.
Unplug this apparatus during lightning storms or when unused for long periods of time.
Refer all servicing to qualified service personnel. Servicing is required when the apparatus has been
damaged in any way, such as power-supply cord or plug is damaged, liquid has been spilled or objects
have fallen into the apparatus, the apparatus has been exposed to rain or moisture, does not operate
normally, or has been dropped.
Additional Safety Information
15) Power Sources-This product should be operated only from the type of power source indicated on the
marking label. If you are not sure of the type of power supply to your home, consult your product dealer or
local power company. For products intended to operate from battery power, or other sources, refer to the
operating instructions.
16) Overloading- Do not overload wall outlets, extension cords, or integral convenience receptacles as this
can result in a risk of fire or electric shock.
17) Object and Liquid Entry- Never push objects of any kind into this product through openings as they may
touch dangerous voltage points or short-out parts that could result in a fire or electric shock. Never spill
liquid of any kind on the product.
18) Damage Requiring Service-Unplug this product from the wall outlet and refer servicing to qualified
service personnel under the following conditions:
a) When the AC cord or plug is damaged,
b) If liquid has been spilled, or objects have fallen into the product,
c) If the product has been exposed to rain or water,
d) If the product does not operate normally by following the operating instructions.
Adjust only those controls that are covered by the operating instructions as an improper adjustment
of other controls may result in damage and will often require extensive work by a qualified technician
to restore the product to its normal operation,
e) If the product has been dropped or damaged in any way, and
f) When the product exhibits a distinct change in performance - this indicates a need for service.
19) Replacement Parts-When replacement parts are required, be sure the service technician has used
replacement parts specified by the manufacturer or have the same characteristics as the original part.
Unauthorized substitutions may result in fire, electric shock, or other hazards.
20) Safety Check-Upon completion of any service or repairs to this product, ask the service technician to
perform safety checks to determine that the product is in proper operating condition.
21) Wall or ceiling mounting-When mounting the product on a wall or ceiling, be sure to install the product
according to the method recommended by the manufacturer.
Q-3
iMPORTANT SAFETY iNSTRUCTiONS
Outdoor Antenna Grounding - If an outside antenna is
connected to the television equipment, be sure the antenna
system is grounded so as to provide some protection against
voltage surges and built-up static charges.
Article 810 of the National Electrical Code, ANSI/NFPA 70,
provides information with regard to proper grounding of the
mast and supporting structure, grounding of the lead-in wire
to an antenna discharge unit, size of grounding conductors,
location of antenna-discharge unit, connection to grounding
electrodes, and requirements for the grounding electrode.
EXAMPLE OFANTENNA GROUNDING AS PER
NATIONAL ELECTRICAL CODE ANSI/NFPA 70
_- ANTENNA
LEADINWIRE
___ /-'_ [J, _ DISCHARGEUNIT
(NECSECTION810-20)
/ _ I GROUNDING
/_ _"-_----_CONDUCTORS
POWERSERVICEGROUNDING
ELECTRODESYSTEM
(NECART250,PARTH)
NEC -- NATIONAL ELECTRICAL CODE
Turn off the main power and unplug the AC cord from the wall outlet before handling. S_,{_
Use a soft cloth and gently wipe the surface of the display panel. Using a hard cloth may _ _..I_ _ _'_'_
scratch the panel surface, y " i_ _
Use a soft damp cloth to gently wipe the panel when it is really dirty. _!
(It may scratch the panel surface when wiped strongly.)
Ifthe panel is dusty, use an anti-static brush, which is commercially available, to clean it.
To protect the panel, do not use a dirty cloth, liquid cleaners or chemical cloth to clean it, such materials may damage
the panel surface.
To clean the outer cabinet, use the same method. Do not use liquid or aerosol cleaners.
Water and Moisture - Do not use this product near water - for example, near a bath tub, wash bowl, kitchen sink, or
laundry tub; in a wet basement; or near a swimming pool; and the like.
Stand - Do not place the product on an unstable cart, stand, tripod or table. Placing the product on an unstable base
can cause the product to fall, resulting in serious personal injuries as well as damage to the product. Use only a cart,
stand, tripod, bracket or table recommended by the manufacturer or sold with the product. When mounting the product
on a wall, be sure to follow the manufacturer's instructions. Use only the mounting hardware recommended by the
manufacturer.
Selecting the location - Select a place with no direct sunlight and good ventilation.
Ventilation - The vents and other openings in the cabinet are designed for ventilation. Do not cover or block these vents
and openings since insufficient ventilation can cause overheating and/or shorten the life of the product. Do not place
the product on a bed, sofa, rug or other similar surface, since they can block ventilation openings. This product is not
designed for builbin installation; do not place the product in an enclosed place such as a bookcase or rack, unless proper
ventilation is provided or the manufacturer's instructions are followed.
The Liquid Crystal panel used in this product is made of glass. Therefore, it can break when the product is dropped or
applied with impact. Be careful not to be injured by broken glass pieces in case the panel breaks.
Heat -- The product should be situated away from heat sources such as radiators, heat registers, stoves, or other
products (including amplifiers) that produce heat.
The Liquid Crystal panel is a very high technology product with 2,073,600 pixels, giving you fine picture details.
Occasionally, a few non-active pixels may appear on the screen as a fixed point of blue, green or red. Please note that
this does not affect the performance of your product.
Lightning - For added protection for this television equipment during a lightning storm, or when it is left unattended and
unused for long periods of time, unplug it from the wall outlet and disconnect the antenna. This will prevent damage to
the equipment due to lightning and power-line surges.
Power Lines - An outside antenna system should not be located in the vicinity of overhead power lines or other electric
light or power circuits, or where it can fall into such power lines or circuits. When installing an outside antenna system,
extreme care should be taken to keep from touching such power lines or circuits as contact with them might be fatal.
To prevent fire, never place any type of candle or flames on the top or near the TV set.
To prevent fire or shock hazard, do not place the AC cord under the TV set or other heavy items.
Do not display a still picture for a long time, as this could cause an afterimage to remain.
To prevent fire or shock hazard, do not expose this product to dripping or splashing.
No objects filled with liquids, such as vases, should be placed on the product.
Do not insert foreign objects into the product. Inserting objects in the air vents or other openings may
result in fire or electric shock. Exercise special caution when using the product around children.
Precautions when transporting the TV
When transporting the TV, never carry it by holding or otherwise putting pressure onto the display. Be sure to always
carry the TV by two people holding it with two hands - one hand on each side of the TV.
Q-4
iMPORTANT SAFETY iNSTRUCTiONS
Congratulations on your purchase! As you enjoy your new product, please keep these safety tips in mind:
THE iSSUE
o The home theater entertainment experience is a growing trend and larger flat panel
displays are popular purchases. However, flat panel displays are not always supported
on the proper stands or installed according to the manufacturer's recommendations.
o Flat panel displays that are inappropriately situated on dressers, bookcases, shelves,
desks, speakers, chests or carts may fall over and cause injury.
THiS MANUFACTURER CARES!
o The consumer electronics industry is committed to making home entertainment enjoyable
and safe.
TUNE INTO SAFETY
o One size does NOT fit all. Follow the manufacturer's recommendations for the safe
installation and use of your flat panel display.
o Carefully read and understand all enclosed instructions for proper use of this product.
o Don't allow children to climb on or play with furniture and television sets.
o Don't place flat panel displays on furniture that can easily be used as steps, such as
a chest of drawers.
o Remember that children can become excited while watching a program, especially
on a "larger than life" flat panel display. Care should be taken to place or install the
display where it cannot be pushed, pulled over, or knocked down.
o Care should be taken to route all cords and cables connected to the flat panel
display so that they cannot be pulled or grabbed by curious children.
WALL MOUNTING: IF YOU DECIDE TO WALL MOUNT YOUR FLAT
PANEL DISPLAY, ALWAYS:
o Use a mount that has been recommended by the display manufacturer and/or listed
by an independent laboratory (such as UL, CSA, ETL).
o Follow all instructions supplied by the display and wall mount manufacturers.
o Ifyou have any doubts about your ability to safely install your flat panel display,
contact your retailer about professional installation.
o Make sure that the wall where you are mounting the display is appropriate. Some
wall mounts are not designed to be mounted to walls with steel studs or old cinder
block construction. Ifyou are unsure, contact a professional installer.
o A minimum of two people are required for installation. Flat panel displays can be
heavy.
Note: CEA is the preeminent trade association promoting growth in the $161 billion U.S.
consumer electronics industry. More than 2,200 companies enjoy the benefits of CEA
membership, including legislative advocacy, market research, technical training and education,
industry promotion and the fostering of business and strategic relationships.
Q-5
Supplied Accessories
Make sure the following accessories are provided with the product.
Remote control unit "AAA" size battery AC cord Cable clamp Stand unit Operation manual
(x 1) (x 2) (x 1) (x 1) (x 1) (x 1)
Page 7 Page 8 Page 7 Page 7 Page 6
J
Always use the AC cord supplied with the TV.
The illustrations above are for explanation purposes and may vary slightly from the actual accessories.
To avoid scratching the frame or screen, please use a soft, lint free cloth for cleaning. Approved cleaning cloths are available
directly from Sharp in single (00Z-LCD-CLOTH) or triple (00Z-LCD-CLOTH-3) packs. Call 1-800-BE-SHARP for ordering, or
VISIT www.sharpusa.com/SharpDirect.
QUICK REFERENCE
o Before attaching (or detaching) the stand, unplug the AC cord from the AC INPUT terminal.
o Before performing work spread cushioning over the base area to lay the TV on. This will prevent it from being damaged.
o Attach the stand in the correct direction.
, Do not remove the stand from the TV unless using an optional wall mount bracket to mount it.
, Be sure to follow the instructions, incorrect instaJJation of the stand may result in the TV faJJing over.
1 Confirm that there are 12 screws (allthe same size)
supplied with the stand unit.
???? ???? ????
2 (_ Set the post for the stand unit onto the box.
{_) Attach the base to the post.
{_} Insert and tighten the 8 screws into the 8 holes
on the bottom of the base.
o Hold the stand unit securely with one hand, and then
tighten the screws.
.....
I
®
(b
3 (_ Insert the stand into the openings on the bottom
of the TV.
{_) Insert and tighten the 4 screws into the 4 holes
on the rear of the TV.
@ _ _ll-JJJJ S.....
To detach the stand, perform the steps in reverse order.
@-6
QUICK REFERENCE
1 Attach your antenna to the back of the television.
(See page 8.)
2 Connect the AC plug for the television into the AC
outlet.
Place the TV close to the AC outlet, and keep the power
plug within reach.
Use the remote control unit by pointing it towards the
remote control sensor on the TV. Objects between the
remote control unit and the remote control sensor may
prevent proper operation.
1T (5 m)
3O
I
,, TO PREVENT RiSK OF ELECTRIC SHOCK, DO NOT
TOUCH UN-INSULATED PARTS OF ANY CABLES
WiTH THE AC CORD CONNECTED.
3 Bundle the cords properly with the cable clamp.
II Cautions regarding the remote control unit
o Do not expose the remote control unit to shock. In addition,
do not expose the remote control unit to liquids, and do not
place in an area with high humidity.
o Do not install or place the remote control unit under direct
sunlight. The heat may cause deformation of the remote
control unit.
o The remote control unit may not work properly if the remote
control sensor on the TV is under direct sunlight or strong
lighting. In such cases, change the angle of the lighting
or the TV, or operate the remote control unit closer to the
remote control sensor.
4
How to turn on the television for the first time.
A) Press POWER on the television.
_3 -'_ POWER
B) The POWER indicator on the front of the
television lights GREEN.
POWER indicator
IMPORTANT:
The POWER indicator on the television should light GREEN
indicating you have power to the television.
Ifthe POWER indicator on the television still does not light up,
press TV POWER on the remote control to turn the power on.
IMPORTANT:
IFTHE UNIT DOES NOT POWER ON - UNPLUG THE
TELEVISION FROM THE OUTLET AND REPEAT THE
INSTALLATION STEPS.
IFYOU STILL ENCOUNTER NO POWER, PLEASE CONTACT
US AT 1-800-BE-SHARP.
Speakers cannot be detached from the TV.
TV angle cannot be adjusted.
@-7
Preparation
To enjoy a clearer picture, use an outdoor antenna. The following is a brief explanation of the types of connections
that are used for a coaxial cable. Ifyour outdoor antenna uses a 75-ohm coaxial cable with an F-type connector,
plug it into the antenna terminal at the rear of the TV set.
f
1.A 75-ohm system is generally a round cable with F-type connector
that can easily be attached to a terminal without tools (Commercially
available).
2.A 300-ohm system is a flat "twin-lead" cable that can be attached
to a 75-ohm terminal through a 300/75-ohm adapter (Commercially
available).
_ F-type connector
75-ohm coaxial cable (round)
300-ohm twin-lead cable (flat)
F=type connector should be finger=tightened only. _ _-:s ,_->_ F-type connector
When connecting the RF cable to the TV set, do not tighten F-type S:_a_./:.:_°"_/_ ........
connector with tools. _'Y _ _,<-'\
If tools are used, it may cause damage to your TV set. (The breaking 75-ohm coaxial cable
of internal circuit, etc. ) j
Connecting Antenna Cable
Connect the antenna cable to the TV using one of the methods in the illustration as shown ((_, (_, (_ or (_).
Home Antenna
terminal (75 ohm)
(_ Cable without a CATV CableWleadIn _ __ 3_,_7_ =
converter Coaxial came
_7 (commercially available)
(_) VHF/UHF antenna HomeAnt ....
5-ohm coaxial cable (round) terminal (75-ohm)
Coaxial cable
(_ Combination VHF/ _ (.......... iallyavailable)
UHF antenna t75_ohm coaxial cable (round)
(_ Separate VHF/UHF
antenna
To TV antenna
terminal
If the remote control fails to operate TV functions, replace the batteries in the remote control unit.
1 Open the battery cover. 2 Insert two "AAA" size batteries 3 Close the battery cover.
(supplied with the product).
o Place the batteries with their terminals
corresponding to the (÷) and (-)
indications in the battery compartment.
Improper use of batteries can result in chemical leakage or explosion. Be sure to follow the instructions below.
o Do not mix batteries of different types. Different types of batteries have different characteristics.
o Do not mix old and new batteries. Mixing old and new batteries can shorten the life of new batteries or cause chemical leakage
in old batteries.
o Remove batteries as soon as they are worn out. Chemicals that leak from batteries that come in contact with skin can cause a
rash. Ifyou find any chemical leakage, wipe thoroughly with a cloth.
o The batteries supplied with this product may have a shorter life expectancy due to storage conditions.
o Ifyou will not be using the remote control unit for an extended period of time, remove batteries from it.
Q-8
Contents
iMPORTANT iNFORMATiON ..................... 1
Trademarks ....................................... 2
DEAR SHARP CUSTOMER ....................... 3
iMPORTANT SAFETY iNSTRUCTiONS ........ 3=5
Supplied Accessories ............................ 6
Enjoying photo and music playback
Viewing photos and listening to music ......... 32
USB memory device compatibility ............. 32
Photo Mode ................................... 33
Music Mode ................................... 33
USB Menu ................................. 34-35
QUICK REFERENCE
Attaching the Stand ............................ 6
QUICK INSTALLATION TIPS ................... 7
Using the Remote Control Unit ................. 7
Preparation
Antennas ....................................... 8
Installing Batteries in the Remote Control Unit... 8
Other Viewing Options
Presetting Remote Control Function ........... 36
Operating the Connected Equipment .......... 36
Using AQUOS LiNK
Controlling HDMI Equipment
Using AQUOS LINK ....................... 38-40
AQUOS LINK Menu ........................ 40-41
Part Names
TV (Front) ..................................... 10
TV (Rear/Side) ................................. 10
Remote Control Unit ........................... 11
Connecting to External Equipment
Connecting Audiovisual Equipment ......... 12-13
Connecting a Speaker/Amplifier ............... 13
Watching TV
Turning On/Off the Power ..................... 14
Initial Setup .................................... 14
Direct
Button Operation
Changing Channels ....................... 15
Changing Volume .......................... 15
MUTE ...................................... 15
Sleep Timer ................................ 15
FLASHBACK ............................... 15
SURROUND ............................... 15
FREEZE.................................... 15
INPUT...................................... 15
AV MODE .................................. 16
AUDIO ..................................... 16
POWER SAVING ........................... 17
Closed Captions and
Digital Closed Captions ................... 17
VIEW MODE ............................... 18
Using a PC
Connecting a PC .............................. 42
Displaying a PC image on the screen .......... 43
Adjusting the PC Image ....................... 44
Setting Audio Input ............................ 44
PC Compatibility Chart ........................ 44
RS-232C Port Specifications .................. 45
Using the Internet
Internet Setup ................................. 46
Displaying the Sidebar Widget ................. 47
Entering Text (Software Keyboard) ............. 48
Using the Browser .......................... 49-52
Appendix
Removing the Stand ........................... 53
Setting the TV on the Wall ..................... 53
Troubleshooting ............................... 54
Troubleshooting-Digital Broadcasting .......... 54
Specifications ................................. 55
Optional Accessory ............................ 55
Information on the Software License for
This Product ................................. 56
Calling for Service ............................... 57
LIMITED WARRANTY ............................ 57
On-Screen Display Menu
On-Screen Display Menu Operation ........... 19
Menu Operation Buttons ...................... 19
Menu Items ................................... 20
Picture Menu ............................... 21-22
Audio Menu ................................... 23
Power Control Menu .......................... 23
Setup Menu ................................ 24-27
Option Menu ............................... 28-29
Digital Setup Menu ......................... 30-31
Dimensional Drawings
The dimensional drawings for the LCD TV set are shown
on the inside back cover.
Q-9
Part Names
!
Blue Illumination LED (See page 25.)
II Y I OPOsens°r*(Seepage21) h
/ ........ / [ Remote control sensor /
_ I ® ® @ @ |
i _ L _ _ oPcindicator(See page21.)|.............................................. POWER indicator (See page 14.)
* OPC: Optical Picture Control
POWER
button
_MENU
button
INPUT
button
Channel
buttons
(CNA/V)
_Volume
buttons
(VOL+/-)
_-- INPUT 5
terminal
(HDMI)
INPUT 3
terminals
--USB
terminal
AC INPUT
terminal
COMP0-
II
I
INPUT 7 terminal
(NDMI)
DIGITAL AUDIO
OUTPUT terminal
ETHERNET terminal
INPUT 8 terminal
L (HDMI)
[ ANT/CABLE] AUDIO OUTPUT
! to ina,s
V,DEOIOOMPO-" __ Antenna/Cable in
INPUT 1 terminals
INPUT 2 terminals
RS=2320 terminal
INPUT 4 terminal (PC-IN)
(shared for INPUT 4 and INPUT 6) *4
INPUT 6 terminal (HDMI)
"1 See pages 12, 13, 38 and 42 for external equipment connection.
*2 See page 19 for button operations.
*3 See page 7 for connecting the AC cord.
*4 See page 44 for details on the PC Audio Select function.
The illustrations in this operation manual are for explanation purposes and may vary slightly from the actual operations.
The examples used throughout this manual are based on the LC-46LE700UN model.
Q-10
Part Names
1 18
_
!
4
5
6
11
12
13
14
15
16
19
2O
-- 21
22
23
24
25
26
27
28
29
-- 30
31
17
When using the remote control unit, point it at the TV.
1 TV POWER: Switch the TM power on or enter standby, (See page
14,)
2 DISPLAY: Display the channel inlermation,
3 SOURCE POWER: Turns the power of the external equipment
on and off,
4 External equipment operational buttons: Operate the external
equipment,
5 0---9: Set the channel, (See page 15,)
6 (DOT}: (See pages 15 and 36,)
7 NET: Switches the display to the Sidebar Widget, TM + Web, Web
or lM screen, (See pages 46 to 52 for details,)
8 INPUT: Select a TMinput source. (l_/, INPUT 1, INPUT 2, INPUT 3,
INPUT 4, INPUT 5, INPUT 6, INPUT 7, INPUT 8, USB) (See page
15,)
9 VOL+/-: Set the volume. (See page 15,)
10 POWER SAVING: Select Power Saving settings, (See page 17.)
11 FREEZE: Set the still image, Press again te return to normal
screen, (See page 15,)
12 EXIT: Turn off the menu screen,
13 OPTION: Display the AQUOS LINK MENU screen, This button
will functk)n only when AQUOS LINK is used, (See pages 38 to 41
for details.)
14 REC STOP: Stops one touch recording, This button will function
only when AQUOS LINK is used. (See pages 38 te 41 for details,)
15 SLEEP: Set the sleep timer, (See page 15.)
16 SURROUND: Select Surround settings. (See page 15,)
17 AUDIO: Selects the MTS/SAP or the audio mode during multi-
channel audio broadcasts, (See page 16,)
18 FUNCTION: Switches the remote control let TV, CBL/SAI, VCR,
BD/DVD and AUDIO operation, Indicator lights up for the current
mode, (See pages 36 to 37 for details,)
• To enter the code registration mode, you need to press
FUNCTION and DISPLAY at the same time,
19 LIGHT :(_: When this button is pressed, some buttons (for
example, VOL+/- and CH/',,/V) on the remote control unit will
light, The lighting will turn off if no operalions are performed within
about 5 seconds, This button is used for performing operations in
low-light situations,
20 VIEW MODE: Select the screen size, (See pages 18 and 43,)
21 ENT: Jumps to a channel after selecting with the 0----9buttons,
22 FLASHBACK: Return to the previous channel or external input
mode. (See page 15,)
23 CH/_/V: Select the channel, (See page 15,)
24 MUTE: Mute the sound. (See page 15,)
25 MENU: Display the menu screen,
26 A/V/_I/I_, ENTER: Select a desired item on the screen,
27 RETURN: Return to the previous menu screen,
28 FAVORITE CH
A, B, C, D: Select 4 preset favorite channels in 4 different
categories, (See page 29,)
While watching, you can toggle the selected channels by pressing
A, B,C and D,
29 FAVORITE: Set the favorite channels, (See page 29,)
30 CC: Display captiens from a closed-caption source, (See page 17,)
31 AV MODE: Select an audio or video setting.
(When the input source is '[_/, INPUT 1, 2 or 3: STANDARD,
MOVIE, GAME, USER, INTELLIGENT, DYNAMIC (Fixed),
DYNAMIC, When the input source is INPUT 4, 5, 6, 7 or
8: SIANDARD, MOVIE, GAME, PC, USER, INTELLIGENT,
DYNAMIC (Fixed), DYNAMIC) (See page 16.)
Q-11
Connecting to External Equipment
For connecting the TV to external equipment, use commercially available cables.
To protect equipment, always turn off the TV before connecting any external equipment.
Please read the relevant operation manual (Bid-ray disc player, etc.) carefully before making connections.
You can connect many types of external equipment to your TV like a Bid-ray disc player, DVD player, VCR, Digital
TV tuner, HDMI equipment, game console or camcorder. To view external source images, select the input source
from iNPUT on the remote control unit or on the TV. (See page 15.)
When using composite cable:
Bid-ray disc player Game console VCR
DVD player Camcorder
Cable/Satellite set-top box
AV cable
VIDEO
AUDIO-L
AUDIO-R,
iNPUT 1 or 3
When using S-VIDEO cable:
Game console ,, Camcorder
VCR
INPUT 2
I S-VIDE0
s v,OEOcab,e
Audio cable _ _L
_ | AUDIO
(Red)/J __ .......
AUDIO-R
When using component cable:
Bid-ray disc player DVD player
Cable/Satellite set-top box
VCR
Component video cable
INPUT 1 or 2
J
Audio cable
AUDIO-L i
AUDIO-R (Red)
To enjoy the AQUOS 1080p display capability, connect your external equipment using a component cable and set the
equipment to 1080p output.
See page 13 for connecting a Bid-ray disc player, DVD player or a Cable/Satellite set-top box to the HDMI terminal.
The COMPONENT terminals take priority over the VIDEO (INPUT 1) and S-VIDEO (INPUT 2) terminals.
Q-12
Connectingto E×ternalEquipment
HDMI-certified cable
When using HDMJ=DVI
conversion cable:
HDMI-DVI conversion cable
® 3.5 mm stereo minijack cable
iNPUT 5, 6, 7 or 8
iNPUT 6
22
,, When using an HDMI-DVI conversion cable, input the audio signal to the AUDIO terminal of INPUT 6.
When you input the audio signal via the AUDIO terminal with INPUT 6, set "PC Audio Select" to "Input 6 (HDMI)". (See page 44.)
,, To enjoy the AQUOS 1080p display capability, connect your Blu-ray disc player or other external equipment using an HDMI-
certified cable and set the equipment to 1080p output.
Amplifier with
analog audio input
OUTPUT
®®
R=AUDIO-L
Amplifier with
digital audio input
Audio cable
Optical fiber cable
AUDIO-R
AUDIO-L(White)
DIGITAL AUDIO OUT PUT
c -1
It is possible to output audio through the DIGITAL AUDIO OUTPUT terminal. (See page 30 for details.) PCM audio
outputs from the terminal.
,, Depending on the connected equipment, audio will not output from the DIGITAL AUDIO OUTPUT terminal in HDMI
connection. In this case, set the audio formats of the connected equipment to PCM, 32/44.1/48 kHz.
@-13
Watching TV
Press POWER on the TV, or TV POWER on the remote control unit to
turn the power on.
_1 o POWER indicator (Green): The TV is on. (After a few seconds, a window
POWER appears with sound.)
o The initial setup starts when the TV powers on for the first time. Ifthe TV has
been turned on before, the initial setup will not be invoked. For changing the
settings of the initial setup, perform EZ setup on the Setup menu on page 24.
] TV Tv vc_ Aul)lo
"IV POWER
(On/Standby)
Press POWER on the TV, or TV POWER on the remote control unit
again to turn the power off.
o TheTV entersstandbyand the imageon the screendisappears.
o The POWERindicatoron the TVturns off.
o Ifyou are not going to use this TV for a long period of time, be sure to remove
the AC cord from the AC outlet.
Weak electric power is still consumed even when the TV is turned off.
When you turn on the TV for the first time, it will
automatically memorize the broadcasting channels
available in the region where you live. Perform the
following steps before you press TV POWER on the
remote control unit.
1. Insert the batteries into the remote control unit. (See page 8.)
2. Connect the antenna cable to the TV. (See page 8.)
3. Plug in the AC cord to the AC outlet. (See page 7.)
Language (Language setting)
Select from among 3 languages: English, French and Spanish.
1 Press A/V to select the desired language listed on the
screen, and then press ENTER.
language
ENERGYSTARqualification is based on AV MODE "STANDARD"
Air/Cable (Antenna setting)
Make sure what kind of connection is made with your TV
when selecting "Air" or "Cable".
3 Press _1/_ to select "Air" or "Cable".
Press ENTER to enter the setting.
CH Search (Channel search)
Channel auto search makes the TV look for all channels
viewable in the set area.
4. When "Air" is selected in Antenna setting:
Press 41/_ to select "Start", and then press ENTER.
TV Location
Select "Home" or "Store" for the location where you plan to
install the TV. This product qualifies for ENERGY STAR V3.0
in Home mode default setting,
2 Press _/_ to select "Home" or "Store".
Press ENTER to enter the setting.
When "Cable" is selected in Antenna setting:
Press A/Y to select "Analog & Digital Search Start" to
search both analog and digital broadcasts, or to select
"Analog Search Start" to search only analog broadcasts,
and then press ENTER.
Home: "Power Saving" is set to "Advanced", and AV
MODE is set to "STANDARD".
Store: "Power Saving" is set to "Off" and AV MODE is set to
"DYNAMIC (Fixed)". Picture Reset and Feature Demo can
be set.
Picture Reset: AV MODE will be set to "DYNAMIC (Fixed)"
regardless of whether Picture Reset is "On" or "Off". If you
select "On", AV MODE will be reset to "DYNAMIC (Fixed)" if
there is no operation for 30 minutes. When "Off" is selected,
AV MODE will be set to "DYNAMIC (Fixed)".
Feature Demo: When "Ors" is selected, after all the settings are
compk_ted, the Feature Demo screen is displayed ifthere is
no operation for several minutes.
,, The Channel search will start automatically.
,, To exit the Channel search screen, select "Cancel", and
then press ENTER.
If no channel is found, confirm the type of connection made
with your TV and try EZ Setup again.
(See page 24.)
For changing the settings of the initial setup, perform EZ
setup on the Setup menu on page 24.
(D-14
Direct Button Operation
OOO
®®®
®QO
®@@
INPUT FLAS_SACK@@
FREEZE MENU
@_o
C@8
You can change channels by pressing CH/VV or 0-9,
(DOT).
Examples:
To select a 1 or 2=digit channel number (e. g., Channel 5):
Press5 :> ENT.
To select a 3=digit channel number (e. g., Channel 115):
Press I :> 1 ...................> 5 ENT.
To select a 4=digit channel number (e. g., Channel 22.1):
Press 2 :>2 , (DOT} 1 .................._ENT.
When selecting a 1-digit channel number, it is not
necessary to press 0 before the number.
When you enter 0-9 only, channel selection will be made if
there is no operation within a few seconds.
Ifyou push "0" by itself, nothing will happen.
Complete the above steps within a few seconds.
When you enter 0-9 and = (DOT), channel selection will be
made if there is no operation within a few seconds.
You can change the volume by pressing VOL÷/- on
the TV or on the remote control unit.
To increase the volume, press VOL+.
To decrease the volume, press VOL -.
I@ ..... il
Audio status
Speaker Variable sound Mute
When "Output Select" is set to "Variable", the indicator on
the screen changes as shown below.
I@ '1
See page 28 for details on the Output Select function.
Mutes the current sound output.
Press MUTE.
"c_" will be displayed on the screen for 30 minutes, and
the sound is silenced.
Within 30 minutes of pressing MUTE, mute can be
canceled by pressing VOL +/- or MUTE.
Mute will be canceled after 30 minutes have passed.
However, the TV will not suddenly output a loud sound as
the volume level is set to 0 automatically.
Allows you to set a time when the TV automatically
switches to standby.
Press SLEEP.
Theremainingtimedisplayswhenthesleeptimerhasbeenset.
Each time you pressSLEEP, the remainingtime switches
asshown below.
Off u, 30 u, 60 _ 90 _* 120
t I
When set, the time automatically starts counting down.
If you want to adjust the sleep timer, you can press SLEEP
twice then change the time setting.
When it is 5 minutes before the time expires, the remaining
time will start to keep appearing every minute.
Select "Off" by pressing SLEEP to cancel the sleep timer.
The11/will enter standby when the remainingtime reaches0
Press FLASHBACK to switch to the previously tuned
channel.
PressFLASHBACK againto switch backtothe currently
tuned channel.
FLASHBACK will not work if no channel has been
changed after the TV is turned on.
The surround function produces Surround effect from
the speakers. Each time you press SURROUND, the
mode changes between On and Off.
On: Makesit possibleto enjoynatural,realisticsurround
sound.
Off: Outputs the normalsound.
You can have the same settings by choosing "Surround"
on the menu items. (See page 23.)
Allows you to capture and freeze a moving image that
you are watching.
Press FREEZE.
A movingimageis captured,
PressFREEZE againto cancelthe function,
When this function is not available, "No displaying still
image available." will display.
The still image automatically goes out after 30 minutes.
If you are using the freeze function and a broadcast
activates the V-CHIP BLOCK, the freeze function will be
canceled and a V-CHIP BLOCK message will appear.
To view external source images, select the input source
using INPUT on the remote control unit or on the W.
1 Press INPUT.
A list of selectable sources appears.
2 Press INPUT again or press A/T to select the input
source.
o An image from the selected source automatically displays.
o Each time iNPUT is pressed, the input source toggles.
Ifthe corresponding input isnot plugged in, you cannot change
the input. Be sure to connect the equipment beforehand.
See pages 12, 13, 38 and 42 for external equipment
connection.
@-15
Direct Button Operation
AV MODE gives you several viewing options to choose
from to best match the surrounding environment of the
TV, which can vary due to factors like room brightness,
type of program watched or the type of image input
from external equipment.
Press AV MODE. Current AV MODE displays.
= Press AV MODE again before the mode displayed on the
screen disappears. The mode changes as shown below:
Example:
When the input source is TV, iNPUT 1, 2 or 3 terminals
STANDARD,_, MOVlE,_* GAME _ USER [TV]
I 1
DYNAMIC _ DYNAMIC (Fixed) _ INTELLIGENT
Example:
When the input source is iNPUT 4, 5, 6, 7 or 8
terminals
STANDARD,_MOVIE _,GAME_PC_USER[ me]
! !
DYNAMIC _ DYNAMIC (Fixed) _ INTELLIGENT
STANDARD: For a highly defined image in a normal
lighting.
MOVIE: For a movie.
GAME: Lowers image brightness for easier viewing.
PC: For PC.
USER: Allows the user to customize settings as desired.
You can set the mode for each input source.
INTELLIGENT: Optimizes the image quality automatically
based on the room brightness and image signal.
DYNAMIC (Fixed}: Changes the image and sound
settings to the factory preset values. No adjustments
are allowed.
DYNAMIC: For a clear-cut image emphasizing high
contrast, useful for sports viewing.
= You can select a different AV MODE item for each input
mode. (For example, select STANDARD for TV input and
DYNAMIC for INPUT 1.)
= When you play games, "GAME" is recommended for AV
MODE.
m MTS/SAP stereo mode
The TV has a feature that allows reception of sound
other than the main audio for the program. This feature
is called Multi-channel Television Sound (MTS). The TV
with MTS can receive mono sound, stereo sound
and Secondary Audio Programs (SAP). The SAP
feature allows a TV station to broadcast other
information, which could be audio in another language
or something completely different like weather
information.
You can enjoy Hi-Fi stereo sound or SAP broadcasts
where available.
= Stereo broadcasts: View programs like live sporting
events, shows and concerts in dynamic stereo sound.
= SAP broadcasts: Receive TV broadcasts in either MAIN
or SAP sound.
MAIN sound: The normal program soundtrack (either in
mono or stereo).
SAP sound: Listen to a second language, supplementary
commentary or other information. (SAP is mono sound.)
If stereo sound is difficult to hear.
= Obtain a clearer sound by manually switching to fixed
mono-sound mode.
You can change MTS as shown below to match the television
broadcast signal.
Press AUDIO to toggle between audio modes.
Examples: when receiving MTS and SAP
STEREO mode: STEREO_,_ MONO
STEREO + SAP mode: ST(SAP),_, SAP(ST),m MONO
It !
MAIN + SAP mode: MAIN_, SAP
MONO mode: MONO
Digital broadcasting audio mode
The types of audio transmitted in a digital broadcast include
SURROUND as well as MONO and STEREO. Inaddition, it
is possible for multiple audio tracks to accompany a single
video track.
Press AUDIO to toggle between audio modes.
Example: when receiving Digital broadcasting
STEREO (Audio1) ,_, STEREO (Audio2)
SURROUND (Audio3) 4_,,,,,I
= MTS only operates while in TV mode.
Q-16
Direct Button Operation
Allows you to set the Power Saving level in order to
decrease the power consumption and increase the
backlight lifespan.
Press POWER SAVING.
= Eachtime you pressPOWER SAVING,the mode changes
as shown below.
Off ,m, Standard ,_' Advanced
t !
1 Press CO.
= This will present the Closed Caption information
display.
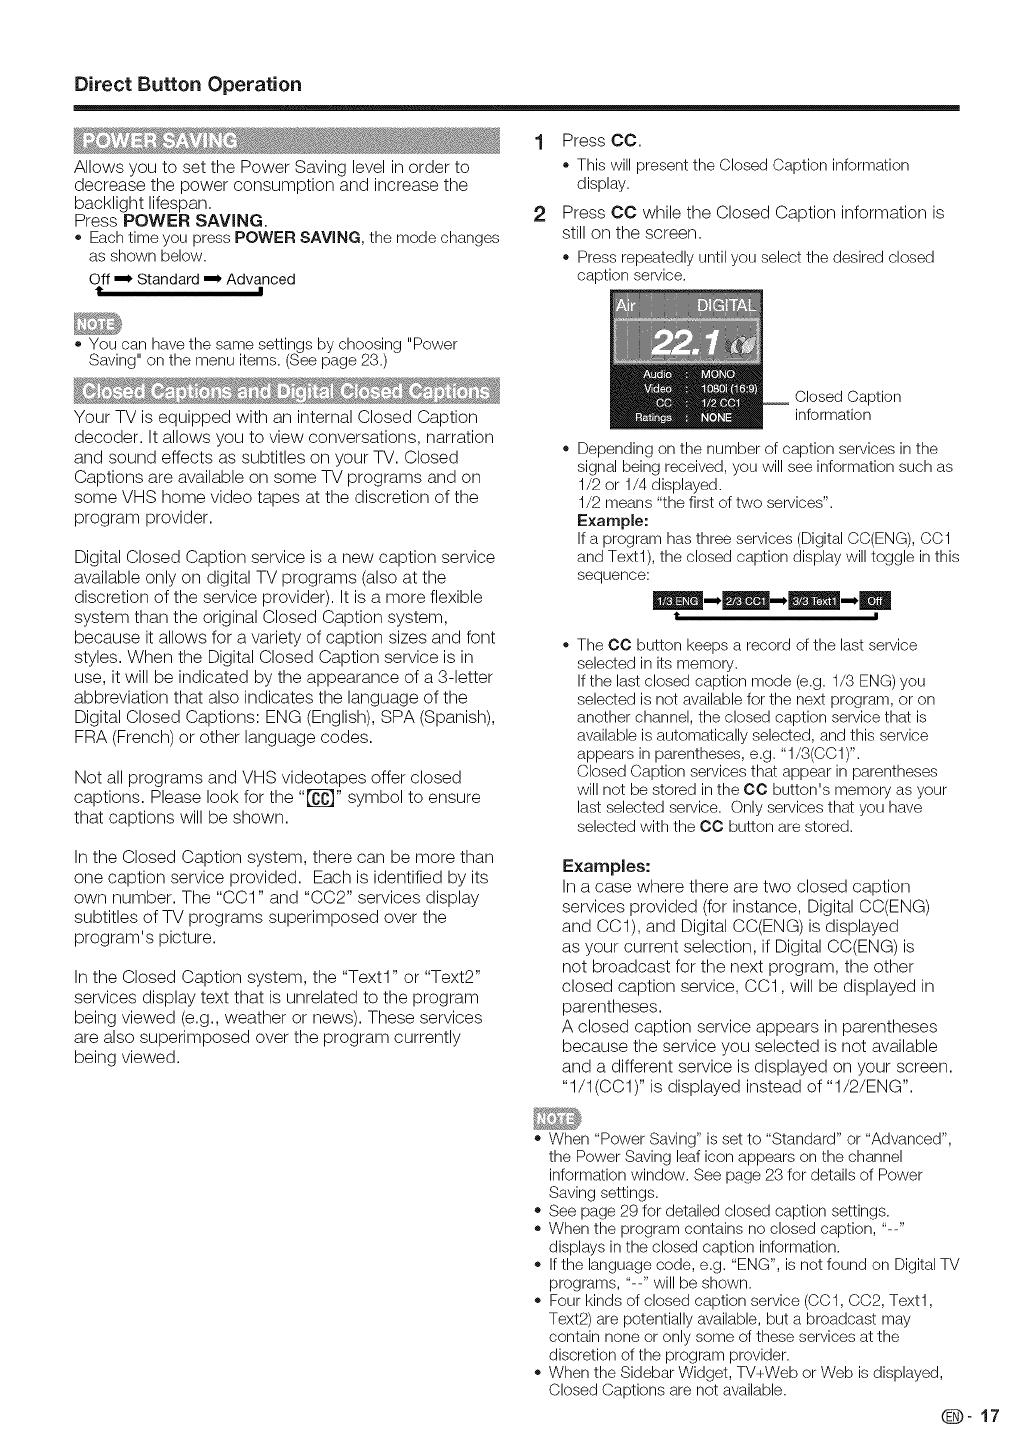
2 Press CC while the Closed Caption information is
still on the screen.
= Press repeatedly until you select the desired closed
caption service.
= You can have the same settings by choosing "Power
Saving" on the menu items. (See page 23.)
Your TV is equipped with an internal Closed Caption
decoder. It allows you to view conversations, narration
and sound effects as subtitles on your TV. Closed
Captions are available on some TV programs and on
some VHS home video tapes at the discretion of the
program provider.
Digital Closed Caption service is a new caption service
available only on digital TV programs (also at the
discretion of the service provider). It is a more flexible
system than the original Closed Caption system,
because it allows for a variety of caption sizes and font
styles. When the Digital Closed Caption service is in
use, it will be indicated by the appearance of a 3-letter
abbreviation that also indicates the language of the
Digital Closed Captions: ENG (English), SPA (Spanish),
FRA (French) or other language codes.
Not all programs and VHS videotapes offer closed
captions. Please look for the "[]_" symbol to ensure
that captions will be shown.
In the Closed Caption system, there can be more than
one caption service provided. Each is identified by its
own number. The "CC1" and "CC2" services display
subtitles of TV programs superimposed over the
program's picture.
In the Closed Caption system, the "Text1" or "Text2"
services display text that is unrelated to the program
being viewed (e.g., weather or news). These services
are also superimposed over the program currently
being viewed.
Closed Caption
information
= Dependingon the number ofcaption servicesin the
signal beingreceived,you will see informationsuch as
1/2 or 1/4 displayed.
1/2 means "the first oftwo services".
Example:
Ifa program hasthree services(DigitalCC(ENG),CC1
andText1),the closed caption displaywill toggle inthis
sequence:
t I
The CO button keeps a record of the last service
selected in its memory.
If the last closed caption mode (e.g. 1/3 ENG) you
selected is not available for the next program, or on
another channel, the closed caption service that is
available is automatically selected, and this service
appears in parentheses, e.g. "1/3(CC1)".
Closed Caption services that appear in parentheses
will not be stored in the CC button's memory as your
last selected service. Only services that you have
selected with the CC button are stored.
Examples:
In a case where there are two closed caption
services provided (for instance, Digital CC(ENG)
and CC1), and Digital CC(ENG)is displayed
as your current selection, if Digital CC(ENG) is
not broadcast for the next program, the other
closed caption service, CC1, will be displayed in
parentheses.
A closed caption service appears in parentheses
because the service you selected is not available
and a different service is displayed on your screen.
"1/1 (CC1)" is displayed instead of "I/2/ENG".
= When "PowerSaving" isset to "Standard" or "Advanced",
the PowerSaving leaficonappears on the channel
informationwindow. See page 23 for detailsof Power
Savingsettings.
= See page29 for detailed closed caption settings.
= Whenthe program containsno closed caption, "--"
displaysin the closed caption information.
= Ifthe languagecode, e.g. "ENG", is not found on DigitalTV
programs, "--" will be shown.
o Fourkindsof closed caption service (CC1,CC2, Text1,
Text2)arepotentiallyavailable,but abroadcast may
contain noneor only some ofthese servicesat the
discretion ofthe program provider.
= Whenthe SidebarWidget, TV+Web or Web is displayed,
ClosedCaptions are not available.
@-17
Direct Button Operation
You can select the screen size.
ioooJi
1 Press VIEW MODE.
o The View Mode menu displays.
The menu liststhe View Modeoptions selectablefor the typeof video signal currentlybeingreceived.
2 Press VIEW MODE or A/V while the View Mode menu is displayed to select a desired item on the menu.
You can sequentially select a View Mode that has its own aspect ratio.
Zoom
Suitable for viewing wide-
II For 4:3 programs
Example: Screen size images
Side Bar
Z
Suitable for viewing
conventional 4:3 programs in
their normal format.
S.Stretch (Smart stretch}
o o
Suitable for stretching 4:3
programs to fill the screen. screen 2.35:1 anamorphic
DVDs in full screen.
Stretch
o 0o
This modeis usefulfor 1,78:1
DVDs,When viewing 1,85:1
DVDs,stretch mode will still show
verythin black bandsat thetop
and bottom of thescreen,
m For HD programs
Stretch: Suitable for viewing wide-screen 1.78:1 aspect ratio program, stretch mode will still show very thin black bands at
the top and bottom of the screen.
Dot by Dot (1080i/p only}: Detects the resolution of the signal and displays an image with the same number of pixels on
the screen.
Full Screen (720p only}: You can select "Full Screen" only when receiving a 720p signal.
S.Stretch (Smart stretch}: Suitable for stretching 4:3 programs to fill the screen.
Zoom: Suitable for viewing wide-screen 2.35:1 aspect-ratio programs in full screen.
When using Dot by Dot or Full Screen, it is possible to see noise or bars around different outer portions of the screen. Please
change view mode to correct this.
(D-18
On=Screen Display Menu
Example _ LCFONT embedded
IIIIIIIIIIIIIIIIIIIIIIIIIIII
®
®
Example
[_ Option
PC Audio Select
®
®
T_he bar above is an operational guide for
the remote control. The bar will change in
[ accordance with each menu setting screen.
(i._ Press 4/_ to select the desired item.
(_ Press A/T to select the desired item.
(._ Press 4/_ to adjust the item.
}
(1._Item displayed in yellow
o This indicates the item currently selected.
o Press ENTER to go to the adjustment screen for this
item.
(_ Item in brackets
This indicates the current setting for the item.
(_ Item displayed in white
o This indicates that the item can be selected.
(_ Item displayed in gray
o This indicates that the item cannot be selected,
There are various reasons why the items cannot be
selected, but the main reasons are as follows:
--Nothing is connected to the selected input terminal,
--The function is not compatible with the current input
signal.
= Menu options differ in the selected input modes, but the operating procedures are the same.
= The screens in the operation manual are for explanation purposes (some are enlarged, others cropped) and may vary slightly
from the actual screens.
LCFONT:
= This product is embedded with LC Font technology, which was developed by SHARP Corporation for clearly displaying easy-
to-read characters on LCD screens.
Using the remote control
Use the following buttons on the remote control to
operate the menu.
MENU:
A/T/41/1_ :
ENTER:
RETURN:
I' '!
i FREEZE MENU [
i ° ®j
Press to open or close the menu screen.
Press to select a desired item on the screen or
adjust a selected item.
Press to go to the next step or complete the
setting.
Press to return to the previous step.
Using the control panel of the main unit
You can also operate the menu with the control panel
of the main unit.
Button operations on the control panel correspond to
the ones on the remote control as shown below.
D
[]
cH
_'_ VOL+/-: Cursor _/_ on theremote control.
MENU: MENU on the remote
control.
iNPUT: ENTER on the remote
control.
OH/X/V: Cursor A/T on the
remote control.
Q-19
  • Page 1 1
  • Page 2 2
  • Page 3 3
  • Page 4 4
  • Page 5 5
  • Page 6 6
  • Page 7 7
  • Page 8 8
  • Page 9 9
  • Page 10 10
  • Page 11 11
  • Page 12 12
  • Page 13 13
  • Page 14 14
  • Page 15 15
  • Page 16 16
  • Page 17 17
  • Page 18 18
  • Page 19 19
  • Page 20 20
  • Page 21 21
  • Page 22 22
  • Page 23 23
  • Page 24 24
  • Page 25 25
  • Page 26 26
  • Page 27 27
  • Page 28 28
  • Page 29 29
  • Page 30 30
  • Page 31 31
  • Page 32 32
  • Page 33 33
  • Page 34 34
  • Page 35 35
  • Page 36 36
  • Page 37 37
  • Page 38 38
  • Page 39 39
  • Page 40 40
  • Page 41 41
  • Page 42 42
  • Page 43 43
  • Page 44 44
  • Page 45 45
  • Page 46 46
  • Page 47 47
  • Page 48 48
  • Page 49 49
  • Page 50 50
  • Page 51 51
  • Page 52 52
  • Page 53 53
  • Page 54 54
  • Page 55 55
  • Page 56 56
  • Page 57 57
  • Page 58 58
  • Page 59 59
  • Page 60 60
  • Page 61 61

Sharp AQUOS LC-40LE700 User manual

Category
LCD TVs
Type
User manual

Ask a question and I''ll find the answer in the document

Finding information in a document is now easier with AI