Page is loading ...

Air conditioner
User & installation manual
AW**AYHGAWKNTC
• Thank you for purchasing this Samsung air conditioner.
• Before operating this unit, please read this manual carefully and retain it for future reference.

AW09AYHGAWKNTC
AW12AYHGAWKNTC
AW18AYHGAWKNTC
AW24AYHGAWKNTC

Structure mechanism and Installation
The Refrigerant 1
Function 6
Precautions 5
7
Power requirement
Installation 8
Notes for installation 11
Operation procedure
CONTENTS
Thank you for choosing the air conditioner.Our design is based on the best eff-
iciency and the lowest noise operation and it can keep the room comfortable.
Please read this operating manual carefully before operating the unit and keep it
for consultation.
12
12
13
18
19
Care and maintenance
20
22
23
24
25
Air direction adjustment
erude corp noitarepo lortnoc etomeR
Remote control panel
Operation Tips
Caution
Care and maintenance
Troubleshooting guide
After service
Please read this operating manual carefully before operating the unit.
to the material objects for reference.
This appliance is not intended for use by persons (including children) with reduced physical,
sensory
or mental capabilities or lack of experience and knowledge, unless they have been given supervision
or instruction concerning use of the appliance by a person responsible for their safety.
Children should be supervised to ensure that they do not play with the appliance.

- 1 -
● The following checks shall be applied to installations using flammable refrigerants:
● Initial safety checks shall include:
● Checking for presence of refrigerant
● Repairs to sealed components
● Repair and maintenance to electrical components shall include initial safety checks
and component inspection procedures. If a fault exists that could compromise
safety, then no electrical supply shall be connected to the circuit until it is
satisfactorily dealt with. If the fault cannot be corrected immediately but it is
necessary to continue operation, an adequate temporary solution shall be used.
This shall be reported to the owner of the equipment so all parties are advised.
The Refrigerant
– the charge size is in accordance with the room size within which the refrigerant
containing parts are installed;
– the ventilation machinery and outlets are operating adequately and are not obstructed;
– if an indirect refrigerating circuit is being used, the secondary circuit shall be checked for
the presence of refrigerant;
– marking to the equipment continues to be visible and legible. Markings and signs that are
illegible shall be corrected;
– refrigeration pipe or components are installed in a position where they are unlikely to
be exposed to any substance which may corrode refrigerant containing components,
unless the components are constructed of materials which are inherently resistant to
being corroded or are suitably protected against being so corroded.
– that capacitors are discharged: this shall be done in a safe manner to avoid possibility
of sparking;
– that no live electrical components and wiring are exposed while charging, recovering or
purging the system;
– that there is continuity of earth bonding.
The area shall be checked with an appropriate refrigerant detector prior to and during work,
to ensure the technician is aware of potentially toxic or flammable atmospheres. Ensure that
the leak detection equipment being used is suitable for use with all applicable refrigerants,
i.e. non-sparking, adequately sealed or intrinsically safe.
During repairs to sealed components, all electrical supplies shall be disconnected from the
equipment being worked upon prior to any removal of sealed covers, etc. If it is absolutely
necessary to have an electrical supply to equipment during servicing, then a permanently
operating form of leak detection shall be located at the most critical point to warn of a
potentially hazardous situation.
Particular attention shall be paid to the following to ensure that by working on electrical
components, the casing is not altered in such a way that the level of protection is affected.
This shall include damage to cables, excessive number of connections, terminals not made
to original specification, damage to seals, incorrect fitting of glands, etc.

● Repair to intrinsically safe components
● Cabling
The Refrigerant
Ensure that the apparatus is mounted securely.
Ensure that seals or sealing materials have not degraded to the point that they no longer
serve the purpose of preventing the ingress of flammable atmospheres. Replacement parts
shall be in accordance with the manufacturer’s specifications.
NOTE:The use of silicon sealant can inhibit the effectiveness of some types of leak detection
equipment. Intrinsically safe components do not have to be isolated prior to working on them.
Do not apply any permanent inductive or capacitance loads to the circuit without ensuring that
this will not exceed the permissible voltage and current permitted for the equipment in use.
Check that cabling will not be subject to wear, corrosion, excessive pressure, vibration, sharp
edges or any other adverse environmental effects. The check shall also take into account the
effects of aging or continual vibration from sources such as compressors or fans.
● Detection of flammable refrigerants
Under no circumstances shall potential sources of ignition be used in the searching for or
detection of refrigerant leaks. A halide torch (or any other detector using a naked flame) shall
not be used.
● Decommissioning
Before carrying out this procedure, it is essential that the technician is completely familiar with
the equipment and all its detail. It is recommended good practice that all refrigerants are
recovered safely. Prior to the task being carried out, an oil and refrigerant sample shall be
taken in case analysis is required prior to re-use of reclaimed refrigerant. It is essential that
electrical power is available before the task is commenced.
a) Become familiar with the equipment and its operation.
b) Isolate system electrically.
c) Before attempting the procedure, ensure that:
– mechanical handling equipment is available, if required, for handling refrigerant cylinders;
– all personal protective equipment is available and being used correctly;
– the recovery process is supervised at all times by a competent person;
– recovery equipment and cylinders conform to the appropriate standards.
d) Pump down refrigerant system, if possible.
e) If a vacuum is not possible, make a manifold so that refrigerant can be removed from
various parts of the system.
f) Make sure that cylinder is situated on the scales before recovery takes place.
Intrinsically safe components are the only types that can be worked on while live in the
presence of a flammable atmosphere. The test apparatus shall be at the correct rating.
Replace components only with parts specified by the manufacturer. Other parts may result in
the ignition of refrigerant in the atmosphere from a leak.
- 2 -

● Labelling
● Recovery
Equipment shall be labelled stating that it has been decommissioned and emptied of refriger-
ant. The label shall be dated and signed. For appliances containing flammable refrigerants,
ensure that there are labels on the equipment stating the equipment contains flammable
refrigerant.
When removing refrigerant from a system, either for servicing or decommissioning, it is
recommended good practice that all refrigerants are removed safely.
The recovered refrigerant shall be returned to the refrigerant supplier in the correct recovery
cylinder, and the relevant waste transfer note arranged. Do not mix refrigerants in recovery
units and especially not in cylinders.
When transferring refrigerant into cylinders, ensure that only appropriate refrigerant recovery
cylinders are employed. Ensure that the correct number of cylinders for holding the total
system charge are available. All cylinders to be used are designated for the recovered
refrigerant and labelled for that refrigerant (i.e. special cylinders for the recovery of
refrigerant). Cylinders shall be complete with pressure-relief valve and associated shut-off
valves in good working order. Empty recovery cylinders are evacuated and, if possible, cooled
before recovery occurs.
The recovery equipment shall be in good working order with a set of instructions concerning
the equipment that is at hand and shall be suitable for the recovery of all appropriate refriger-
ants including, when applicable, flammable refrigerants. In addition, a set of calibrated
weighing scales shall be available and in good working order. Hoses shall be complete with
leak-free disconnect couplings and in good condition. Before using the recovery machine,
check that it is in satisfactory working order, has been properly maintained and that any
associated electrical components are sealed to prevent ignition in the event of a refrigerant
release. Consult manufacturer if in doubt.
If compressors or compressor oils are to be removed, ensure that they have been evacuated
to an acceptable level to make certain that flammable refrigerant does not remain within the
lubricant. The evacuation process shall be carried out prior to returning the compressor to the
suppliers. Only electric heating to the compressor body shall be employed to accelerate this
process. When oil is drained from a system, it shall be carried out safely.
The Refrigerant
g) Start the recovery machine and operate in accordance with manufacturer's instructions.
h) Do not overfill cylinders. (No more than 80 % volume liquid charge).
i) Do not exceed the maximum working pressure of the cylinder, even temporarily.
j) When the cylinders have been filled correctly and the process completed, make sure that
the cylinders and the equipment are removed from site promptly and all isolation valves on
the equipment are closed off.
k) Recovered refrigerant shall not be charged into another refrigeration system unless it has
been cleaned and checked.
- 3 -

The Refrigerant
To realize the function of the air conditioner unit, a special refrigerant circulates
Compared to common refrigerants, R32 is a nonpolluting refrigerant with no
lower. R32 has got very good thermodynamic features which lead to a really high
- 4 -
’s
WARNING:
The appliance shall be stored in a room without continuously operating ignition
Do not use means to accelerate the defrosting process or to clean, other than
those recommended by the manufacture.Should repair be necessary, contact your
nearest authorized Service Centre.
instructions only.
Read specialist’s manual.
Do not pierce or burn.
electric heater.)
. It can
.
leads to explosion
Appliance shall be installed, operated and stored in a room with a floor area larger
than
X
2
m . (Please refer to table “a” in section of “ Safety operation of flammable
refrigerant ” for Space X.)

- 5 -
Precautions
Warning
This appliance can be used by children aged from 8 years and above and persons
with reduced physical, sensory or mental capabilities, or lack of experience and
knowledge if they have been given supervision or instruction concerning use of the
appliance in a safe way and understand the hazards involved.
Children shall not play with the appliance.
Cleaning and user maintenance shall not be made by children without supervision.
The air conditioner should be installed in accordance with national wiring regulation.
Air Conditioner
should be properly grounded. Incorrect grounding may cause elec-
tric shock.
Please install the devices for short-circuit protection and electrical leakage protec-
tion when installing the air conditioner.
According to the local safety regulations, use qualified power supply circuit and
circuit break.
If it needs to install, move or maintain the air conditioner, please contact dealer or
local service center to conduct it at first. Air conditioner must be installed, moved or
maintained by appointed unit. Otherwise, it may cause serious damage or personal
injury or death.
When refrigerant leaks or requires discharge during installation, maintenance, or
disassembly, it should be handled by certified professionals or otherwise in compli-
ance with local laws and regulations.
Do not connect air conditioner to multi-purpose socket.Otherwise, it may cause
fire hazard.
Do install the air switch. If not, it may cause malfunction.
Do not spill water on the remote controller, otherwise the remote controller may be
broken.
Do not spray water on air conditioner. It may cause electric shock or malfunction.
Do not extend fingers or objects into air inlet or air outlet. It may cause personal
injury or damage.
Do not step on air conditioner, or put heavy objects. It may cause damage or per-
sonal injury.
Do not block air outlet or air inlet. It may cause malfunction.
Do disconnect power supply when cleaning air conditioner. Otherwise, it may
cause electric shock.
Do not repair air conditioner by yourself. It may cause electric shock or damage.
Please contact dealer when you need to repair air conditioner.
Maintenance must be performed by qualified professionals.Otherwise,it may
cause injury or damage.
The appliance is not to be used by persons (including children) with reduced phys-
ical, sensory or mental capabilities, or lack of experience and knowledge, unless
they have been given supervision or instruction.
Children being supervised not to play with the appliance.
Working temperature range
※
32/23 43/-
Indoor side DB/WB(°C)
Maximum cooling
Operating Temperature Range
Outdoor side DB/WB(°C)
The operating temperature range (outdoor te
mperature) for cooling only unit is 18°C~ 43°C.

- 6 -
Function
Introduction
Window type room air conditioners can
regulate the room temperature and dry
the room. It is convenient for your work, study
and life. It can be widely used in residence,
so on.
Room
temp.
Spring
Autumn
Winter
Wind
direction
Summer
Cooling in summer
Dehumidifying in rainy or
humid season
In hot summer, Air conditioner can
cool down the room air by
transferring heat out.
Without reducing the room temp., air
conditioner can dehumidify and make
the room air dry and comfortable.
Dry

- 7 -
Power requirement
Rated voltage :230V~ 60Hz
● The electric components will be damaged when
the voltage is too high. If the voltage is too low,
the compressor will vibrate violently to damage
the refrigerant system and easily cause the
compressor and electric components not work.
To ensure the reliable earthing, please do not connect earth
wire to the following places:
Earth wire
Water pipe
The ground must be connected.
● Special socket must be used. Furthermore, the
socket and wiring must conform to the wiring
regulations. And the earthing method must be
reliable.
protection switch of enough power capacity
and air switch with enough space.

- 8 -
Installation
Location:
Installation precaution:
Window type conditioner is so valuable and the
improper installation of it will cause a lot of da-
mage! Please associate the professional tech-
nician to install the unit and don’t install it by yourself. Otherwise, we are not
responsible for the damage like this.
The condensation water must be drained away conveniently.
bing video or voice.
by sulphurous gas, or other special areas, please contact the seller before
use.
Avoid other heat sources or direct sun light.
n salt and coastal area or place where is near thermal springs and polluted
Avoid a place where is easy for children to touch.
Install air conditioner unit far away from TV set or radio etc. to avoid distur-
shower or a swimming pool.
where is strong electromagnetic disturbance, you should contact the seller
in advance to avoid the malfunction in use.
Don't use the unit in the immediate surroundings of a laundry,a bath,a
How to install:
Choose a location where there are
htly bigger than unit size.
no any obstacle surrounding the
unit, and the plug is accessible.
cording to the following diagram.
5
500mm 500mm
300mm
300mm
The distance between the air conditioner
and the around obstacles should meet
the requirement as below: over 300mm
(upper side), over 500mm (left side),
over 500mm (right side), over 1500mm
(front side) and over 500mm (rear side).

- 9 -
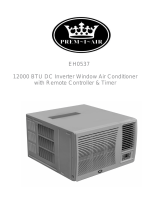
Installation procedure:
Remove the sticker from the front panel.1)
3)
Put the unit into the installation hole.2)
●
Fill up sews in the cabinet with sponge
or foam.
The installation place should be strong
enough to avoid the enlargement of
noise or vibration.
Installation assistance:
●
● Use anti-corrosion metal support
The installation hole should be stro-
ng enough to support the air
conditioner. If it cannot, corrosion
resistant metal support has tobe
used outdoors. Iron support should
be fixed on the building (6hoZn at
right Iigure.)
● Use of non-corrosive metal support
and capable of withstanding up to
three times the weight of the
product
it block the air inlet at the side grille.
Wall
Sunshade
board
Rubber
plate
Support
Horizontal line
Use sunshade board
Air conditioner should avoid anything
to be dropped into it and avoid direct
sunshine. If there is no cover on it,
you should contact the seller for inst-
●
alling the sunshade board. When in-
stalling the sunshade board, don’t let
condensation water can be drain
When installing the unit, it should slant
down to the back to make sure the
away conveniently.
(Slant about 3
(Shown at right figure.)
。
ed
。
1 )
+
-
。 。
+
-
3 1

- 10 -
Drain water :
Drain pan and drain hose need to be installed before using. Drain hose is
not included in the products, you need to purchase it locally to satisfy your
particular needs. Use the following procedure to install drain pan and drain
hose.
1. Slide out the chassis from the cabinet.
2. Install the drain pan to the corner of the cabinet with 2 screws.
3. Connect the drain hose to the outlet on the drain pan bottom.
4. Slide the chassis into its original place in the cabinet.
To get the maximum cooling efficiency , the air conditioner is designed to
splash the condensation water on the condenser coil . If the splashing sound
annoy you , you can remove the rubber plug from the chassis to lower the
noise, which also cause a bit loss of performance.

- 11 -
Notes for installation
Remove
Noise
Electric wiring
Before removing air conditioner to the other place, you
Then it must be done under the direction of the profe-
ssional technician. In addition, the charge of this must
be paid.
enlargement of noise and vibration.
● Don’t put anything in front of the outlet of the unit
to avoid increasing noise.
● Be sure that hot air or noise will not inconvenience neighbors.
● Please contact the seller as soon as there is strange noise during operation.
● Please use the safety support.
● Must connect with ground reliably.
● The exclusive circuit must be used. But removable socket
can’t be used because poor contact of it can cause over heat
● Don’t pull the power cord strongly.
and leakage current is less than 30mA.
● Connecting method between air conditioners and power cord and intercon-
necting method of each individual element with one another should accord
with wiring diagram on the unit.
● The air conditioner should be installed in accordance with national wiring
regulation.
● An all-pole disconnection switch having a contact separation of at least 3mm
● Air switch (thermal-magnetic breaker) should be installed in the circuit.
● If the supply cord is damaged,it must be replaced by the manufacturer or
●
All the electrical work must be done according to the local wiring regulations.

- 12 -
Air direction adjustment
positioning the vane to discharge the air upwards,
downwards or straight out.
Remote
control
panel
Air inlet
louver
Cabinet
Front intake
grille
(behind the
front intake
grille)
Panel outlook picture, just for reference, please take the real unit as standard.

- 1
3 -
Buttons on remote controller
Introduction for icons on display screen
1
3
5
2
4
6
7
ON/OFF button
MODE button
+/- button
FAN button
SWING button
SLEEP button
TIMER button
Timer on Timer off
Sending signal
swing operation
sleep operation
lock
set speed
Set timeSet temperature
heat operation
fan operation
dry operation
cool operation
auto operation
Remote control operation procedure
21
3
4 5
6 7

- 1
4 -
Introduction for buttons on remote controller
Note:
●
When power is connected(stand by condition), you can operate the air conditioner
through the remote controller.
●
When unit is on, each time you press the button on remote controller, the sending
signal icon " " on the display of remote controller will blink once. If the air con-
ditioner gives out a beep sound, it means the signal has been sent.
● When unit is o
f
f, set temperature will be displayed on the remote controller (If the
light of the unit display is turned on, the corresponding icon will be displayed);
When unit is on, it will display the icon of the on-going function.
Press this button to turn unit on/off.
ON/OFF button
1
Pressing this button once can select your required mode circularly as below (the
corresponding icon " " will be lit up after the mode is selected):
●
When selecting auto mode, air conditioner will operate automatically according to
ambient temperature. Set temperature can't be adjusted and won't be displayed
either
. Press FAN button to adjust fan speed.
● When selecting cool mode, air conditioner will operate under cool mode. Then
press + or - button to adjust set temperature. Press FAN button to adjust fan speed.
● When selecting dry mode, air conditioner will operate at low fan speed under dry
mode. In dry mode, fan speed can't be adjusted.
● When selecting fan mode, air conditioner will operate in fan mode only.
Then
press F
AN button to adjust fan speed.
● When selecting heat mode, air conditioner will operate under
heat mode.
Then
press + or - button to adjust set temperature. Press FAN button to adjust fan speed.
(Cooling only unit can’t receive heating mode signal. If set HEAT mode by remote
controller
, press ON/OFF button can’t turn on the air conditioner.)
AUTO COOL DRY FAN HEAT
MODE button
2
●
Pressing + or - button once will increase or decrease set temperature by 1°F(°C).
Hold + or - button for 2s, set temperature on remote controller will change quickly.
Release the button after your required set temperature is reached.
● When setting
Timer On or Timer Of
f , press + or - button to adjust the time.(See
TIMER Button for setting details)
+ / - button
3
● This is a general use remote controller, it could be used for the air conditioners
with multifunction; For some function, which the model doesn't have, if press
the corresponding button on the remote controller that the unit will keep the
original running status.

- 1
5 -
Introduction for buttons on remote controller
Press this button to turn on left & right air swing.
SWING button
5
Under Cool, Heat mode, press this button to turn on Sleep function. Press this button
to cancel Sleep function. Under Fan, Dry and Auto mode, this function is unavailable.
SLEEP button
6
TIMER button
7
Note:
● Under Auto speed, air conditioner will select proper fan speed automatically acc-
ording to ambient temperature.
● Fan speed can't be adjusted under Dry mode.
FAN button
4
Pressing this button can select fan speed circularly as: AUTO, SPEED 1 ( ),
SPEED 2 ( ) , SPEED 3 ( ), SPEED 4 ( ) (unavailable in this air conditioner.
Speed 4 is the same with speed 3.).
AUTO
SPEED 1 (equals to low fan speed)
SPEED 3 (equals to high fan speed) SPEED 4 (equals to high fan speed)
SPEED 2 (equals to mid fan speed)
● When unit is on, press this button to set Timer Off. T-OFF and H icon will be
blinking. Within 5s, press + or - button to adjust the time
for Timer Off. Pressing
+ or - button once will increase or decrease the time by 0.5h. Hold + or - button
for 2s, time will change quickly. Release the button after your required set time
is reached. Then press TIMER button to confirm it. T-OFF and H icon will stop
blinking.
● When unit is off, press this button to set Timer On. T-ON and
H icon will be
blinking. Within 5s, press + or - button to adjust the time
for Timer On. Pressing
+ or - button once will increase or decrease the time by 0.5h. Hold + or - button
for 2s, time will change quickly. Release the button after your required set time
is reached. Then press TIMER button to confirm it. T-ON and H icon will stop
blinking.
● Cancel Timer On/Off: If Timer function i
s set up, press TIMER button once to
review the remaining time. Within 5s, press TIMER button again to cancel this
function.

- 1
6 -
Introduction for buttons on remote controller
Note:
●
Range of time setting is: 0.5~24h.
● The interval between two motions can't exceed 5s, otherwise the remote con-
troller will exit setting status.
Function introduction for combination buttons
Press “+” and “-” buttons simultaneously can turn on or turn off child lock function.
When child lock function is started up, LOCK indicator on remote controller is ON.
If you operate the remote controller, remote controller won’t send signal.
Child lock function
Temperature display switchover function
Under OFF status, press “-” button and “MODE”button simultaneously can switch
between °C and °F.
Operation guide
1.
After putting through the power, press "ON/OFF" button on remote controller to
turn on the air conditioner.
2.
Press "MODE" button to select your required mode: AUTO, COOL, DRY, FAN,
HEAT.
3.
Press "+" or "-" button to set your required temperature. (Temperature can’t be
adjusted under auto mode).
4.
Press "FAN" button to set your required fan speed: auto, low, medium and high
speed.
Under switch-on or switch-off state, you may hold "+"and "FAN" buttons
simultaneously for 3 seconds to set the lamp on or off and send the code. After
being energized the lamp is defaulted on.
Light function

- 1
7 -
Replacement of batteries in remote controller
1. Press the mark “ ” on back cover of batteries box cover for remote controller with
fingers as shown in the fig, and then remove the batteries box cover along the arrow
direction.
Battery
Cover of battery box
Remove
Reinstall
2. Replace with two #7 (AAA 1.5V) dry batteries.
Make sure positions for “+” pole and “-” pole are
correct.
3. Reinstall batteries box cover.
● The distance between signal sender and receiving window should be no more
than 8m, and there should be no obstacles between them.
●
conditioner when using the remote controller.
● Replace new batteries of the same model when replacement is required.
● When you don’t use remote controller for a long time, please take out the
batteries.
NOTICE
/