
If you have questions or comments, contact us.
Pour toute question ou tout commentaire, nous contacter.
Si tiene dudas o comentarios, contáctenos.
1-800-4-DeWALT
Instruction Manual
Guide D’utilisation
Manual de instrucciones
DCS571
20V Max* Compact Brushless Circular Saw
Scie circulaire sans balai compacte 20V max*
Sierra Circular sin Escobillas Compacta 20V Máx*
final page size: 8.5 x 5.5 in

ENGLISH
English (original instructions) 1
Français (traduction de la notice d’instructions originale) 15
Español (traducido de las instrucciones originales) 31

ENGLISH
1
English (original instructions)
Definitions: Safety Alert Symbols and Words
This instruction manual uses the following safety alert symbols and words to alert you to hazardous situations and your risk
of personal injury or property damage.
DANGER: Indicates an imminently hazardous situation which, if not avoided, will result in death or seriousinjury.
WARNING: Indicates a potentially hazardous situation which, if not avoided, could result in death or seriousinjury.
CAUTION: Indicates a potentially hazardous situation which, if not avoided, may result in minor or moderateinjury.
(Used without word) Indicates a safety related message.
NOTICE: Indicates a practice not related to personal injury which, if not avoided, may result in propertydamage.
WARNING: Read all safety warnings and all
instructions. Failure to follow the warnings and
instructions may result in electric shock, fire and/or
seriousinjury.
WARNING: To reduce the risk of injury, read the
instructionmanual.
If you have any questions or comments about this or
any
DeWALT
tool, call us toll free at:
1-800-4-
DeWALT
(1-800-433-9258).
1
Trigger switch lock-off
button
2
Trigger switch
3
Battery pack
4
Battery release button
5
Depth adjustment knob
6
Shoe
7
Lower blade guard
retracting lever
8
Lower blade guard
9
Blade clamping screw
10
Kerf indicator
11
Bevel adjustment knob
12
Blade lock button
13
Auxiliary handle
14
Blade wrench
Fig. A
2
1
3
4
6
8
7
9
13
14
5
11
12
10

ENGLISH
2
GENERAL POWER TOOL SAFETY WARNINGS
WARNING: Read all safety warnings,
instructions, illustrations and specifications
provided with this power tool. Failure to follow all
instructions listed below may result in electric shock,
fire and/or seriousinjury.
SAVE ALL WARNINGS
AND INSTRUCTIONS FOR
FUTURE REFERENCE.
The term “power tool” in the warnings refers to your mains-
operated (corded) power tool or battery-operated (cordless)
powertool.
1) Work Area Safety
a ) Keep work area clean and well lit. Cluttered or dark
areas inviteaccidents.
b ) Do not operate power tools in explosive
atmospheres, such as in the presence of
flammable liquids, gases or dust. Power tools
create sparks which may ignite the dust orfumes.
c ) Keep children and bystanders away while
operating a power tool. Distractions can cause you
to losecontrol.
2) Electrical Safety
a ) Power tool plugs must match the outlet. Never
modify the plug in any way. Do not use any
adapter plugs with earthed (grounded) power
tools. Unmodified plugs and matching outlets will
reduce risk of electricshock.
b ) Avoid body contact with earthed or grounded
surfaces, such as pipes, radiators, ranges and
refrigerators. There is an increased risk of electric
shock if your body is earthed orgrounded.
c ) Do not expose power tools to rain or wet
conditions. Water entering a power tool will increase
the risk of electricshock.
d ) Do not abuse the cord. Never use the cord for
carrying, pulling or unplugging the power tool.
Keep cord away from heat, oil, sharp edges or
moving parts. Damaged or entangled cords increase
the risk of electricshock.
e ) When operating a power tool outdoors, use an
extension cord suitable for outdoor use. Use of
a cord suitable for outdoor use reduces the risk of
electricshock.
f ) If operating a power tool in a damp location
is unavoidable, use a ground fault circuit
interrupter (GFCI) protected supply. Use of a GFCI
reduces the risk of electricshock.
3) Personal Safety
a ) Stay alert, watch what you are doing and use
common sense when operating a power tool. Do
not use a power tool while you are tired or under
the influence of drugs, alcohol or medication. A
moment of inattention while operating power tools
may result in serious personalinjury.
b ) Use personal protective equipment. Always wear
eye protection. Protective equipment such as dust
mask, non-skid safety shoes, hard hat, or hearing
protection used for appropriate conditions will reduce
personalinjuries.
c ) Prevent unintentional starting. Ensure the
switch is in the off-position before connecting
to power source and/or battery pack, picking up
or carrying the tool. Carrying power tools with your
finger on the switch or energizing power tools that
have the switch on invitesaccidents.
d ) Remove any adjusting key or wrench before
turning the power tool on. A wrench or a key left
attached to a rotating part of the power tool may
result in personalinjury.
e ) Do not overreach. Keep proper footing and
balance at all times. This enables better control of
the power tool in unexpectedsituations.
f ) Dress properly. Do not wear loose clothing or
jewelry. Keep your hair, clothing and gloves
away from moving parts. Loose clothes, jewelry or
long hair can be caught in movingparts.
g ) If devices are provided for the connection of dust
extraction and collection facilities, ensure these
are connected and properly used. Use of dust
collection can reduce dust-relatedhazards.
h ) Do not let familiarity gained from frequent use
of tools allow you to become complacent and
ignore tool safety principles. A careless action can
cause severe injury within a fraction of asecond.
4) Power Tool Use and Care
a ) Do not force the power tool. Use the correct
power tool for your application. The correct power
tool will do the job better and safer at the rate for
which it wasdesigned.
b ) Do not use the power tool if the switch does not
turn it on and off. Any power tool that cannot be
controlled with the switch is dangerous and must
berepaired.
c ) Disconnect the plug from the power source and/
or remove the battery pack, if detachable, from
the power tool before making any adjustments,
changing accessories, or storing power tools.
Such preventive safety measures reduce the risk of
starting the power toolaccidentally.
d ) Store idle power tools out of the reach of children
and do not allow persons unfamiliar with the
power tool or these instructions to operate the
power tool. Power tools are dangerous in the hands
of untrainedusers.
e ) Maintain power tools and accesories. Check
for misalignment or binding of moving parts,
breakage of parts and any other condition
that may affect the power tool’s operation. If
damaged, have the power tool repaired before
use. Many accidents are caused by poorly maintained
powertools.
f ) Keep cutting tools sharp and clean. Properly
maintained cutting tools with sharp cutting edges are
less likely to bind and are easier tocontrol.
g ) Use the power tool, accessories and tool bits etc.
in accordance with these instructions, taking
into account the working conditions and the

ENGLISH
3
work to be performed. Use of the power tool for
operations different from those intended could result
in a hazardoussituation.
h ) Keep handles and grasping surfaces dry, clean
and free from oil and grease. Slippery handles and
grasping surfaces do not allow for safe handling and
control of the tool in unexpectedsituations.
5) Battery Tool Use and Care
a ) Recharge only with the charger specified by the
manufacturer. A charger that is suitable for one type
of battery pack may create a risk of fire when used
with another batterypack.
b ) Use power tools only with specifically designated
battery packs. Use of any other battery packs may
create a risk of injury andfire.
c ) When battery pack is not in use, keep it away
from other metal objects, like paper clips, coins,
keys, nails, screws or other small metal objects,
that can make a connection from one terminal to
another. Shorting the battery terminals together may
cause burns or afire.
d ) Under abusive conditions, liquid may be ejected
from the battery; avoid contact. If contact
accidentally occurs, flush with water. If liquid
contacts eyes, additionally seek medical help.
Liquid ejected from the battery may cause irritation
orburns.
e ) Do not use a battery pack or tool that is
damaged or modified. Damaged or modified
batteries may exhibit unpredictable behavior resulting
in fire, explosion or risk ofinjury.
f ) Do not expose a battery pack or tool to
fire or excessive temperature. Exposure to
fire or temperature above 265 °F (130°C) may
causeexplosion.
g ) Follow all charging instructions and do not
charge the battery pack or tool outside the
temperature range specified in the instructions.
Charging improperly or at temperatures outside the
specified range may damage the battery and increase
the risk of fire.
6) Service
a ) Have your power tool serviced by a qualified
repair person using only identical replacement
parts. This will ensure that the safety of the power
tool ismaintained.
b ) Never service damaged battery packs. Service
of battery packs should only be performed by the
manufacturer or authorized serviceproviders.
Safety Instructions for All Saws
Cutting Procedures
a ) DANGER: Keep hands away from cutting area
and the blade. Keep your second hand on
auxiliary handle, or motor housing. If both hands
are holding the saw, they cannot be cut by theblade.
b ) Do not reach underneath the workpiece. The
guard cannot protect you from the blade below
theworkpiece.
c ) Adjust the cutting depth to the thickness of the
workpiece. Less than a full tooth of the blade teeth
should be visible below theworkpiece.
d ) Never hold the workpiece in your hands or across
your leg while cutting. Secure the workpiece to a
stable platform. It is important to support the work
properly to minimize body exposure, blade binding, or
loss ofcontrol.
e ) Hold the power tool by insulated gripping
surfaces, when performing an operation where
the cutting tool may contact hidden wiring.
Contact with a "live" wire will also make exposed
metal parts of the power tool "live" and could give the
operator an electricshock
f ) When ripping, always use a rip fence or straight
edge guide. This improves the accuracy of cut and
reduces the chance of bladebinding.
g ) Always use blades with correct size and shape
(diamond versus round) of arbor holes. Blades
that do not match the mounting hardware of the saw
will run off-center, causing loss ofcontrol.
h ) Never use damaged or incorrect blade washers
or bolt. The blade washers and bolt were specially
designed for your saw, for optimum performance and
safety ofoperation.
Further Safety Instructions for all Saws
Kickback Causes and Related Warnings
ʵ Kickback is a sudden reaction to a pinched, jammed or
misaligned saw blade, causing an uncontrolled saw to
lift up and out of the workpiece toward the operator;
ʵ When the blade is pinched or jammed tightly by
the kerf closing down, the blade stalls and the
motor reaction drives the unit rapidly back toward
theoperator;
ʵ If the blade becomes twisted or misaligned in the cut,
the teeth at the back edge of the blade can dig into
the top surface of the wood causing the blade to climb
out of the kerf and jump back toward theoperator.
Kickback is the result of saw misuse and/or incorrect
operating procedures or conditions and can be avoided by
taking proper precautions as given below:
a ) Maintain a firm grip with both hands on the saw
and position your arms to resist kickback forces.
Position your body to either side of the blade,
but not in line with the blade. Kickback could cause
the saw to jump backwards, but kickback forces can
be controlled by the operator, if proper precautions
aretaken.
b ) When blade is binding, or when interrupting a
cut for any reason, release the trigger and hold
the saw motionless in the material until the
blade comes to a complete stop. Never attempt
to remove the saw from the work or pull the
saw backward while the blade is in motion or
kickback may occur. Investigate and take corrective
actions to eliminate the cause of bladebinding.

ENGLISH
4
c ) When restarting a saw in the workpiece, center
the saw blade in the kerf so that the saw teeth
are not engaged into the material. If a saw blade
binds, it may walk up or kickback from the workpiece
as the saw isrestarted.
d ) Support large panels to minimize the risk of
blade pinching and kickback. Large panels tend to
sag under their own weight. Supports must be placed
under the panel on both sides, near the line of cut and
near the edge of thepanel.
e ) Do not use dull or damaged blades. Unsharpened
or improperly set blades produce narrow kerf causing
excessive friction, blade binding andkickback.
f ) Blade depth and bevel adjusting locking levers
must be tight and secure before making cut. If
blade adjustment shifts while cutting, it may cause
binding andkickback.
g ) Use extra caution when sawing into existing
walls or other blind areas. The protruding blade
may cut objects that can causekickback.
Lower Guard Function
a ) Check the lower guard for proper closing before
each use. Do not operate the saw if the lower
guard does not move freely and close instantly.
Never clamp or tie the lower guard into the open
position. If saw is accidentally dropped, lower guard
may be bent. Raise the lower guard with the retracting
handle and make sure it moves freely and does not
touch the blade or any other part, in all angles and
depths ofcut.
b ) Check the operation of the lower guard spring.
If the guard and the spring are not operating
properly, they must be serviced before use. Lower
guard may operate sluggishly due to damaged parts,
gummy deposits, or a build-up ofdebris.
c ) The lower guard may be retracted manually
only for special cuts such as “plunge cuts” and
“compound cuts.” Raise the lower guard by
retracting the handle and as soon as the blade
enters the material, the lower guard must be
released. For all other sawing, the lower guard
should operateautomatically.
d ) Always observe that the lower guard is covering
the blade before placing saw down on bench
or floor. An unprotected, coasting blade will cause
the saw to walk backwards, cutting whatever is in
its path. Be aware of the time it takes for the blade to
stop after switch isreleased.
Additional Safety Information
WARNING: Never modify the power tool or any part
of it. Damage or personal injury couldresult.
WARNING: ALWAYS use safety glasses. Everyday
eyeglasses are NOT safety glasses. Also use face or
dust mask if cutting operation is dusty. ALWAYS WEAR
CERTIFIED SAFETYEQUIPMENT:
• ANSI Z87.1 eye protection (CAN/CSA Z94.3),
• ANSI S12.6 (S3.19) hearing protection,
• NIOSH/OSHA/MSHA respiratoryprotection.
WARNING: Some dust created by power sanding,
sawing, grinding, drilling, and other construction
activities contains chemicals known to the State
of California to cause cancer, birth defects or
other reproductive harm. Some examples of these
chemicalsare:
• lead from lead-based paints,
• crystalline silica from bricks and cement and other
masonry products, and
• arsenic and chromium from chemically-
treatedlumber.
Your risk from these exposures varies, depending on how
often you do this type of work. To reduce your exposure to
these chemicals: work in a well ventilated area, and work with
approved safety equipment, such as those dust masks that are
specially designed to filter out microscopicparticles.
• Avoid prolonged contact with dust from power
sanding, sawing, grinding, drilling, and other
construction activities. Wear protective clothing and
wash exposed areas with soap and water. Allowing
dust to get into your mouth, eyes, or lay on the skin may
promote absorption of harmfulchemicals.
WARNING: Use of this tool can generate and/
or disperse dust, which may cause serious and
permanent respiratory or other injury. Always use
NIOSH/OSHA approved respiratory protection
appropriate for the dust exposure. Direct particles
away from face andbody.
WARNING: Always wear proper personal hearing
protection that conforms to ANSI S12.6 (S3.19)
during use. Under some conditions and duration
of use, noise from this product may contribute to
hearingloss.
CAUTION: When not in use, place tool on its side
on a stable surface where it will not cause a
tripping or falling hazard. Some tools with large
battery packs will stand upright on the battery pack
but may be easily knockedover.
• Air vents often cover moving parts and should be
avoided. Loose clothes, jewelry or long hair can be
caught in movingparts.
The label on your tool may include the following symbols. The
symbols and their definitions are asfollows:
V ......................... volts
Hz .......................hertz
min ..................... minutes
or DC ......direct current
...................... Class I Construction
(grounded)
…/min ..............per minute
BPM .................... beats per minute
IPM ..................... impacts per minute
RPM .................... revolutions per
minute
sfpm ................... surface feet per
minute
SPM .................... strokes per minute
A ......................... amperes
W ........................watts
or AC ...........alternating current
or AC/DC .... alternating or
direct current
...................... Class II
Construction
(double insulated)
n
o
.......................no load speed
n .........................rated speed

ENGLISH
5
......................earthing terminal
.....................safety alert symbol
.....................visible radiation
..................... wear respiratory
protection
..................... wear eye
protection
..................... wear hearing
protection
..................... read all
documentation
BATTERIES AND CHARGERS
The battery pack is not fully charged out of the carton.
Before using the battery pack and charger, read the
safety instructions below and then follow charging
proceduresoutlined. When ordering replacement battery
packs, be sure to include the catalog number andvoltage.
Your tool uses a
DeWALT
charger. Be sure to read all safety
instructions before using your charger. Consult the chart
at the end of this manual for compatibility of chargers and
batterypacks.
READ ALL INSTRUCTIONS
Important Safety Instructions for All
Battery Packs
WARNING: Read all safety warnings and all
instructions for the battery pack, charger and
power tool. Failure to follow the warnings and
instructions may result in electric shock, fire and/
or seriousinjury.
• Do not charge or use the battery pack in explosive
atmospheres, such as in the presence of flammable
liquids, gases or dust. Inserting or removing the battery
pack from the charger may ignite the dust orfumes.
• NEVER force the battery pack into the charger. DO
NOT modify the battery pack in any way to fit into
a non-compatible charger as battery pack may
rupture causing serious personal injury. Consult
the chart at the end of this manual for compatibility of
batteries andchargers.
• Charge the battery packs only in designated
DeWALT
chargers.
• DO NOT splash or immerse in water or otherliquids.
• Do not store or use the tool and battery pack in
locations where the temperature may reach or
exceed 104°F (40°C) (such as outside sheds or metal
buildings in summer). For best life store battery packs in
a cool, drylocation.
NOTE: Do not store the battery packs in a tool with
the trigger switch locked on. Never tape the trigger
switch in the ONposition.
• Do not incinerate the battery pack even if it is
severely damaged or is completely worn out. The
battery pack can explode in a fire. Toxic fumes and
materials are created when lithium ion battery packs
areburned.
• If battery contents come into contact with the skin,
immedicately wash area with mild soap and water.
If battery liquid gets into the eye, rinse water over the open
eye for 15 minutes or until irritation ceases. If medical
attention is needed, the battery electrolyte is composed of
a mixture of liquid organic carbonates and lithiumsalts.
• Contents of opened battery cells may cause
respiratory irritation. Provide fresh air. If symptoms
persist, seek medicalattention.
WARNING: Burn hazard. Battery liquid may be
flammable if exposed to spark orflame.
WARNING: Fire hazard. Never attempt to open the
battery pack for any reason. If the battery pack case
is cracked or damaged, do not insert into the charger.
Do not crush, drop or damage the battery pack. Do
not use a battery pack or charger that has received a
sharp blow, been dropped, run over or damaged in
any way (e.g., pierced with a nail, hit with a hammer,
stepped on). Damaged battery packs should be
returned to the service center forrecycling.
Transportation
WARNING: Fire hazard. Do not store or carry the
battery pack so that metal objects can contact
exposed battery terminals. For example, do
not place the battery pack in aprons, pockets, tool
boxes, product kit boxes, drawers, etc., with loose
nails, screws, keys, etc. Transporting batteries
can possibly cause fires if the battery terminals
inadvertently come in contact with conductive
materials such as keys, coins, hand tools and the
like. The US Department of Transportation Hazardous
Material Regulations (HMR) actually prohibit
transporting batteries in commerce or on airplanes in
carry-on baggage UNLESS they are properly protected
from short circuits. So when transporting individual
battery packs, make sure that the battery terminals
are protected and well insulated from materials that
could contact them and cause a shortcircuit.
NOTE: Lithium-ion batteries should not be put in
checkedbaggage.
Fuel Gauge Battery Packs (Fig. B)
Some
DeWALT
battery packs include a fuel gauge which
consists of three green LED lights that indicate the level of
charge remaining in the batterypack.
The fuel gauge is an indication of approximate levels of
charge remaining in the battery pack according to the
followingindicators:
75–100% charged
51–74% charged
< 50% charged
Pack needs to be charged
To actuate the fuel gauge, press and hold the fuel gauge
button. A combination of the three green LED lights will
illuminate designating the level of charge left. When the
level of charge in the battery is below the usable limit, the

ENGLISH
6
fuel gauge will not illuminate and the battery will need to
berecharged.
Fig. B
NOTE: The fuel gauge is only an indication of the charge left
on the battery pack. It does not indicate tool functionality
and is subject to variation based on product components,
temperature and end-userapplication.
For more information regarding fuel gauge battery packs,
please call 1-800-4-
DeWALT
(1-800-433-9258) or visit our
website www.dewalt.com.
The RBRC® Seal
The RBRC® (Rechargeable Battery
Recycling Corporation) Seal on the nickel
cadmium, nickel metal hydride or lithium-
ion batteries (or battery packs) indicates
that the costs to recycle these batteries
(or battery packs) at the end of their useful life have already
been paid by
DeWALT
. In some areas, it is illegal to place
spent nickel cadmium, nickel metal hydride or lithium-ion
batteries in the trash or municipal solid waste stream and
the Call2Recycle® program provides an environmentally
consciousalternative.
Call 2 Recycle, Inc., in cooperation with
DeWALT
and other
battery users, has established the program in the United
States and Canada to facilitate the collection of spent nickel
cadmium, nickel metal hydride or lithium-ion batteries. Help
protect our environment and conserve natural resources by
returning the spent nickel cadmium, nickel metal hydride
or lithium-ion batteries to an authorized
DeWALT
service
center or to your local retailer for recycling. You may also
contact your local recycling center for information on
where to drop off the spent battery. RBRC® is a registered
trademark of Call 2 Recycle,Inc.
Important Safety Instructions for All
Battery Chargers
WARNING: Read all safety warnings and all
instructions for the battery pack, charger and
power tool. Failure to follow the warnings and
instructions may result in electric shock, fire and/
or seriousinjury.
• DO NOT attempt to charge the battery pack with
any chargers other than the ones in this manual.
The charger and battery pack are specifically designed to
worktogether.
• These chargers are not intended for any uses other
than charging
DeWALT
rechargeable batteries.
Any other uses may result in risk of fire, electric shock
orelectrocution.
• Do not expose the charger to rain orsnow.
• Pull by the plug rather than the cord when
disconnecting the charger. This will reduce the risk of
damage to the electric plug andcord.
• Make sure that the cord is located so that it will not
be stepped on, tripped over or otherwise subjected
to damage orstress.
• Do not use an extension cord unless it is absolutely
necessary. Use of improper extension cord could result in
risk of fire, electric shock orelectrocution.
• When operating a charger outdoors, always provide
a dry location and use an extension cord suitable
for outdoor use. Use of a cord suitable for outdoor use
reduces the risk of electricshock.
• An extension cord must have adequate wire size
(AWG or American Wire Gauge) for safety. The smaller
the gauge number of the wire, the greater the capacity
of the cable, that is, 16 gauge has more capacity than 18
gauge. An undersized cord will cause a drop in line voltage
resulting in loss of power and overheating. When using
more than one extension to make up the total length,
be sure each individual extension contains at least the
minimum wire size. The following table shows the correct
size to use depending on cord length and nameplate
ampere rating. If in doubt, use the next heavier gauge. The
lower the gauge number, the heavier thecord.
Minimum Gauge for Cord Sets
Volts
Total Length of Cord in Feet
(meters)
120 V 25 (7.6) 50 (15.2) 100 (30.5) 150 (45.7)
240 V 50 (15.2) 100 (30.5) 200 (61.0) 300 (91.4)
Ampere Rating
American Wire Gauge
More
Than
Not
More
Than
0 6 18 16 16 14
6 10 18 16 14 12
10 12 16 16 14 12
12 16 14 12 Not Recommended
• Do not place any object on top of the charger or
place the charger on a soft surface that might block
the ventilation slots and result in excessive internal
heat. Place the charger in a position away from any heat
source. The charger is ventilated through slots in the top
and the bottom of thehousing.
• Do not operate the charger with a damaged cord
orplug.
• Do not operate the charger if it has received a sharp
blow, been dropped or otherwise damaged in any
way. Take it to an authorized servicecenter.
• Do not disassemble the charger; take it to an
authorized service center when service or repair
is required. Incorrect reassembly may result in a risk of
electric shock, electrocution orfire.
• Disconnect the charger from the outlet before
attempting any cleaning. This will reduce the risk of
electric shock. Removing the battery pack will not reduce
thisrisk.
• NEVER attempt to connect 2 chargerstogether.
• The charger is designed to operate on standard
120V household electrical power. Do not attempt to

ENGLISH
7
use it on any other voltage. This does not apply to the
vehicularcharger.
WARNING: Shock hazard. Do not allow any liquid to
get inside the charger. Electric shock mayresult.
WARNING: Burn hazard. Do not submerge the
battery pack in any liquid or allow any liquid to
enter the battery pack. Never attempt to open the
battery pack for any reason. If the plastic housing of
the battery pack breaks or cracks, return to a service
center forrecycling.
CAUTION: Burn hazard. To reduce the risk of injury,
charge only
DeWALT
rechargeable battery packs.
Other types of batteries may overheat and burst
resulting in personal injury and propertydamage.
NOTICE: Under certain conditions, with the charger
plugged into the power supply, the charger can
be shorted by foreign material. Foreign materials
of a conductive nature, such as, but not limited to,
grinding dust, metal chips, steel wool, aluminum
foil or any buildup of metallic particles should be
kept away from the charger cavities. Always unplug
the charger from the power supply when there is no
battery pack in the cavity. Unplug the charger before
attempting toclean.
Charging a Battery (Fig. C)
1. Plug the charger into an appropriate outlet before
inserting batterypack.
3
4
Fig. C
2. Insert the battery pack
3
into the charger, making sure
the battery pack is fully seated in the charger. The red
(charging) light will blink continuously indicating that
the charging process hasstarted.
3. The completion of charge will be indicated by the red
light remaining ON continuously. The battery pack is
fully charged and may be used at this time or left in the
charger. To remove the battery pack from the charger,
push the battery release button
4
on the battery pack
and then slide the battery pack out of thecharger.
NOTE: To ensure maximum performance and life of lithium-
ion battery packs, charge the battery pack fully before
firstuse.
Charger Operation
Refer to the indicators below for the charge status of the
batterypack.
DCB107, DCB112, DCB113, DCB115, DCB118, DCB132
Charging
Fully Charged
Hot/Cold Pack Delay*
* DCB107, DCB112, DCB113, DCB115, DCB118, DCB132:
The red light will continue to blink, but a yellow indicator
light will be illuminated during this operation. Once the
battery pack has reached an appropriate temperature, the
yellow light will turn off and the charger will resume the
chargingprocedure.
The compatible charger(s) will not charge a faulty battery
pack. The charger will indicate faulty battery pack by
refusing tolight.
NOTE: This could also mean a problem with acharger.
If the charger indicates a problem, take the charger and
battery pack to be tested at an authorized servicecenter.
Hot/Cold Pack Delay
When the charger detects a battery pack that is too hot
or too cold, it automatically starts a Hot/Cold Pack Delay,
suspending charging until the battery pack has reached an
appropriate temperature. The charger then automatically
switches to the pack charging mode. This feature ensures
maximum battery packlife.
A cold battery pack will charge at a slower rate than a warm
battery pack. The battery pack will charge at that slower rate
throughout the entire charging cycle and will not return to
maximum charge rate even if the battery packwarms.
The DCB118 charger is equipped with an internal fan
designed to cool the battery pack. The fan will turn on
automatically when the battery pack needs to becooled.
Never operate the charger if the fan does not operate
properly or if ventilation slots are blocked. Do not permit
foreign objects to enter the interior of thecharger.
Electronic Protection System
Li-Ion tools are designed with an Electronic Protection
System that will protect the battery pack against
overloading, overheating or deepdischarge.
The tool will automatically turn off if the Electronic
Protection System engages. If this occurs, place the lithium-
ion battery pack on the charger until it is fullycharged.
Wall Mounting
DCB107, DCB112, DCB113, DCB115, DCB118, DCB132
These chargers are designed to be wall mountable or to
sit upright on a table or work surface. If wall mounting,
locate the charger within reach of an electrical outlet,
and away from a corner or other obstructions which may
impede air flow. Use the back of the charger as a template
for the location of the mounting screws on the wall. Mount
the charger securely using drywall screws (purchased
separately) at least 1" (25.4 mm) long, with a screw head
diameter of 0.28–0.35" (7–9mm), screwed into wood to an
optimal depth leaving approximately 7/32" (5.5 mm) of the

ENGLISH
8
screw exposed. Align the slots on the back of the charger
with the exposed screws and fully engage them in theslots.
Charger Cleaning Instructions
WARNING: Shock hazard. Disconnect the charger
from the AC outlet before cleaning. Dirt and grease
may be removed from the exterior of the charger using
a cloth or soft non-metallic brush. Do not use water or
any cleaningsolutions.
Important Charging Notes
1. Longest life and best performance can be obtained if
the battery pack is charged when the air temperature is
between 65°F and 75°F (18° – 24°C). DO NOT charge
the battery pack below +40°F (+4.5°C), or above
+104°F (+40°C). This is important and will prevent
serious damage to the batterypack.
2. The charger and battery pack may become warm to the
touch while charging. This is a normal condition, and
does not indicate a problem. To facilitate the cooling of
the battery pack after use, avoid placing the charger or
battery pack in a warm environment such as in a metal
shed or an uninsulatedtrailer.
3. If the battery pack does not charge properly:
a. Check operation of receptacle by plugging in a lamp
or other appliance;
b. Check to see if receptacle is connected to a light
switch which turns power off when you turn out the
lights;
c. Move the charger and battery pack to a location
where the surrounding air temperature is
approximately 65°F – 75°F (18° – 24°C);
d. If charging problems persist, take the tool, battery
pack and charger to your local servicecenter.
4. The battery pack should be recharged when it fails to
produce sufficient power on jobs which were easily
done previously. DO NOT CONTINUE to use under these
conditions. Follow the charging procedure. You may
also charge a partially used pack whenever you desire
with no adverse effect on the batterypack.
5. Foreign materials of a conductive nature such as, but
not limited to, grinding dust, metal chips, steel wool,
aluminum foil, or any buildup of metallic particles
should be kept away from charger cavities. Always
unplug the charger from the power supply when there
is no battery pack in the cavity. Unplug the charger
before attempting toclean.
6. Do not freeze or immerse the charger in water or any
otherliquid.
Storage Recommendations
1. The best storage place is one that is cool and dry, away
from direct sunlight and excess heat orcold.
2. For long storage, it is recommended to store a fully
charged battery pack in a cool dry place out of the
charger for optimalresults.
NOTE: Battery packs should not be stored completely
depleted of charge. The battery pack will need to be
recharged beforeuse.
SAVE THESE INSTRUCTIONS FOR
FUTURE USE
Intended Use
This circular saw is designed for professional wood cutting
and fiber cement applications. DO NOT cut metal, plastic,
concrete, masonry. DO NOT use for wet tile application.
Maximum cutting depth is 1-11/20" (39.5mm).
DO NOT use under wet conditions or in presence of
flammable liquids orgases.
This circular saw is a professional power tool.
DO NOT let children come into contact with the tool.
Supervision is required when inexperienced operators use
thistool.
ASSEMBLY AND ADJUSTMENTS
WARNING: To reduce the risk of serious personal
injury, turn unit off and remove the battery pack
before making any adjustments or removing/
installing attachments or accessories. An
accidental start-up can causeinjury.
Changing Blades (Fig. A, D)
To Install the Blade (Fig. A, D)
WARNING: Remove battery before service,
adjustment, installing or removingaccessories.
1. Place inner clamp washer
15
on sawspindle.
Fig. D
16
9
15
8
2. Retract the lower blade guard
8
and place blade on
saw spindle against the inner clamp washer, making
sure that the blade will rotate in the proper direction
(the direction of the rotation arrow on the saw blade
and the teeth must point in the same direction as the
direction of rotation arrow on the lower blade guard).
Do not assume that the printing on the blade will
always be facing you when properly installed. When
retracting the lower blade guard to install the blade,
check the condition and operation of the lower blade
guard to assure that it is working properly. Make sure it
moves freely and does not touch the blade or any other
part, in all angles and depths of cut.

ENGLISH
9
3. Place outer clamp washer
16
on saw spindle with the
large flat surface against the blade with beveled side
facingout.
4. Thread blade clamping screw
9
into saw spindle by
hand (screw has left-hand threads and must be turned
counterclockwise totighten).
5. Depress the blade lock button
12
while turning
the saw spindle with the blade wrench
14
counterclockwise until the blade lock engages and the
blade stopsrotating.
6. Tighten the blade clamping screw firmly with the
bladewrench.
NOTE: Never engage the blade lock while saw is running,
or engage in an effort to stop the tool. Never turn the saw
on while the blade lock is engaged. Serious damage to your
saw willresult.
To Replace the Blade (Fig. A, D)
WARNING: Remove battery before service,
adjustment, installing or removingaccessories.
1. To loosen the blade clamping screw
9
, depress the
blade lock button
12
and turn the saw spindle with
the blade wrench
14
until the blade lock engages and
the blade stops rotating. With the blade lock engaged,
turn the blade clamping screw clockwise with the
blade wrench (screw has left-hand threads and must be
turned clockwise toloosen).
2. Remove the blade clamping screw
9
and outer clamp
washer
16
only. Remove oldblade.
3. Clean any sawdust that may have accumulated in the
guard or clamp washer area and check the condition
and operation of the lower blade guard as previously
outlined. Do not lubricate thisarea.
4. Select the proper blade for the application (see
Blades). Always use blades that are the correct size
(diameter) with the proper size and shape center hole
for mounting on the saw spindle. Always assure that the
maximum recommended speed (rpm) on the saw blade
meets or exceeds the speed (rpm) of thesaw.
5. Follow steps 2 through 6 under To Install the
Blade, making sure that the blade will rotate in the
properdirection.
Blades
CAUTION: Burn hazard. Do not touch the the blade
immediately after use. Contact with the blade may
result in personalinjury.
WARNING: To minimize the risk of eye injury, always
use eye protection. Carbide is a hard but brittle
material. Foreign objects in the workpiece such as wire
or nails can cause tips to crack or break. Only operate
saw when proper saw blade guard is in place. Mount
blade securely in proper rotation before using, and
always use a clean, sharpblade.
WARNING: Do not cut ferrous and or non-ferrous
metals (steel), glass, masonry-type planking, or tile
with thissaw.
Do not use abrasive wheels or blades. A dull blade will
cause slow inefficient cutting, overload on the saw motor,
excessive splintering, and could increase the possibility of
kickback. Please refer to the table below to determine the
correct size replacement blade for your modelsaw.
Blade Diameter Teeth Application
DWA412TCT 4-1/2" (115 mm) 24 Wood cutting
If you need assistance regarding blades, please call
1–800–4-
DeWALT
(1–800–433–9258).
Installing the Belt Hook (Fig. E)
WARNING: To reduce the risk of serious personal
injury, turn unit off and remove the battery pack
before making any adjustments or removing/
installing attachments or accessories. An
accidental start-up can causeinjury.
WARNING: To reduce the risk of serious personal
injury, ONLY use the tool’s belt hook to hang
the tool from a work belt. DO NOT use the belt
hook for tethering or securing the tool to a person or
object during use. DO NOT suspend tool overhead or
suspend objects from the belthook.
WARNING: To reduce the risk of serious personal
injury, ensure the screw holding the belt hook
issecure.
IMPORTANT: When attaching or replacing the belt
hook
20
, use only the screw
21
that is provided. Be sure to
securely tighten thescrew.
If the hook is not desired at all, it can be removed from
thetool.
Fig. E
20
21
Installing the Auxiliary Handle (Fig. A)
Using the supplied blade wrench
14
screw the auxiliary
handle
13
into place as shown in Figure A. The saw can be
used with or without the auxiliary handle inplace.
Cutting Depth Adjustment (Fig. F)
1. Hold the saw firmly and loosen (counterclockwise) the
depth adjustment knob
5
and move shoe to obtain the
desired depth ofcut.
2. Make sure the depth adjustment knob has been
retightened (clockwise) before operatingsaw.

ENGLISH
10
For the most efficient cutting action, set the depth
adjustment so that one-half tooth of the blade will project
below the material to be cut. This distance is from the tip of
the tooth to the bottom of the gullet in front of it. This keeps
blade friction at a minimum, removes sawdust from the cut,
results in cooler, faster sawing and reduces the chance of
kickback. A method for checking for correct cutting depth
is shown in FigureF. Lay a piece of the material you plan to
cut along the side of the blade, as shown, and observe how
much tooth projects beyond thematerial.
Fig. F
5
Bevel Angle Adjustment (Fig. G)
The full range of the bevel adjustment is from 0° to 45°. The
quadrant is graduated in increments of 15°. On the front of
the saw is a bevel angle adjustment mechanism consisting
of a calibrated quadrant and a bevel adjustment knob
11
.
Fig. G
11
To Set the Saw for a Bevel Cut
1. Loosen (counterclockwise) the bevel adjustment
knob
11
and tilt shoe to the desired angle by aligning
the pointer with the desired anglemark.
2. Retighten knob firmly (clockwise).
Shoe Adjustment for 90° Cuts (Fig. G, H)
If Additional Adjustment is Needed
1. Adjust the saw to 0°bevel.
2. Retract the lower blade guard. Place the saw on
bladeside.
3. Loosen bevel adjustment knob
11
. Place a square
against the blade and shoe to adjust the 90°setting.
4. Turn the calibration screw
19
so that the shoe will stop
at the properangle.
5. Confirm the accuracy of the setting by checking the
squareness of an actual cut on a scrap piece ofmaterial.
19
Fig. H
OPERATION
WARNING: To reduce the risk of serious personal
injury, turn unit off and remove the battery pack
before making any adjustments or removing/
installing attachments or accessories. An
accidental start-up can causeinjury.
Installing and Removing the Battery Pack
(Fig. I)
NOTE: For best results, make sure your battery pack is
fullycharged.
To install the battery pack
3
into the tool handle, align the
battery pack with the rails inside the tool’s handle and slide
it into the handle until the battery pack is firmly seated in
the tool and ensure that it does notdisengage.
To remove the battery pack from the tool, press the release
button
4
and firmly pull the battery pack out of the tool
handle. Insert it into the charger as described in the charger
section of thismanual.
Fig. I
3
4
Proper Hand Position (Fig. J)
WARNING: To reduce the risk of serious personal injury,
ALWAYS use proper hand position as shown.

ENGLISH
11
WARNING: To reduce the risk of serious personal
injury, ALWAYS hold securely in anticipation of a
suddenreaction.
Proper hand position requires one hand on the main
handle
18
or, if the auxiliary handle is attached, one hand
on the main handle
18
and one hand on the auxiliary
handle
13
.
18
18
13
Fig. J
Trigger Switch (Fig. A)
WARNING: This tool has no provision to lock the
trigger switch in the ON position and should never be
locked ON by any othermeans.
Release the trigger switch lock-off button
1
by pressing
the lock-off button. Pull the trigger switch
2
to turn the
motor on. At this time you can let go of the lock-off button.
Releasing the trigger switch turns the motor off.
Dust Extraction (Fig. K, L)
Your saw has a built-in dust port
22
which allows either
the supplied dust bag
25
or a shop vacuum system to
be connected. The built-in dust port utilizes the
DeWALT
AirLock connection making it compatible with the
DeWALT
dustextractors.
To Attach a Dust Extractor (Fig. K)
Your D
e
WALT circular saw is fitted with the D
e
WALT
AirLock® connection system. The AirLock® allows for a fast,
secure connection between the dust extractor and power
tool. The AirLock® connector
23
connects directly to
D
e
WALT compatibletools.
1. Ensure the collar on the AirLock® connector is in the
unlock position. (Refer to FigureK.) Align notches
24
on
collar and AirLock® connector as shown for unlock and
lockpositions.
2. Push the AirLock® connector onto the adapter
connectorpoint.
3. Rotate the collar to the lockedposition.
NOTE: The ball bearings inside collar lock into slot and
secure the connection.The power tool is now securely
connected to the dustextractor.
Fig. K
23
2424
To Attach the Dust Bag (Fig. L)
1. While holding the saw, fit the dust bag collar
26
to the
dust port
22
as shown in FigureL.
2. Turn the collar
26
clockwise to lock the dust bag
25
inplace.
Fig. L
22
26
25
To Empty the Dust Bag (Fig. L)
1. While holding the saw, turn the collar
26
counterclockwise to unlock the dust bag
25
.
2. Remove dust bag from the saw and gently shake or tap
the dust bag toempty.
3. Reattach the dust bag back onto the dust port and lock
into place by turning the dust bag collarclockwise.
You may notice that all the dust will not come free from
the bag. This will not affect sanding performance but will
reduce the saw’s dust collection efficiency. To restore your
saw’s dust collection efficiency, depress the spring inside
the dust bag when you are emptying it and tap it on the
side of the trash can or dustreceptacle.
Lower Blade Guard
WARNING: The lower blade guard is a safety
feature which reduces the risk of serious
personal injury. Never use the saw if the lower
blade guard is missing, damaged, misassembled
or not working properly. Do not rely on the
lower blade guard to protect you under all
circumstances. Your safety depends on following
all warnings and precautions as well as proper
operation of the saw. Prior to use, the check
lower guard operation by manually opening the

ENGLISH
12
guard using the lower guard blade retracting
lever then releasing it from the fully open
position. If the guard does not operate smoothly,
close quickly or completely then do not use the
saw and contact your D
e
WALT service center for
repairs. If the lower blade guard is missing or not
working properly, have the saw serviced before
using. To assure product safety and reliability,
repair, maintenance and adjustment should
be performed by an authorized service center
or other qualified service organization, always
using identical replacementparts.
Kerf Indicator (Fig. A, M)
The front of the saw shoe has a kerf indicator
10
for vertical
and bevel cutting. This indicator enables you to guide the
saw along cutting lines penciled on the material being
cut. The kerf indicator lines up with the left (outer) side of
the saw blade, which makes the slot or “kerf” cut by the
moving blade fall to the right of the indicator. Guide along
the penciled cutting line so that the kerf falls into the waste
or surplusmaterial. To adjust the kerf indicator
10
, loosen
the kerf indicator screw
28
with the blade wrench
14
and
move the indicator left or right as needed. Tighten screw
when finished adjusting theindicator.
28
10
Fig. M
Workpiece Support (Fig. J, N–P)
WARNING: It is important to support the work
properly and to hold the saw firmly to prevent loss of
control which could cause personal injury. FigureJ
illustrates proper hand support of the saw. Maintain
a firm grip with both hands on the saw and position
your body and arm to allow you to resist kickback
if it occurs. ALWAYS TURN OFF TOOL AND REMOVE
BATTERY BEFORE MAKING ANY ADJUSTMENTS!
Fig. N
Figure N shows proper sawing position. Note that hands
are kept away from cutting area. To avoid kickback, DO
support board or panel NEAR the cut (Fig.O). DON’T support
board or panel away from the cut (Fig.P).
Place the work with its “good” side – the one on which
appearance is most important – down. The saw cuts
upward, so any splintering will be on the work face that is
up when you cutit.
SUPPORT
DO support board or panel NEAR thecut.
Fig. O
DON’T support board or panel AWAY from thecut.
Fig. P
Cutting (Fig. N)
Place the wider portion of the saw shoe on that part of the
workpiece which is solidly supported, not on the section
that will fall off when the cut is made. As an example,
FigureN illustrates the RIGHT way to cut off the end of a
board. Always clamp work. Don’t try to hold short pieces by
hand! Remember to support cantilevered and overhanging
material. Use caution when sawing material frombelow.
Be sure saw is up to full speed before blade contacts
material to be cut. Starting saw with blade against material
to be cut or pushed forward into kerf can result in kickback.
Push the saw forward at a speed which allows the blade to
cut withoutlaboring.
Hardness and toughness can vary even in the same piece of
material, and knotty or damp sections can put a heavy load
on the saw. When this happens, push the saw more slowly,
but hard enough to keep working without much decrease
in speed. Forcing the saw can cause rough cuts, inaccuracy,
kickback, and over-heating of themotor.
Should your cut begin to go off the line, don’t try to force
it back on. Release the trigger switch and allow blade to
come to a complete stop. Then you can withdraw the saw,
sight anew, and start a new cut slightly inside the wrong
one. Withdraw the saw if you must shift the cut. Forcing
a correction inside the cut can stall the saw and lead
tokickback.
IF SAW STALLS, RELEASE THE TRIGGER SWITCH AND
BACK THE SAW UNTIL IT IS LOOSE. BE SURE BLADE IS
STRAIGHT IN THE CUT AND CLEAR OF THE CUTTING EDGE
BEFORERESTARTING.
As you finish a cut, release the trigger switch and allow the
blade to stop before lifting the saw from the work. As you
lift the saw, the spring-tensioned lower blade guard will
automatically close under the blade. Remember the blade

ENGLISH
13
is exposed until this occurs. Never reach under the work for
any reason. When you have to retract the lower blade guard
manually (as is necessary for starting pocket cuts), always
use the retractinglever.
WARNING: When cutting thin strips, be careful to
ensure that small cutoff pieces don’t hang up on the
inside of the lower bladeguard.
Ripping
Ripping is the process of cutting wider boards into narrower
strips – cutting grain lengthwise. Hand guiding is more
difficult for this type of sawing and the use of a
DeWALT
rip
fence isrecommended.
Installing the Rip Fence (Fig, A, Q)
You can install a rip fence on your circular saw by loosening
the rip fence locking screw
27
with the included blade
wrench
14
and inserting the rip fence as shown in
FigureQ. When the rip fence is at the desired position, use
the blade wrench to tighten the rip fence locking screw,
locking it inplace.
INSTALL RIP FENCE
IN THIS DIRECTION
Fig. Q
27
Pocket Cutting (Fig. R)
WARNING: Never tie the lower blade guard in a raised
position. Never move the saw backwards when pocket
cutting. This may cause the saw to raise up off the
work surface, which could causeinjury.
Fig. R
A pocket cut is one that is made in a floor, wall or other
flatsurface.
1. Adjust the saw shoe so the blade cuts at desireddepth.
2. Tilt the saw forward and rest front of the shoe on
material to becut.
3. Using the lower blade guard retracting lever, retract the
lower blade guard to an upward position. Lower the
rear of the shoe until the blade teeth almost touch the
cuttingline.
4. Release the lower blade guard (its contact with the work
will keep it in position to open freely as you start the
cut). Remove your hand from the lower blade guard
retracting lever and firmly grip the auxiliary handle, as
shown in FigureR. Position your body and arm to allow
you to resist kickback if itoccurs.
5. Make sure blade is not in contact with cutting surface
before startingsaw.
6. Start the motor and gradually lower the saw until its
shoe rests flat on the material to be cut. Advance saw
along the cutting line until cut iscompleted.
7. Release the trigger switch and allow the blade to
stop completely before withdrawing the blade from
thematerial.
8. When starting each new cut, repeat the abovesteps.
MAINTENANCE
WARNING: To reduce the risk of serious personal
injury, turn unit off and remove the battery pack
before making any adjustments or removing/
installing attachments or accessories. An
accidental start-up can causeinjury.
Cleaning
WARNING: Blow dirt and dust out of the guarding
system and all air vents with clean, dry air at least
once a week. To minimize the risk of eye injury, always
wear ANSI Z87.1 approved eye protection when
performingthisprocedure.
WARNING: Never use solvents or other harsh
chemicals for cleaning the non-metallic parts of
the tool. These chemicals may weaken the plastic
materials used in these parts. Use a cloth dampened
only with water and mild soap. Never let any liquid
get inside the tool; never immerse any part of the tool
into aliquid.
Accessories
WARNING: Since accessories, other than those
offered by
DeWALT
, have not been tested with this
product, use of such accessories with this tool could be
hazardous. To reduce the risk of injury, only
DeWALT
recommended accessories should be used with
thisproduct.
Recommended accessories for use with your tool
are available at extra cost from your local dealer or
authorized service center. If you need assistance in
locating any accessory, please contact
DeWALT
Industrial
Tool Co., 701East Joppa Road, Towson, MD 21286, call
1-800-4-
DeWALT
(1-800-433-9258) or visit our website:
www.dewalt.com.
Repairs
The charger and battery pack are notserviceable.
WARNING: To assure product SAFETY and
RELIABILITY, repairs, maintenance and adjustment
(including brush inspection and replacement, when
applicable) should be performed by a
DeWALT
factory
service center or a
DeWALT
authorized service center.
Always use identical replacementparts.

ENGLISH
14
Register Online
Thank you for your purchase. Register your product nowfor:
• WARRANTY SERVICE: Registering your product will
help you obtain more efficient warranty service in case
there is a problem with yourproduct.
• CONFIRMATION OF OWNERSHIP: In case of
an insurance loss, such as fire, flood or theft, your
registration of ownership will serve as your proof
ofpurchase.
• FOR YOUR SAFETY: Registering your product will
allow us to contact you in the unlikely event a safety
notification is required under the Federal Consumer
SafetyAct.
Register online at www.dewalt.com/register.
Three Year Limited Warranty
DeWALT
will repair, without charge, any defects due to
faulty materials or workmanship for three years from
the date of purchase. This warranty does not cover part
failure due to normal wear or tool abuse. For further detail
of warranty coverage and warranty repair information,
visit www.dewalt.com or call 1-800-4-
DeWALT
(1-800-
433-9258). This warranty does not apply to accessories
or damage caused where repairs have been made
or attempted by others. THIS LIMITED WARRANTY IS
GIVEN IN LIEU OF ALL OTHERS, INCLUDING THE IMPLIED
WARRANTY OF MERCHANTABILITY AND FITNESS FOR A
PARTICULAR PURPOSE, AND EXCLUDES ALL INCIDENTAL
OR CONSEQUENTIAL DAMAGES. Some states do not allow
limitations on how long an implied warranty lasts or the
exclusion or limitation of incidental or consequential
damages, so these limitations may not apply to you. This
warranty gives you specific legal rights and you may have
other rights which vary in certain states orprovinces.
In addition to the warranty,
DeWALT
tools are covered
byour:
1 YEAR FREE SERVICE
DeWALT
will maintain the tool and replace worn parts
caused by normal use, for free, any time during the first year
afterpurchase.
2 YEARS FREE SERVICE ON DEWALT BATTERY PACKS
DC9071, DC9091, DC9096, DC9182, DC9280, DC9360, DCB120,
DCB127, DCB201, DCB203BT, DCB207, DCB361
3 YEARS FREE SERVICE ON DEWALT BATTERY PACKS
DCB200, DCB203, DCB204, DCB204BT, DCB205, DCB205BT,
DCB206, DCB230, DCB606, DCB609, DCB612
NOTE: Battery warranty voided if the battery pack is
tampered with in any way.
DeWALT
is not responsible
for any injury caused by tampering and may prosecute
warranty fraud to the fullest extent permitted bylaw.
90 DAY MONEY BACK GUARANTEE
If you are not completely satisfied with the performance of
your
DeWALT
Power Tool, Laser, or Nailer for any reason, you
can return it within 90 days from the date of purchase with
a receipt for a full refund – no questionsasked.
LATIN AMERICA: This warranty does not apply to products
sold in Latin America. For products sold in Latin America,
see country specific warranty information contained in
the packaging, call the local company or see website for
warrantyinformation.
FREE WARNING LABEL REPLACEMENT: If your warning
labels become illegible or are missing, call 1-800-4-
DeWALT
(1-800-433-9258) for a freereplacement.

FRANÇAIS
15
Définitions : symboles et termes d'alarmes sécurité
Ces guides d'utilisation utilisent les symboles et termes d'alarmes sécurité suivants pour vous prévenir de situations
dangereuses et de risques de dommages corporels ou matériels.
DANGER: indique une situation dangereuse imminente qui, si elle n’est pas évitée, entraînera la mort ou des
blessuresgraves.
AVERTISSEMENT: indique une situation potentiellement dangereuse qui, si elle n’est pas évitée, pourrait entraîner la
mort ou des blessuresgraves.
ATTENTION: indique une situation potentiellement dangereuse qui, si elle n’est pas évitée, pourrait entraîner des
blessures légères oumodérées.
(Si utilisé sans aucun terme) Indique un message propre à la sécurité.
AVIS : indique une pratique ne posant aucun risque de dommages corporels mais qui par contre, si rien n’est fait
pour l’éviter, pourrait poser des risques de dommages matériels.
AVERTISSEMENT : lire tous les avertissements
de sécurité et toutes les directives. Le non-respect
des avertissements et des directives pourrait se
solder par un choc électrique, un incendie et/ou une
blessuregrave.
AVERTISSEMENT : afin de réduire le risque de
blessures, lire le mode d’emploi del’outil.
Pour toute question ou remarque au sujet de cet outil
ou de tout autre outil
DeWALT
, composez le numéro
sans frais : 1-800-4-
DeWALT
(1-800-433-9258).
1
Bouton de verrouillage
de la gâchette
2
Gâchette
3
Bloc-piles
4
Bouton de libération du
bloc-piles
5
Bouton d’ajustement de
la profondeur
6
Patin
7
Levier de rétraction du
protège-lame inférieur
8
Protège-lame inférieur
9
Vis de serrage de la lame
10
Indicateur de trait de scie
11
Bouton d’ajustement du
biseau
12
Bouton de verrouillage
de la lame
13
Poignée auxiliaire
14
Clé pour lame
Français (traduction de la notice d’instructions originale)
Fig. A
2
1
3
4
6
8
7
9
13
14
5
11
12
10

FRANÇAIS
16
AVERTISSEMENTS GÉNÉRAUX SUR LA
SÉCURITÉ DES OUTILS
AVERTISSEMENT: lisez tous les avertissements de
sécurité, toutes les instructions, les illustrations
et les caractéristiques fournis avec cet outil
électrique. Ne pas suivre toutes les instructions
comprises aux présentes peut conduire à un choc
électrique, un incendie et/ou des blessuresgraves.
CONSERVER TOUS LES
AVERTISSEMENTS ET TOUTES
LES DIRECTIVES POUR UN
USAGE ULTÉRIEUR
Le terme « outil électrique » cité dans les avertissements se
rapporte à votre outil électrique à alimentation sur secteur
(avec fil) ou par piles (sansfil).
1) Sécurité du lieu de travail
a ) Tenir l’aire de travail propre et bien éclairée.
Les lieux encombrés ou sombres sont propices
auxaccidents.
b ) Ne pas faire fonctionner d’outils électriques
dans un milieu déflagrant, tel qu’en présence de
liquides, de gaz ou de poussières inflammables.
Les outils électriques produisent des étincelles qui
pourraient enflammer la poussière ou lesvapeurs.
c ) Éloigner les enfants et les personnes à proximité
pendant l’utilisation d’un outil électrique.
Une distraction pourrait en faire perdre la maîtrise
àl’utilisateur.
2) Sécurité en matière d’électricité
a ) Les fiches des outils électriques doivent
correspondre à la prise. Ne jamais modifier la
fiche d’aucune façon. Ne jamais utiliser de fiche
d’adaptation avec un outil électrique mis à la
terre. Le risque de choc électrique sera réduit par
l’utilisation de fiches non modifiées correspondant à
laprise.
b ) Éviter tout contact physique avec des surfaces
mises à la terre comme des tuyaux, des
radiateurs, des cuisinières et des réfrigérateurs.
Le risque de choc électrique est plus élevé si votre corps
est mis à laterre.
c ) Ne pas exposer les outils électriques à la pluie ou
à l’humidité. La pénétration de l’eau dans un outil
électrique augmente le risque de chocélectrique.
d ) Ne pas utiliser le cordon de façon abusive.
Ne jamais utiliser le cordon pour transporter,
tirer ou débrancher un outil électrique. Tenir le
cordon éloigné de la chaleur, de l’huile, des bords
tranchants et des pièces mobiles. Les cordons
endommagés ou enchevêtrés augmentent les risques
de chocélectrique.
e ) Pour l’utilisation d’un outil électrique à
l’extérieur, se servir d’une rallonge convenant à
cette application. L’utilisation d’une rallonge conçue
pour l’extérieur réduira les risques de chocélectrique.
f ) S’il est impossible d’éviter l’utilisation d’un
outil électrique dans un endroit humide,
brancher l’outil dans une prise ou sur un circuit
d’alimentation dotés d’un disjoncteur de fuite à
la terre (GFCI). L’utilisation de ce type de disjoncteur
réduit les risques de chocélectrique.
3) Sécurité personnelle
a ) Être vigilant, surveiller le travail effectué et faire
preuve de jugement lorsqu’un outil électrique
est utilisé. Ne pas utiliser d’outil électrique en
cas de fatigue ou sous l’influence de drogues,
d’alcool ou de médicaments. Un simple moment
d’inattention en utilisant un outil électrique peut
entraîner des blessures corporellesgraves.
b ) Utiliser des équipements de protection
individuelle. Toujours porter une protection
oculaire. L’utilisation d’équipements de protection
comme un masque antipoussière, des chaussures
antidérapantes, un casque de sécurité ou des
protecteurs auditifs lorsque la situation le requiert
réduira les risques de blessurescorporelles.
c ) Empêcher les démarrages intempestifs. S’assurer
que l’interrupteur se trouve à la position
d’arrêt avant de relier l’outil à une source
d’alimentation et/ou d’insérer un bloc-piles, de
ramasser ou de transporter l’outil. Transporter
un outil électrique alors que le doigt repose sur
l’interrupteur ou brancher un outil électrique dont
l’interrupteur est à la position de marche risque de
provoquer unaccident.
d ) Retirer toute clé de réglage ou clé avant de
démarrer l’outil. Une clé ou une clé de réglage
attachée à une partie pivotante de l’outil électrique
peut provoquer des blessurescorporelles.
e ) Ne pas trop tendre les bras. Conserver
son équilibre en tout temps. Cela permet
de mieux maîtriser l’outil électrique dans les
situationsimprévues.
f ) S’habiller de manière appropriée. Ne pas porter
de vêtements amples ni de bijoux. Garder les
cheveux, les vêtements et les gants à l’écart des
pièces mobiles. Les vêtements amples, les bijoux ou
les cheveux longs risquent de rester coincés dans les
piècesmobiles.
g ) Si des composants sont fournis pour le
raccordement de dispositifs de dépoussiérage
et de ramassage, s’assurer que ceux-ci sont bien
raccordés et utilisés. L’utilisation d’un dispositif de
dépoussiérage peut réduire les dangers engendrés par
lespoussières.
h ) Ne pas laisser votre connaissance acquise suite
l’utilisation fréquente des outils vous permettre
de baisser la garde et ignorer les principes de
sécurité de l’outil. Un acte irréfléchi peut causer une
blessure grave en une fraction deseconde.
4) Utilisation et entretien d’un
outil électrique
a ) Ne pas forcer un outil électrique. Utiliser l’outil
électrique approprié à l’application. L’outil
électrique approprié effectuera un meilleur travail,

FRANÇAIS
17
de façon plus sûre et à la vitesse pour laquelle il a
étéconçu.
b ) Ne pas utiliser un outil électrique dont
l’interrupteur est défectueux. Tout outil électrique
dont l’interrupteur est défectueux est dangereux et
doit êtreréparé.
c ) Débranchez la fiche de la prise électrique et, si
amovible, retirez le bloc-piles de l’outil avant
d’effectuer tout ajustement, changement et
entreposage de celui-ci. Ces mesures préventives
réduisent les risques de démarrage accidentel de
l’outilélectrique.
d ) Ranger les outils électriques hors de la portée
des enfants et ne permettre à aucune personne
n’étant pas familière avec un outil électrique ou
son mode d’emploi d’utiliser cet outil. Les outils
électriques deviennent dangereux entre les mains
d’utilisateursinexpérimentés.
e ) Gardez les poignées et surfaces d’emprise
propres et libres de tout produit lubrifiant.
Vérifier si les pièces mobiles sont mal alignées ou
coincées, si des pièces sont brisées ou présentent
toute autre condition susceptible de nuire au bon
fonctionnement de l’outil électrique. En cas de
dommage, faire réparer l’outil électrique avant
toute nouvelle utilisation. Beaucoup d’accidents
sont causés par des outils électriques malentretenus.
f ) S’assurer que les outils de coupe sont aiguisés et
propres. Les outils de coupe bien entretenus et affûtés
sont moins susceptibles de se coincer et sont plus
faciles àmaîtriser.
g ) Utiliser l’outil électrique, les accessoires, les
forets, etc. conformément aux présentes
directives en tenant compte des conditions de
travail et du travail à effectuer. L’utilisation d’un
outil électrique pour toute opération autre que celle
pour laquelle il a été conçu estdangereuse.
h ) Garder vos mains et les surfaces de prise sèches,
propres et libres de graisse et de poussière. Les
mains et les surfaces de prise glissante ne permettent
pas la manutention et le contrôle sécuritaires de l’outil
dans les situationsimprévues.
5) Utilisation et entretien du bloc-piles
a ) Ne recharger l’outil qu’au moyen du chargeur
précisé par le fabricant. L’utilisation d’un chargeur
qui convient à un type de bloc-piles risque de
provoquer un incendie s’il est utilisé avec un autre type
de b loc-piles.
b ) Utiliser les outils électriques uniquement avec
les blocs-piles conçus à cet effet. L’utilisation de
tout autre bloc-piles risque de causer des blessures ou
unincendie.
c ) Lorsque le bloc-piles n’est pas utilisé, le tenir
éloigné des objets métalliques, notamment
des trombones, de la monnaie, des clés, des
clous, des vis ou autres petits objets métalliques
qui peuvent établir une connexion entre les
deux bornes. Le court-circuit des bornes du bloc-piles
risque de provoquer des brûlures ou unincendie.
d ) En cas d’utilisation abusive, le liquide peut gicler
hors du bloc-piles; éviter tout contact avec ce
liquide. Si un contact accidentel se produit, laver
à grande eau. Si le liquide entre en contact avec
les yeux, obtenir également des soins médicaux.
Le liquide qui gicle hors du bloc-piles peut provoquer
des irritations ou desbrûlures.
e ) Ne pas utiliser de bloc-piles ou outil qui
a été endommagé ou modifié. Les unités
endommagées ou modifiées peuvent avoir une
réaction imprévisible résultant en un incendie,
une explosion ou un potentiel de blessure.
f ) Ne pas exposer de bloc-piles ou l’outil aux
flammes ou à des températures excessives.
L’exposition aux flammes ou à une température
au-dessus de 130°C (265°F) pourrait causer
uneexplosion.
g ) Suivre toutes les instructions de recharge et
ne rechargez pas le bloc-piles ou l’outil à des
températures hors de la plage de température
indiquée dans les instructions. Une recharge non
conforme ou à une température hors des limites
spécifiées peut endommager les piles et augmenter le
risque d’incendie.
6) Réparation
a ) Faire réparer l’outil électrique par un réparateur
professionnel en n’utilisant que des pièces de
rechange identiques. Cela permettra de maintenir
une utilisation sécuritaire de l’outilélectriques.
b ) Ne jamais réparer des blocs-piles endommagés.
La réparation de blocs-piles doit seulement être
effectuée par le fabricant ou les fournisseurs de
serviceautorisé.
Consignes de sécurité propres à toutes
les scies
Procédures de coupe
a ) DANGER : kéloigner les mains des zones et
organes de coupe. Maintenir la deuxième main
sur la poignée auxiliaire ou le boîtier du moteur.
Lorsque les deux mains maintiennent la scie, la lame
ne peut lescouper.
b ) N’essayez pas de tenir le dessous de l’ouvrage. Le
protège-lame ne peut pas vous protéger de la lame en
dessous de l'ouvrage.
c ) Ajustez la profondeur de coupe à l’épaisseur de
l’ouvrage. Moins d’une dent entière de lame devrait
être visible en dessous de l’ouvrage.
d ) Ne tenez jamais dans vos mains ou sur vos
genoux un ouvrage qui est en cours de coupe.
Fixez votre ouvrage sur une plateforme stable. Il
est important de soutenir correctement l’ouvrage afin
de minimiser l’exposition du corps à la lame, le risque
de coincement de la lame ou la perte de contrôle
del’outil.
e ) Tenez l’outil électrique par ses surfaces de
préhension isolantes quand vous réalisez une
opération au cours de laquelle l’outil de coupe

FRANÇAIS
18
pourrait entrer en contact avec des câbles
dissimulés. Le contact avec un fil sous tension mettra
également sous tension toutes les pièces métalliques
exposées et donnera un choc électrique à l’utilisateur
de l’outil.
f ) Pendant les coupes de refente, utilisez toujours
un guide de refente ou un guide à bord droit. Ceci
augmente toujours l’exactitude de la coupe et diminue
la possibilité de coincement de lalame.
g ) Utilisez toujours des lames dont l’alésage central
est de la taille et de la forme appropriées (soit
en forme de diamant, soit en forme de rond).
Les lames qui ne correspondent pas aux pièces de
montage de la cie tourneront de façon excentrique, ce
qui causera une perte de contrôle de l’outil.
h ) Ne vous servez jamais de rondelles ou de boulons
de lames qui sont endommagés ou inappropriés.
Les rondelles et le boulon de lame ont été conçus
spécifiquement pour votre scie dans le but d'assurer
une performance optimale et un fonctionnement
sansdanger.
Consignes additionnelles de sécurité
propres à toutes les scies
Causes des rebonds et méthodes de
prévention pouvant être utilisées par
l’utilisateur
ʵ Le rebond est une réaction subite (causée par une
lame de scie pincée, coincée ou mal alignée) qui peut
entraîner le soulèvement d’une scie non contrôlée,
sa sortie de l’ouvrage et sa projection en direction
del'utilisateur.
ʵ Si la lame est pincée ou coincée fortement pendant
l’abaissement de la scie, la lame se cale et le moteur
réagit en entraînant rapidement l’outil vers l’arrière
dans la direction de l’opérateur.
ʵ Si la lame se tord ou perd son alignement correct au
cours de la coupe, les dents sur le bord arrière de la
lame peuvent entamer la surface supérieure du bois,
forçant ainsi la lame à sortir du trait de scie et à «
sauter » vers l’arrière en direction de l’opérateur.
Le rebond est la conséquence d’une mauvaise utilisation
de la scie et/ou de procédures ou de conditions incorrectes,
et il peut être évité en prenant les précautions qui sont
décrites ci-dessous :
a ) Maintenez fermement la scie avec vos deux
mains et positionnez vos bras de façon à résister
aux forces de rebond. Les forces de rebond peuvent
être contrôlées par l’utilisateur quand les précautions
appropriées sontprises.
b ) En cas de coincement de la lame ou
d’interruption d'une coupe pour une raison
quelconque, relâchez la gâchette et tenez la
scie immobile dans l’ouvrage jusqu’à ce que
la lame se soit immobilisée complètement. Ne
tentez jamais de retirer la scie de l’ouvrage ou
de la tirer vers l’arrière pendant que la lame est
en mouvement, car un rebond risquerait de se
produire. Évaluez la situation et prenez les mesures
correctives nécessaires pour éliminer la cause du
coincement de lalame.
c ) Lorsque vous remettez une scie en marche quand
l’ouvrage est présent, centrez la lame de scie
dans le trait de scie et vérifiez que les dents de
la lame ne sont pas engagées dans le matériau
de l’ouvrage. Si la lame de scie se coince, elle peut
grimper hors de l’ouvrage ou rebondir sur celui-ci
quand la scie est remise enmarche.
d ) Soutenez les panneaux de grande taille de
façon à minimiser le risque de pincement et de
rebond de la lame. Les panneaux de grande taille
ont tendance à s’affaisser sous leur propre poids.
Des supports doivent être placés des deux côtés sous
le panneau, à proximité de la ligne de coupe et à
proximité du rebord dupanneau.
e ) N’utilisez pas de lame émoussée ou
endommagée. Des lames non aiguisées ou mal
installées produisent un trait de scie étroit qui cause
une friction excessive, le coincement de la lame et un
effet derebond.
f ) Les leviers de réglage de la profondeur et de
l’angle de coupe de la lame doivent être bien
serrés et assujettis avant de réaliser une coupe.
Une modification du réglage de la lame pendant
la coupe risque d’entraîner un coincement et un
rebondissement de lalame.
g ) Procédez avec une prudence supplémentaire
quand vous réalisez une « coupe en plongée »
dans des murs déjà en place ou dans des pièces
sans issue. La lame saillante peut couper des objets,
et ceci peut entraîner unrebond.
Directives de sécurité propres au
fonctionnement du carter inférieur
a ) Inspectez le protège-lame inférieur avant
chaque utilisation pour vous assurer qu’il se
ferme correctement. Ne faites pas fonctionner la
scie si le protège-lame inférieur ne se déplace pas
librement et ne se ferme pas instantanément. Ne
forcez jamais le protège-lame inférieur dans la
position ouverte à l’aide d’un collier de serrage
ou d’une attache. Il est possible que le protège-lame
inférieur se torde en cas de chute accidentelle de la
scie. Soulevez le protège-lame inférieur à l’aide de la
poignée rétractable et assurez-vous qu’il se déplace
sans problème et qu’il ne touche pas la lame ou une
autre pièce, quel que soit l’angle ou la profondeur de
lacoupe.
b ) Vérifiez le fonctionnement du ressort du protège-
lame inférieur. Si le protège-lame inférieur et
le ressort ne fonctionnent pas correctement, ils
doivent être réparés avant l’emploi. Le protège-
lame inférieur peut parfois mal fonctionner à cause
de pièces endommagées, d’accumulation de résine
ou dedébris.
Page is loading ...
Page is loading ...
Page is loading ...
Page is loading ...
Page is loading ...
Page is loading ...
Page is loading ...
Page is loading ...
Page is loading ...
Page is loading ...
Page is loading ...
Page is loading ...
Page is loading ...
Page is loading ...
Page is loading ...
Page is loading ...
Page is loading ...
Page is loading ...
Page is loading ...
Page is loading ...
Page is loading ...
Page is loading ...
Page is loading ...
Page is loading ...
Page is loading ...
Page is loading ...
Page is loading ...
Page is loading ...
Page is loading ...
Page is loading ...
Page is loading ...
Page is loading ...
-
 1
1
-
 2
2
-
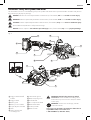 3
3
-
 4
4
-
 5
5
-
 6
6
-
 7
7
-
 8
8
-
 9
9
-
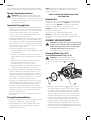 10
10
-
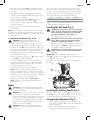 11
11
-
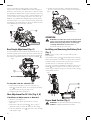 12
12
-
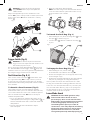 13
13
-
 14
14
-
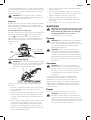 15
15
-
 16
16
-
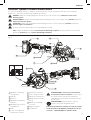 17
17
-
 18
18
-
 19
19
-
 20
20
-
 21
21
-
 22
22
-
 23
23
-
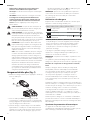 24
24
-
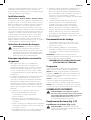 25
25
-
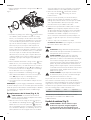 26
26
-
 27
27
-
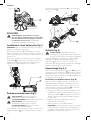 28
28
-
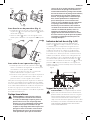 29
29
-
 30
30
-
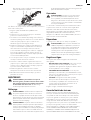 31
31
-
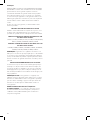 32
32
-
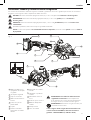 33
33
-
 34
34
-
 35
35
-
 36
36
-
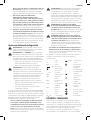 37
37
-
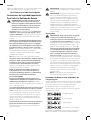 38
38
-
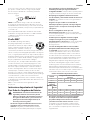 39
39
-
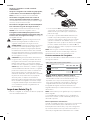 40
40
-
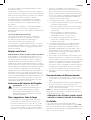 41
41
-
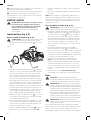 42
42
-
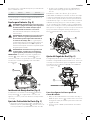 43
43
-
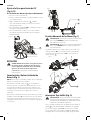 44
44
-
 45
45
-
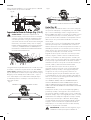 46
46
-
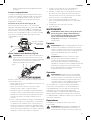 47
47
-
 48
48
-
 49
49
-
 50
50
-
 51
51
-
 52
52


Ask a question and I''ll find the answer in the document
Finding information in a document is now easier with AI
in other languages
- français: DeWalt DCS570 Manuel utilisateur
- español: DeWalt DCS570 Manual de usuario