Rheem AP22604 Super High Efficiency Condensing Tankless Water Heater Outdoor Kit User manual

Type
User manual

Rheem AP22604 Super High Efficiency Condensing Tankless Water Heater Outdoor Kit allows for outdoor installation of compatible Rheem water heaters. It includes an outdoor box, junction box, back panel, mounting bracket, and display cover, and is compatible with both Wi-Fi and non-Wi-Fi models. The outdoor kit ensures safe and efficient operation of your water heater in outdoor environments.

Rheem AP22604 Super High Efficiency Condensing Tankless Water Heater Outdoor Kit allows for outdoor installation of compatible Rheem water heaters. It includes an outdoor box, junction box, back panel, mounting bracket, and display cover, and is compatible with both Wi-Fi and non-Wi-Fi models. The outdoor kit ensures safe and efficient operation of your water heater in outdoor environments.

Super High Efficiency Condensing
Tankless Water Heater
Outdoor Kit
Installation Instructions
AP22604 Rev 01
2
CONVERSION KIT CONTAINS THE FOLLOWING PARTS:
FOR WIFI MODELS ONLY:
Outdoor Box Junction Box
Back Panel
Outdoor Kit Mounting Bracket
Wood Screws (2) for
Display Mount
Anchors (2)
Display Mounting
Back
Display Mounting
Front
Screws (4) for Slide
Mounting Bracket
Screws (3) for
Junction Box
10 ft. Cable
Display Cover
Installation
Instructions
Junction Box
Front Panel
Junction Box Wire Harness
WARNING:
If the information in these instructions is not
followed exactly, a re or explosion may result,
causing death, personal injury, or property
damage.
SAFETY PRECAUTIONS
Read these instructions and the water heater
instruction manual before installing this outdoor
conversion kit.
Use this outdoor conversion kit for only
the intended purpose as described in these
instructions.
Be sure to install your water heater properly in
accordance with local codes and the installation
instructions provided.
DO NOT attempt to repair or replace any other
parts not provided in this outdoor conversion kit.
All servicing should be referred to a qualied
technician.
The installation of this Outdoor Conversion Kit
requires that the installer have the following tools:
1. Phillips head screw driver
2. Wire nuts (2)
3. Power cord for hard-wiring
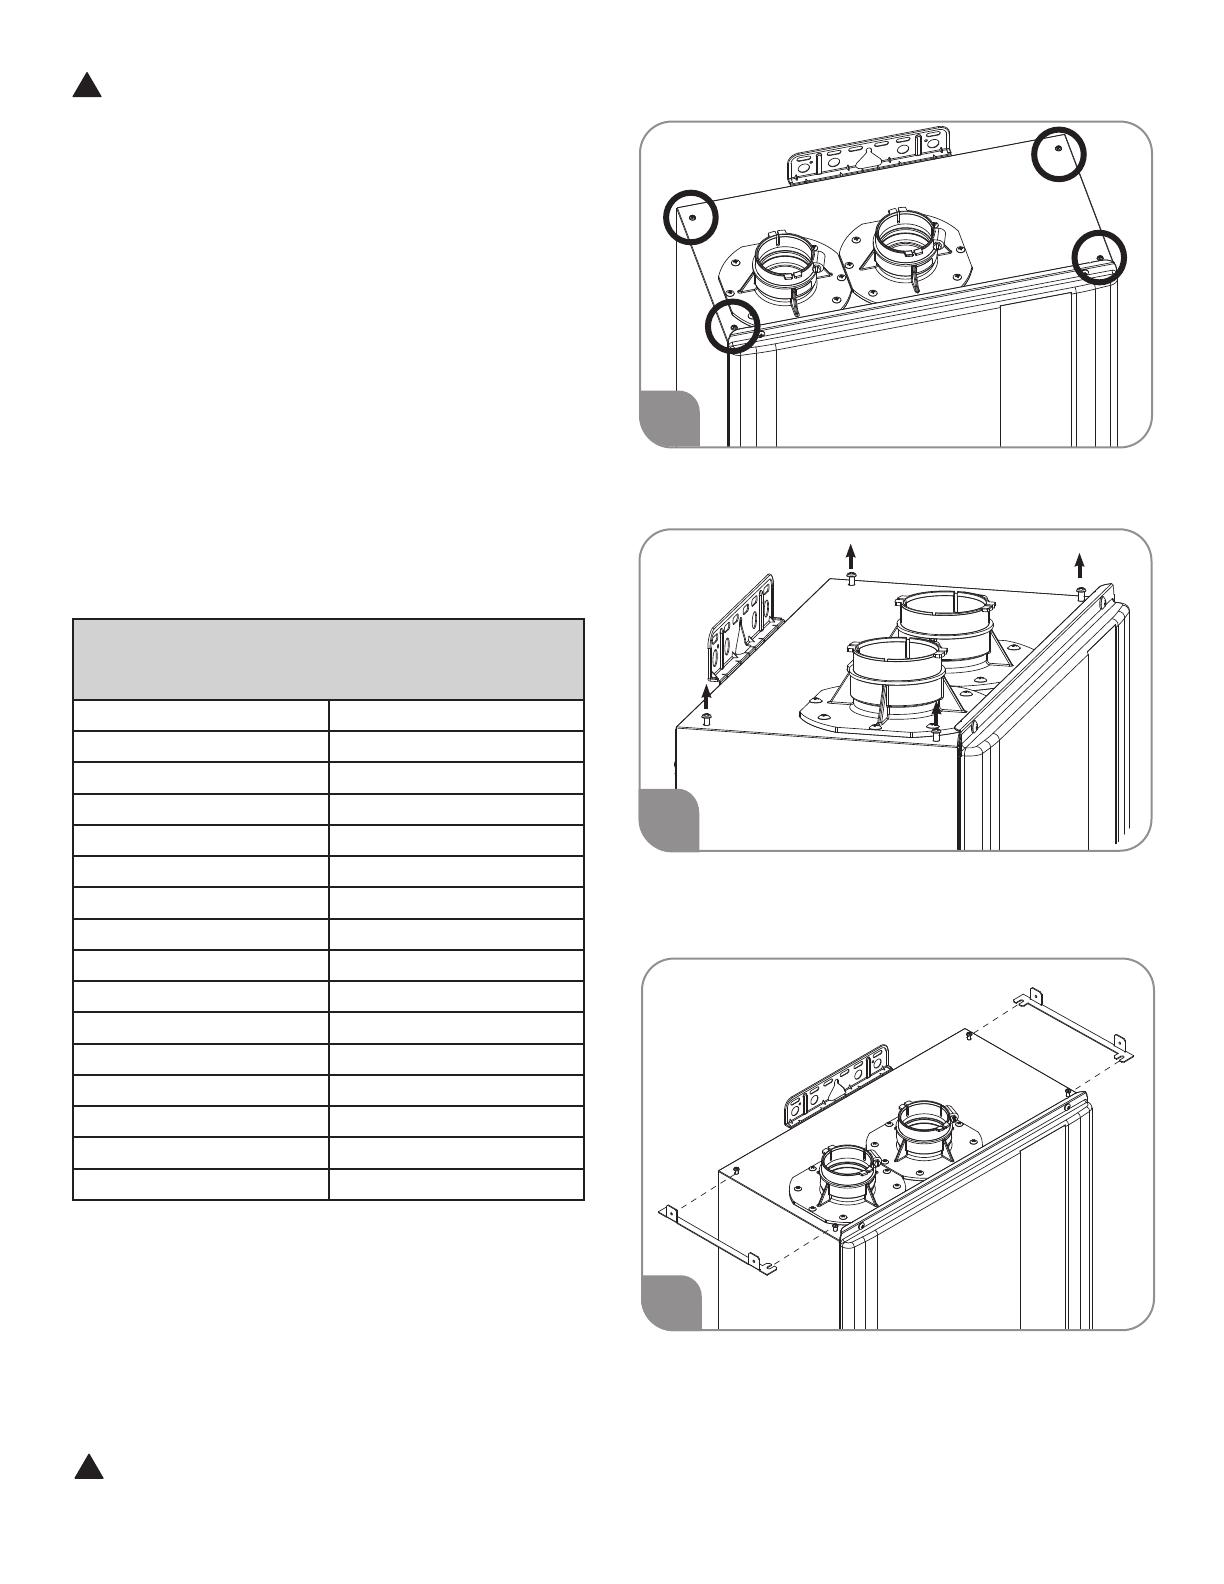
EXHAUST HOOD INSTALL
Locate 4 screws on top of the unit that will be used to
mount the exhaust hood.
Loosen the four screws to prepare for the mounting
brackets. (5 or 6 turns).
Slide mounting bracket onto screws. Before tightening,
ensure bracket is inserted along guides fully.
!
!
1
2
CAUTION: Front opening and their surrounding area can be hot while the water heater is
operating. DO NOT touch these area. DO NOT block these opening.
3
The outdoor conversion instructions are only
for tankless water heaters with model numbers
beginning with:
ECOH160DVELN-3 RTGH-90DVLN-3
ECOH160DVELP-3 RTGH-90DVLP-3
ECOH180DVELN-3 RTGH-95DVELN-3
ECOH180DVELP-3 RTGH-95DVELP-3
ECOH200DVELN-3 RTGH-95DVLN-3
ECOH200DVELP-3 RTGH-95DVLP-3
RMTGH84DVELN-3 RUTGH-68DVLN-3
RMTGH84DVELP-3 RUTGH-68DVLP-3
RMTGH90DVELN-3 RUTGH-84DVLN-3
RMTGH90DVELP-3 RUTGH-84DVLP-3
RMTGH95DVELN-3 RUTGH-90DVLN-3
RMTGH95DVELP-3 RUTGH-90DVLP-3
RTGH-68DVLN-3 RUTGH-95DVELN-3
RTGH-68DVLP-3 RUTGH-95DVELP-3
RTGH-84DVLN-3 RUTGH-95DVLN-3
RTGH-84DVLP-3 RUTGH-95DVLP-3
3
Tighten screws to secure the brackets to the unit.
Place the exhaust hood on the top of the unit by aligning
the exhaust pipe to the outlet ue connection of the unit.
Secure the exhaust hood to the mounting brackets with 4
screws.
After completion of all installation steps, peel o
protective lm from all external surfaces.
DISPLAY INSTALLATION OPTIONS
WiFi Models
Option 1: Install Display Cover Over Display
Inside of Unit (See: DISPLAY COVER
INSTALL).
Option 2: For a better WiFi connection, display
can be installed inside the home. See WALL
MOUNTED DISPLAY INSTALL.
Non-WiFi Models
Display cover installed to protect display.
!
!
6
7
4
5
4
JUNCTION BOX INSTALL
Remove 4 screws of Front Cover to access into unit.
Remove power cable by disconnecting Molex connector,
ground screw and strain relief.
Locate junction box mounting location and power cord
grommet.
Mount Back of junction box with two screws provided.
A) Connect the wire harness to the power supply via wire
nuts.
B) Connect the ground wire to the back of junction box via
the ground screw.
C) Install strain relief into the junction box.
A) Run the wire harness through the cut out.
B) Add the front cover of the junction box with one
screw.
Reconnect the Molex connector of the wire harness to the
unit.
2
1
3
4
5
AWhite
Black
C
B
6
7
A
B
Green
5
WIFI MODELS ONLY
WALL MOUNTED DISPLAY INSTALL
Replace display cable with 10ft cable.
Run cable through wall to display location.
Use two screws to mount back of wall mount to wall/
desired location.
Ensure screw is ush to mount and does not protrude, as
it will interfere with the display.
Pull wire through designated route at the top left of the
mount.
Rest display in “cup” at the bottom of mount and push
into retention clips at the top.
5
6
4
6
2
3
1
1A
7
Have enough slack in wire to plug into the bottom of the
display.
Ensure wire is tucked inside of the retention clip.
Front cover snaps onto the back of wall mount kit.
NON-WIFI AND WIFI (OPTIONAL)
DISPLAY COVER INSTALL
NOTE: For best connectivity on WiFi models,
follow instructions for Wall Mount of the display.
Peel release paper to expose adhesive.
Place display cover over display.
Press rmly around entire cover border to ensure
water tight seal.
CAUTION:
DO NOT remove the display cover once placed.
It will compromise the water tight seal. Remove 4
screws and the front cover to operate the display.
WARNING:
Outdoor installation of the water heater requires
a junction box and hard-wire (permanent) power
supply per National code, state code or local code.
Without an appropriate junction box or hard-wiring
(permanent) power supply, electric shock or short
circuit can cause death, personal injury or property
damage.
1 YEAR LIMITED WARRANTY
1 Year Limited Warranty – This part will be replaced at no cost (upon receipt of the defective part and proof of purchase) if it
becomes defective during normal use within one year from date of purchase. This Limited Warranty does not cover labor or any other
related expenses.
!
!
7
8
9
  • Page 1 1
  • Page 2 2
  • Page 3 3
  • Page 4 4
  • Page 5 5
  • Page 6 6
  • Page 7 7

Rheem AP22604 Super High Efficiency Condensing Tankless Water Heater Outdoor Kit User manual

Type
User manual

Rheem AP22604 Super High Efficiency Condensing Tankless Water Heater Outdoor Kit allows for outdoor installation of compatible Rheem water heaters. It includes an outdoor box, junction box, back panel, mounting bracket, and display cover, and is compatible with both Wi-Fi and non-Wi-Fi models. The outdoor kit ensures safe and efficient operation of your water heater in outdoor environments.

Ask a question and I''ll find the answer in the document

Finding information in a document is now easier with AI