Page is loading ...

INSTALLATION INSTRUCTIONS
MODEL 1200 DOG WATERER
or to place an order:
Questions?
Phone: 888-844-6606
www.nelsonmfg.com
Monday-Friday 7:30-5:00 CST
WARNING! Install waterer near
floor drain when locating waterer in
a building - homes, garages, etc.
Locate waterer near a floor drain
so that if waterer overflows, water
will go down floor drain and not
damage building. Failure to locate
waterer near a floor drain could
result in water damage to building
if waterer overflow occurs.
READ OWNER’S MANUAL
CAREFULLY BEFORE INSTALLING.
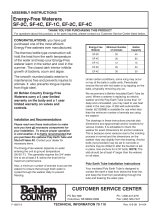
Nelson Model 1200 Automatic Waterer
provides a constant supply of fresh water
and eliminates the hassles and expense
of manually watering. The Model 1200
is made from tough 304 stainless steel, is
virtually maintenance-free and is designed
for easy cleaning.
1
Acorn Nut &
Screw 1209
Latch Bar
1203
Float Cover
1204
Screw & Hex
Nut 1214
Drinking Bowl
1201
Valve
Complete
1220
Wall Bracket (Includes
acorn nut, screw and hole
plug) 1202
Hole Plug
1215
Dog Feeding Pan
Model 1400

2
OPERATION
Water passes through float valve into the
drinking bowl. As the bowl fills with water, the
float rises until water is shut off due to action
of the float arm. When the animal drinks,
water is removed from the bowl lowering the
float. This reduces the pressure of the valve
seat on the valve orifice, allowing water to
enter the bowl.
WATERLINE CONNECTION
Faucet Connection. Mounting the waterer
next to an outdoor faucet is a popular
installation. Nelson’s garden hose adapter
(Accessory K3) provides a fast and easy
connection. The garden hose adapter consists
of a one foot length of stainless steel braided
garden hose with fittings on each end for
easily connecting to an outdoor faucet.
The faucet also serves as a handy shut-off
valve to be used when cleaning the drinking
bowl. To utilize a single faucet for multiple
purposes consider obtaining an inexpensive
2-way faucet adapter available at most home
improvement centers and hardware stores.
Pipe or Tubing Connection.
More permanent waterline materials may
include iron pipe, copper pipe, brass pipe,
copper tubing and plastic tubing. Connect
waterline making certain to locate a pipe
union or a compression connector in the
line near the valve as it may be necessary to
disconnect the water line to remove float valve
for maintenance. It is recommended that
a waterline shut off valve be installed in the
waterline where it is handy to reach. Water
can then be easily shut-off when cleaning
or performing maintenance. Waterline
can be brought to the waterer from above,
below, behind or straight out, which ever is
convenient. Use Teflon thread sealing tape on
1/8” FPT connecting waterline to valve.
ASSEMBLY
Step 1. Mount Wall Bracket on Wall or
Kennel Pole
Mount on Wall - Three 5/16” diameter
bolts are required for mounting wall bracket
to wall. Four carriage bolts (1 3/4” long X
5/16” diameter) and nuts are included with
the Nelson’s pole mounting kit (Accessory
K2). The carriage bolts may or may not
work with the type and thickness of your wall.
It may be that 5/16” lag bolts are desirable.
Lag bolts can be obtained at a local hardware
store. Locate waterer such that the top holes
in the wall mounting bracket are a minimum of
9 inches above the floor. This allows enough
room to remove the drinking bowl for cleaning.
Attach wall bracket to wall using two top holes
and center bottom hole. The wall bracket must
be level, requiring the use of a level when
locating the holes on the wall. If the waterer
is installed inside, locate it near a drain for
cleaning convenience.
Mount on Kennel Pole - The pole mounting
bracket kit (Accessory K2) contains the
necessary bolts, nuts and brackets to mount
the waterer to most kennel poles. Attach wall
bracket to pole using top four holes. Locate
waterer such that the top holes in the wall
mounting bracket are a minimum of 9 inches
above the floor. This allows enough room to
remove the drinking bowl for cleaning. If the
waterer is installed inside, locate it near a drain
for cleaning convenience.
Step 2. Attach Valve to Wall Bracket
1. Remove washer and valve nut located on
valve.
2. Valve can be located on either right or left
side of wall bracket. Place valve body through
hole such that valve body fits in hex hole on
bracket. Secure valve to wall bracket with the
washer and nut removed earlier. Valve should
be installed with float arm hanging directly
downward. Push black hole plug in hole on
opposite side of valve.
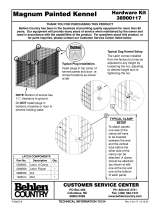
Step 3. Attach Drinking Bowl
to Wall Bracket
Pole Mounting Kit (Acc. K2)
Wall bracket must be level.
Garden hose
adapter (Acc. K3)
2-Way faucet
adapter (not
included)

1. Mounting drinking bowl to wall bracket
requires the hardware in the plastic pack (2
Phillips head
screws, 2 hex
nuts and 1 acorn
nut).
2. Thread
both screws into
holes in back
two corners of
drinking bowl.
Thread screws
from the top with
screw heads up.
Tighten screws
so that screw
heads just make
contact with
surface of bowl
then back out
2 ¾ complete
rotations. The
length the
screws are backed out of drinking bowl
determines how tight the latch bar operates.
The latch bar locks and releases the drinking
bowl from the wall bracket. The further the
screws are backed out the looser the latch bar
operates. Conversely, the further the screws
are set into the drinking bowl the tighter the
latch bar operates. Some experimentation
may be required to find the optimal setting.
3. Once proper setting of screws is
determined, lock the screws in place by
installing a hex nut on bottom of each screw.
4. Slide latch bar into retainer on wall
bracket, handle up or down, whichever you
prefer. The latch bar will go either way with
the handle on the right or left side of waterer,
whichever is convenient.
5. Lift drinking bowl upwards onto wall
bracket such that screw heads on bowl pass
through bracket and through latch bar. Slide
latch bar so as to capture screw heads in slots
on latch bar.
6. Place float guard over screw in center of
mounting bracket
and secure with
acorn nut, hand
tighten.
Cleaning and
Sterilizing. Clean
drinking bowl
as required.
To remove the
drinking bowl
from the wall
bracket, line up
latch bar so that
bolts on the back
of the drinking
bowl slide through wall bracket. Bowl may
be sterilized with a disinfectant solution, but
make certain the float and float arm are also
immersed in the disinfectant. After disinfecting,
thoroughly rinse with water.
Removing Mineral Deposits. Mineral
deposits can be removed from the drinking
bowl by soaking the bowl in a water-vinegar
solution. Remove the drinking bowl from the
wall bracket. Fill the drinking bowl up with
enough water to cover the mineral deposits.
Mix in one cup of vinegar. Let the bowl soak
for 24 hours and wipe clean.
Replacing Rubber Valve Seat. Over time,
rubber seat can harden and tear. If wear
on rubber valve seat causes valve to leak,
resulting in overflow, replace rubber valve seat.
1. Turn off the water supply at shut-off valve.
2. Remove the Acorn nut and the Float Cover.
3. Place your index finger inside the front of
the valve cap and pull gently towards the
front of the waterer. While pulling out on
the valve cap, use the index finger of your
other hand to push the valve cap away
from the valve. This will allow the Float arm
assembly to release from the valve body.
4. Remove the Rubber seat from the Float arm
assembly and replace with a new Rubber
seat.
5. Replace the Float arm assembly into the
Valve body.
6. While holding the float assembly in place,
slide the Valve cap over the Valve body until
you hear and feel the Valve cap snap into
place.
7. Replace the Float Cover and Acorn nut.
8. Turn on the water supply.
Tightening / Loosening Bowl Latch. The
length the screws are backed out of drinking
bowl determines how tight the bowl release
latch operates. Tighten screws so that screw
heads just make contact with surface of bowl
then back out 2 ¾ complete rotations. The
further the screws are backed out the looser
the bowl release latch operates. Conversely,
the further the screws are set into the drinking
bowl the tighter the bowl release latch
operates. Some experimentation may be
required to find the optimal setting.
3
Screws
Screws
Latch
Bar
Float Guard
Valve Complete
Part No. 1220
Nelson Model 1200 Automatic Waterer is
guaranteed against defects in workmanship
and/or materials for One Year. Nelson
Manufacturing Company will repair or,
at its option, replace without charge, any
parts found defective upon examination at
the factory if returned within the guarantee
period, transportation charges prepaid.
Replacement shipment will be made
transportation charges prepaid by Nelson.
Warranty

Part Number Description
*1201 Drinking Bowl with square corners (includes Mounting Fasteners, Part #1214)
*1201R Drinking Bowl with two round corners and two square corners
(includes Mounting Fasteners, Part #1214)
1202 Wall Bracket with Screw, Acorn Nut, and Hole Plug
1203 Latch Bar
1204 Float Cover
1220 NEW Valve Complete (white plastic) for waterers shipped after Sept. 2009
1223 Rubber Seat and O-Ring (qty. 6 ea.) for NEW Valve Complete (Part # 1220)
1209 Screw & Acorn Nut for Mounting Float Cover (Part #1204)
1214 Mounting fasteners for Mounting Drinking Bowl to Wall Bracket.
Includes (2) 1/4 - 20 x 5/8” Phillips Head Screws and (2) 1/4” Hex Nut.
1215 Black Hole Plug
1221 Float Arm for Valve (Part # 1220)
1222 Float for Valve (Part # 1220)
1224 Valve Body for Valve (Part # 1220)
Includes Valve Body, Hood, Nut and O-Ring
Acc. K1 Brass Shutt-off Valve 1/4 Turn
Acc. K2 Pole Mounting Kit
Acc. K3 Garden Hose Adapter
Old Valve Complete (brass w/ plastic float). No longer available.
911 Float for OLD Valve (Part # 1207)
1206 Float Arm (brass) for OLD Valve (Part # 1207)
1208 Rubber Seat, Cotter Pin and Washer (qty 6 ea.) for OLD Valve (Part # 1207)
*The drinking bowl with the square corners was replaced with the bowl with round corners in May 2002.
Dog Feeding Pan Model 1400
Nelson Model
1400 Dog Feeding
Pan is the practical,
cost-effective
solution for feeding
dogs. The Model 1400, a companion
to the model 1200 automatic waterer,
is made from the same tough 304
stainless steel. Like the 1200, the bowl
is attached to the wall bracket by a slide
latch, making removal easy and fast for
cleaning.
Automatic Horse & Livestock Waterers
Nelson
Automatic
Livestock and
Horse Waterers
provide a
constant supply
of fresh clean
water and
are available
with optional
heaters to
prevent freeze-up, even in the coldest
climates. Nelson 300 & 700 Series
Automatic Waterers are available in
several configurations. They’re ideal for
livestock, horses, exotic animals and,
yes, even dogs.
Water Bucket Heaters for Dogs
With a
Nelson Water
Bucket Heater
your dog’s
water never
freezes. You
never have to
knock ice out of the bucket, and your
dog never goes without water. The
thermostatically controlled heater costs
just pennies a day to operate. Both
models work in all types of buckets
– plastic, metal and rubber – up to 5
gallons, 3 year warranty. CSA approved
Part No. 1201 Old Valve (w/ Brass Arm)New Valve (Part No. 1220)
To Order Parts Call 1-888-844-6606
or go online
www.nelsonmfg.com
MODEL 1200 PARTS LIST
Nelson Manufacturing Company
3049 12
th
St SW
Cedar Rapids, Iowa 52404
Phone: 319-363-2607
Phone: 1-888-844-6606
Fax: 319-363-3601
E-mail: [email protected]
Buy Direct from Nelson.
Our goal is to make it easy
for you to purchase and
own Nelson products. Our
expertise comes from taking
care of our customers for over 60 years.
/