
REFRIGERATOR
REFRIGERADOR
LSC26905**
Owner´s Manual

2
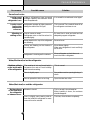
Entry
Important Safety Instruction
Identification of Parts
Where to Locate
Door Removal
Door Replacement
Water Pipe Installation
Water Connection Instruction Guide
Operation Instruction Guide
Height Adjustment
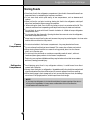
Starting
Adjusting the Temperatures and functions
(Dispenser/Automatic Icemaker)
Shelf
Location of Foods
Storing Foods
How to Dismantle Parts
General Information
Cleaning
Troubleshooting
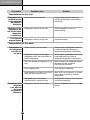
Table of Contents
Introduction
Installation
Operation
Suggestion on
Food Storage
Care and
Maintenance
3
3
6
6
8
9
9
9
10
12
13
13
17
18
19
20
22
22
23

Introduction
this guide as a permanent record of your purchase. Staple your receipt here.
Date of purchase
:
:
:
:
:
:
Dealer
Dealer address
Dealer phone no.
Model no.
Serial no.
Important safety
Instructions
WARNING
WARNING
CAUTION
You can
be killed or seriously injured if you don’t follow instructions.
Indicates an imminently hazardous situation which, if not avoided,
may
result in minor or moderate injury, or product damage only.
All safety messages will identify the hazard, tell you how to reduce the chance of injury
and tell you what can happed if the instructions are not followed.
DANGER
You will be killed or seriously injured if you don’t follow instructions.
This guide contains many important safety messages. Always read and obey
SAFETY MESSAGES
To reduce the risk of fire, electric shock or injury to persons when using your
product, basic safety precautions should be followed, including the
following. Read all instructions before using this appliance:
NEVER unplug your refrigerator by pulling on the power cord. Always grip the
plug firmly and pull it straight out from the outlet.
Repair or replace inmediately all electric service cords that have become frayed
or otherwise damaged. Do not use a cord that shows cracks or abrasion damage
along its length or at either the plug or connector end.
When moving your refrigerator away from the wall, be careful not to roll over or
damage it in any way.
Do not crush or damage the water line.
Do not store or use gasoline or other flammable vapors and liquids in the vicinity
of this or any other appliance.
Do not allow children to climb, stand, or hang on the refrigerator doors or
shelves in refrigerator. They could damage the refrigerator and seriously injure
themshelves.
Keep fingers out of “pinch point” areas; clearances between the doors and
cabinet are necessarily small. Be careful when you open the doors when children
Unplug your refrigerator before cleaning or making any repairs.
NOTE: We strongly recommend that any servicing be performed by a qualified
individual.
Entry
The model and serial numbers are found on the inner case or back of refrigerator
compartment of this unit. These numbers are unique to this unit and not
available to others. You should record requested information here and retain
3
are in the area.

Introduction
Before replacing a burned-out light bulb, unplug the refrigerator or turn off power
at the circuit breaker or fuse box in order to avoid contact with a live wire filament.
(A burned-out light bulb may break when being replaced). NOTE: Setting either or
both controls to the OFF position does not remove power to the light circuit.
Do not store bottles in the freezer compartment they may break when frozen,
causing damage.
The refrigerator-freezer should be so positioned that the supply plug is accessible
for quick disconnection when accident happens.
For personal safety, this appliance must be properly grounded. Have the wall
outlet and the circuit checked by a qualified electrician to make sure the outlet is
properly grounded.
This refrigerator must be properly installed in accordance with the Attention
Installer Instructions that were taped to the front of the refrigerator.
After your refrigerator is in operation, do not touch the cold surfaces in the freezer
compartment when hands are damp or wet. Skin may adhere to the extremely cold
surfaces.
In refrigerators with automatic icemakers, avoid contact with the moving parts of
the ejector mechanism, or with the heating element that releases the cubes. DO
NOT place fingers or hands on the automatic icemaking mechanism while the
refrigerator is plugged in.
DO NOT refreeze frozen foods which have thawed completely. The United States
Department of Agriculture in Home and Garden Bulletin No. 69 says:
“...You may safely refreeze frozen foods that have thawed if they still contain ice
crystals or if they are still cold below 40° (4°C).”
“...Thawed ground meats, poultry, or fish that have any off-odor or off-color should
not be frozen and should not be eaten. Thawed ice cream should be discarded. If
the odor or color of any food is poor or questionable, get rid of it. The food may be
dangerous to eat.”
“Even partial thawing and refreezing reduces the eating quality of foods,
particularly fruits, vegetables and prepared foods.
The eating quality of red meats is affected less than that of many other foods. Use
refrozen foods as soon as possible to save as much of their quality as you can.”
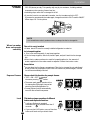
DANGER
CFC DISPOSAL
Risk of child
entrapment
BEFORE YOU THROW AWAY YOUR OLD REFRIGERATOR OR FREEZER
Take off the doors.
Leave the shelves in place so that
children may not easily climb inside.
Child entrapment and suffocation are not problems of
the past. Junked or abandoned refrigerators are still
dangerous... even if they will sit for “just a few days”.
Your old refrigerator may have a cooling system that used CFCs
(chlorofuorocarbons). CFCs are believed to harm stratospheric ozone.
If you are throwing away your old refrigerator, make sure the CFC refrigerant is
removed for proper disposal by a qualified servicer. If you intentionally release
this CFC refrigerant, you can be subject to fines and imprisonment under
provisions of environmental legislation.
This appliance contains fluid (refrigerant, lubricant), is made of parts and
materials which are reusable and / or recyclable. All the important materials
should be sent to the collection center of waste material and can be reused
after rework (recycling). For take back, please contact with the local agency.
4

Introduction
IMPORTANT: Please read carefully
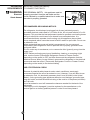
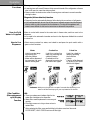
TO CONNECT ELECTRICITY
GROUNDING
REQUIREMENTS
Shock Hazard
Electrical
FOR PERSONAL SAFETY, this appliance must be
properly grounded. Have the wall outlet and the
circuit checked by a qualified electrician to make sure
the outlet is properly grounded.
Ensure proper
ground exists
before use.
3-prong
grounding
plug
3-prong
grounding type
wall receptacle
WARNING
RECOMMENDED GROUNDING METHOD
The refrigerator should always be plugged into its own individual properly
grounded electrical outlet rated for 115 Volts, 60 Hz, AC only and fused at 15 or 20
amperes. This provides the best performance and also prevents overloading house
wiring circuits which could cause a fire hazard from overheated wires. It is
recommended that a separate circuit serving only this appliance be provided.
Use a receptacle which cannot be turned off with a switch or pull chain. Do not use
an extension cord.
Where a standard two-prong wall outlet is encountered, it is your personal
responsibility and obligation to have it replaced with a properly grounded three-
prong wall outlet.
Do not, under any circumstances, cut or remove the third (ground) prong from the
power cord.
NOTE: Before performing any type of installation, cleaning, or removing a light
bulb, turn the control (Thermostat, Refrigerator Control or Freezer Control,
depending on the model) to OFF and then disconnect the refrigerator from the
electrical source. When you are finished, reconnect the refrigerator to the electrical
source and reset the control (Thermostat, Refrigerator Control or Freezer Control,
depending on the model) to the desired setting.
USE OF EXTENSION CORDS
Because of potential safety hazards under certain conditions, we strongly
recommend against the use of an extension cord. However, if you still elect to use
an extension cord, it is absolutely necessary that it be a UL-listed (in the United
States), 3-wire grounding type appliance extension cord having a groundind type
plug and outlet, and that the electrical rating of the cord be 15 amperes (minimum)
and 120 volts.
Use of an extension cord will increase the clearance needed for the back of the
refrigerator.
If the supply cord is damaged, it must be replaced by the manufacturer or its
service agent or a similarly qualified person in order to avoid any hazard.
5

Introduction
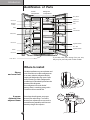
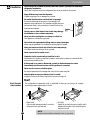
Freezer
Compartment
Refrigerator
Compartment
Dairy Corner
Water Filter
Lamp 1 or 2
Door Rack
Lamp
Automatic
Icemaker
Shelf (steel)
Door Rack
Drawer
Door Rack
Lower Cover
Shelf
Shelf
Snack Drawer
Vegetable Drawer
Vegetable Drawer
Door Rack
Identification of Parts
6
6
•
If you find some parts missing from your unit,
they may be parts only used in other models.
Where to install
Unstable installation may cause vibration and
noise. If the floor to install the refrigerator on
is not even, make the refrigerator level by
rotating the height adjusting screw. Carpet
or floor covering on which a refrigerator is
installed may be discolored by heat from the
bottom of the refrigerator.
If our refrigerator causes this kind of
damage, there is something wrong with it.
Customers will not stand for this.
Strong
and even floor
A proper
distance from
adjacent items
Please keep the refrigerator at a proper
distance from other things. Too small a
distance from adjacent items may result in
lowered freezing capability and increased
electricity charges consumption.
More than
4"(10 cm)
to top
More than
2"(5 cm)
to back

Installation
Where water
supply can be
easily connected
in a dry place
Where it is free
from heat
Select a place where a water supply can be
easily connected between the automatic ice
maker and dispenser.
Installing the refrigerator in a wet or damp
area may cause rust and may be an electrical
hazard.
If this refrigerator is installed where the
ambient temperature is high, the freezing
capacity is deteriorated and the cost of
electricity used increases.
•
Install the refrigerator at a place where the ambient temperature is 5˚C ~ 43˚C
(41˚F
~
110˚F).
Ambient temperature outside this range may cause product malfunction. Also, the
tube between the dispenser and automatic ice maker may freeze.
NOTE
Bottom Pad
6
7
Method to remove protection film(Some Model)
1. Grasp the handles with both hands and push them upward to remove.
2. Entirely remove the protection film adhered to the external surface of the door.
3. Assemble the fixing bracket on both ends of the handle to the fixing bolt of the door
and lower the handle downward until it is entirely fixed.

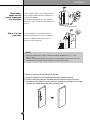
Door removal
Failure to do so could result in death or serious injury.
If your entrance door is too narrow for the
refrigerator to pass through, remove the
refrigerator door and pass the refrigerator laterally.
Electric Shock Hazard
Disconnect electrical supply to refrigerator before installing.
Remove the lower cover by lifting upward, and
then pull up the water feed tube while pressing
area
shown in the figure to the right.
Remove Lower
Cover and
Water Feed Tube
Warning
Remove the
Freezer
Compartment
Door
Remove the
Refrigerator
Door
Installation
1) Remove the hinge cover by loosening the
screws. Disconnect all connections except
the ground line.
2) Remove the keeper by rotating it counter
clockwise
and then lifting the upper
hinge up
.
3) Remove the freezer compartment door by
lifting it upward. This time, the door should
be lifted enough for the water feed tube to
be completely pulled out.
1) Loosen the hinge cover screws and remove
the cover. Remove connection wire.
2) Remove keeper by rotating it clockwise
and then remove the upper hinge by lifting
it up
.
3) Remove the refrigerator compartment door
by lifting it up.
•
If a tube end is deformed or abraded, trim the part away.
Disconnecting the tube under the door causes about 1.5 litters water to flow out. Please
put a large container at end of tube to prevent water from draining on to the floor.
NOTE
•
When removing the upper hinge, be careful that the door does not fall forward .
NOTE
•
After removing the door, take it into the kitchen where you are installing the
refrigerator. Lay it down on a blanket and be careful to avoid damaging the water
feed tube.
NOTE
Lower Cover
Lower hinge
Lower Hinge
Keeper
Water Feed Tube
Connection
Wires
Connection
Wires
Hinge
Cover
Upper Hinge
Upper Hinge
Keeper
Upper Hinge
Earth Line
6
8

Feed wa
ter
tube installatio
n
Push the refrigerator sideways through the
entrance door as shown in the right picture.
Automatic icemaker operation needs water pressure of 21.3~121psi(lb/inch
2
) (That
is, a 7oz. paper cup will be filled within 3 sec.).
to purchase a separate pressure pump for normal automatic icemaking and cool
water feed.
Keep the total length of the water feed tube within 40 feet and be careful not to
bend or kink the tube. If the tube is longer than 40 feet, the icemaker and water
dispenser will not operate properly.
Install the water feed tube at a place free from heat.
Connect to potable water supply only.
Refer to instructions with water filter kit for installation.
Mount the doors in the reverse order of
removal after the refrigerator is brought to
the installation area.
Move the
Refrigerator
Before
Installation
Warning
Installation
9
Water Connection Instruction Guide
Read all directions carefully before you begin.
Connecting
the Refrigerator
to a Water Source
•
If operating the refrigerator before installing the water connection, turn icemaker
to the OFF position to prevent operation without water.
•
All installations must be in accordance with local plumbing code requirements.
•
Use copper tubing and check for leaks.
•
Install copper tubing only in areas where temperatures will remain above freezing.
•
It may take up to 24 hours for your icemaker to begin producing ice.
IMPORTANT
Standard screwdriver
7/16-inch and 1/2-inch open-end wrenches or two adjustable wrenches
1/4-inch nut driver
1/4-inch drill bit
Hand drill or electric drill (properly grounded)
Tools Required
NOTE
In order to perform the water connection you will need to buy: a 1/4-inch saddle-type
shut off valve, a union, and copper tubing. Before purchasing, make sure the saddle-type
valve complies with your local plumbing codes. Do not use a piercing-type or 3/16-inch
saddle valve which reduces water flow and clogs more easily.
Screwdriver
Adjustable wrenches
Electric drill
NOTE:
Check the direction of the lever hinge.
Correct
Incorrect
If water pressure does not reach the rated 21.3psi(lb/inc ) or below, it is necessaryh
2
Door replacement

1. Unplug refrigerator or disconnect power.
2. Turn OFF main water supply. Turn on the nearest faucet to relieve the pressure on the
line. It may help to open an outside faucet to allow the water to drain from the line in
the house.
3. Find a 1/2-inch to 1-1/4-inch vertical COLD water pipe near the refrigerator.
Connect
the Tubing to
Water Line
•
Horizontal pipe will work, but the following precaution must be taken: Drill on the top of the pipe
not the bottom. This will help keep water away from the drill. This also keeps normal sediment
from collecting in the valve.
NOTE
4. To determine the length of copper tubing you will need, measure from the connection
on the lower left rear of the refrigerator to the water pipe. Add 7 feet (2.1m) to allow
for moving refrigerator for cleaning. Use 1/4-inch O.D. (outside diameter) copper
tubing. Be sure both ends of copper tubing are cut square.
5. Using a drill, drill a 1/4-inch hole in the cold water pipe you have selected.
6. Fasten shut-off valve to cold water pipe with pipe clamp. Be sure outlet end is solidly
in the 1/4-inch drilled hole in the water pipe and that the washer is under the pipe
clamp. Tighten packing nut. Tighten the pipe clamp screws carefully and evenly so
washer makes a watertight seal. Do not overtighten or you may crush the cooper
tubing, especially if soft (coiled) copper tubing is used. Now you are ready to connect
copper tubing.
7. Slip compression sleeve and compression nut on copper tubing as shown. Insert end
of tubing into outlet end squarely as far as it will go. Screw compression nut onto
outlet end with adjustable wrench. Do not over tighten.
8. Place the free end of the tubing into a container or zinc, and turn ON main water
supply and flush out tubing until water is clear. Turn OFF shutoff valve on the water
pipe. Coil the copper tubing as shown below.
Installation
6
10
Coil of Polyethylene or
1/4" Cooper Tubing
Tubing Clamp
1/4"
Compression
Nut
Ferrule
(sleeve)
Refrigerator Connection
1
2
Operation Instruction Guide
Before making the connection to the refrigerator, be sure the refrigerator
power cord is not plugged into the wall outlet.
• If your refrigerator does not
have a water filter, we
recommend installing one. If
your water supply has sand or
particles that could clog the
screen of the refrigerator’s
water valve. Install the filter in
the water line near the
refrigerator.
1. Remove the plastic flexible
cap from the water valve.
2. Place the compression nut and
ferrule (sleeve) onto the end of
the tubing as shown.
3. Insert the end of the copper tubing into the connection as far as possible. While
holding the tubing, tighten the fitting.
Connect the Tubing
to the Refrigerator

- The first ice and water may include particles or odor from the feed water pipe or
feed water box. Throw away the ice.
This is also necessary if the refrigerator has not been used for a long time.
- Never store beverage cans or other foods in ice storage bin for the purpose of rapid
cooling. Such actions may damage the automatic ice maker.
- Never remove the icemaker cover.
- Shake the bin occasionally to cause the ice to settle.
- Ice may pile up just around the icemaker causing the icemaker to think that the ice
storage bin is full.
- If discolored ice is dispensed, contact an Authorized Service Center immediately.
Do not use the ice or water until the problem is corrected.
CAUTION
Installation
11
Plug In the Refrigerator
Arrange the coil of copper tubing behind the refrigerator so it does not vibrate
against the back of the refrigerator or against the wall. Push the refrigerator
back to the wall.
Start the lcemaker
Set the icemaking stop switch to the ON position. The icemaker will not begin
to operate until it reaches its operating temperature of 15 °F (-9 °C). It will then
begin operation automatically, if the icemaking stop switch is in the ON
position.
Turn the Water On at
the Shut off Valve
The automatic icemaker makes 8 cubes at a time, 120/150 pieces per day.
But these quantities may vary according to circumstance, including ambient
temperature, door openings, freezer load.etc.
The Icemaker stops when the bin is full.
Automatic Ice maker
•
It is normal to hear a noise when ice drops into the bin.
NOTE
Tighten any connections that leak.
Ice is lumped together
When ice is lumped together, take the ice lumps out of the ice storage bin,
break them into small pieces, and then place them into the ice storage bin
again.
When the icemaker produces too small or lumped ice, the amount of water
supplied to the ice maker must be adjusted. Contact the service center.
If ice is not used frequently, it may lump together.
Power failure
Water may drop into the freezer compartment. Take the ice storage bin out and
discard all the ice. Dry the bin and replace it.
The unit is newly installed
It takes about 12 hours for a newly installed refrigerator to make ice.
When Icemaker
Does Not Operate
Smoothly

12
Height adjustment
Make them level by inserting at (
-
type) driver into the groove of the left height adjusting
screw and rotating it clockwise ( ).
Make them level by inserting at (
-
type) driver into the groove of the right height
adjusting screw and rotating it cl ockwise ( ).
The refrigerator door will close smoothly by raising the front side by adjusting the
height adjusting screw. If the door does not close properly because it is improperly
adjusted, the performance of the refrigerator will be aected.
If the freezer
compartment door
is lower than the
refrigerator
compartment door
If the freezer
compartment door
is higher than the
refrigerator
compartment door
- rst method
After leveling the
door height
Do not force too hard to level the height. The hinge pin can be pulled out.
(Adjustable range of height is a maximum of 2" (5 cm))
Adjust the level when the refrigerator door is lower than the freezer door during the
use of the refrigerator.
1. Using the wide side of the tool for adjustment , turn the keeper nut ( )
clockwise to loosen the Keeper nut.
2. Using the narrow side of the tool for adjustment, turn the adjustment hinge pin
( ) clockwise or ( ) counterclockwise to level the refrigerator and
freezer door.
3. After setting the level of the door, turn the keeper nut( ) counterclockwise to
tighten.
If the freezer
compartment door
is higher than the
refrigerator
compartment door
- second method
Installation
CAUTION
Adjustment
hinge pin
Tool for
adjustment
Up
Down
1

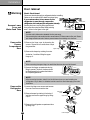
Starting
Adjusting th
e
Temperatures and Functions
When your refrigerator is rst installed, allow it to stabilize at normal operating
temperatures for 2-3 hours prior to lling it with fresh or frozen foods.
If operation is interrupted, wait 5 minutes before restarting.
Operation
6
13
1
2
NOTE:
Images may vary between models,
display functions remain the same.
Display Power Saving Mode

Operation
1. Buzzer sound mute Mode
The buzzer sound is set to OFF.
It activates by sounding the recognition sound of “Ding~” after pressing and
holding “Express FRZ” button more than 5 seconds.
It inactivates when resetting the mode power.
2. Display Power saving Mode
It places display in standby mode until door is opened.
Press “Freezer” and “Express FRZ” buttons simultaneously to turn all leds ON and
then OFF with the recognition sound of “Ding~” after 5 seconds.
Once the mode activates, the display is OFF. Until door is opened or display button
is pressed. When 30 seconds has elapsed after closing door or pressing button,
the display turns OFF.
To deactivate this mode is same as the activation methods. The mode inactivates
when resetting the power.
6
14
BAR
Indication
BAR
Indication
REFRIGERATOR
You can adjust temperature of freezer compartment and refrigerator
Compartment.
❇ Whenever pressing button, setting is repeated in the order of
(Middle) (Middle Strong)
➔
(Strong)
➔
(Weak)
➔
(Middle Weak).
The actual inner temperature varies depending on the food status, as the
indicated setting temperature is the target temperature, not actual temperature
within refrigerator.
Please adjust temperature as above after using refrigerator for minimum 2~3
days.
You can select water or ice.
❇ Please select water, Crushed ice, or cubed ice by
pressing button as you desire.
❇ Please press the button gently by pushing in cup.
You will hear a clap when the ice door closes
after ice is dispensed.
How to adjust the
temperature in
the freezer
compartment
How to adjust the
temperature in
the refrigerator
compartment
Dispenser
selection
•
Reference : Hold your cup in place for a couple of seconds after
dispensing ice or water so the last few drops go in
your cup instead of on the floor.
FREEZER
Freezer Compartment temperature adjustment
Refrigerator Compartment temperature adjustment
Pressing
Switch
➔

Please select this function for prompt freezer.
”OFF➝ ON➝ OFF” is repeated
whenever pressing button.
The arrow mark graphic remains at the
On status after flickering 4 times when
selecting Special Refrigeration On
Prompt freezer function automatically
turns off after a fixed time passes.
Express Freezer
•
It is normal that a noise is produced when ice drops into the ice storage bin.
NOTE
This button stops operation of different
button and dispenser function.
Locking or Release is repeated
whenever the is pressed more than 3
seconds.
If you use the LOCK button, none of the other
buttons will work until you unlock them.
Lock
6
15
The automatic icemaker can automatically make 8 cubes at a time,
120~150 pieces per day. This quantity may vary by circumstance, including ambient
temperature, door opening, freezer load. etc.
Icemaking stops when the ice storage bin is full.
If you don't want to use automatic icemaker, turn the icemaker switch to OFF.
If you want to use automatic ice-maker again, change the switch to ON. To switch ON/OFF
follow steps 1 & 2 in the picture.
Automatic
Icemaker
1
2
ON
OFF
Ice is lumped together
If the ice lumps together, take it out, break it apart, and put it back into the storage
bin.
When the ice maker produces too small or lumped together ice, the amount of
water supplied to the ice maker needs to adjusted. Contact the service center.
❈
If ice is not used frequently, it may lump together.
Power failure
Ice may drop into the freezer compartment. Take the ice storage bin out and discard
all the ice then dry it and place it back. After the machine is powered again, crushed
ice will be automatically selected.
The unit is newly installed
It takes about 12 hours for a newly installed refrigerator to make ice.
When ice maker
does not operate
smoothly
Operation

Operation
Select among crushed ice, water, and cubed ice and press the push switch with a
glass or other container.
The Other
Functions
Door open warning
A warning tone will sound 3 times at thirty-second intervals if the refrigerator or freezer
door is left open for more than sixty seconds.
Please contact the local service center if warning tone continues to sound even after
closing the door.
Diagnosis (failure detection) function
Diagnosis function automatically detects failure during the normal use of refrigerator.
If your refrigerator fails, do not turn off the power. Instead, contact a local Authorized
service center or call our support line for assistance. Turning off the appliance will
make it more difficult for the service technician to determine the problem.
Crushed Ice
Light the crushed ice
lamp by pressing the
selection button.
•
C
rushed
ice will be
dispensed by pressing the
push switch with a glass.
Water
Light the water lamp
by pressing the
selection button.
•
Water will be dispensed
by pressing the push
switch with a glass.
Cubed Ice
Light the cubed ice
lamp by pressing
the selection
button.
•
Cubed ice will be dispensed
by pressing the push
switch with a glass.
Water is cooled while stored in the water tank in freezer door, and then sent to the
dispenser.
Ice is made in the automatic icemaker and sent to the dispenser divided into crushed
or cubed ice.
How Ice/Cold
Water is Supplied
6
16
How to Use
Dispenser
LED
There is a replacement indicator light for the
water filter cartridge on the dispenser.
Water filter needs replacement once every six
months.
Filter light comes on to let you know when to
replace filter.
After replacing the filter, press and hold the lock button more than 3seconds.
FILTER RESET, HOLD 3 SECS text turn off filter light.
Filter Condition
(filter replacement
cycle) Display
Function
•
Reference : Hold your cup in place for a couple of seconds after dispensing ice or
water so the last few drops go in your cup instead of on the floor.

Operation
Throw away the ice (about 20 pieces) and water (about 7 glasses) first made after
refrigerator installation.
This is also necessary when the refrigerator has not been used for a long time.
Keep children away from the dispenser.
Children may play with or damage the controls.
Be careful that food does not block the ice passage.
If foods are placed at the entrance of ice passage, the
dispenser may malfunction. The passage may also become
blocked with frost if only crushed ice is used. Remove the
frost that accumulates.
Storing cans or other items in the ice bin may damage
the icemaker or the container may burst.
Never use thin crystal glass or crockery to collect ice.
Such glasses or containers may break.
Put ice first into a glass before filling water or other beverages.
Water may be splashed if ice is added to existing liquid in a glass.
Keep your hands and tools out of the ice door and passage.
You might break something or injure yourself.
Never remove the ice maker cover.
Shake the ice bin occasionally to level the ice in it.
Sometimes the ice piles up near the icemaker, causing the icemaker to misread the bin
level and stop producing ice.
If discolored ice or water is dispensed, contact an Authorized service center
immediately and discontinue use until the problem is corrected.
Never use too narrow or shallow glass.
Ice may be jammed in ice passage and, thus, the ice maker may fail.
Keep the glass at a proper distance from ice outlet.
A glass too close to the outlet may hinder ice from coming out.
Cautions
6
17
•
Make sure the shelf is horizontal. If not, it may drop.
NOTE
Shelf
The refrigerator compartment shelf is adjustable so that you can place it at a height
according to space requirement of foods.
Shelf Height
Adjustment
1
3
2
1
2
3
Fix Shelf
Lightly lift up the front part of shelf to pull it
ahead and then take it out while lifting the
rear part of shelf.
Slide Shelf
Pull the shelf ahead and take it out while
lifting both front and rear part.

Suggestion on Food Storage
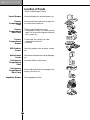
Location of Foods
(Refer to Identification of Parts)
Store small foods such as bread, snacks, etc.
Store various frozen foods such as meat, fish,
ice cream, frozen snacks, etc.
Store small packed frozen food.
Temperature is likely to increase as door
opens.
So, do not store long-term food such
as ice cream, etc.
Snack
Drawer
Freezer
Compartment
Shelf
Freezer
Compartment
Door Rack
Freezer
Compartment
Drawer
Milk Product
Corner
Refreshment
Center
Refrigerator
Compartment
Shelf
Refrigerator
Compartment
Door Rack
Vegetable Drawer
Store meat, fish, chicken, etc. after
wrapping them with foil.
Store dry
.
Store milk products such as butter, cheese,
etc.
Store foods of frequent use such as beverage,
etc.
Store side dishes or other foods.
Store small packed food or beverages such
as milk, juice, beer, etc.
Store vegetables or fruits.
6
18

Suggestion on Food Storage
Storing Foods
Store fresh food in the refrigerator compartment. How food is frozen and thawed is an
important factor in maintaining its freshness and flavor.
Do not store food, which spoils easily, at low temperatures, such as bananas and
melons.
Allow hot food to cool prior to storing, placing hot food in the refrigerator could spoil
other food, and lead to higher energy consumption.
When storing the food, cover it with vinyl wrap or store in a container with a lid. This
prevents moisture from evaporating, and helps food to keep its taste and nutrients.
Do not block air vents with food. Smooth circulation of chilled air keeps refrigerator
temperatures even.
Do not open the door frequently. Opening the door lets warm air enter the refrigerator,
and cause temperatures to rise.
Never keep too much food in door rack because they may be pushed against the inner racks
and the door would not be fully closed.
Do not store bottles in the freezer compartment - they may break when frozen.
Do not refreeze food that has been thawed. This causes loss of taste and nutrient.
When storing frozen food like ice cream for a long period, place it on the freezer
shelf, not in the door rack.
Do not touch the cold foods or containers- especially made of metal -, with wet
hands and place glass products in the freezer compartment.
- That’s why you may have chilblains and they may be broken when their inner matters
are frozen, causing personal injury.
Avoid placing moist food in top refrigerator shelves, it could freeze from direct
contact with chilled air.
Always clean food prior to refrigeration. Vegetables and fruits should be washed and
wiped, and packed food should be wiped, to prevent adjacent food from spoiling.
When storing eggs in their storage rack or box, ensure that they are fresh, and always
store them in an upright position, which keeps them fresh longer.
Freezer
Compartment
Refrigerator
Compartment
•
If you keep the refrigerator in a hot and humid place, frequent opening of the door or
storing a lot of vegetables in it may cause condensation to form. Remove the
condensation with dust free cloth.
NOTE
6
19

Care and Maintenance
How to Dismantle Parts
Freezer
Compartment
Lamp
Dispenser Lamp
Freezer
Compartment
Shelf
Door Rack and
Support
Ice Storage Bin
After Dispenser
Is Used
Seperate the lamp by pulling it out, and then
remove the lamp. Max. 15 W bulb for
refrigerator is used and can be purchased at a
service center.
To remove a shelf, Lift the left part of the
shelf a bit. Lift it to the direction
, push the
right part to the direction
, and take it out.
Lift the door rack holding both sides and
pull it out to direction.
Lift the ice shelf as shown in the right gure
and pull it out .
The water collector has no self-draining
function. It should be cleaned regularly.
Remove the cover by pulling the front side of
water collector cover and dry it with a cloth.
Hold the ice storage bin as shown in the right
gure and pull it
out while
slightly lifting it .
•
Dismantling is done in the reverse sequence of assembly.
Be sure to unplug the power plug before dismantling and assembly.
Never apply severe force to dismantle parts. Parts may be damaged.
NOTE
Remove cover by pressing upward on bottom
and rotating outward .
Turn the bulb counterclockwise. Max. 40 W
bulb
for refrigerator is used and can be purchased at
a service center.
1
2
Care and Maintenance
It is recommended not to dismantle the ice
storage bin unless it is necessary.
Use both hands to remove the ice bin to avoid
dropping it.
If the ice bin does not slide into place easily,
twist the drive device slightly.
6
20
Page is loading ...
Page is loading ...
Page is loading ...
Page is loading ...
Page is loading ...
Page is loading ...
Page is loading ...
Page is loading ...
Page is loading ...
-
 1
1
-
 2
2
-
 3
3
-
 4
4
-
 5
5
-
 6
6
-
 7
7
-
 8
8
-
 9
9
-
 10
10
-
 11
11
-
 12
12
-
 13
13
-
 14
14
-
 15
15
-
 16
16
-
 17
17
-
 18
18
-
 19
19
-
 20
20
-
 21
21
-
 22
22
-
 23
23
-
 24
24
-
 25
25
-
 26
26
-
 27
27
-
 28
28
-
 29
29


Ask a question and I''ll find the answer in the document
Finding information in a document is now easier with AI
Related papers
-
LG GR-L267ATBA Owner's manual
-
-
-
-
-
LG GM-L267BVRA Owner's manual
-
-
-
-
LG LSC27910ST Owner's manual