Page is loading ...

SAFETY WARNINGS
TRP BRAKES
688 W. Amidan Dr. 4X-1
Ogden, UT 84404
Toll Free: 1-877-807-4162
Direct: 1-650-965-4442
Email: [email protected]
Web: www.trpbrakes.com
HYLEX & HYLEX RS
INSTALLATION INSTRUCTIONS
WARNING - This braking system was designed for use on a single rider bicycle. Use of this system on any other vehicle or apparatus will void the warranty, possibly
causing you great personal harm or injury.
WARNING - Disc brakes, calipers and rotors get VERY HOT during regular use. DO NOT touch or attempt to service the rotor or caliper assembly until you’ve allowed for
sufficient cooling to occur.
WARNING - These disc brakes offer a significant increase in performance over traditional cable actuated systems. Follow the break-in recommendations listed in this
manual, allow yourself time to learn and become accustomed to the braking characteristics.
WARNING - Leaking oil indicates a potential BRAKE FAILURE. If you’re system is leaking oil stop immediately and determine the nature of the problem. DO NOT
continue to ride a leaking system.
WARNING - If your bike is involved in a fall or crash, fully check the brake function including: the lever, caliper and rotor are securely attached to the bike, pads are
correctly installed and functioning, the cable, (if applicable) is operating smoothly and the lever feels firm when applying the brake.
Always have a qualified mechanic check the brakes if you have any doubts.
WARNING - Pad thickness must be at least 0.8mm of pad material. Confirm this before each ride.
Keep pads clean and free of oil or hydraulic fluid. If pads become contaminated, discard and replace.
CAUTION - Read this manual completely before attempting to install or work on your TRP brakes. If you are unfamiliar with any element of assembly or maintenance of
this braking system please consult a qualified mechanic for assistance.
CAUTION - Only use TRP or TEKTRO branded replacement Mineral Oil when servicing the brakes. Other disc brake fluids, ESPECIALLY DOT based oils, will harm the system
and compromise braking performance.
CAUTION - Cleanliness is a very important part of any maintenance of a TRP disc brake. If the pads or rotor become contaminated with oil, or if the system becomes
contaminated with impurities, braking performance will be greatly impaired.
CAUTION - As with any oil, precautions in handling and clean up of any spills should be handled according to accepted best practices as governed by your state or
country. Our Mineral oil is non-toxic, but clean up any spills promptly and completely.
If Mineral Oil gets in your eyes IMMEDIATELY FLUSH WITH WATER for several minutes and go to the hospital. If Mineral oil gets on your skin RINSE IMMEDIATELY with soap
and water. Do not inhale Mineral Oil, it is harmful. If inhaled move to a well ventilated environment and proceed to the hospital for appropriate care. If you ingest
Mineral oil it may cause vomiting and/or diarrhea.
TRP hydraulic disc brakes are warranted against manufacturing defects in materials and / or workmanship for a period of two years from the date of original retail purchase.
Not covered under this warranty is damage resulting from improper installation, adjustment or maintenance, lack of maintenance, alterations, crashes or use judged by
Tektro to be excessive or abusive. For warranty related questions or more information please contact a TRP Service Center or e-mail at [email protected]
13
32
34
34
13
14
34
70
B
AA
B
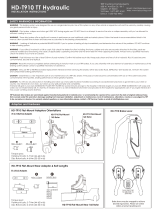
Hylex FlatMount Rear Adaptor & Bolt Lengths
Hylex FlatMount Adaptors Orientations Hylex IS Mount
Hylex Post Mount
Hylex FlatMount Rear 160 Rotor
Hylex FlatMount
160 Rotor
Hylex FlatMount
140 Rotor
For Post Mount
adaptors, hold the
adaptor so that the
stamped ‘UP’ is
oriented upwards,
or furthest from
the hub axle.

A-1. Rotor torquing sequence
000907FM2.3
B-2 Adjust lever reach
B-1 Tighten clamp nut with 5mm hex wrench
C-1 Install cap, nut and olive before installing
the barb!
INSTALLATION & ADJUSTMENT
2
4
3
5
1
6
GENERAL MAINTENANCE
D-1. Replace new pad
2.5 mm
Pad wear Indicator
PAD REPLACEMENT
Pads should be replaced if they become contaminated or have less than 2.5mm thickness (Pad friction material
& metal backing plate). [ref. D-1]
BEFORE RIDING
Check the pads for wear or contamination.
Check the hose for cracking, wear or deformation. Replace if necessary.
Check that the brake system is operating correctly.
AFTER RIDING
Remove any mud or contamination from the rotor slot on the caliper.
Clean the caliper body with a cloth.
AT REGULAR INTERVALS
Check the oil level in the reservoir.
Lubricate the brake lever pivot with grease.
Check to make sure that all the bolts are tightened to the correct torque specifications.
Instructions on bleeding the brakes can
be found on www.trpbrakes.com or
on www.youtube.com/user/TRPBrakes
For questions about setup, usage or general inquiries, please contact TRP by e-mail at
[email protected] or by phone toll free in US, 877-807-4162 or outside US 1-801-648-7079.
TOOLS AND EQUIPMENT REQUIRED
The following tools are necessary to install the Tektro hydraulic disc brake:
2mm hex wrench 5mm hex wrench T25 Torx® wrench
8mm open end wrench Birzman Pad Gap Tool (optional)
MOUNTING THE ROTOR TO THE HUB
Attach the rotor to the hub with the supplied Torx® bolts and tighten in an alternating pattern with
a T25 Torx® wrench. Final tightening torque: 4-6 Nm (35-53 in-lb). [ref. A-1]
NOTE - The rotor must be installed with the “rotation” arrows pointing in the same direction as the
forward rotation of the wheel.
INSTALLING FLATMOUNT ADAPTORS
Select the correct adapter (front or rear) for the size of rotor.
Front caliper -
Attach the adapter to the caliper in correct direction for 140mm or 160mm rotor.
Tighten the two M5x13 bolts to a torque of 5-7 Nm.
Attach the adapter to fork using the two M5x14 bolts. Align the caliper to the rotor, (using an gap
or alignment tool,) and tighten to a torque of 5-7 Nm.
Rear caliper -
With 140mm rotor: Insert mounting bolt into the frame and make sure it is protruding 7mm
through the frame. Attach the caliper to bolt .
With 160mm rotor: Attach F-6 adapter to brake caliper and tighten bolt to a torque of 5-7 Nm
(44-62 in-lb). Then attach adapter to the frame with mounting bolt .
Make sure the pads are correctly positioned in the caliper. Do not tighten the bolts at this stage.
With the caliper mounting bolts still loose, squeeze the brake lever. The caliper will correctly center
itself to the rotor. You may also use a disc brake gap or alignment tool. Maintaining pressure on
the brake lever, tighten the caliper mounting bolts. Final tightening torque: 6-8 Nm (53-71 in-lb).
MOUNTING THE BRAKE LEVERS
Pull back the rubber hood to expose the 5mm hex head clamping nut - loosen and slide onto bar.
Place the levers in an appropriate position and tighten to 4-6 Nm (35-53 in-lb). [ref. B-1]
Route the brake hose along the handlebar. As with all hydraulic hose, there should be no kinks or
bends that collapse the housing.
Once you have the lever assembly positioned appropriately, you can adjust the reach of the
blade by 2mm Allen wrench to suit your preference. [ref. B-2]
MODIFYING HOSE LENGTH
Pull to remove the plastic cap and unscrew the compression nut.
Pull on the hose to free it from the caliper. Some fluid may drip out. Measure the new hose length
making sure you have enough free length for full rotation of your handlebars. Cut the hose to the
desired length using a hydraulic hose cutter. (Hylex uses a banjo fitting on the hose end at the
brake lever, which is not replaceable. This is the reason for cutting the hose at the caliper. )
Important: Slide on the plastic cap, compression nut, then the olive with the tapered end oriented
to engage the compression nut.
Install the barb ensuring that it is fully seated within the cut end of hydraulic tubing. [ref. C-1]
Reinsert the hose into the caliper and tighten the compression nut to 4-6 Nm (35-53in-lbs).
/