
B
u
i
l
t-i
n C
o
n
v
e
c
t
i
o
n
O
v
e
n
s
CARE AND USE MANUAL
Models:
SEC271
SEC272
SECD272
SEC301
SEC302
SECD302
C271
C272
C301
C302

A Special Message
to Our Customers
Thank you for buying a Thermador oven. We recommend
that you take the time to read this entire booklet before
using your new appliance.
We hope the information in this manual will help you
easily operate and care for your oven for years of
satisfaction.
Please contact us if you have any questions or comments.
Phone us at 1-800-735-4328 or write to us at:
Customer Support Call Center
Thermador
5551 McFadden Avenue
Huntington Beach, CA 92649
Sincerely,
Thermador Application Lab Consumer Scientists

Built-in Oven Care and Use Manual
1
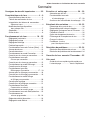
Contents
Important Safety Instructions .............. 2-3
Features of Your Oven ........................ 4 - 9
Oven Parts Description................................. 4
Oven Control Panel ...................................... 5
Interpreting the Control Panel:
Sights & Sounds ................................... 6
Heating Modes Available in Each Oven .......... 7
General Tips ................................................ 8
Oven Racks................................................. 9
Oven Operations ............................. 10 - 25
Setting the Timer........................................10
Setting the Clock.........................................11
Setting the Lights ........................................11
Fast Preheat Operation ...............................11
Bake Mode Operation .................................12
Baking Tips ................................................13
Baking Recommendations ...........................13
Convection Mode Operation.........................14
Convection Recommendations .....................14
Convection Bake Mode Operation ................15
Convection Bake Recommendations.............15
Roast Mode Operation ................................16
Roasting Recommendations.........................16
Convection Roast Mode
and Probe Operation..................... 17 - 18
Convection Roast Tips ................................18
Convection Roast Recommendations............19
Broil
and
Convection
Broil
Mode
Operation .....20
Broil Recommendations ...............................21
Convection Broil Recommendations ..............21
Warm Mode Operation................................22
Proof Mode Operation .................................22
Dehydrate Mode Operation .........................22
Timed Cook Operation .........................23 - 24
Food Safety Guidelines ................................24
Setting the Sabbath Mode ...........................25
Care and Cleaning ..........................26 - 29
Self-Cleaning the Oven ................................26
Self-Clean Mode Operation ...................27 - 28
Oven Finishes / Cleaning Method .................29
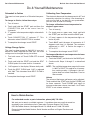
Do-It-Yourself Maintenance ...........30 - 32
Removing the Oven Door............................30
Replacing the Halogen Lamp........................31
Changing to 24-hour Clock ...........................31
Fahrenheit to Celsius ...................................32
Voltage Change Option................................32
Calibrating Oven Temperature ..................... 32
Changing the Volume ..................................32
How to Obtain Service.................................32
Problem Solving .............................. 33 - 34
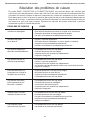
Solving Baking Problems ..............................33
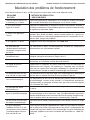
Solving Operational Problems .......................34
Thermador Built-in Oven Warranty ....... 35
See Also
Quick Cooking Guide and Quick Guide for
Self-Cleaning ........................
packed separately

Built-in Oven Care and Use Manual
2
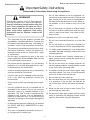
Safety Precautions
• This appliance must be properly installed and
grounded by a qualified technician. Connect only
to properly grounded outlet. See “Grounding In-
structions” found in the Installation Instructions.
• This appliance should be serviced only by a quali-
fied service technician. Contact the nearest au-
thorized service center for examination, repair
or adjustment.
• Do not repair or replace any part of the oven
unless specifically recommended. Refer service
to an authorized service center.
• Do not operate this appliance if it is not working
properly or if it has been damaged, until an auth–
orized technician has examined it.
• Install or locate this appliance only in accordance
with the Installation Instructions.
• Use this oven only as intended by the manufac-
turer. If you have any questions, contact the
manufacturer.
• Do not cover or block any openings on this appli–
ance.
• Use this appliance only for its intended use as
described in this manual. Do not use corrosive
chemicals, vapors, or nonfood products in this
appliance. This type of oven is specifically de-
signed to heat or cook. It is not designed for
industrial or laboratory use. The use of corrosive
chemicals in heating or cleaning will damage the
appliance.
• In the event that personal clothing or hair catches
fire, DROP AND ROLL IMMEDIATELY to extin-
guish flames.
• This oven is intended for residential use only. It
is not approved for outdoor use.
WARNING
When properly cared for, your new Thermador oven
has been designed to be a safe, reliable appliance.
Read all instructions carefully before using this
oven. These precautions will reduce the risk of
burns, electric shock, fire and injury to persons.
When using kitchen appliances, basic safety
precautions must be followed, including the
following:
Continued on next page
• Do not allow children to use this appliance, un-
less closely supervised by an adult. Children and
pets should not be left alone or unattended in
the area where the appliance is in use. Never al-
low children to sit or stand on any part of the
oven.
• Do not store items of interest to children above
the oven. If children should climb onto the appli-
ance to reach these items, they could be seri-
ously injured.
To reduce the risk of fire in the oven cavity:
1. Do not store flammable materials in or near the
oven.
2. Do not use water on a grease fire. Smother fire
or use a dry chemical or foam-type extinguisher.
3. It is highly recommended that a fire extinguisher
be readily available and highly visible next to any
cooking appliance.
4. Do not overcook food. Carefully attend oven if
paper, plastic or other combustible materials are
placed inside the oven.
5. Do not use the cavity for storage purposes. Do
not leave paper products, cooking utensils or food
in the cavity when not being used.
6. If materials inside the oven should ignite, keep
oven door closed. Turn oven off and disconnect
the circuit at the circuit breaker box.
7. Do not block any vent openings.
8. Be sure the blower fan runs whenever the oven
is in operation. If the fan does not operate, do
not use the oven. Call an authorized service cen-
ter.
9. Never use the oven to warm or heat a room. This
can damage the oven parts.
10. For personal safety, wear proper clothing. Loose
fitting or garments with hanging sleeves should
never be worn while using this appliance.
Important Safety Instructions
Please read all instructions before using this appliance.

Built-in Oven Care and Use Manual
Safety Instructions
3
SAFETY PRECAUTIONS
• Tie long hair so that it doesn't hang loose.
• The heating elements may be hot even though
they are dark in color. Interior surfaces of an oven
become hot enough to cause burns.
• During and after use, do not touch or let clothing
or other flammable materials contact the heating
elements or the interior surfaces of the oven until
they have had sufficient time to cool.
• The trim on the top and sides of the oven door
may become hot enough to cause burns.
• Use care when opening the door. Open the door
slightly to let hot air or steam escape before
removing or replacing food.
• Do not heat unopened food containers. Build-up
of pressure may cause the container to burst and
result in injury.
• Always place oven racks in desired location while
oven is cool. If a rack must be moved while oven
is hot, do not let pot holder contact the heating
elements.
• Use only dry pot holders. Moist or damp pot
holders on hot surfaces may result in burns from
steam. Do not let pot holders touch hot eating
elements. Do not use a towel or other bulky
cloth.
SAFETY PRECAUTIONS WITH
SELF CLEANING OVEN
• Confirm that the door locks and will not open
once START is touched and the Door Lock icon
appears. If door does not lock, touch OVEN OFF
and do not run Self-Clean. Phone 800/735-4328
for service (see Page 32 for obtaining service).
• Note: During a normal Self-Clean and a Delayed
Self-Clean cycle, the door locks within 25 to 30
seconds after start is touched.
• Do not clean the door gasket. It is essential for
a good seal. Care should be taken not to rub,
damage, move or remove the door gasket.
• Do not use commercial oven cleaners or oven
liner protective coatings of any kind in or around
any part of the oven.
• Clean only oven parts listed in this manual.
• Before self-cleaning the oven, remove the
broiler pan, all oven racks, other utensils and
excess soft spillage.
• Make sure the Extendable Rack (C oven mod-
els) is removed.
• Listen for fan. A fan noise should be heard some-
times during the cleaning cycle. If no fan is heard,
call for service. See Page 32.
REGARDING PET BIRDS
Birds have very sensitive respiratory systems.
Keep pet birds out of the kitchen or other rooms
where kitchen fumes could reach them. During
Self-Clean mode, fumes that may be harmful to
birds are released. Other kitchen fumes, such
as from overheating margarines and cooking
oils, may also be harmful.
Important Safety Instructions
Please read all instructions before using this appliance.
The California Safe Drinking Water and Toxic
Enforcement Act requires businesses to warn
customers of potential exposure to substances
which are known by the State of California to
cause cancer or reproductive harm.
The elimination of soil during self-cleaning
generates some by-products which are on this
list of substances.
To minimize exposure to these substances,
always operate this oven according to the
instructions in this manual and provide good
ventilation to the room during and immediately
after self-cleaning the oven.
WARNING

Built-in Oven Care and Use Manual
4
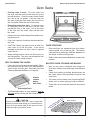
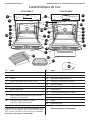
#
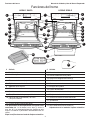
Item
12 Front Frame
13 Automatic Door Lock Latch
14 Halogen Oven Lamps (2)
15 Convection Fan and Cover
16 Side Trim
17 Door Hinge
18 Removable Door
19 Door Cooling Vents
20 Probe Receptacle
21 Vent Trim
22 Probe
23 Broiler Pan and Grid
24 Extendable Rack - (C oven models)
Remove during Self-Clean mode.
SINGLE OVEN DOUBLE OVEN
#
Item
1 Door Handle
2 Oven Door Gasket
3 Window
4 Bake Element (under oven floor)
5 Removable Oven Racks
6 Rack Supports*
7 Broil Element
8 Glass Touch Control Panel
9 Clock/Time Display & Control Display
10 Model & Serial No. Location
11 Oven Cooling Vents
Features of Your Oven
Oven Features
*Rack support positions are numbered from the
bottom rack support (#1) to the top (#6). Cooking
Recommendations in this manual refer to the
recommended rack positions.
Remove racks during Self-clean mode.
1
2
3
4
7
6
9
13
14
16
17
18
19
21
20
23
22
8
24
11
S
T
A
R
T
12 34 5 6 78 90
L
OW
E
R
OV
E
N
T
IM
E
R
1
T
IM
E
R
2
S
E
L
F
C
L
E
AN
T
IM
E
R
1
O
FF
T
IM
E
R
2
O
FF
C
L
O
C
K
T
IM
E
S
T
O
P
T
IM
E
C
L
O
C
K
P
AN
E
L
L
O
C
K
OV
E
N
O
FF
OV
E
N
L
IGH
T
F
A
S
T
P
R
E
H
E
A
T
C
ONV
E
C
T
ION
P
R
O
B
E
B
AK
E
C
ONV
E
C
T
ION
B
AK
E
WA
R
M
P
R
OO
F
C
ONV
E
C
T
ION
R
OA
S
T
C
ONV
E
C
T
ION
B
R
OI
L
B
R
OI
L
B
R
OI
L
D
E
HYD
R
A
T
E
U
PP
E
R
OV
E
N
OV
E
N
L
IGH
T
OV
E
N
O
FF
C
OOK
R
OA
S
T
S
T
A
R
T
12 34 5 6 78 90
L
OW
E
R
OV
E
N
T
IM
E
R
1
T
IM
E
R
2
S
E
L
F
C
L
E
AN
T
IM
E
R
1
O
FF
T
IM
E
R
2
O
FF
C
L
O
C
K
T
IM
E
S
T
O
P
T
IM
E
C
L
O
C
K
P
AN
E
L
L
O
C
K
OV
E
N
O
FF
OV
E
N
L
IGH
T
F
A
S
T
P
R
E
H
E
A
T
C
ONV
E
C
T
ION
P
R
O
B
E
B
AK
E
C
ONV
E
C
T
ION
B
AK
E
WA
R
M
P
R
OO
F
C
ONV
E
C
T
ION
R
OA
S
T
C
ONV
E
C
T
ION
B
R
OI
L
B
R
OI
L
B
R
OI
L
D
E
HYD
R
A
T
E
U
PP
E
R
OV
E
N
OV
E
N
L
IGH
T
OV
E
N
O
FF
C
OOK
R
OA
S
T
2
3
4
5
5
6
7
8
9
12
20
10
10
15

Built-in Oven Care and Use Manual
S
T
A
R
T
12 34 5 6 78 90
L
OW
E
R
OV
E
N
T
IM
E
R
1
T
IM
E
R
2
S
E
L
F
C
L
E
AN
T
IM
E
R
1
O
FF
T
IM
E
R
2
O
FF
C
L
O
C
K
T
IM
E
S
T
O
P
T
IM
E
C
L
O
C
K
P
AN
E
L
L
O
C
K
OV
E
N
O
FF
OV
E
N
L
IGH
T
F
A
S
T
P
R
E
H
E
A
T
C
ONV
E
C
T
ION
P
R
O
B
E
B
AK
E
C
ONV
E
C
T
ION
B
AK
E
WA
R
M
P
R
OO
F
C
ONV
E
C
T
ION
R
OA
S
T
C
ONV
E
C
T
ION
B
R
OI
L
B
R
OI
L
B
R
OI
L
D
E
HYD
R
A
T
E
U
PP
E
R
OV
E
N
OV
E
N
L
IGH
T
OV
E
N
O
FF
C
OOK
R
OA
S
T
5
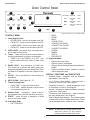
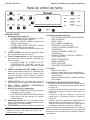
Oven Control Panel
Oven Features
1
2
3
4
5
7
8
9
10
11
CONTROL MENU
1. Oven Selector Pads
• UPPER OVEN – touch to turn upper oven ON.
• OVEN OFF – touch to turn the upper oven OFF.
• LOWER OVEN – touch to turn lower oven ON.
• OVEN OFF – touch to turn the lower oven OFF.
2. OVEN LIGHT – (two pads) Turns oven lights on or
off for upper or lower oven.
3. Timers – There are two timers that count down in
minutes and seconds or in hours and minutes.
•
TIMER 1 (or 2) and TIMER 1 (or 2) OFF
–
sets
kitchen timers and turns timers off.
See Page
10.
4. PANEL LOCK – also referred to as Child Lock-
Out; select this to prevent the control pads from
being activated when oven is not being used. Touch
and hold for 5 seconds to activate; repeat to can-
cel.
5 . CLOCK – Use to set the time of day and timer(s)
countdown.
6 . SELF-CLEAN – See Pages 26 - 27.
7 . Timed Cooking Pads
• COOK TIME – selects the time to cook.
• STOP TIME – selects the time of day the oven
is to automatically turn off.
8 . Number Pads – 1 through 0 – select a time of
day, temperatures, cook and stop time, or timer(s).
9 . START – touch this pad to complete a timed
entry or any oven mode.
10.
Oven Mode Pads
• FAST PREHEAT
• BAKE
• ROAST
• BROIL
• CONVECTION
• CONVECTION BAKE
• CONVECTION ROAST
• CONVECTION BROIL
• PROBE
• WARM
• PROOF
• DEHYDRATE
11.
Display Window
• Displays the time of day.
• Displays timer(s) countdown.
• Displays Panel Lock and Probe icons when ac-
tivated.
• Displays selected modes, numbers, symbols
and scrolling messages.
SPECIAL FEATURES and INDICATORS
• Sabbath Mode – complies with the Sabbath
requirement. See Page 25.
• 12- or 24-hour Clock Choice – oven can have a
12-hour or 24-hour clock. See Page 31.
• Fahrenheit or Celsius – switch temperature scale
to Fahrenheit or Celsius. See Page 32.
• Volume – decrease or increase loudness of control
panel tones. See Page 6.
• Calibrating Oven Temperature – used to calibrate
the oven temperature. See Page 32.
• Default Temperature Settings – The cooking modes
automatically select a suitable temperature. These
can be changed when a different one is needed.
1
* Control Shown is for a Double Oven
6
NOTE: In the event of a power failure, these
functions return to the factory
settings and will need to be reset.

Built-in Oven Care and Use ManualOven Features
6
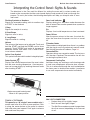
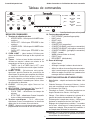
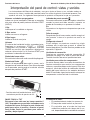
Interpreting the Control Panel: Sights & Sounds
The directions in the Care and Use Manual for setting the oven and its various modes are
based on the assumption that the control panel displays and sounds will lead you through the
process. To assist you further, the following descriptions will help you interpret what is seen
and heard.
Flashing Symbols or Numbers
Signals an incomplete setting; calls for another step
or START to be touched.
1 Beep
Signals the receipt of an entry.
2 Short Beeps
Signal an error in entry.
4 Long Beeps
Signal the end of a setting.
Volume
The volume of the beeps can be adjusted. Touch and
hold the START pad and the PROBE pad for three
seconds. Touch PROBE pad again to increase or
decrease volume, from levels 1 to 3. Touch START
to set volume selection.
Active Oven Symbol
This symbol indicates which mode is being displayed.
Probe Symbol
Displays the internal temperature of the meat rather
than the oven roasting temperature. Oven tempera-
ture can be seen briefly by touching the cook mode
after touching START.
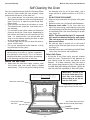
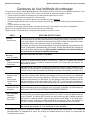
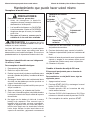
208 VOLT CONNECTION
• Preheat time will be slightly longer.
• Broil time will be slightly longer.
• The Self-Clean mode may need a longer clean
time than normal, depending on the amount
of soil.
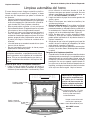
Single oven model control panel
shown in 20º open position.
➥
TOUCH 'n' TILT PANEL
This panel is on 30"single C oven models only. It
can be used in the tilt or flush-to-oven position. Push
in along the center bottom of the panel to release
latch and raise panel upward. Push again to release
latch and lower the panel.
Door Lock Indicator
Displays during the Self-clean mode whenever the
door is locked. Door can be opened when symbol no
longer appears.
Err
Displays if an invalid temperature or time is entered.
Power Failure
After the power returns to the oven, the clock dis-
plays the time when the power was lost or turned
off.
F Number Codes
These codes are displayed when there is a problem
with the signal sent to the electronic control board.
See Solving Operational Problems, Page 34.
Convection Fan
Operates during any convection mode. The fan turns
off if the door is opened. The convection fan will also
run during the preheat time.
Component Cooling Fan
Activates during any cooking or self-cleaning mode
to cool inner components and outer door surfaces.
This air is exhausted through the vent located below
the lower oven in double oven models. It continues
to run until components have cooled sufficiently.

Built-in Oven Care and Use Manual
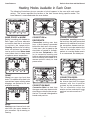
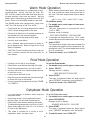
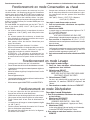
Heating Modes Available in Each Oven
Oven Features
7
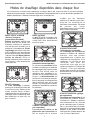
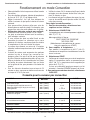
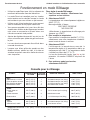
The following illustrations give an overview of what happens in the oven with each mode
setting. The arrows represent the location of the heat source during specific modes. The
lower element is concealed under the oven bottom.
CONVECTION BROIL
Convection broiling
combines
the intense heat from the upper
element with the circulation
assisted by the convection fan.
This air circulation crisps the
exterior surface and retains inner
moisture in meats more than 1
-1
/2"
thick.
CONVECTION ROAST
Convection roasting
combines
the heat from the lower concealed
element with additional heat from
the convection element and fan.
The result is a crispier exterior that
seals in the interior juices.
It is
perfect for roasting tender meats
in an uncovered, low-sided pan.
CONVECTION BAKE
Convection Bake
has heat from
the upper and lower element with
circulation assisted by the convec-
tion fan. This mode is designed for
breads and pastries.
CONVECTION or
DEHYDRATE
Convection
cooking uses heat
from a third element concealed
behind the back wall of the oven.
It also uses a fan to speed up the
circulation of heated air through-
out the oven.
Dehydrate
is simi-
lar to convection cooking and
holds an optimum low temperature
while circulating the heated air to
remove moisture slowly for food
preservation.
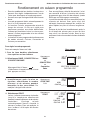
BROIL
Broiling
uses intense heat radi-
ated from the upper element to
give excellent top browning or
searing.
ROAST
Roast
has more top heat than
bake. This additional top heat is for
conventional open roasting when
drippings are desired or for cov-
ered-dish roasting.
BAKE, PROOF or WARM
Baking is cooking with heated air.
Both upper and lower elements
are used to heat the air and cycle
to maintain the temperature.
Proofing,
while similar to baking,
holds an optimum low tempera-
ture for yeast to rise.
Warm mode
uses bottom heat to keep foods
at optimum warm tenperature.

Built-in Oven Care and Use Manual
Oven Features
8
PREHEATING THE OVEN
• Place oven racks in desired position before heat-
ing the oven.
• Preheat the oven when using the BAKE,
CONVECTION, ROAST, CONVECTION BAKE
and CONVECTION ROAST modes.
• Preheat is not used for BROIL and CONVECTION
BROIL modes.
• Allow oven to preheat while preparing recipe in-
gredients or food item.
• Setting a higher temperature does not shorten
preheat time.
• During preheat, the selected cooking tempera-
ture is displayed and alternates with a display of
the actual oven temperature.
• The oven beeps once when it is preheated and
the selected cooking temperature is displayed.
• Once oven is preheated, place food in the oven
as quickly as possible to minimize the loss of heat
and reduction of oven temperature.
• Use FAST PREHEAT to speed up preheating.
OPERATIONAL SUGGESTIONS
• Use the cooking recommendations as a guide.
• Use the interior oven light to view the food through
the oven door window rather than opening the
door frequently.
• Use TIMER 1 or TIMER 2 to keep track of cook-
ing times.
• Open the door as briefly as possible to avoid tem-
perature reduction.
BAKING PANS AND DISH INFORMATION
• Glass baking dishes absorb heat; therefore, re-
duce oven temperature 25°F when baking in
glass.
• Use pans that give the desired browning. For
tender, light golden brown crusts, use light, an-
odized or shiny metal utensils.
• Dark, rough or dull pans (nonstick or anodized)
will absorb heat and result in a browner, crisper
crust. Some manufacturers recommend reduc-
ing the temperature 25° F when using this type
of pan. Follow manufacturer recommendations.
General Tips
• Insulated cookie sheets or baking pans may in-
crease the length of cooking time.
• Do not set roasting pans or other baking pans
on the open oven door.
• Do not keep the empty broiler pan in the oven
during cooking as this could change cooking per-
formance. Store the broil pan outside of the oven.
• Tips for “Solving Baking Problems” are found on
Page 33.
HIGH ALTITUDE BAKING
• When cooking at high altitude with BAKE, CON-
VECTION, CONVECTION BAKE, ROAST or
CONVECTION ROAST modes, recipes and cook-
ing times will vary.
• For accurate information, write the Extension
Service, Colorado State University, Fort Collins,
Colorado 80521. There may be a cost for the
guides. Specify which high altitude food prepa-
ration guide you prefer: general information,
cakes, cookies, breads, etc.
CONDENSATION / TEMPERATURE SENSOR
• It is normal for a certain amount of moisture to
evaporate from the food during any cooking
process. The amount depends on the moisture
content of the food. The moisture may condense
on any surface cooler than the inside of the oven,
such as the control panel.
• Your new Thermador
®
oven has an electronic
temperature sensor that accurately maintains the
temperature selected. Your previous oven may
have had a mechanical thermostat that drifted
gradually over time to a higher temperature. If
you have adjusted your favorite recipe for use
with your previous oven, you may have to adjust
the time or temperature in your new oven.

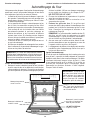
Built-in Oven Care and Use Manual
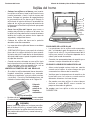
Oven Racks
6
1
2
3
4
5
RACK POSITIONS
• Rack positions are numbered from the bottom
support guide (#1) to the top (#6). The correct
rack position for cooking a food item depends on
the recipe and the cooking mode.
• Refer to the cooking recomendations for best rack
position.
9
Oven Features
• The Extendable Rack (C oven models) must be
removed before starting the Self-Clean mode.
Extendable Rack
Always
remove
before
Self-Clean
Rack
Positions
MULTIPLE RACK COOKING AND BAKING
• Now you can cook a complete meal using mul-
tiple racks without flavor exchange from different
foods.
• Check that cooking or baking temperatures are
the same when cooking different foods at the
same time.
• Two racks can be used at one time during BAKE
mode, such as when baking a batch of cookies.
• Three racks or more can be used with convection
mode.
• Placing racks in oven: To insert racks into
the oven, hold the rack with the back rail up and
toward the back. Place the safety hooks under
the front of the rail guides. Push the rack into
the oven, lifting the rack stops over the front of
the rail guides. Slide the rack into position.
• Removing racks from oven: To remove racks
or reposition racks in the oven, pull the rack
toward the front of the oven. Lift up the front
of the rack over the safety stops and pull from
the oven.
• Place oven racks in desired positions before turn-
ing the oven on.
• Oven rack supports should not be removed from
the oven.
• CAUTION! Never use aluminum foil to cover the
oven racks or to line the oven. It can cause
damage to the oven can liner if heat is trapped
under the foil.
• When placing food on a rack, pull the rack out to
the stop position. The racks are designed to lock
and not tilt when pulled forward.
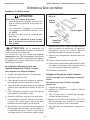
SELF-CLEANING THE RACKS
• If the racks are left in the oven during Self-Clean,
the racks will lose the shiny finish and change to
a dull, bluish, metallic gray. See Oven Care and
Cleaning Recommendations on Page 29.
CAUTION
Always insert racks with pan stops toward the
back of the oven and facing up. If inserted incor-
rectly, the rack could slide all the way out of the
oven causing injury and/or burns.
Back of Rack
Front of Rack
Insert Rack with back of rack
toward back wall of oven

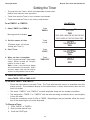
Built-in Oven Care and Use Manual
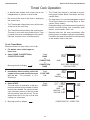
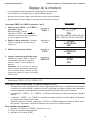
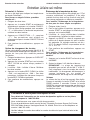
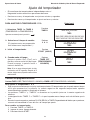
Setting the Timer
To Change a Timer:
1. Touch TIMER 1 or TIMER 2.
2. Enter the new desired time.
3. Touch the START pad.
To Set Both TIMER 1 and TIMER 2:
• Follow the steps above to set each Timer. The Timer with the least amount of countdown time has
display priority. The countdown display for the second timer is shown automatically when the first
timer has ended.
• The words “TIMER 1” and “TIMER 2” are both displayed along with the number countdown.
• The designation, “TIMER 1” or “TIMER 2” with the least remaining countdown time is more brightly
lit than the other.
• During the countdown, touch CLOCK or TIMER. Depending on the pad touched, either the time of
day or the remaining time is briefly displayed.
• The oven has two Timers, which are independent of each other.
Neither timer controls oven operations.
• Touch once and the Timer is set in minutes and seconds.
• Touch twice and the Timer is set in hours and minutes.
To Cancel an Active Timer:
Select TIMER 1 OFF or TIMER 2 OFF.
1. Select TIMER 1 or TIMER 2.
Message scrolls in display.
MIN SEC
––
:
––
You Will See
To set TIMER 1 or TIMER 2:
Oven Operations
10
Touch
START
Touch
TIMER OFF
Touch
TIMER 1
Touch
3 0 0
End
MIN SEC
TIMER 1
3:00
MIN SEC
TIMER 1
3:00
Touch TIMER 1 again for hrs and Min then
select length of time then touch start
Note: If timer is not turned off, beeps
will continue every 30 seconds. After 5
minutes, beeps stop and the display
reverts to the previous time of day.
TIMER 1
TIMER 1
2 . Set the amount of time.
(Example shows a 3-minute
setting with Timer 1.)
3 . Start Timer.
4 . When set time is complete,
“End” is displayed and 2 long beeps
signal. When turned off, display
reverts to time of day.

Built-in Oven Care and Use Manual
Setting the Clock
• Always set the clock immediately after installa-
tion or after a power failure. Once power returns
to the oven, the clock displays the time of day
when power was turned off or lost.
• The Time of Day clock can be set when an au-
tomatic timed cooking mode is in operation.
• If 10 seconds elapse between touching the clock
pad or number pads, the oven will beep two times
as a reminder.
• After 5 more seconds, the clock pad will stop
flashing and original time will be displayed.
Setting the Lights
• Touch OVEN LIGHT pads once to turn lights on or off.
• The lights do not operate in the Self-Clean mode.
Oven Operations
To Set the Clock:
1. Select the CLOCK pad.
Message scrolls in display:
Select Time of Day then touch START
2. Set the current time of day.
Message scrolls in display:
Select Time of Day then touch START
3. Select START or CLOCK.
11
Fast Preheat Operation
FAST PREHEAT can be used to preheat the oven faster.
To use FAST PREHEAT:
• Always select the cooking mode first. Change the oven temperature if necessary.
• Then touch FAST PREHEAT.
• Then touch START.

Built-in Oven Care and Use ManualOven Operations
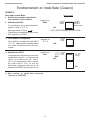
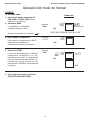
12
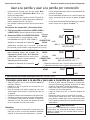
To set Bake mode:
1. For double ovens, select upper or
lower oven.
You Will See
100
o
/375
o
PREHEAT
375
o
350
o
Touch
START
Touch
3 7 5
Touch
BAKE
4. Select START.
The temperature display alternates be-
tween the set temperature and the actual
temperature, beginning with 100°F. The
actual temperature counts up in 5°F in-
crements.
The oven is preheated when the beep sig-
nals once. PREHEAT disappears from
the display.
3. To change the temperature
To change the temperature from 350ºF,
select another temperature immediately
before starting.
2. Select BAKE.
The temperature is automatically set at
350ºF.
Message scrolls in display.
➝
2:
57
(Clock time)
UPPER
Select Bake temperature then touch START
BAKE
5. To end this mode, select
OVEN OFF.
3:
27
UPPER
UPPER
Bake Mode Operation
EXAMPLE

Built-in Oven Care and Use ManualOven Operations
13
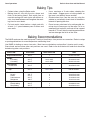
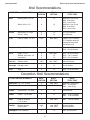
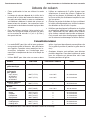
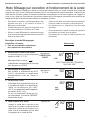
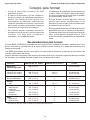
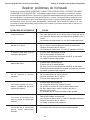
Baking Recommendations
The BAKE mode can be used to prepare a variety of food items, from pastries to casseroles. Refer to recipe
or package directions for oven temperature and baking time.*
Use BAKE for baking on one or two racks. Most items are baked on rack position 3 (center rack in oven).
Some foods are best when other rack positions are used. Refer to the chart below for foods that should be
baked using other rack positions.
Baking Tips
• Preheat when using the Bake mode.
• Baking time will vary with the size, shape and
finish of the baking utensil. Dark metal pans or
nonstick coatings will cook faster with darker re-
sults. Insulated bakeware will lengthen the cook-
ing time for most foods.
• For best results, bake food on a single rack with
at least 1
-1
/2" space between pans or dishes and
oven walls.
• Use a maximum of 2 racks when selecting the
bake mode. Stagger pans or baking sheets so
that one is not directly above another.
• Eliminate heat loss from the oven by using the
window to periodically check food for doneness
instead of opening the door.
• Do not use any aluminum foil or a disposable alu-
minum tray to line any part of the oven. Foil is an
excellent heat insulator and heat will be trapped
beneath it. This will alter the cooking performance
and can damage the finish of the oven.
FOOD ITEM OVEN TEMP RACK POSITION TIME
Angel Food Cake Mix 350° F 1 37 to 47 minutes
Cake Mix
8" round(s) 350° F 3 or 2 and 5 32 to 36 minutes
9" round(s) 350° F 3 or 2 and 5 28 to 31 minutes
Cakes, Specialty
Pound cakes 350° F 2 48 to 58 minutes
Cookies
Drop 375° F 3 or 1 and 4 8 to 10 minutes
Pizza
Scratch 425° F 3 20 to 25 minutes
Frozen 375° F 3 18 to 25 minutes
Prebaked crust 425° F 3 12 to 20 minutes
Refrigerator 400° F 3 18 to 22 minutes
Pudding
Bread pudding 350° F 2 50 to 60 minutes
Rice pudding 325° F 2 40 to 50 minutes
* This chart is a guide. Follow recipe or package.

Built-in Oven Care and Use Manual
Oven Operations
14
• Preheat when using the convection mode.
• For a quick recipe conversion, reduce the oven
temperature 25° from the bake setting.
• Set Timer 1 or 2 as a reminder to check doneness
of the food at minimum time.
• Multiple-rack cooking and baking can be done in
this mode. For example, cookies can be baked
on all six racks.
• Use low-sided uncovered pans, such as cookie
sheets with 1 or 2 sides.
• Shiny aluminum pans are best, unless otherwise
specified.
• Dark finish metal pans and heatproof glass or
ceramic bakeware may require oven temperature
to be reduced or the time shortened.
• Foods cooking in less than 15 minutes requires
the same time as in bake mode.
• Cookie-baking time may be a few minutes longer
for multi-rack convection baking. That is because
the presence of additional baking sheets in the
oven has an effect on the heating and air
circulation. Place baking sheets directly under
each other on the oven racks to enable optimum
heat circulation.
• Foods taking 30 minutes or more to cook will have
a 10 to 15 percent time savings.
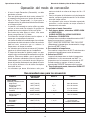
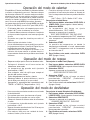
Convection Mode Operation
To Set the Convection mode:
4. Select START.
The temperature display alternates between the
set temperature and the actual temperature, be-
ginning with 100°F. The actual temperature
counts up in 5°F increments
The oven is preheated when the beep signals
once. PREHEAT disappears from the display.
3. To change the temperature:
To change the temperature from 325ºF,
select another temperature immediately
before starting.
2. Select CONVECTION.
The temperature is automatically set at 325°F.
Message scrolls in display:
Select Convection temperature
then touch START
1. For double ovens, select upper or lower oven.
5. To end this mode, select OVEN OFF.
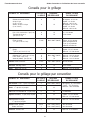
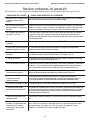
Convection Recommendations
FOOD ITEM OVEN RACK TIME*
TEMPERATURE
Cakes, mix or scratch:
Angel Food 325°F 1 38 to 48 minutes
Layers (8" or 9") 325°F 2 and 5 32 to 35 minutes
Rectangle (9 x 13) 325ºF 3 31 to 34 minutes
Cupcakes 325ºF 1, 3, and 5 17 to 20 minutes
Biscuits:
Scratch or 425°F 3 10 to 12 minutes
Refrigerator
Cookies:
Drop or Sliced 350°F 1, 3, and 5 8 to 10 minutes
Cream puffs 375°F 3 20 to 30 minutes
Meringues 325°F 2 20 minutes
Souffles 350°F 3 35 to 40 minutes
* This chart is a guide. Follow recipe or package directions.
• Check doneness 5 to 10 minutes sooner than the
minimum time for foods taking 30 minutes or more
to cook.
• Items such as angel food cake, popovers and
soufflés will have higher volume when baked in
this mode.

Built-in Oven Care and Use Manual
Oven Operations
15
• This mode may be used for breads, pastries and
pies to take advantage of the bottom heat, yield-
ing a better crust on baked items.
• Use the conventional cooking time given in the
recipe.
• Cook using only one rack at a time.
• Most recipes are baked on rack positions 1 or 2
to take advantage of the bottom heat.
• For a quick recipe conversion, reduce the oven
temperature by 25ºF from the recommended tem-
perature.
• When a recipe has a two-step temperature
cooking method (ex: pumpkin pie), use the lower
temperature for the entire cooking time given.
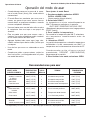
Convection Bake Mode Operation
To set the Convection Bake mode:
1. For double ovens, select upper or lower oven.
2. Select CONVECTION BAKE.
The temperature is automatically set at 325°F.
Message scrolls in display:
Select Convection Bake temperature
then touch START
3. To change the temperature:
To change the temperature from 325ºF, select
another temperature immediately before starting.
4. Select START.
The temperature display alternates between the
set temperature and the actual temperature,
beginning with 100°F. The actual temperature
counts up in 5°F increments.
The oven is preheated when the beep signals
once. PREHEAT disappears from the display.
5. To end this mode, select
OVEN OFF
.
Convection Bake Recommendations
Breads-Yeast:
Bread 2 325°F 25 to 35 minutes
Dinner rolls 2 or 3 375°F 15 to 20 minutes
Sweet rolls 2 or 3 350°F 20 to 25 minutes
Frozen dough 1 or 2 375°F 25 to 35 minutes
Pizza:
Frozen, 3 375°F 18 to 25 minutes
self-rising crust
Pies:
2 Crust fruit, scratch 1 350°F 45 to 60 minutes
frozen 2 375°F 60 minutes
Pumpkin, scratch 2 325°F 50 to 60 minutes
frozen 2 375°F 55 to 60 minutes
Meringue toppings 2 325°F 15 to 20 minutes
Nut pies 1 325°F 40 to 50 minutes
Pastry Crust:
Scratch 2 400°F 15 to 20 minutes
Graham cracker 2 350°F 8 to 10 minutes
Refrigerator 2 425°F 10 to 15 minutes
Frozen 2 Follow directions
Puff Pastries:
Frozen or scratch 1 375°F 20 to 25 minutes
Turnovers 1 375°F 20 to 25 minutes
Strudel 1 325°F 35 to 40 minutes
FOOD ITEM RACK OVEN TIME*
TEMPERATURE
* This chart is a guide. Follow recipe or package directions. ** No pan used

Built-in Oven Care and Use ManualOven Operations
16
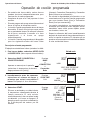
To set Roast mode:
1. For double ovens, select upper or lower oven.
2. Select ROAST.
The temperature is automatically set at 350ºF.
Message scrolls in display:
Select Roast temperature
then touch START
3. To change the temperature.
To change the temperature from 350ºF, select
another temperature immediately before start-
ing.
4. Select START.
The temperature display alternates between the
set temperature and the actual temperature, be-
ginning with 100ºF. The actual temperature counts
up in 5ºF increments.
The oven is preheated when the beep signals
once. PREHEAT disappears from the display.
5. To end this mode, select OVEN OFF.
Roast Mode Operation
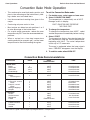
• Use Roast mode for conventional open roasting
when drippings are desired.
• Roast mode is excellent for less tender meats or
poultry when meat is brasied and a covered dish
is used.
• Use a high-sided roasting pan or cover dish with
a lid or foil.
• This may be used to roast meats, poultry and
vegetables, which would be covered or cooked
in a high-sided open roaster.
• Add liquids, such as water, juice, wine, bouillon
or stock for flavor and moisture.
• Roasting bags are suitable to use in this mode.
• When roasting whole chickens or turkey, tuck
wings behind back and loosely tie legs with
kitchen string.
Roasting Recommendations
Beef:
Pot roast, 3-4 pounds 350°F 1 40 to 60 minutes per pound 170°F
Beef brisket 350°F 2 50 to 60 minutes per pound 170°F
Beef chuck 350°F 1 45 to 55 minutes per pound 170°F
Meatloaf 350°F 3 60 to 90 minutes total time 170°F
Poultry:
Chicken, whole or 375°F 2 18 to 21 minutes per pound 180°F
halves
Chicken, pieces 375°F 3 Total time 60 minutes 180°F
Turkey, whole 325°F 1 11 to 15 minutes per pound 180°F
Pork:
Shoulder 325°F 1 35 to 40 minutes per pound 170°F
Smoked ham, half 325°F 1 2 to 3 hours total 160°F
* Serving temperature is 175ºF. Cover with foil and let stand for 10-15 minutes.
MEAT AND POULTRY OVEN RACK COOK TIME END TEMP
COVERED PAN TEMPERATURE LEVEL

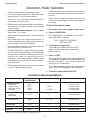
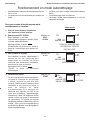
Built-in Oven Care and Use Manual
Oven Operations
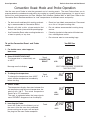
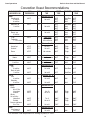
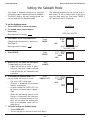
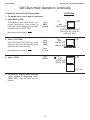
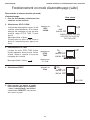
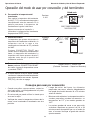
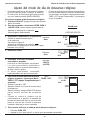
Convection Roast Mode and Probe Operation
You Will See
Use the oven meat Probe to take the guesswork out of roasting meats. The meat Probe allows you to
prepare perfectly roasted meats and poultry by roasting to a specific internal temperature. It is easy to roast
meats to an exact temperature for Rare, Medium Rare, Medium, Medium Well or Well Done. Refer to the
Convection Roast Recommendations for “end” temperatures for different meats and poultry.
325
o
350
o
To set the Convection Roast and Probe
mode:
3. To change the temperature:
To change the temperature from 325ºF,
select another temperature immediately
before starting.
2. Select CONVECTION ROAST.
The temperature is automatically set
at 325°F.
Message scrolls in display.
1. For double ovens, select upper or
lower oven.
Touch
3 5 0
Touch
CONVECTION
ROAST
2:
57
UPPER
Select Convection Roast temperature
then touch START
17
UPPER
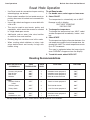
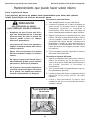
• For best results and beautiful roasting, preheat-
ing is recommended for Convection Roast.
• Results will yield a drier, crisper exterior that
seals in the interior juices with few pan drippings.
• Use Convection Roast when roasting tender cuts
of meat or poultry of any size.
• Roast in a low-sided, uncovered pan. Place meat
on a flat or V-shaped roasting rack.
• Do not reduce recommended roasting temp-
erature.
• Place tip of probe into the center of thickest sec-
tion, avoiding bone and fat.
• Do not cover meat or use cooking bags.
4 . Select START.
The temperature display alternates between the
set temperature and the actual temperature, be-
ginning with 100°F. The actual temperature
counts up in 5°F increments.
The oven is preheated when the beep signals
once. PREHEAT disappears from the display.
5. Inserting the Probe.
Insert the Probe into the thickest part of
the meat. After the oven has preheated,
place roasting pan on oven rack and push
the plug into the oven Probe receptacle.
350
o
Touch
UPPER
350
o
UPPER
PREHEAT

Built-in Oven Care and Use Manual
18
Convection Roast Tips
• When roasting whole chickens or turkey, tuck
wings behind back and loosely tie legs with
kitchen string.
• The broil pan with the grid can be used in this
mode.
• Double-check the internal temperature of meat
or poultry by inserting probe into another position.
145
o
100
o
/145
o
7. Select START.
The temperature display alternates be-
tween the set Probe temperature and the
actual meat/poultry temperature, increas-
ing in 5ºF increments starting with 100ºF.
Touch CONVECTION ROAST once to
set oven temperature. The oven temp is
displayed for 5 seconds before the probe
display continues.
8. To Change Oven Temperature
Touch CONVECTION ROAST twice, en-
ter new temperature and press start.
9. The oven beeps 3 times when the meat/
poultry item Probe temperature is
reached.
End is displayed as the heat
turns off.
Touch
1 4 5
Convection Roast Mode and Probe Operation
Oven Operations
Touch
START
6. To change the Probe temperature:
To change the Probe temperature from
160ºF (71ºC), select another temperature
immediately before starting. The Probe
temperature continues to be displayed in-
stead of the oven temperature.
Message scrolls in display.
Select PROBE temperature
then touch START
3:
29
3:
29
Convect Roast
UPPER
UPPER
• After removing the meat item from the oven,
cover loosely with foil for 10 to 15 minutes before
carving.
• While covered, small roast temperatures may
increase 5ºF and large roast temperatures
increase 10ºF.
• Roasting large cuts of meat and poultry generally
takes 10 to 20 percent less cooking time than
roast or bake mode. Check doneness early.
Cooking Complete -- remove food
You Will See
Page is loading ...
Page is loading ...
Page is loading ...
Page is loading ...
Page is loading ...
Page is loading ...
Page is loading ...
Page is loading ...
Page is loading ...
Page is loading ...
Page is loading ...
Page is loading ...
Page is loading ...
Page is loading ...
Page is loading ...
Page is loading ...
Page is loading ...
Page is loading ...
Page is loading ...
Page is loading ...
Page is loading ...
Page is loading ...
Page is loading ...
Page is loading ...
Page is loading ...
Page is loading ...
Page is loading ...
Page is loading ...
Page is loading ...
Page is loading ...
Page is loading ...
Page is loading ...
Page is loading ...
Page is loading ...
Page is loading ...
Page is loading ...
Page is loading ...
Page is loading ...
Page is loading ...
Page is loading ...
Page is loading ...
Page is loading ...
Page is loading ...
Page is loading ...
Page is loading ...
Page is loading ...
Page is loading ...
Page is loading ...
Page is loading ...
Page is loading ...
Page is loading ...
Page is loading ...
Page is loading ...
Page is loading ...
Page is loading ...
Page is loading ...
Page is loading ...
Page is loading ...
Page is loading ...
Page is loading ...
Page is loading ...
Page is loading ...
Page is loading ...
Page is loading ...
Page is loading ...
Page is loading ...
Page is loading ...
Page is loading ...
Page is loading ...
Page is loading ...
Page is loading ...
Page is loading ...
Page is loading ...
Page is loading ...
Page is loading ...
Page is loading ...
Page is loading ...
Page is loading ...
Page is loading ...
Page is loading ...
Page is loading ...
Page is loading ...
Page is loading ...
Page is loading ...
Page is loading ...
Page is loading ...
Page is loading ...
Page is loading ...
Page is loading ...
Page is loading ...
Page is loading ...
Page is loading ...
-
 1
1
-
 2
2
-
 3
3
-
 4
4
-
 5
5
-
 6
6
-
 7
7
-
 8
8
-
 9
9
-
 10
10
-
 11
11
-
 12
12
-
 13
13
-
 14
14
-
 15
15
-
 16
16
-
 17
17
-
 18
18
-
 19
19
-
 20
20
-
 21
21
-
 22
22
-
 23
23
-
 24
24
-
 25
25
-
 26
26
-
 27
27
-
 28
28
-
 29
29
-
 30
30
-
 31
31
-
 32
32
-
 33
33
-
 34
34
-
 35
35
-
 36
36
-
 37
37
-
 38
38
-
 39
39
-
 40
40
-
 41
41
-
 42
42
-
 43
43
-
 44
44
-
 45
45
-
 46
46
-
 47
47
-
 48
48
-
 49
49
-
 50
50
-
 51
51
-
 52
52
-
 53
53
-
 54
54
-
 55
55
-
 56
56
-
 57
57
-
 58
58
-
 59
59
-
 60
60
-
 61
61
-
 62
62
-
 63
63
-
 64
64
-
 65
65
-
 66
66
-
 67
67
-
 68
68
-
 69
69
-
 70
70
-
 71
71
-
 72
72
-
 73
73
-
 74
74
-
 75
75
-
 76
76
-
 77
77
-
 78
78
-
 79
79
-
 80
80
-
 81
81
-
 82
82
-
 83
83
-
 84
84
-
 85
85
-
 86
86
-
 87
87
-
 88
88
-
 89
89
-
 90
90
-
 91
91
-
 92
92
-
 93
93
-
 94
94
-
 95
95
-
 96
96
-
 97
97
-
 98
98
-
 99
99
-
 100
100
-
 101
101
-
 102
102
-
 103
103
-
 104
104
-
 105
105
-
 106
106
-
 107
107
-
 108
108
-
 109
109
-
 110
110
-
 111
111
-
 112
112


Ask a question and I''ll find the answer in the document
Finding information in a document is now easier with AI
in other languages
- français: Thermador C272BB Manuel utilisateur
- español: Thermador C272BB Manual de usuario
Related papers
-
Thermador SEMW272 User manual
-
-
-
-
-
-
-
Thermador PRD48WLSGU User guide
-
-
Thermador PRD48WDSGU User guide
Other documents
-
Frigidaire FEB755CEBG Control Manual
-
GE Convection Oven ZET2 User manual
-
Electrolux EW30MC65PSB Owner's manual
-
GE ZEK938SF5SS User manual
-
Frigidaire TGF657BFD1 Owner's manual
-
Dacor MORD230 User manual
-
-
-
LG LSE4616ST Owner's manual
-