Atwood HE-0801 User manual

Type
User manual

This manual is also suitable for

Atwood HE-0801 is a gas absorption RV refrigerator that automatically selects the best available energy source (AC or gas) and features a backup temperature control system, door ajar alarm, and moisture divider heater. Its tilt sensor technology constantly monitors the refrigerator's angle of inclination, preventing potential hazards from prolonged operation at severe angles.

Atwood HE-0801 is a gas absorption RV refrigerator that automatically selects the best available energy source (AC or gas) and features a backup temperature control system, door ajar alarm, and moisture divider heater. Its tilt sensor technology constantly monitors the refrigerator's angle of inclination, preventing potential hazards from prolonged operation at severe angles.

HE
-
0601
GAS ABSORPTION
HE-0801 RV REFRIGERATORS
Refrigerator Service Manual
Table of Contents
Model Number Identification
Sequence of Operation
Troubleshooting Guide
Diagnostic Mode Instructions
Schematic Diagrams
Powerboard Layout Diagram
Review Questions
After reviewing this manual, you will be able to answer the following questions:
What is the refrigerator’s AUTO mode and how does it choose the power source?
How does the temperature setting affect the refrigerator’s internal temperature?
What is the Backup Temperature Control system? How is it connected to the thermistor?
What are the pinouts for the Powerboard connectors?
How to handle a “poor cooling” complaint?
What are all of the fault conditions which the control can display?
How can the tilt feature be verified if it is working properly?
HE
-
0601
GAS ABSORPTION
HE-0801 RV REFRIGERATORS
Model Number Description
HE-0801 RF
Configuration
“Blank” – Standard Configuration
F - Fan Slideout Configuration
Hinge Configuration
R - Right Hinged Doors
L - Left Hinged Doors
Cabinet Volume
06 - 6 cu ft model
08 - 8 cu ft model
Appliance Type
HE – Helium Charged RV Refrigerator
Serial Number Description
ATWOOD SERIAL NUMBER
12007 HE A0801RF
12008 HE-A0801LF
12005 HE-A0801R
12006 HE-A0801L
12003 HE-A0601RF
12004 HE-A0601LF
12001 HE-A0601R
12002 HE-A0601L
Date Code Cabinet Number
Constructed based on
Model Number, door
hinge, fan
11001 HE-0601R
Year Month Date
Atwood Part Number
11002 HE-0601L
11003 HE-0601RF
11007 HE 0801RF
11004 HE-0601LF
11005 HE-0801R
11008 HE-0801LF
The cabinet number starts at "0001" for each new
model number, for example: if on Oct 16, 2011 the
first 3 cabinets are HE-0601L and the next 3
cabinets are HE-601R, and the following 2
cabinets are HE-801LF they would have the
following Atwood serial numbers:
110021110160001
110021110160002
110021110160003
110011110160001
110011110160002
11006 HE-0801L
110011110160003
110081110160001
110081110160002
HE
-
0601
GAS ABSORPTION
HE-0801 RV REFRIGERATORS
CONTROL PANEL
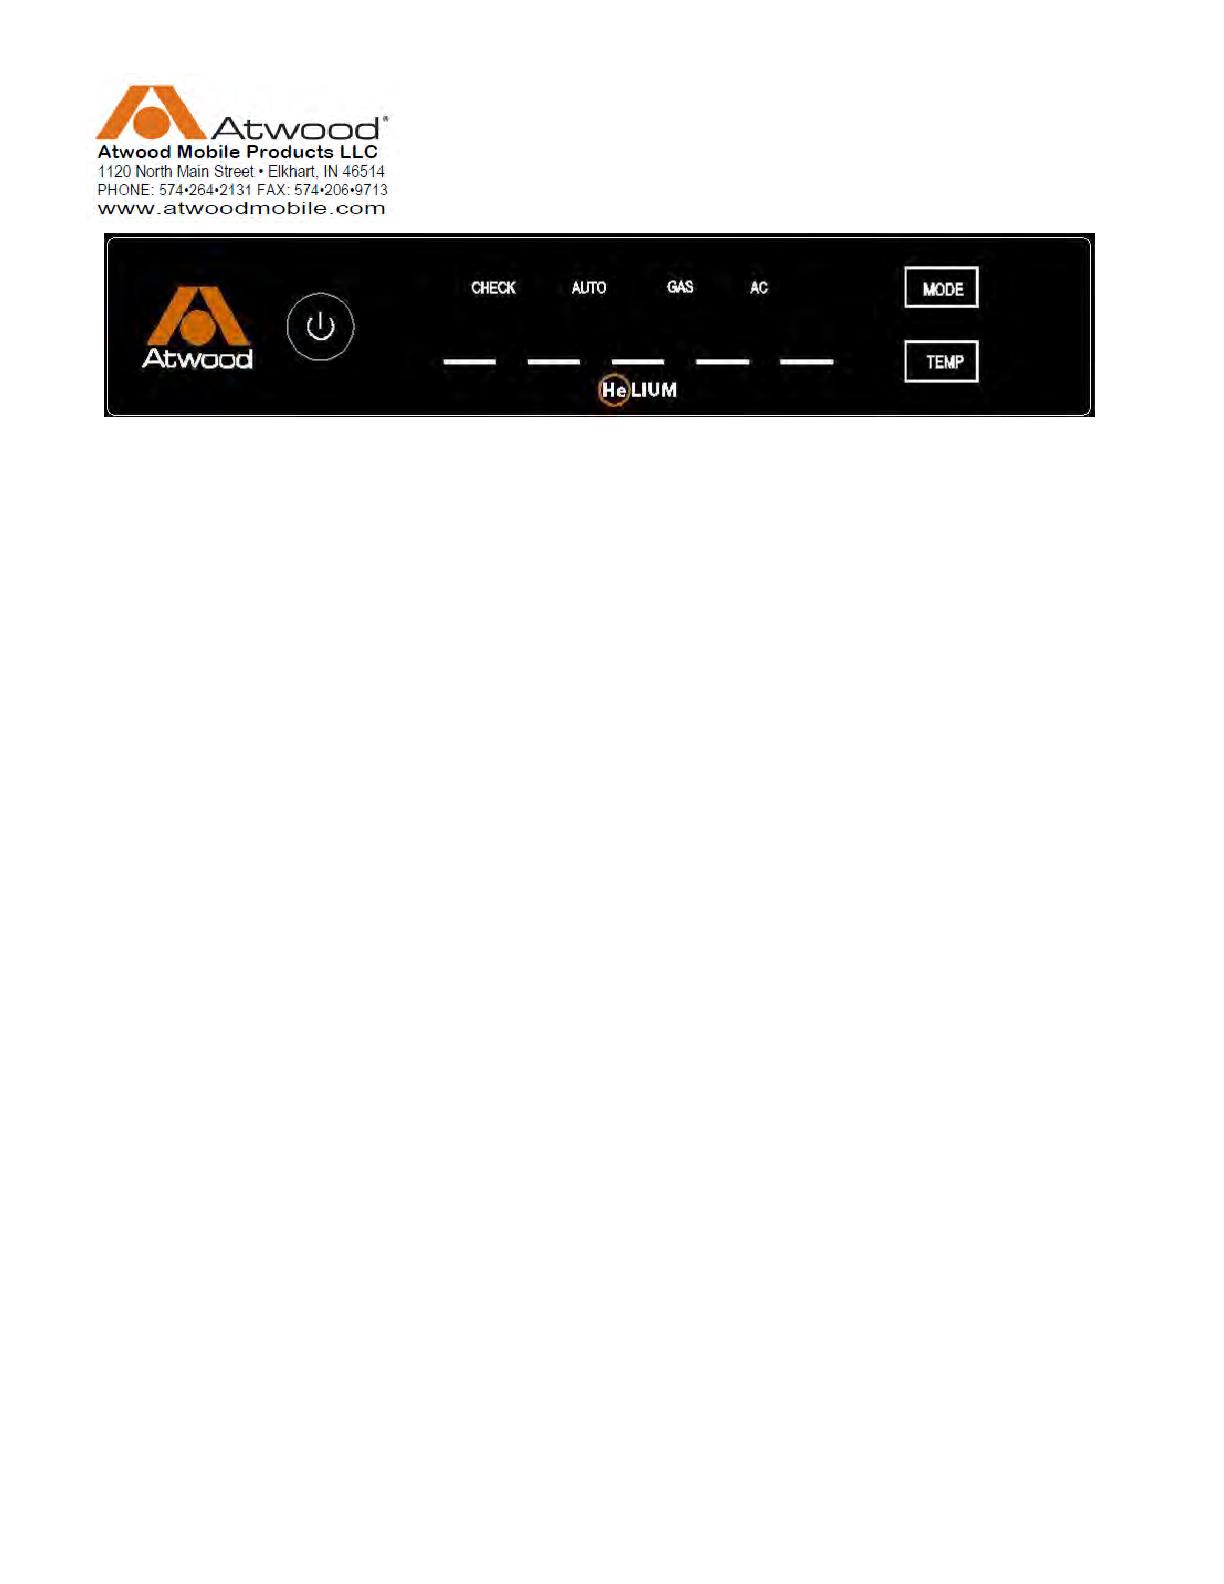
The refrigerator control panel is located between the
fresh food and freezer compartments of your refrigerator.
The refrigerator control requires +12 volts DC to operate.
There are three pushbuttons.
POWER ON – Pressing this pushbutton turns the
refrigerator on and off.
MODE – Pressing and holding this pushbutton cycles
the mode selections from AUTO, manual GAS, and
manual AC. Releasing the pushbutton selects the last
mode displayed. The selected mode will be displayed
for approx 5 seconds before all the mode indicators are
turned off. The active mode can be displayed at any
time by pressing and releasing the MODE pushbutton.
TEMP – Pressing and holding this pushbutton cycles the
temperature settings from 1 through 5 with 5 being the
maximum cool setting. Releasing the pushbutton
selects the last temperature setting displayed. The
selected temperature setting will be displayed for approx
5 seconds before all the temperature indicators are
turned off. The active temperature setting can be
displayed at any time by pressing and releasing the
TEMP pushbutton.
AUTO MODE
When the refrigerator is in the AUTO mode, the control
automatically selects the best energy source which is
available. When a more efficient energy source
becomes available, the refrigerator automatically
switches to the more efficient source. AC energy is
considered the more efficient energy source and is the
first choice selected by the control. Propane gas is the
second choice and is selected in the AUTO mode only
when AC energy is not available.
GAS MODE
The GAS mode can be selected either automatically or
manually. When switching to gas operation, the
refrigerator control begins a 40 second trial ignition
cycle. During this period, the control opens the gas
safety valve and begins sparking the burner. If after 40
seconds the control fails to detect the presence of a
flame, the control shuts off the gas safety valve and
stops sparking the burner. The CHECK indicator on the
control panel turns on indicating that the burner failed to
ignite. The CHECK indicator can be reset by turning the
refrigerator off and then back on again and a new 40
second trial ignition cycle begins. On initial start up or
after changing a propane tank, it is possible that air in
the gas supply lines will require 2 or 3 ignition trials
before successfully lighting the burner. If after repeated
attempts, the burner fails to ignite, stop and consult your
local dealer or an authorized Atwood Service Center.
MANUAL MODES
The manual modes allow for selection of either the AC or
GAS modes directly. If the selected mode’s energy
source is not available, the refrigerator is turned off, the
CHECK is turned on and the selected mode indicator flashes on
and off indicating which energy source is not available.
DOOR HANDLES
The door handles latch when closed to prevent the doors from
opening travel. When closing the doors, push each door into the
refrigerator cabinet until you hear a distinct “click” sound which
will indicate that the door is latched. To open a door, pull the
handle away from the refrigerator cabinet to unlatch the handle.
During off-season storage, the handle has a storage latch which
prevents the door from completely closing. Keeping the doors
partially opened during long term storage prevents odors from
building up in the cabinet. To engage the storage latch, open
each door about 1/2 inch, hold the door handle in the open
position, and push the storage latch into the cutout of the strike
plate. Never use the storage latch as a travel latch because the
doors will not be fully closed.
DOOR AJAR ALARM
This refrigerator has an alarm to alert you if the fresh food
compartment door is left not fully closed. If the door is left open
for more than 2 minutes, the CHECK light will be lit and a beeper
will sound a chirp approx every 5 seconds until the door is closed.
The refrigerator will continue to operate normally throughout the
door ajar alarm sequence.
MOISTURE DIVIDER HEATER
This refrigerator has a heater which is automatically controlled
and prevents moisture from forming on the center divider located
between the freezer and fresh food compartments.
BACKUP TEMPERATURE CONTROL SYSTEM
This refrigerator has a backup temperature control system which
allows the owner to have variable temperature control of the
refrigerator even if the temperature sensor should fail.
If the control cannot read the temperature sensor, the control
uses the selected temperature setting to control the refrigerator
cycle and adjust the temperature accordingly.
THERMAL SWITCH MONITOR
This refrigerator has a thermal switch which serves as an
overheating monitor.
TILT SENSOR TECHNOLOGY
This refrigerator control incorporates a patent pending tilt sensor
which enables the control to constantly monitor the angle at which
the refrigerator is operated. This feature is protects the user from
potential hazards attributed to prolonged operation at severe
angles of inclination. This monitoring function is completely
invisible to the user and only becomes apparent to the user in the
rare event that the refrigerator has been operated for prolonged
periods of time at severe tilt angles. Normal care in leveling of
your vehicle will prevent this feature from ever being noticed.
HE
-
0601
GAS ABSORPTION
HE-0801 RV REFRIGERATORS
Troubleshooting Guide
Control Display Panel Fault Table
The refrigerator’s electronic control provides “fault codes” for a variety of fault conditions.
For example, if the thermal switch located on the canister just above the burner box reaches an
abnormally high temperature, the thermal switch “opens” and the control display panel lights up the
following indicators: CHECK, AUTO, GAS, AC, DC and they remain ON when the control is powered ON.
In addition, all the power source outputs (the AC relay and the GAS valve relay output) are all disabled.
Another example, if the refrigerator is in GAS mode and the burner fails to ignite in the 45 seconds
allowed, the control display panel turns on the GAS indicator, it flashes the CHECK indicator, and the
beeper sounds a beep lasting 240ms.
A third example, if the door is left open for longer than 2 minutes, the CHECK indicator flashes and the
beeper sounds a very short beep approximately every 2 seconds.
The table below provides a complete listing of all of these fault codes.
Condition
Beeper
CHECK
AUTO
GAS
AC
DC
NOTE
Open Thermal Switch on Heat Source OFF ON ON ON ON ON
Under Voltage Condition (<8V) OFF ON ON ON ON ON
Open fuse F3 (Controller) OFF ON ON ON ON ON
AC Mode and No AC Supply 250ms ON OFF OFF ON OFF
DC Mode and No DC Supply 250ms ON OFF OFF OFF ON
GAS Mode and no Ignition 240ms FLASH any ON OFF OFF Latched after 33 sec
Door Open > 2 minutes 80ms FLASH any any any any any mode, every 2 sec
Thermister Open or Short OFF FLASH any any any any any mode, every 10sec
Stress Monitor Fault (initial) 720ms ON OFF OFF OFF OFF Latched Nonvolatile
Stress Monitor Fault (after power cycle) OFF ON OFF OFF OFF OFF Latched Nonvolatile
Flame Detect circuit offset too high 240ms ON any ON OFF OFF Detected at power up
No Communication from Display Board
any
any
any
any
any
any
Heat sources OFF
Condition
Beeper
TEMP1
TEMP2
TEMP3
TEMP4
TEMP5
NOTE
Thermister Open or Short
OFF
FLASH
FLASH
FLASH
FLASH
FLASH
FLASH if ON
Enter Diagnostic Display Mode by pressing MODE and TEMP simultaneously for 5 sec during NORMAL operation
Diagnostic Display Mode
Beeper
CHECK
AUTO
GAS
AC
DC
NOTE
OFF ON STR2 STR1 STR0 OFF Stress Monitor
TEMP1
TEMP2
TEMP3
TEMP4
TEMP5
ON
OFF
TILT2
TILT1
TILT0
Tilt Monitor
Condition
Beeper
CHECK
AUTO
GAS
AC
DC
NOTE
No Communication from Display Board
any
any
any
any
any
any
Heat sources OFF
Condition
Beeper
TEMP1
TEMP2
TEMP3
TEMP4
TEMP5
NOTE
No Communication from Display Board
any
any
any
any
any
any
Heat sources OFF
HE
-
0601
GAS ABSORPTION
HE-0801 RV REFRIGERATORS
Troubleshooting Guide
Temperature Setting Setpoints
There is a high temperature TURN ON setpoint and a low temperature TURNOFF setpoint associated with each
temperature setting. The corresponding voltage at the input pin (J10-1) is listed for each temperature point.
This results in an average temperature for each setting given in the small table on the right. Please note that
this is the average temperature for the FIN - the average CABINET AIR temperature will be approximately 6-8
degrees warmer than the FIN temperature.
Condition Solution
Poor Cooling
INFORMATION GATHERING
First – we need to define what is meant by “poor cooling”.
1) What are the outside ambient conditions? Direct sunlight on vehicle?
2) What are the temperatures in the freezer air and the cabinet air?
3) Is there reported frost buildup in cabinet or freezer?
4) Is the cabinet level?
5) What is power source? Does problem happen with AC and GAS?
6) Is there evidence of “frosted elbow” (ie cooling not being used up)
7) Is there adequate ventilation? (ie, no blockages, etc)
Verify: In AC mode, verify AC heater is energized with 2.7amps
Verify : In GAS mode, that burner is being ignited and flame has good
shape and color
Next - attempt to get accurate temp data
1) Suggest running cabinet overnight with thermometers placed
2) Get thermocouple data if possible
3) Have dealers/service centers run cabinet outside of RV overnight
Poor Cooling
1) Refrigerators perform poorly in 100-110˚F;especially in direct sunlight
These refrigerators may perform normally in 90˚F
2) Door gasket leakage can lead to abnormal high internal temperatures
3) Leakage generally caused by door mis-alignment or poor gaskets
4) Off level cabinets inhibit good absorber/condenser function (3˚ angle)
5) If one power source is worse – focus on that power source
6) Suggests poor evaporator tube contact in freezer and/or cabinet fin
7) Poor ventilation directly affects cooling performance
8) AC heater may not be delivering full power (ie damaged, open circuit)
8a) Incoming AC power may be below 110VAC (90-100 VAC problematic)
9) Gas pressure may not be 11”wc; burner may be misaligned if the
flame wicks up along the side of the flue
HE
-
0601
GAS ABSORPTION
HE-0801 RV REFRIGERATORS
DIAGNOSTIC MODE WORK INSTRUCTION OF REFRIGERATOR rev 1
(NOTE: The diagnostic mode is only accessible from a normal, power on condition)
1. Make sure the refrigerator is powered on and functioning normally.
2. To enter the Diagnostic Mode, perform the following steps:
1. Press and hold both the TEMP and MODE pushbuttons together while watching the LEDs on the left
hand side of the display board;
2. After about 2 seconds of holding both pushbuttons down, both the CHECK LED and the leftmost bar
indicator on the temperature setting LEDs will turn on.
3. Release both the TEMP and MODE pushbuttons within 1 second of the two LEDs becoming lit and
the display will be in the diagnostic mode.
a) The CHECK and the leftmost bar both ON indicates that the display is in diagnostic mode
b) The AUTO, GAS, and AC LEDs indicate the contents of the stress level counter in binary
with the AC indicator being the least significant bit and the AUTO indicator being the most
significant bit
c) The 3 LEDs on the right-hand side of the temperature setting LEDs indicate the tilt position
angle of the power board in binary with the rightmost LED being the least significant bit.
4. To exit the diagnostic mode and return to normal operation, press either the MODE or TEMP buttons.
4. Normally the tilt angle position is zero (all LEDs OFF) when the powerboard is mounted on the
refrigerator and the refrigerator is standing vertical. As the powerboard is tilted approximately 5
degrees either to the right or the left, one rightmost LED will light. As the powerboard is tilted to 10
and 15 degree angles off of vertical, the tilt position will count up in binary to “010” and “011”
respectively. When the refrigerator is returned to the vertical position, all three LEDs should again be
OFF. This indicates that the tilt sensor is performing normally. If none of the LEDs turn on as the
refrigerator is tilted thru these angles – you should contact an authorized service center immediately.
If when the refrigerator and the powerboard are standing vertical and all three of the LEDs are not
OFF – this indicates that the tilt calibration procedure may need to be performed. Please contact an
authorized service center.
5. Normally the stress level counter is zero (all LEDs OFF) indicating that the control has not been
operated at severe position angles for any length of time. It is possible that the counter might display
“001” or a “010” – this indicates that the refrigerator had been operated at a severe angle for short
periods of time. The owner should be alerted that better care of leveling needs to be taken when
operating his refrigerator particularly during long-term storage. If the counter displays “110” or
“111” - the owner should contact an authorized service center immediately as the refrigerator has
been operated for long periods of time at severe position angles
.
DIAGNOSTIC MODE
(Both LEDs ON)
STRESS LEVEL COUNTER
(Binary Indication)
TILT ANGLE POSITION
(Binary Indication)
HE
-
0601
GAS ABSORPTION
HE-0801 RV REFRIGERATORS
Mode
Power
J1-1
J1-1
3 AMP
J9
120 VAC - Line
J1-2
J1-2
Temp
J1-3
J1-3
J11
120 VAC - Neutral
J1-4
J1-4
J1-5
J1-5
J12
J13
AC HEATER
J10-6
DIVIDER HEATER
J10-5
J15-4
J15-3
SOLENOID GAS VALVE
DOOR SWITCH
J10-3
J15-2
3 AMP
J15-1
THERMAL SWITCH
INTERIOR LIGHT
J10-4
20 AMP
J2
+12 VDC
J10-1
J4
GROUND
THERMISTOR
J10-2
J5
J3
DC HEATER (3-WAY ONLY)
J7
ALT
ENGINE RUNNING (3-WAY ONLY)
J15-5
EXTERNAL FAN (OPTIONAL)
J15-6
J14
IGNITOR ELECTRODE
DISPLAY BOARD POWER BOARD
FAN
Mode
Power
Temp
J1
IGNITOR ELECTRODE
FAN
OPTIONAL
DIVIDER HEATER
THERMAL SWITCH
DOOR SWITCH
GAS SAFETY VALVE
INTERIOR LIGHT
THERMISTOR
+12 VDC
GROUND
3-WAY MODELS ONLY
J15
DISPLAY BOARD
J1
J10
POWER BOARD
6
4
3
2
5
120 VAC - LINE
120 VAC - NEUTRAL
120 VAC - HEATER
120 VAC - HEATER
12 VDC - HEATER
12 VDC - HEATER
ENGINE RUNNING
+12 VDC INPUT
GROUND
J14
4
2
2
2
HE
-
0601
GAS ABSORPTION
HE-0801 RV REFRIGERATORS
Thermistor Input J10-1 Ground connected to:
Door Switch Input J10-3 J15-4
Door Light Output J10-4 J15-6
Strip Heater Output J10-5 J15-8
J15-10
Ground Connected J10-2
J10-6
  • Page 1 1
  • Page 2 2
  • Page 3 3
  • Page 4 4
  • Page 5 5
  • Page 6 6
  • Page 7 7
  • Page 8 8

Atwood HE-0801 User manual

Type
User manual
This manual is also suitable for

Atwood HE-0801 is a gas absorption RV refrigerator that automatically selects the best available energy source (AC or gas) and features a backup temperature control system, door ajar alarm, and moisture divider heater. Its tilt sensor technology constantly monitors the refrigerator's angle of inclination, preventing potential hazards from prolonged operation at severe angles.

Ask a question and I''ll find the answer in the document

Finding information in a document is now easier with AI