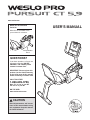
Weslo Pro Pursuit5.9 is an advanced stationary exercise cycle designed for effective home workouts. With its user-friendly console, you can track your progress and customize your exercise routine. The adjustable seat and handlebars provide a comfortable fit for users of different heights. The Pursuit5.9 offers various resistance levels to challenge users of all fitness levels and help them achieve their goals. Its sturdy construction ensures stability and durability, while the included water bottle holder keeps you hydrated during your workouts. By incorporating the Pursuit5.
Weslo Pro Pursuit5.9 is an advanced stationary exercise cycle designed for effective home workouts. With its user-friendly console, you can track your progress and customize your exercise routine. The adjustable seat and handlebars provide a comfortable fit for users of different heights. The Pursuit5.9 offers various resistance levels to challenge users of all fitness levels and help them achieve their goals. Its sturdy construction ensures stability and durability, while the included water bottle holder keeps you hydrated during your workouts. By incorporating the Pursuit5.


-
 1
1
-
 2
2
-
 3
3
-
 4
4
-
 5
5
-
 6
6
-
 7
7
-
 8
8
-
 9
9
-
 10
10
-
 11
11
-
 12
12
-
 13
13
-
 14
14
-
 15
15
-
 16
16
-
 17
17
-
 18
18
-
 19
19
-
 20
20
-
 21
21
-
 22
22
-
 23
23
-
 24
24


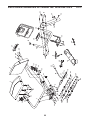
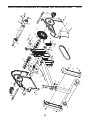
Weslo Pro Pursuit5.9 User manual
- Type
- User manual
- This manual is also suitable for
Weslo Pro Pursuit5.9 is an advanced stationary exercise cycle designed for effective home workouts. With its user-friendly console, you can track your progress and customize your exercise routine. The adjustable seat and handlebars provide a comfortable fit for users of different heights. The Pursuit5.9 offers various resistance levels to challenge users of all fitness levels and help them achieve their goals. Its sturdy construction ensures stability and durability, while the included water bottle holder keeps you hydrated during your workouts. By incorporating the Pursuit5.
Ask a question and I''ll find the answer in the document
Finding information in a document is now easier with AI
Related papers
Other documents
-
NordicTrack Commercial 400 User manual
-
-
ProForm 831217520 User manual
-
-
-
FreeMotion XTC User manual
-
Pro-Form 380 ZLX User manual
-
-
-