
INFORMATION I MANUALS I SERVICE
441 112_a I 12/2013
GB
F
I
SLO
DK
N
PL
SK
LV
D
NL
E
H
HR
S
FIN
CZ
EST
RO
LT
RUS
UA
P
BG
GR
TR
SRB
MK
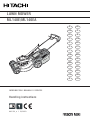
HITACHI
HITACHI
LAWN MOWER
ML140E/ML140EA
Handling instructions

Original-Betriebsanleitung
2
Benzin-Rasenmäher
© Copyright 2009
AL-KO KOBER GROUP Kötz, Germany
This documentation is allowed to-also in excerpts-only with express authorization of the AL-KO KOBER GROUP duplicates or third
accessible is done. Technical alterations of inuence of the function reservations.
D: Betriebsanleitung .................................... 6
GB: Operating Instructions ..........................16
NL: Instructies voor gebruik ........................26
F : Mode d’emploi ......................................36
E: Instrucciones de uso .............................46
P: Instruções para o uso ...........................78
I: Libretto di istruzioni ...............................92
SLO: Navodilo za uporabo ...........................106
HR: Upute za uporabu ...............................120
SRB:Упутствазаупотребу ........................134
PL: Instrukcjaobsługi ................................ 148
CZ: Návodkpoužití ................................... 162
SK: Návodnapoužitie ............................... 176
H: Használat ............................................190
DK: Brugsanvisning ...................................204
S: Bruksanvisning ...................................218
N: Bruksanvisning ...................................232
FIN: Käyttöohjeet ........................................246
EST: Kasutusjuhend .................................... 260
LV: Instrukcijas ..........................................274
LT: Instrukcijųvadovas .............................288
RUS:Руководствопоэксплуатации ..........302
UA: Посібникзексплуатації ....................316
BG: Ръководствозаексплоатация .........330
RO: Instrucţiuni ..........................................344
GR: Οδηγίεςλειτουργίας ...........................358
МК: Упатствозаработа ...........................372
TR: Kullanımkılavuzu ...............................386

3441 112_a
Notice
Page is loading ...
Page is loading ...
Page is loading ...
Page is loading ...
Page is loading ...
Page is loading ...
Page is loading ...
Page is loading ...
Page is loading ...
Page is loading ...
Page is loading ...
Page is loading ...

GB
Translation of original user instructions
16
Petrol lawnmower
Contents
About this handbook .................................................... 16
Product description ...................................................... 16
Safety and protection devices ..................................... 16
Safety instructions ....................................................... 18
Assembly ..................................................................... 19
Fuelling ........................................................................ 19
Initial startup ................................................................ 20
Maintenance and care ................................................. 22
Storage ........................................................................ 23
Repairs ........................................................................ 23
Disposal ....................................................................... 23
Faults and remedies .................................................... 24
Warranty ...................................................................... 25
EC declaration of conformity ....................................... 25
About this handbook
Read through these operating instructions before
starting up the machine. This is a prerequisite for
safe and trouble-free working. Before use, familiar-
ize yourself with the control elements and the cor-
rect use of the machine.
You should save these instructions, and also pass
them on to any subsequent users.
Observe the safety and warning signs on the
machine.
Pictogram description
Caution!
Strict following of these warning alerts can
prevent injury to persons and/or materials.
Special information for better understanding and
handling.
The camera symbol refers to illustrations
Product description
This document describes various models of petrol
lawnmowers. Some models are equipped with a grass
catcher and/or are suitable for mulching.
Please identify your particular model in the product
illustrations and descriptions of the various options.
Proper use
This equipment is intended for moving lawns on private
property and should be used on dry grass only.
Use for any other purpose is considered improper use.
Incorrect use
This lawnmower is not suitable for use in public
spaces, parks, sports grounds, farming or forestry
Safety devices must not be removed or bypassed
Do not use the equipment on damp grass, or if it is
raining
The equipment is intended for domestic use only
Safety and protection devices
Caution - Risk of injury!
Safety/protection devices should not be disabled!
Safety brake handle
The lawnmower is equipped with a safety brake.
Release the brake handle if there is an immediate
danger.
Lawnmower without blade coupling:
Mower blade is stopped
Motor is stopped
Lawnmower with blade coupling:
Mower blade is stopped
Motor continues running

GB
17470 591_c
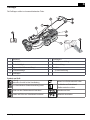
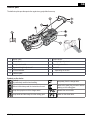
1 Starter cable 7 Grass catcher
2 Wheel drive* 8 Cutting height adjustment
3 Safety brake handle 9 Operating instructions
4 Ergonomic height adjustment* 10 Mulch kit
5 Fill level indicator * depending on version
6 Deectorplate
Symbols on the device
Caution!
Be particularly careful when handling.
Keep away from the danger area.
Before initial startup read the instructions for use!
Remove the spark plug connector before
working on the cutting gear.
Keep other people out of the danger area! Release the motor brake.
Keep hands and feet away from the cutting gear! Switch on the wheel drive.
Deector plate
Thedeectorplateprovidesprotectionagainstanyprojectilesthrownup.

GB
Translation of original user instructions
18
Petrol lawnmower
Safety instructions
Caution!
Use the equipment only if it is in correct operating
condition!
Caution - Risk of injury!
Safety/protection devices should not be disabled!
Caution - risk of re!
After fuelling, do not store the machine in
buildings where the petrol fumes might come into
contactwithnakedamesorsparks!
Keep the area around the motor, exhaust, battery
case, and fuel tank clear of grass cuttings, petrol
and oil.
Warning - risk of re!
Petrolandoilarehighlyammable!
Keep other persons away from the danger area.
Never mow while persons, especially children or
pets are nearby.
The unit operator or user is responsible for acci-
dents involving other persons and their property.
Children or persons who are not familiar with these
operating instructions are not permitted to use the
unit.
Observe the local regulations governing the mini-
mum age of the operator.
Donotoperatetheunitwhenundertheinuenceof
alcohol, drugs or medication.
Wear suitable work clothing.
Long trousers
Firm and slip-resistant footwear
Hearing protection
When working on slopes
Always make sure the unit is in a safe position.
Always mow across slopes, never up or down.
Never mow slopes with a gradient of more
than 20°.
Take special care when turning.
Only work when there is adequate daylight or prop-
erarticiallighting
Keep body, body parts and clothing away from the
cutter area.
Observecountry-specicordinancesforoperating
times
Never leave the unit unattended when it is ready for
operation
Mow only with a sharp cutting blade
Never operate the unit with damaged safety de-
vices/safety grilles
Never operate the unit without completely installed
safetydevices(e.g.,bafeplate,grasscatchers)
Prior to each use, check the unit for damage and
have damaged parts replaced before using again.
Only replace used or damaged blades and mount-
ing bolts as a set to prevent imbalance
Before starting the motor, disengage all blades and
drives
Shut down the motor, wait until the unit comes to a
standstill, and remove the ignition key and pull the
spark plug connector
When leaving the unit
When inspecting, cleaning or working on the
unit
After faults occur
Before loosening blockages
Before eliminating stoppages
After contact with foreign bodies
Before refuelling
If malfunctions or unusual vibrations occur on
the unit (immediate inspection required)
Check the lawnmower for damage, and carry out
the necessary repairs before restarting or using
the lawnmower again.
Attach the spark plug connector and start the motor
Afterrecticationofthemalfunction(seetrou-
bleshooting table) and inspection of the unit
After cleaning the unit
Do not start the motor if you are standing in front of
the discharge chute
Check the terrain to be mowed completely and
carefully and remove all foreign bodies.

GB
19470 591_c
Be especially careful when turning the lawn mower
around or when pulling the lawn mower towards
you
Do not mow over obstacles (e.g. branches, roots
of trees)
Only remove cuttings when the motor is at a stand-
still.
Switch the motor / cutting blades off when an area
other than the area to be mowed is crossed
Never lift or carry the unit while the motor is run-
ning.
Do not eat or drink while refuelling or adding mo-
tor oil
Do not breathe in fuel vapours
Guide the unit at walking speed
Before use, make sure the seat of nuts, screws,
andboltsisrm.
Close the throttle valve* when running out the mo-
tor. If the motor has a fuel stopcock, it should be
closed after mowing
Assembly
Follow the accompanying assembly instructions.
Caution!
The equipment can be used only after complete
assembly.
Fuelling
Fill the lawnmower with fuel before the initial startup.
Warning - risk of re!
Petrolandoilarehighlyinammable!
Always observe the operating instructions sup-
plied by the motor manufacturer.
Operating uids
Petrol Motor oil
Grade Regular petrol /
unleaded
Refer to the motor
manufacturer's
instructions
Filling
capacity
Refer to the motor
manufacturer's
instructions
about 0.6 l
Safety
Warning!
Never leave a motor running in an enclosed
space. Toxic hazard!
Store petrol and oil in suitable containers
Onlylloremptypetrolandoiloutdoorswhenthe
motor is cold
Neverllpetroloroilwhenthemotorisrunning
Donotoverllthefueltank(petrolexpands)
Do not smoke while refuelling
Do not open the fuel tank while the motor is running
or if the motor is hot
Replace damaged fuel tank or fuel tank cap
Always close the fuel tank tightly
Iffueloverowsneverattempttostartthemotor.
Instead, move the machine away from the fuel con-
taminated area. Avoid any attempt to start the igni-
tion until the fuel vapours have evaporated.
If motor oil has leaked out:
Do not start the motor
Soak up the leaked motor oil using an oil bind-
ing agent or rag and dispose of it properly
Clean the unit
Used oil should not be:
disposed of with domestic rubbish
poured into the sewage system, drains, or
onto the ground
We recommend to collect the used oil in a closed
container and to deliver it to a suitable recycling or
service station.

GB
Translation of original user instructions
20
Petrol lawnmower
Adding petrol
1. Unscrew the tank cap, and keep in a clean place.
2. Pour in petrol using a funnel.
3. Firmlyreplacethecaponthelleropeningand
clean it.
Adding motor oil
1. Unscrewthellercap,andkeepinacleanplace.
2. Pour in oil using a funnel.
3. Firmlyreplacethecaponthelleropeningand
clean it.
Initial startup
Caution!
The equipment should not be used if the cutting
gear and/or fastenings are loose, damaged or
worn.
Carry out a visual inspection before each start-
up.
The camera symbol on the following page refers
to the illustrations on Page 4–5.
Adjusting the cutting height
Caution - Risk of injury!
Adjust the cutting height only with the motor
switched off and when the mower blade has
come to a standstill.
▪ Always set all the wheels to the same cutting
height.
▪ Cutting height adjustment depends on the
particular model.
Central adjustment ( 1)
1. To release the lever, press to the side and hold.
2. Push the lever to the left or right to select the
desired cutting height.
3. Let the lever click into position.
4. Check that all wheels are set to the same position.
Quick adjustment of individual wheels ( 2)
1. To release the lever, press to the side and hold.
2. Push the lever to the left or right to select the
desired cutting height.
3. Let the lever click into position.
4. Check that all wheels are set to the same position.
Mowing with the grass catcher
Caution - Risk of injury!
Attach/detach the grass catcher only when the
motor is switched off and the mower blade has
come to a standstill.
1. Liftthedeectorplateandinsertthegrasscatcher
in the holders ( 4).
Fill level indicator
Thelllevelindicatorispushedupwardbytheairow
when mowing ( 3a).
If the grass catcher is full, the indicator points to the box
( 3b). The grass catcher must be emptied.
Emptying the grass catcher
1. Liftthedeectorplate.
2. Unhook the grass catcher and pull backward to
remove ( 4).
3. Empty the grass catcher.
4. Liftthedeectorplateandinsertthegrasscatcher
in the holders ( 4).
Mowing without the grass catcher
Caution!
Only work without the grass catcher if the
deectorplatetorsionspringisworkingcorrectly.
The deector plate is held to the mower housing by
spring force. This causes the mowed grass to be thrown
backward and downward.

GB
21470 591_c
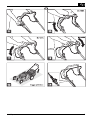
Mulching with the mulch kit
When mulching, the grass cuttings are not collected, but
are left on the lawn. The grass mulch prevents the soil
from drying out, and supplies it with nutrients.
The best results are obtained by cutting back regularly
by about 2 cm. Only young grass with a soft leaf texture
decomposes quickly.
Grass height before mulching: 8 cm maximum
Grass height after mulching: 4 cm minimum
Adapt your walking pace to the mulching process,
do not walk too fast.
Inserting the mulch kit
Caution - Risk of injury!
Insert/remove the mulch kit only with the motor
switched off and when the mower blade has come
to a standstill.
1. Remove the grass catcher ( 4).
2. Liftthedeectorplateandinsertthemulchkitinthe
outlet shaft ( 5).
It must lock into place.
If the mulch kit is not locked into position, both the
mulch kit and the mower blade may be damaged.
Removing the mulch kit
1. Liftthedeectorplate.
2. Release the lock on the mulch kit ( 6/1).
3. Pull out the mulch kit ( 6/2).
Starting the motor
Caution - risk of poisoning!
Never leave a motor running in an enclosed
space.
Caution - Risk of injury!
Do not tilt the lawnmower while starting.
▪ Start the motor only when the blade is mounted
(thebladeactsasaywheelmass)
▪ If starting the motor when hot do NOT use the
primer button
▪ Do not change the motor controller settings
Do not start the equipment if the outlet shaft is not
covered by one of the following parts:
Grass catcher
Deectorplate
Mulch kit
Be particularly careful when operating the starter
switch - follow the manufacturer's instructions
Keep your feet at a safe distance from the cutting
gear
Start the lawnmower where the grass is shorter
Starting manually
without remote throttle control, with primer ( 7)
1. Press the primer button 3 times at intervals of about
2 seconds ( 7). If the temperature is below
10 °C, press the primer button 5 times.
2. Pull in the safety brake handle on the handlebar and
hold it ( 8) – the brake handle does not lock.
1. Pull out the starter cord sharply, then allow it to
slowly rewind ( 9).
Motorspeed(rpmvalue)isxed.
Motor speed cannot be adjusted.
without remote throttle control, without primer/
choke
2. Pull in the safety brake handle on the handlebar and
hold it ( 8) – the brake handle does not lock.
3. Pull out the starter cord sharply, then allow it to
slowly rewind ( 9).
Motorspeed(rpmvalue)isxed.
Motor speed cannot be adjusted.

GB
Translation of original user instructions
22
Petrol lawnmower
Wheel drive (optional) ( 10)
Caution!
Engage the transmission only when the motor is
running.
Switching on the wheel drive
1. Press the transmission control handle against the
handlebar and hold it ( 10) – the transmission
control handle does not lock.
- The wheel drive is switched on.
Switching off the wheel drive
1. Release the transmission control handle ( 11).
- The wheel drive is switched off.
Turn the motor off
1. Release the safety brake handle ( 12).
- The motor is switched off.
Caution - danger of serious cut injuries!
The motor may continue running. After switching
off, make sure the motor has stopped turning.
Maintenance and care
Caution - Risk of injury!
▪ Before carrying our any care or maintenance
work, always switch off the motor and pull out
the spark plug connector.
▪ The motor may continue running. After switching
off, make sure the motor has stopped turning.
▪ Always wear working gloves when carrying out
maintenance or repair work.
Allnuts,bolts,andscrewsmustbetightenedrmly
The unit must be in a safe working condition
Allow the motor to cool off before the machine is
shut down
Regularly check the grass catcher system for cor-
rect function and wear.
Cleaning the unit after every use
Do not hose down the unit with water
Water ingress can lead to malfunctions (ignition
system, carburettor)
Regularly check the cutter blade for damage
Always replace defective silencers
Tilting the lawnmower
Depending on the motor manufacturer:
thecarburettor/airltermustbefacingupward
the spark plug must be facing upward ( 13)
Follow the operating instructions of the motor
manufacturer!
Resharpening/replacing the mower blade
Blunt or damaged blades should be
resharpened / replaced only at a service point or by
an authorised specialist
Resharpened blades must be rebalanced
Caution!
Blades that have not been rebalanced can cause
serious vibrations, and may result in damage to
the lawnmower.
Care of the motor
Changing the motor oil
1. Have a suitable container ready to collect the used
oil.
2. Drainorsuctionoffalltheoilthroughtheoilller
opening.
Dispose of used motor oil in a manner that is
compatible with the environment!
We recommend to collect the used oil in a closed
container and to deliver it to a suitable recycling
or service station.
Used oil should not be
▪ disposed of with domestic rubbish
▪ poured into the sewage system or drains
▪ poured out onto the ground
Changing the air lter
Follow the instructions of the manufacturer of the
motor.

GB
23470 591_c
Changing the spark plug
Follow the instructions of the manufacturer of the
motor.
Wheel drive (optional)
Adjusting the Bowden cable
If the wheel drive can no longer be switched on or off
while the motor- is running, the related Bowden cable
needs to be adjusted.
Caution!
Adjust the Bowden cable only when the motor is
switched off.
1. Turn the adjuster on the Bowden cable in the
direction of the arrow ( 14).
2. To test the cable setting, switch on the motor and
switch on the wheel drive.
3. If the wheel drive is still not working, the lawnmower
must be taken to a service point or an authorised
specialist.
Lubricating the drive pinion
From time to time, lubricate the drive pinion on the
transmission shaft
The wheel drive gearing is maintenance free.
Storage
Caution - risk of explosion!
Do not store the equipment where there are
nakedamesorheatsources.
Allow the motor to cool down
Store the equipment in an area which is kept dry,
and which cannot be accessed by children or
unauthorised persons
Drain the fuel tank
Pull out the spark plug connector
Repairs
Repairs should be carried out only by a service point or
an authorised specialist.
Disposal
Do not dispose of old equipment,
batteries or accumulators as household
waste!
Machine, packaging, and accessories were made
with recyclable materials, and should be disposed of
accordingly.

GB
Translation of original user instructions
24
Petrol lawnmower
Faults and remedies
Caution!
The motor shaft and mower blade should not be aligned.
Fault Solution
The motor does not start ▪ Add petrol
▪ Press the motor switch at the handlebar
▪ Check the spark plugs and replace if necessary.
▪ Cleantheairlter.
▪ Spin the mower blade
▪ Start on a surface already mowed
Motor power reduced ▪ Adjust the cutting height
▪ Resharpen / replace the mower blade
▪ Clean the outlet shaft/housing
▪ Cleantheairlter.
▪ Reduce the working speed
Lawnmower cuts unevenly ▪ Resharpen/replace the mower blade
▪ Adjust the cutting height
Grasscatcherdoesnotll
sufciently
▪ Adjust the cutting height
▪ Allow the lawn to dry
▪ Resharpen/replace the mower blade
▪ Clear the grille on the grass catcher
▪ Clean the outlet shaft/housing
Wheel drive does not work ▪ Adjust the Bowden cable
▪ V-belt faulty
▪ Contact the service-workshop
▪ Clean any dirt away from the wheel drive, toothed belt and gearing
▪ Lubricate the freewheels (drive pinion on drive shaft) with spray oil
Wheels do not turn when the
transmission is switched on
▪ Retighten the wheel bolts
▪ Wheel hub faulty
▪ V-belt faulty
▪ Contact the service-workshop
Unusually strong vibrations in
the lawnmower
▪ Check the mower blade
For faults not listed in this table, or which you cannot resolve by yourself, please contact our customer service.

GB
25470 591_c
E
Always have the equipment checked out by a pro-
fessional in the following cases:
after bumping against an obstacle
if the motor stops suddenly
if there is damage to the transmission
if the V-belt is faulty
if the blade is bent
if there is warping of the motor shaft
EC declaration of conformity
see assembly instructions
-
 1
1
-
 2
2
-
 3
3
-
 4
4
-
 5
5
-
 6
6
-
 7
7
-
 8
8
-
 9
9
-
 10
10
-
 11
11
-
 12
12
-
 13
13
-
 14
14
-
 15
15
-
 16
16
-
 17
17
-
 18
18
-
 19
19
-
 20
20
-
 21
21
-
 22
22
-
 23
23
-
 24
24
-
 25
25


Hitachi ML140E Handling Instructions Manual
- Category
- Toys
- Type
- Handling Instructions Manual
Ask a question and I''ll find the answer in the document
Finding information in a document is now easier with AI
in other languages
- Deutsch: Hitachi ML140E
Other documents
-
Einhell Blue BG-PM 51 SD Owner's manual
-
EINHELL GC-PM 46/2 S HW-E Original Operating Instructions
-
AL-KO Petrol lawnmower Operating instructions
-
Jonsered 500 BAT Owner's manual
-
Dolmar RM-72.13 H Owner's manual
-
-
-
Scheppach MS139-42 User manual
-
Einhell Classic GC-PM 46/2 S HW-E User manual
-
Wolf Garten 2.48 A HW User manual