GE GSD3410Z05AA Owner's manual
- Category
- Dishwashers
- Type
- Owner's manual
This manual is also suitable for

GEAppliances
GSD3310 GSD3630
GSD3320 GSD3810
GSD3330 GSD3820
GSD3410 GSD3830
GSD3420 GSD3910
GSD3430 GSD3920
GSD3610 GSD3930
GSD3620
Part No. 165D4700P195 Pub,No, 49.5870 GeeJR

Congratulations!
YouAm Now Partof theGEFamily.
Welcome to file GE t?unily.
We're proud of our quality
products and we are
committed to providing
dependable service. You'll
see it in this easy-to-use
O_mer's Manual and you'll
hem it in tile flJendly voices
of our customer service
department.
l_st of all, you'll experience
tllese values each time you
use your dishwasher. That's
important, because your new
dishwasher will be part of
your tamily tot many years.
And we hope you will be part
of ours tbr a long time to
coIne.
Wethank you tot buying
GE.We appreciate your
purchase, and hope you
willcontinue to relyon us
whenever you need quality
appliances for your home.
Important!
Fill out and rennn the Consumer Product
()_mership Registrauon card that is packed
wifll this product. If pro cannot find it,
please send in the duplicate card printed in
the back of this manual.
Write themodel and serial
numbershere.
#
2
#
Youcan find them on the tub wall just
inside the door.
Staple sales slip or cancelled check
here.
Proof of the original purchase date is
needed to obtain service under the
warran_

GE& You,
A Service Partnership.
Ask any GEappliance owner and they will
tell you we stand behind our products with
unmatched quality service. However, did
you know that most questions result from
simple problems that you can easily fix
yourself& just a few minutes? This
Owner's Manual can tell you how
ReadthisManual
Inside you _dll find many
helpthl hinls on how Io use and
mainlain your dishwasher
properly..lust a liule preventive
cm-eon your pmt can save >x)t.ta
great deal of time and money
over lhe lit( of your dishwasher.
ReviewtheSectionon
TroubleshootingTips
You'll find many answers 1o
common problems here.
If you review our char! of
Troubleshooting Tips firsl,
)X)tlIn Wnol need 1ocall tar
sel_ice al all.
If YouNeedService
If you do need sel_ice, you can
relax knoxdng help isonly a
phone call awW.A lislof loll-tiee
cusR)iner se_ice nulnbers is
included in the back secdon.
()r >m can alwws call the
GE Answer Cenler ®at
800.626.2000, 24 hours a d W,
7 days a week.
Operating Instructions
Control :
Dia! Cycles: : ;;
UsingtbeOishwasheri lZi3
Loadingthe
DishwasherRacks . :: 14,15
Careand Cleanin_
Y
OpfionalAccessories::: :18
Troubleshooting_ps
Before You
CallForService ....... 19-24
CustomerService
ProductRegistration ........ 29
Warranty ................ 31
ServiceTelephone
Numbers .......... BackCover
3

IMPORTANTSAFETYINFORMATION.
READALLINSTRUCTIONSBEFOREUSING.
WARNING!
For your safety, the information in this manual must be
followed to minimize the risk of fire, explosion, electric
shock, or to prevent property damage,personal injury,
or loss of life.
:i°
ili!}i{iiiiii!iii!'iiii!il!_l¸
i_i!iiiii{/ii/iiiHii!!!!!!iiHiii
ii/i!_i'i_iiiii'
iiiii!iiiH!!_iiiiiHiil
4
WATERHEATERSAFETY
Under certain conditions hydrogen gas may be produced in
a water heater that has not been used for two weeks or
more. HYDROGEN GAS IS EXPLOSIVE.
If lhe hot waler has not been used for l_x) weeks or more, prevenl
lhe possibilily of damage or in.juU byluming on all hot waler
f_tucels and allow flmm u) nm for several minules. Do this before
using aW eleclfical appliance which is connecled 1othe hol wamr
syslem. This simple procedure xdll allow aW buih-up h},tmgen gas
1,7escape. Since lhe gas is flammable, do nol smoke or use an open
flame or appliance during lifts process.

Use your dishwasher only for its intended purpose as
described in this Owner's Manual
PROPERINSTALLATION
ANDMAINTENANCE
This dishwasher must be properly installed and located in
accordance with the Installation Instructions before it is
used. If you did not receive an Installation Instructions
sheet with your dishwasher, you can receive one by calling
us toll-free at the GEAnswer Cente_ 800.626.2000.
Connecl lo a grounded
melal, permanent _dfing
sysleln; or nln an equipmenl_
gTounding conductor _dlh
lhe circuil conduclors and
connect lo lhe equipmenl:
gTounding lenninal or lead
oflhe appliance.
hnproper connecuon of the
equipmenl:grounding
conduclor can result in arisk
ofeleclfic shock. Check xdlh
a qualified elecuician or
sel_ice represenladve if)xm
are in doubl wheflmr lhe
appliance is properly
gTounded.
Dispose of discarded
appliances and shipping or
packing malefial properly.
Do not attempt to repair or
replace any part of)xmr
dishwasher unless it is
specifically recommended in
this manual. All other
sel_icing should be retened
u) a qualified lechnician.
To minimize lhe possibilily of
eleclfic shock, disconnect this
appliance flom the power
supply before anempling any
mainlenance. NOTE"Turning
the dishwasher offdoes not
disconnecl tim appliance
flom tim power supply.
We recommend having a
qualified lechnician sel_ice
your appliance.
5
iiiiiiliii!/iiHi!iii:i_

IMPORTANTSAFETYINFORMATION.
READALLINSTRUCTIONSBEFOREUSING.
WARNING!
:i°
ili!}i{iiiiii!iii!iiii!il!l¸
i_i!iiiii{/ii/iiiHii!!!!!!iiHiii
ii/i!_ii_iiiii
iiiii!iiiH!!_iiiiiHiil
6
DONOT...
Do nol tamper xdlh conll-ols. Do nol allow children to play
inside, on or xdlh lhis
} Do nol abuse, sit on, or stand
on the door or dish rack of appliance or any discarded
the dishwasher, appliance.
Do not discard a dishwasher
xdthoul first removing the
door of the washing
comparlmenl.
Do not sRJre or use
combustible mamrials,
gasoline or other flmnmable
vapors and liquids in the
x{cinityof this or aW other
appliance.

WHENUSINGYOURDISHWASHER
Use only powder, tabs or
liquid delergenls or _tling
agents recommended for use
in a dishwasher and keep
them out of file reach of
children. Cascade"
Auumlafic Dishwashing
Detergent has been approved
for use in all GE dishwashers.
Locate shm_p items st) that
they are not likely It) damage
tile door seal.
Load shin 1)knives xdth tile
handles up to reduce the risk
of cul-tvpe injuries.
iiiiiiiiiiiii_iil
iiiiiiiiiiiii_iil
Do not wash plastic items
unless marked dishwasher
safe or lhe equivalent. For
plastic items not st)marked,
check the manuf_tcturer's
recommendations.
Non-Dishware Ilems: Do not
wash ilems such as elecmmic
air cleaner filters, fllmace
filmrs and paint brushes in
)xmr dishwasher. Damage u)
dishwasher and discoloration
or staining of dishwasher
In W resuh.
Do not touch the heating
element during or
immediateb, afler use.
Do not operale y()tlr
dishwasher unless all
enclosure panels are properly
in place.
Close supe_Yision is necessm T
it this appliance is used byor
near children.
Load light plastic items so
they xdll not become
dislodged and drop lo lhe
bot u)m of tile dishwashel_
they might come into contact
_dth file heating element and
be dmnaged.
Readandfollow this
SafetyInformation carefully.
SAVETHESEINSTRUCTIONS
7

il!i i lii
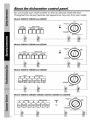
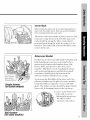
About the dishwasher controlpanel
Youcan locate your model number on the tub wall just inside the door.
Throughout this manual, features and appearance may vary from your model
CYCLES
POT- NORMAL
SCRUBBER WASH
ModelsGSD3310,GSD3320and GSD3330
START
I
START.__
CYCLE
ON
ENERGY OPTIONS
• °
%,_E,,W_H2_.,EBN DF,
II III
ModelsGSD3410,GSD3420andGSD3430
SCRUBBER WASH WASH
U_U
RINSE & HOLD {HEATED#RY OFF}
ModelsGSD3610,GSD3620and GSD3630
B_F
CYCLES ENERGY OPTIONS S@ORT WASH
I I I I I
iili! i'i iiiii'
iiiii!iiiH!!_iiiiiHiil
8
ModelsGSD3810,GSD3820,GSD3830,GSD3910,GSD3920and GSD3930
CYCLES ENERGY OPTIONS STATUS
I I I I I I I

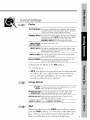
ControlSettings
cycles
POTSCRUBBERForheavilysoileddishesor cookwarewith dried-on
or baked-onsoils. Everydaydishesmaybeincluded.
Thiscyclewill not removeburned-onfoods.
NORMALWASH Forloadsof everydaydishes,glassesandcookware
with mediumsoils.NOTE:Manydisheshavelighter
soil than normal.Choosinga cycleotherthan
NORMALI!IIASHwill saveenergyand water.
LIGHTWASH/For disheswith lightsoils.
WATERSAVER
SHORTWASH Forquicklywashing loads ofeverydaydisheswith
mediumsoilsthat havenotdriedon,suchas loads
consistingmostlyof glasses.
RINSE& HOLDForrinsingpartial loadsthat will bewashedlater.
Donotuse detergent.
PLATEWARMER Forwarmingcleandishesand servingplates.This
cyclewill takeapproximately32 minutes.
Make sure the Dial is at the OFFposidon.
Latch the door.
NOTE."Tile lights over tile pads come on when pressed,
to indicate the c}vle/option fllat has been selected.
Press pad firmly undl lights come on. These lights
remain on while the door is locked.
E.ergvo.t o.s
HI TEMP Providesextra heatfor bestperformance.Itis used
WASH bestwith heavily-soileddishes.
HEATEDDRYON/Turnsthedryingheateronforfast drying.This
HEATEDDRY cyclewill extendthetime to your washcycle.
HEATEDDRYOFFShutsoff thedryingheat option.Dishesair dry
naturallyand energyis saved.
ENERGYSAVERTurnsall ENERGYOPTIONSoff.
li ii
Start
Slowly tm-n file Dial to tile STARTposilion. Don't turn it
past file STARYposifion, or }xm could accidentally miss a
linse. There is a lime delay between start-up and water
fill st) yotl xdll not hear aW wash a(lion lJg'hl away.
9

il!i ilii
Aboutthe dial cycles.
START
START OELAV %
(HRS) % SHORT
WASH
OF_
RINSE&HOLDf._T_,.R_o_
Short Wash
For quickly washing loads of eve_Tday dishes with medium
soils thai have not dried on.
r7] Select tile NORMAL WASH r_ Slowly tmn tile Dial to
cycle and any options. _ SHORTWASH.
r-2-]Be sure tile door is r_ Latch tile door to start
unlatched. _ the cycle.
START
STARTDELAy_. _
(HBS) % SHORT
WASH
OFF
pL_T_WARMER
Rinse& Hold
For rinsing partial loads that will be washed later. Do not use
detergent.
r7] Make stne HEATEDDRY _ Slowly tm-n the Dial to
is not selected. _ RINSE& HOLD.
Latch the door to start
r_ Be sure tile door is r_ tile cycle.
unlatched.
START
START DELAY %
!H_S} _ SHORT
_ WASH
RINSE& HOta_._l_. De_e*F_
Plate Warmer
For warming clean dishes and se_'ing plates.This cyde will
takeapproximately 32 minutes.
7] oad clean dishware
tobe wm_ned.
F_-]Select HEATEDDRY,
p']Be sure tile door is
unlatched.
["_ Slowly turn tile Dial
toPLATEWARMER.
I-if]Latch tile door to start
the cycle.
iili! ii iiiii
iiiii!iiiH!! iiiiiHiil
10
START DELAy %
_HRS} _ SHORT
WASH
_L_T_W_RM_R
Start Delay (GSD3310,GSD3320,GSD3330,GSD3410,GSD3420,GSD3430,
GSD3810,GSD3820,GSD3830,GSD3910,GSD3920andGSD3930only)
The STARTDELAY_4IIallow you todelay the stmt time of any
cycle not on tile Dial aUtOlnaticallv tot up to 6hours.
r7] Be sure tile door is _ Slowly turn tile Dial to
' ' unlatched, desired lime. The CYCLE
F'_ Select tile wash cycle and ON light will come on.
option you want.' r_ Latch tile door to start
the cycle.

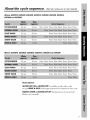
About the circle sequence. (Not all cycles are on all models)
ModelsGSD3310,GSD3320,GSD3330,GSD3410,GSD3420,GSD3430,GSD3610,
GSD3620andGSD3MO
POTSCRUBBER 9.5gal. 63min. RinseRinseRinseMainWashRinseRinseRinse
LIGHTWASH 6.7gal. 63min.
RinseRinseMainWash RinseRinse
SHORTWASH 6.6gal. 55min. RinseMainWashRinseRinseRinse
ModelsGSD3810,GSD3820,GSD3830,GSD3910,GSD3920andGSD3930
POTSCRUBBER 9.3gal. 63min. RinseRinseRinseMainWash RinseRinseRinse
LIGHTWASH 6.7gal. 63min.
RinseRinseMainWashRinseRinse
SHORTWASH 6.6gal. 55min.
RinseMainWash RinseRinseRinse
DryingOptions:
HEATEDDRYONorHEATEDDRY,Available on all washcydes
ex(epI RINSE& HOLD.Add approximately 32 minutes to the c_xle.
ENERGYSAVERorHEATEDDRYOFF.D1)_ing•heater is mined off.
Dishes dl_-naturally.
11

il!i ilii
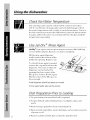
Usingthe dishwasher.
Checkthe WaterTemperature
The entering water must be at least 120oF. and not more titan
150 oF., %r ettecfive cleaning and to prevent dish damage. Check
tl_ewater temperature xdth a can@ or meat thermometer. Turn on
the hot wamr faucet nearest the dishwasher, place the thennomemr
in a glass and let the wamr nm conunuously into the glass undl the
temperature stops rising.
iili! ii iiiii
iiiii!iiiH!!_iiiiiHiil
12
UseJet-D ent
Jet-Dry®rinse agent removes spots and prevents new fihn build-up
on your dishes, glasses, tiara'are, cookwme and plastic.
Fill the rinse agent; dispenser
until it:reaches the bottom of lip
inside the opening. Replace cap.
To check ifrinse agent is needed,
remove fl_e cap and look into the
dispenser. ()n some models, the
dispenser can be checked by
pressing the clem center of the
fill cap 2 or 3 times. If rinse agent
fills the cenmr of the fill cap, you
have enough.
/
A full dispenser should last about one month.
If rinse agent spills, wipe up the excess.
DishPreparationPriortoLoading
No pre-rinsing of normal tbod soil is required.
Nrape off hmd soils including bones, toothpicks, skins, and
seeds.
Remove lm-gequantifies of any remaining tbod.
Remove leat_ivegetables, meat uJmmings, and excessive amounts
of grease or oil.
Remo_ addic fi)od soils that can discolor stainless steel.

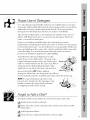
ProperUseof Detergent
Use only detergent specifically made tbr use in dishwashe)_. Cascade<_
Automatic Dishwashing Detergent has been approved tbr use in all GE
dishwashers. Keep your detergent ftesh and d U. Don't pul powder
detergent into the dispenser until you're ready Io wash dishes.
The mnount of demrgent to use depends on whelher your wamr is
hard or soft. Wifl_ hmd wamr, sxm need exua detergent. With soft
water, you need less demrgent.
Protect your dishes and dishwasher by contacting your water
deparunent and asking how hard >mr water is. Twelve or more grains
is exlremely hard wamr. A wamr softener is recommended. Without it,
lime can build up in the water valve, which could slick while ()pen and
cause flooding. Too nmch detergent x_fl_ soft water can caum a
permanent cloudiness of glassware, called etching.
You'll find Ix_) detergent dispensers on the
inside door ofyour dishwasher. All wash cycles
require detergent in the main cup. Wash cycles 0 pen
xdth two washes will also use the ()pen cup. When
using automatic dishwashing dete)gent tabs,
simply place one tab in the main cup and close.
Be sure lhe Dial is OFFbetbre adding
detergent. Other_dse, the detergent cup will not
close and latch properly. Add detergent then close tim main cup.
/VOTE."To open detergent cup 'atierit has / .{
been closed, simply turn the detergent cup
handle counter-clockxdse until it releases.
A snapping sound may be heard.
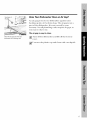
ForgettoAdd a Dish?
A fbrgotten dish can be added any lime beft_re the main wash.
Push the door latch u) the left.
Once the water cahns, ()pen the door. Steam may)ise out of the
:::::::: dishwasher.
Add fi)rgotten dishes.
_ Close the door and push the latch to the f_trright.
13
li ii

il!i ilii
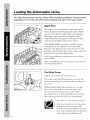
Loadingthe dishwasher racks.
For best dishwashing results, follow these loading guidelines. Features and
appearance of racks and silverware baskets may vary from your model
Upper Rack
The upper rack is for glasses, cups and saucers.
Cups and glasses fit best along lhe sides. This is
also a secure place for dishwashe>sate plastics.
The upper rack is good tbr all kinds of odd-
shaped ulensils. Saucepans, mixing bowls and
other items should be placed tare doom.
A wineglassholder (on some models) secures
_dne glasses al an angle tar besl washability.
Because _dne glasses come in various sizes, 'ailer
loading, slowly push in lhe rack to make sure lhey
_dll clear the lop of ll_e dishwasher.
Securelargerdishwasher-safeplasticsovertwofingers
whenpossible.
Makesuresmaflplasticitemsaresecuresotheycan'tfall
ontotheheatingdement
ii/i! i'i iiiii'
iiiii!iiiH!! iiiiiHiil
14
The Wash Tower
Keepthecenterareaclearinthelowerrack.
The wash tower rises through fl_e cenmr of the
lower rack during the wash and rinse portions of
the wcle.
Asecond wash toweris locamd in the top rock.
Waler from the wash tower in the lower rack
shoals up into this wash tower and out fl_e
openings a_/he top. X,_q_enloaNng items around
this wash _owerdo no_ block _he top openings.
Don'tblockit orloadtallthingsnexttoit.
Also, be cmetul not to let a portion
of an item such as a pot or dish
handle extend fluough the bouom
rack. This could block the wash mm
and cause [×:,orwashing resuhs.

Lower Rack
When/oading the/ower rack,do not load largeplatters or
trays le the front right comer Theymay prevent detergent
from circulatleg during the wash cycle.
Tile lower rack is best used fbr plains, saucers, and
cookware. Large items such as broiler pans and
racks should go along the sides. D_ad platters,
pols and bowls along lhe sides, in comers, or in
tile back. Tile soiled side of items should fkacetile
center of the rack.
li ii
Don'tletany
itemextend
Single basket
(on some models)
Silverware Basket
Put flatware in the removable basket _dth fork and
knife handles up u) promct your hands. Place
spoons in lhe basket x_lh handles doxm. Mix
knives, forks and spoons st) they don'l nest
together. Distfibum evenly. Small plastic items,
such as measuring spoons and lids flom small
containers, should go in lhe bollonl of the
silverware basket xdlh silverware on u_p.
To increase file flexibility of tile lower rack, tile
silverware basket may be split (on some models).
(;rasp the basket at opposim comers and slide
apart. The basket sections should be placed in the
lower rack by hanging them on the lop hoop.
A cover can be lowered to
eilher side It) secure
lighlweight ilems flom
the eflecls of file
vigorous wash action.
Split basket
(on some models)
75

il!i ilii
Caringforthe dishwasher.
Toclean the control panel use a lightly dampened cloth then dry
thoroughly. Toclean the exterior use a good appliance polish wax.
Never use sharp objects, scouring pads or harsh cleaners on any
part of the dishwasher.
Sumpcoverscrews
Protect Against Freezing
If your dishwasher is left in an unheated place during
tim _dnter, ask a service technician to:
Cut off electrical power to the dishwasher. Remove
fllses or tlip circuit breaker.
Turn off the water supply and disconnect the water
....- ' inlet line from the water valve.
{{{_Drain water from the inlet line and water valve.
::{ (I Jse a pan to catch the water.)
_ Reconnect the water inlet line to the water valve.
{2 Remove the plastic sump cover in tim mb
' bottoln and use a sponge to soak up water in the
robber boot.
ii/i! ii iiiii
iiiii!iiiH!! iiiiiHiil

Checktheair gapany timeyour
dishwasherisn't drabbg well
Does YourDishwasher Have anAir Gap?
An air gap prolecls your dishwasher againsl waler
backing up inlo it if a drain clogs. The air gap is nol a
[)art of the dishwasher. 11is not covered 1)yyour
wanamy. Not all plumbing codes require air gaps, so
)x)u may nol have one.
The air gap iseasy toclean.
',_" Tum offlhe dishwasherandliflofflhe chrome
:::::::::::::::::::::cover.
'_"_IJnscrew.... the plaslic cap and clean _dlh a toothpick.
li ii
17

il!i i lii
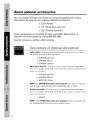
Aboutoptional accessories.
Youcan change the door and lower access panel appearance of your
dishwasher by ordering one of these optional accessories:
Color Panels
1/4" Wood Panel TrimKit
3/4" Trimless Panel Kit
These accessories are available at extra cost (VISA,MasterCard, or
Discover cards accepted) by calling 800-626-2002.
Specify accessory number when ordering.
iili! i'i iiiii'
iiiii!iiiH!! iiiiiHiil
18
Descriptionsof OptionalAccessories
Color panels-- Replacement door panels and lo_r access panels
are available in the fbllo_x_ng colors:
:: GPF3OOA(Almond)
_ GPF3OOB(Black)
GPF3OOW(White)
Wood panel trim kit--This accessory contains trim and instructions
f()l"you It) supply and install a 1/4" thick decorative _ot-] door and
lower access panel:
GPF325A (Almond)
GPF325B (Black)
GPF325W (White)
NOTE."The GPFIO0dishwasher door spring kitmust also be ordered
and installed when the door panel weighs four Ibs. or more.
Trimlesspanel kit--This accessory contains parts and &structions
for you to supply and install a 3/4" thi(k de(orative wood door and
lower access panel:
GPF375
NOTE."The GPFIO0dishwasher door spring kit_5ll be included _fith
the trimless panel kit and must be installed with it.

Beforeyou call for service...
Troubleshooting -tips
Review the charts on the following pages first and
you may not need to call for service.
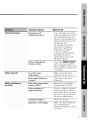
Dishwasherwon'trun
Possible Causes
Fuse is blown, or the
circuit breaker tripped
What ToDo
Replace fllse or reset
circuit breaker. Remove
aW oflmr appliances flom
the circuit.
Noise Some of the sounds
you'll hear are normal
Utensils are not secure
in the rack or something
small has dropped into
the rack
Soft ff_od disposal
shredding action.
Drain valve opening to
pump water out.
Timer conu-ol as cycle
progTesses.
Detergent cup opening.
The motor stopping during
the duing period.
Make sure eveuthing is
secured in dishwasher.
Motor hums Dishwasher has not been
used on a regular basis. If
you do not use }_)ur
dishwasher often, set it to
fill and pump oul once
eveU x_ek. This xdll help
keep the seal moist and
the gmbage disposer clear.
10

Beforeyou call for service...
Troubleshooting -tips
Waterstandingin This isnormal
thebottomof thetub
Water won"tpump
out of the tub
Drain is dogged
Sudsin thetub Correct detergent
wasn't used
Rinse agent
was spilled
What ToDo
A small amount of clean
water around the outlet on
the mb botlom at tim back
of the tub keeps the water
seal lubricated.
If you have an air gap,
clean it.
Check to see if}x)ur kitchen
sink is draining well. If not,
)xm may need a plumber.
If the dishwasher drains
inu) a disposer, nm
disposer clear.
Use only automatic
dishwasher demrgenls to
avoid sudsing. Cascade"
Automatic Dishwashing
Detergent has been
approved ibr use in all
GE dishwashers.
To remove suds from the
tub, ()pen the dishwasher
and let suds evaporam.
Add 1gallon of cold water
to the tub. Close and latch
the dishwasher. Pump out
water 1)ysl(mqy mining the
Dial until a drain period
is reached. Repeat if
necessaly.
Alwaysxdpe up rinse agent
spillsimmediately.
2O
Page is loading ...
Page is loading ...
Page is loading ...
Page is loading ...
Page is loading ...
Page is loading ...
Page is loading ...
Page is loading ...
Page is loading ...
Page is loading ...
Page is loading ...
Page is loading ...
-
 1
1
-
 2
2
-
 3
3
-
 4
4
-
 5
5
-
 6
6
-
 7
7
-
 8
8
-
 9
9
-
 10
10
-
 11
11
-
 12
12
-
 13
13
-
 14
14
-
 15
15
-
 16
16
-
 17
17
-
 18
18
-
 19
19
-
 20
20
-
 21
21
-
 22
22
-
 23
23
-
 24
24
-
 25
25
-
 26
26
-
 27
27
-
 28
28
-
 29
29
-
 30
30
-
 31
31
-
 32
32


GE GSD3410Z05AA Owner's manual
- Category
- Dishwashers
- Type
- Owner's manual
- This manual is also suitable for
Ask a question and I''ll find the answer in the document
Finding information in a document is now easier with AI
Related papers
Other documents
-
GEAppliances GSD700 User guide
-
Hotpoint HDA3520Z02BB Owner's manual
-
 GE Monogram Dishwasher ZBD3000 User manual
-
Signature 6010 Operating instructions
-
Maytag MDB9100AWQ User manual
-
Dunkirk 5EW200ZBTP Installation guide
-
Triarch 34105 User manual
-
Maytag MDB9050AW User manual
-
-
 Muscle Rack SWS181859-5C Operating instructions

