Page is loading ...

Use the following recommendations as a general operation guideline. Operator
judgement of actual on site conditions or poultry company
recommendations may require modification to this guideline.
Start-Up Guidelines:
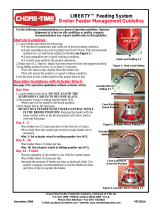
1.Lower feeder and check the following:
•All electrical connections and cords are in good working condition.
•All pan assemblies are set for proper feed level (Chore-Time recommends
number four (4) feed level setting for Poults see Figure 1.).
•All pan assemblies are in good working condition.
•All control pans perform the proper operations.
2.Make sure ALL objects / debris has been removed from the hopper and boot.
3.Run feeder system for two (2) or three (3) minutes.
•This will remove any objects from the feeder line.
•This will assure the system is in good working condition.
4.Set the time on the control panel to the proper time of day.
Operation Guidelines with Actuator Winch:
See page 2 for operation guidelines without actuator winch.
Day One
1.Lower feeder to the floor. DO NOT ALLOW THE
SUSPENSION CABLES TO BECOME SLACK.
2.Set actuator winch to setting number five (# 5).
•Feed cone will be raised to the brood position.
3.Run feeder line to fill feed pans.
DO NOT RUN FEEDER WITH TIMER CONTROL WHILE
IN THE BROOD POSITION! Running the feeder with the
timer control while in the brood position will allow feed to
over-run feed pans.
Day 1 - 5
•Run feeder two (2) times per day for the first five (5) days.
•Move feed away from the control pan switch to make feeder
run if necessary.
•Day 3: Set actuator winch to setting number four (# 4).
Day 6 - 13
•Run feeder three (3) times per day.
•Day 6: Set actuator winch to setting number three (# 3).
•Day 10: Set actuator winch to setting number two (# 2).
Day 14 - 35
•Day 14: Set actuator winch to setting number one (# 1).
•Switch operation of the feeder to run with the control panel.
Line Up Setting
with Arrow
Figure 1. Feed Level Setting
Feed Level Setting # 4
LIBERTY™ Feeding System
Poult Feeder Management Guideline
Actuator Winch
Setting # 5
Cone Raised to
Brood Position
Figure 2. Actuator Winch Setting # 5
Actuator Winch
Setting # 1
Cone Lowered to
Grow-Out Position
Figure 3. Actuator Winch Setting # 1
Chore-Time Poultry Production Systems, a Division of CTB, Inc.
P.O. Box 2000 • Milford, Indiana 46542-2000 • U.S.A.
Phone (574) 658-4101 • Fax (877) 730-8825
E-Mail: poultry@choretime.com • Internet: www.choretimepoultry.com
MF2360ADecember 2009

LIBERTY™ Feeding System
MF2360A 2
Operation Guidelines without Actuator Winch
Day One
1.Lift cone to the brood position.
2.Rotate the cone counterclockwise.
3.Lower feeder to the floor. DO NOT ALLOW THE SUSPENSION
CABLES TO BECOME SLACK.
4.Run feeder line to fill feed pans.
DO NOT RUN FEEDER WITH TIMER CONTROL WHILE IN
THE BROOD POSITION! Running the feeder with the timer
control while in the brood position will allow feed to over-run
feed pans.
Day 1 - 4
•Run feeder two (2) times per day for the first five (5) days.
•Move feed away from the control pan switch to make feeder run
if necessary.
Day 5 - 13
•Lift and rotate cone clockwise.
•Line up as shown see Figure 5. This will allow the cone to rest on
the feed and lower to the grow out position.
Day 14 - 35
•Switch operation of the feeder to run with the control panel.
After Flock
1.Remove all feed from the feeder line and feeder pans.
2.Swing pans down for cleaning.
3.Clean feeders per integrator recommendations.
4.After feeder is dry, lock the pans into the grill.
5.Raise feeder.
Figure 4. Raise and Rotate Cone
Cone Raised to
Brood Position
Figure 5. Rotate and Lower Cone
Cone Lowered to
Grow-Out Position
Line up to
lower cone
Figure 6. Swing Pan Down for Cleaning
/