Gigabyte GV-NX66128DP User manual

Category
Graphics cards
Type
User manual

This manual is also suitable for

Gigabyte GV-NX66128DP-SI, powered by NVIDIA GeForce 6600 GPU, supports DirectX 9.0c, and accelerates 3D graphics. It has 128MB DDR memory and multiple connectors (D-Sub, DVI-I, AV/S-Video, and HDTV output), enabling connections to various displays, including VGA monitors, flat-panel displays, projectors, and TVs. It's suitable for GIGABYTE BTX motherboards, providing enhanced visuals for gaming, multimedia, and other graphics-intensive applications.

Gigabyte GV-NX66128DP-SI, powered by NVIDIA GeForce 6600 GPU, supports DirectX 9.0c, and accelerates 3D graphics. It has 128MB DDR memory and multiple connectors (D-Sub, DVI-I, AV/S-Video, and HDTV output), enabling connections to various displays, including VGA monitors, flat-panel displays, projectors, and TVs. It's suitable for GIGABYTE BTX motherboards, providing enhanced visuals for gaming, multimedia, and other graphics-intensive applications.

Nov. 17, 2004
VGA Card
GV-NX66128DP
VGA Card
Nov. 17, 2004
GV-NX66128DP
Copyright
© 2005 GIGABYTE TECHNOLOGY CO., LTD
Copyright by GIGA-BYTE TECHNOLOGY CO., LTD. ("GBT"). No part of this manual may be reproduced or transmitted in
any form without the expressed, written permission of GBT.
Trademarks
Third-party brands and names are the property of their respective owners.
Notice
Please do not remove any labels on VGA card, this may void the warranty of this VGA card.
Due to rapid change in technology, some of the specifications might be out of date before publication of this booklet.
The author assumes no responsibility for any errors or omissions that may appear in this document nor does the author make
a commitment to update the information contained herein.
GV-NX66128DP
GeForce
6600 Graphics Accelerator
User's Manual
Rev. 101
12MD-NX661SI-101R
* The WEEE marking on the product indicates this product must not be disposed of with user's other household waste
and must be handed over to a designated collection point for the recycling of waste electrical and electronic equipment!!
* The WEEE marking applies only in European Union's member states.
GV-NX66128DP Graphics Accelerator - 2 -
English
Table of Contents
1. Introduction ......................................................................................... 3
1.1. Features ..................................................................................................... 3
1.2. Minimum system requirement ....................................................................... 3
2. Hardware Installation ........................................................................... 4
2.1. Board Layout .............................................................................................. 4
2.2. Hardware installation ................................................................................... 6
3. Software Installation ............................................................................ 8
3.1. Windows
®
XP driver and utilities installation .................................................. 8
3.1.1. Operating system requirement ..................................................................................... 8
3.1.2. DirectX installation .......................................................................................................... 8
3.1.3. Driver installation .......................................................................................................... 10
3.1.4. Utilities on driver CD .................................................................................................... 12
3.1.5. Taskbar icon ................................................................................................................. 14
3.1.6. Display properties pages ............................................................................................. 17
3.1.7. nView properties pages ............................................................................................... 21
3.2. Windows
®
2000 driver installation .............................................................. 26
4. Troubleshooting Tips ........................................................................ 27
5. Appendix .......................................................................................... 28
5.1. How to Reflash the BIOS ........................................................................... 28
5.1.1. Reflash BIOS in MS-DOS mode ................................................................................. 28
5.1.2. Reflash BIOS in Windows mode ................................................................................ 28
5.2. Resolutions and Color Depth Table (In Windows
®
XP) ............................... 29
Introduction- 3 -
English
1. Introduction
1.1. Features
Powered by NVIDIA
®
GeForce
6600 Graphics Processing Unit (GPU)
Supports the newest PCI Express x 16
Integrated with 128MB DDR memory
Supports DirectX 9.0c
Supports AV / S-Video and HDTV output
Provides D-Sub and DVI-I connectors
Most suitable for GIGABYTE BTX motherboards (including the GA-8I945G-MBX,
GA-8I915D-YFD, GA-8I945D-YFD, and GA-8I915G-ZFD. The above list is
subject to change without notice).
1.2. Minimum system requirement
IBM
®
or 100% PC compatible with Pentium
®
III 650MHz or AMD Athlon 650MHz
class processor or higher
One PCI Express x 16 slot
Operating Systems Windows
®
2000 / Windows
®
XP
64MB system memory
50MB of available disk space for full installation
CD-ROM or DVD-ROM drive
GV-NX66128DP Graphics Accelerator - 4 -
English
TV-Out
VGA Monitor
Connector
(15-pin)
DVI-I Connector
Analog LCD Monitor
Analog Monitor
OR
VGA Output
NTSC / PAL TV
Projector
Y
S-Video Output
DVI-I to D-Sub Adapter
Digital LCD Monitor
DVI Output
Analog LCD Monitor
VGA Output
Pr
Pb/AV Output
HDTV
2. Hardware Installation
2.1. Board Layout
TV-out
VGA Monitor Connector
(15-pin)
DVI-I Connector
Hardware Installation- 5 -
English
Expansion cards contain very delicate Integrated Circuit (IC) chips. To
protect them against damage from static electricity, you should follow
some precautions whenever you work on your computer.
1. Turn off your computer and unplug power supply.
2. Use a grounded wrist strap before handling computer components. If you do not
have one, touch both of your hands to a safely grounded object or to a metal object,
such as the power supply case.
3. Place components on a grounded antistatic pad or on the bag that came with the
components whenever the components are separated from the system.
The card contains sensitive electric components, which can be easily damaged by
static electricity, so the card should be left in its original packing until it is installed.
Unpacking and installation should be done on a grounded anti-static mat. The operator
should be wearing an anti-static wristband, grounded at the same point as the anti-
static mat.
Inspect the card carton for obvious damage. Shipping and handling may cause damage
to your card. Be sure there are no shipping and handling damages on the card before
proceeding.
DO NOT APPLY POWER TO YOUR SYSTEM IF IT HAS BEEN DAMAGED ON
THE CARD.
In order to ensure your graphics card working correctly, please use official
Gigabyte BIOS only. Use none official Gigabyte BIOS might cause problem
on the graphics card.
GV-NX66128DP Graphics Accelerator - 6 -
English
2.2. Hardware installation
Installing Your graphics card.
Now that you have prepared your computer, you are ready to install your graphics
accelerator card.
To remove the existing graphics card:
1. Power off the computer and monitor, then
disconnect the display cable from the back
of your computer.
2. Remove the computer cover. If necessary,
consult your computer's manual for help
in removing the cover.
3. Remove any existing graphics card from
your computer.
Or, if your computer has any on-board
graphics capability, you may need to
disable it on the motherboard. For more
information, please see you computer
documentation.
Hardware Installation- 7 -
English
You are now ready to proceed with the installation of the graphics card driver. Please refer
to next chapter for detailed instructions.
2. Plug the display cable into your card; then
turn on the computer and monitor. If your
graphics card came with a DVI-I connector,
you can connect a flat panel display to the
appropriate connector, as shown below...
To TV or VCR
To VGA Monitor
To Flat Panel Display
To install your new graphics card:
1. Locate the PCI Express x 16 slot. If
necessary, remove the metal cover from this
slot; then align your graphics card with the
PCI Express x 16 slot, and press it in firmly
until the card is fully seated.
Replace the screw to fasten the card in place,
and replace the computer cover.
GV-NX66128DP Graphics Accelerator - 8 -
English
3.1.2. DirectX installation
Install Microsoft DirectX to enable 3D hardware acceleration support for Windows
®
2000
or Windows
®
XP to achieve better 3D performance.
0 Note: For software MPEG support in Windows
®
2000 or Windows
®
XP, you must install
DirectX first. Users who run Windows XP with Service Pack 2 or above do not need to
install DirectX separately.
Step 1. When autorun window show up, click
the Install DirectX 9 item.
3. Software Installation
In this manual, we assume that your CD-ROM Drive letter to be Drive D:
The installation of Windows
®
2000 / Windows
®
XP drivers is very simple. When you insert the
driver CD into your CD-ROM drive, you can see the AUTORUN window (if it does not show
up, run "D:\setup.exe"). Then you can follow the guides to setup your graphics card driver.
(Please follow the subsection 3.1.3 "Driver installation" to install the driver for your graphics
accelerator.)
3.1. Windows
®
XP driver and utilities installation
3.1.1. Operating system requirement
When loading the graphics card drivers for the system, please make sure your system
has installed DirectX 9.0c or later version.
If you install the graphics card drivers for the motherboard, which consist of SIS or VIA
chipsets, please install the appropriate driver program for that motherboard. Or please
contact your motherboard nearest dealer for motherboard driver.
Software Installation- 9 -
English
Step 4. Click "Finish" to restart computer.
Then the DirectX 9 installation is completed.
Installing the components.
Step 2. Choose I accept the agreement and click
the "Next" button.
Step 3. Click the "Next" button.
GV-NX66128DP Graphics Accelerator - 10 -
English
3.1.3. Driver installation
A. New hardware found
After the graphics card is inserted into your computer at the first time, the windows will
automatically detect a new hardware in the system and pop out a "New Hardware Found"
message. The following is the step-by-step installation guide.
Step 1: Found new hardware wizard: Video controller (VGA Compatible)
Click "Next" button to install the driver. (There is a
driver CD disk that came with your graphics
accelerator, please insert it now.)
Or click the "Cancel" button to install the driver
from AUTORUN window.
Step 2: Found new hardware wizard: Searching and installing
The wizard will search for the driver and install it automatically.
Step 3: Found new hardware wizard: Finish
Click the "Finish" button to finish the installation.
Software Installation- 11 -
English
B. Driver installation (Autorun Window)
Insert the driver CD disk into your CD-ROM, and then you can see the AUTORUN window.
If it does not show up, please run "D:\setup.exe".
Step 1. When autorun window show up,
click Install Display Driver item.
Step 2. Click "Next" button.
Step 3. Click "Finish" button to restart
computer. Then the driver installation is
completed.
Windows installings the components.
GV-NX66128DP Graphics Accelerator - 12 -
English
3.1.4. Utilities on driver CD
Insert the driver CD disk into your CD-ROM, and then you can see the AUTORUN window.
If it does not show up, please run "D:\setup.exe".
Install GIGABYTE Utility (V-Tuner 2):
Step 3. Enter your name and company.
Step 4. Click the Finish button to restart computer.
Then the utilities installation is completed.
Step 2. Click the Next button.
Step 1. When autorun window show up, please click
the Utilities item.
Then click the GIGABYTE Utility item.
Software Installation- 13 -
English
V-Tuner 2
V-Tuner 2 lets you adjust the working frequency of the graphic engine and video memory
(Core Clock and Memory Clock).
Adjust
Core speed
Displays core clock status Displays memory clock status
Adjust
Memory speed
Select choice of skinOpen Help page
GV-NX66128DP Graphics Accelerator - 14 -
English
3.1.5. Taskbar icon
After installation of the display drivers, you will find a GIGABYTE icon on the taskbar's
status area. Right-clicking this icon opens the GIGABYTE control panel, showing a menu
composed of shortcut of the graphics card's enhanced and other functions.
You may click the Display Properties item, and then click Settings. Click Advanced after
clicking Settings. Click the appropriate tab to change your display settings.
Right click the icon.
You can link to GIGABYTE website for updated information about the
graphics accelerator, latest drivers, and other information.
Click the VGA Information
item into the "VGA Info" and
"Color Adjust" tabs.
Software Installation- 15 -
English
VGA Information
VGA Info lists the relevant information about your card.
Color Adjust
Color Adjust allows you to make color adjustments, such as brightness, contrast and
gamma values for each or all of RGB colors.
GV-NX66128DP Graphics Accelerator - 16 -
English
After installation of the display drivers, you will find a NVIDIA icon on the taskbar's status
area. Click this icon to open the control panel.
You can adjust the properties of
the graphics accelerator from
here.
Right click the icon.
Software Installation- 17 -
English
GeForce 6600 properties
This page shows the Adapter, System and Driver
version information.
You can select other properties from the pop-out menu.
3.1.6. Display properties pages
To access Display Properties pages, right-click the GBT icon on the taskbar and select
Display Properties or right-click on Desktop and then select Properties. The Display
Properties dialog box shows the information of display adapter, color, the range of display
area, and the refresh rate.
Settings (Resolutions and Color depth for Windows)
You may adjust the screen resolution and color quality settings in this dialog box.
To access more advanced options, click the "Advanced" button.
After pressing the "Advanced" button in Settings, you'll see the Plug and Play Monitor and
NVIDIA GeForce 6600 dialog box. Click the GeForce 6600 tab. (You can also click the Nvidia icon
on the taskbar and select Nvidia Display to access the GeForce 6600 page.)
You can click the item to change the color quality.
You can move the slider to change the resolution.
Click the Advanced button for adapter and setting.
GV-NX66128DP Graphics Accelerator - 18 -
English
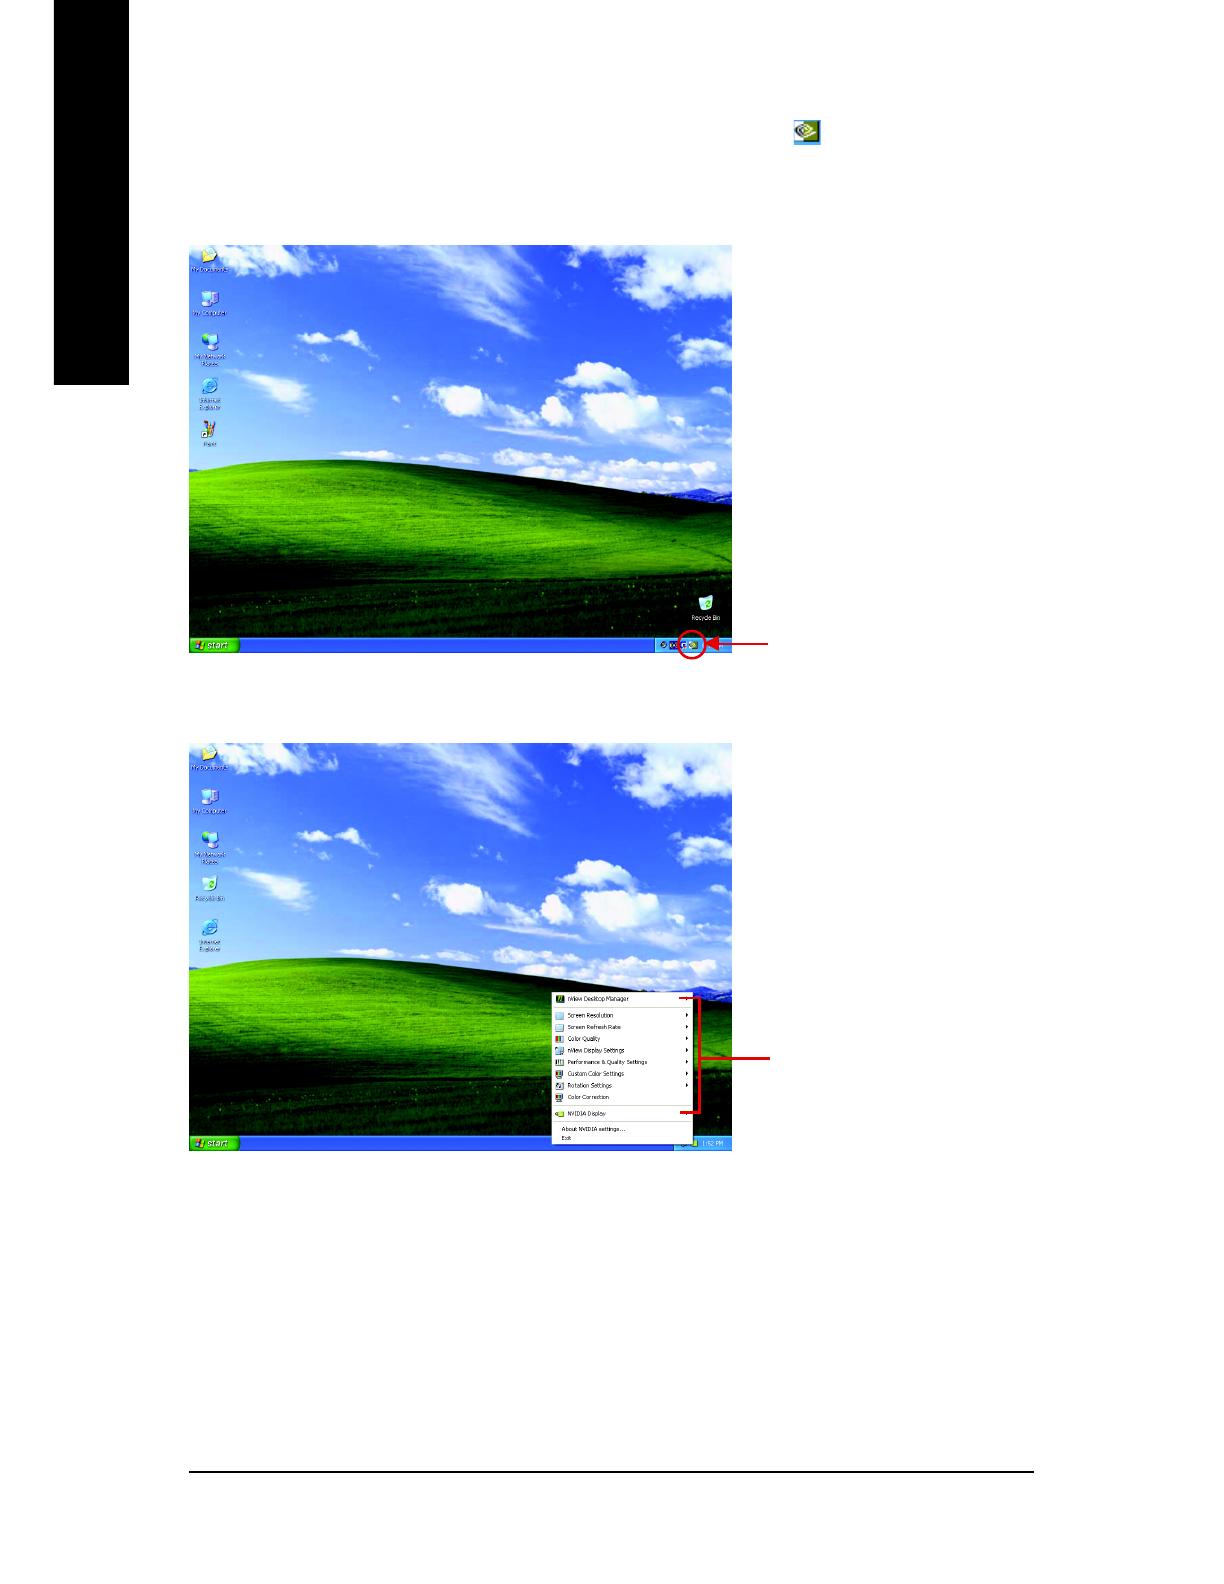
nView allows you to connect separate displays to single
graphics card.
nView Display mode: select your preferred nView display
modes here. Options: Single display/ Clone/ Horizontal
span/ Vertical span/ Dualview
Primary/Secondary display: select a single display or
display pair. The selected display combination will appear
in the graphical representation below.
Make this the primary display: Specifies that the display
corresponding to the icon you selected above is the
primary display.
Click Apply to apply settings or click OK to save settings.
If TV is chosen as the display, you will need to select the
proper TV format. To do this, click "Device Settings" followed
by "Select TV format". Select the format for your television
and then click "Apply" followed by "OK".
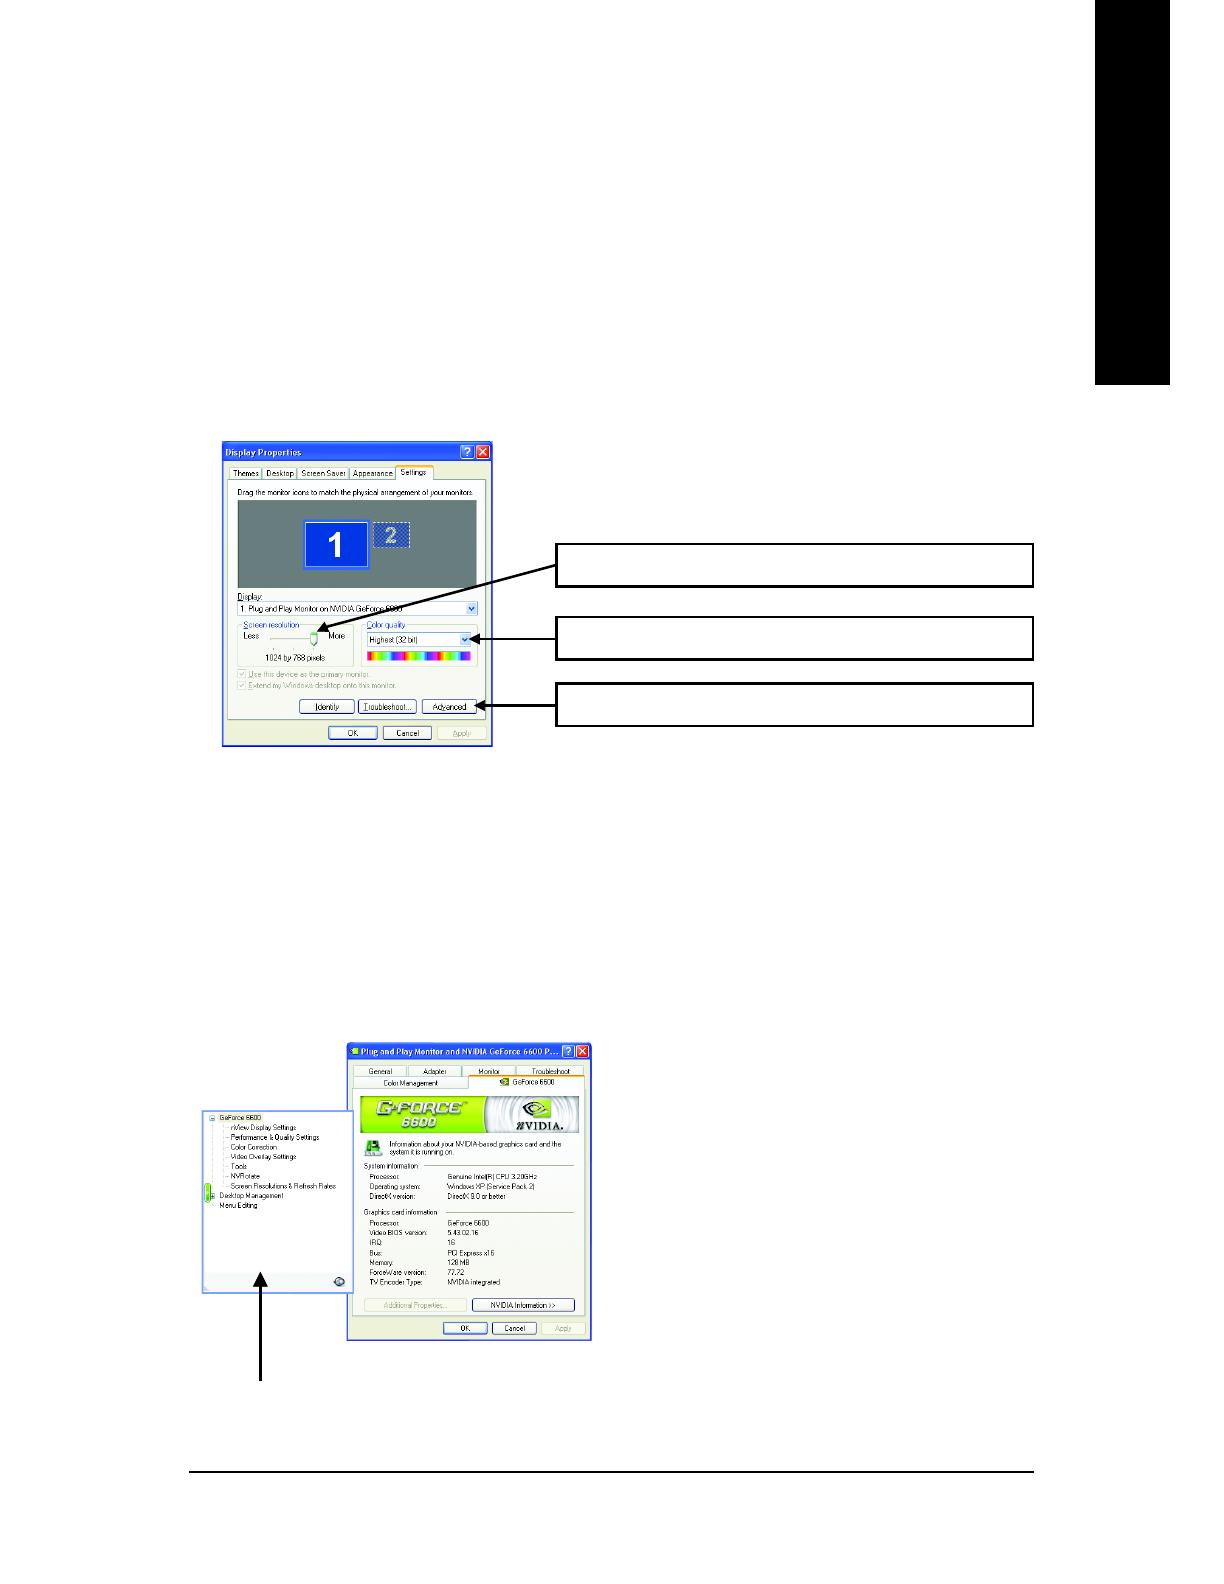
nView Display properties
Performance and Quality Settings properties
The sliders lets to decide whether your application should use
quality or high performance texture.
Application profiles: Select the application profile from the list
of profiles.
Global Driver Settings: Select the Settings item and move
the slider below to set the degree of antialiasing to used in
Direct3D and OpenGL applications.
Antialiasing settings: allows to set the degree of the Global
Driver Settings.
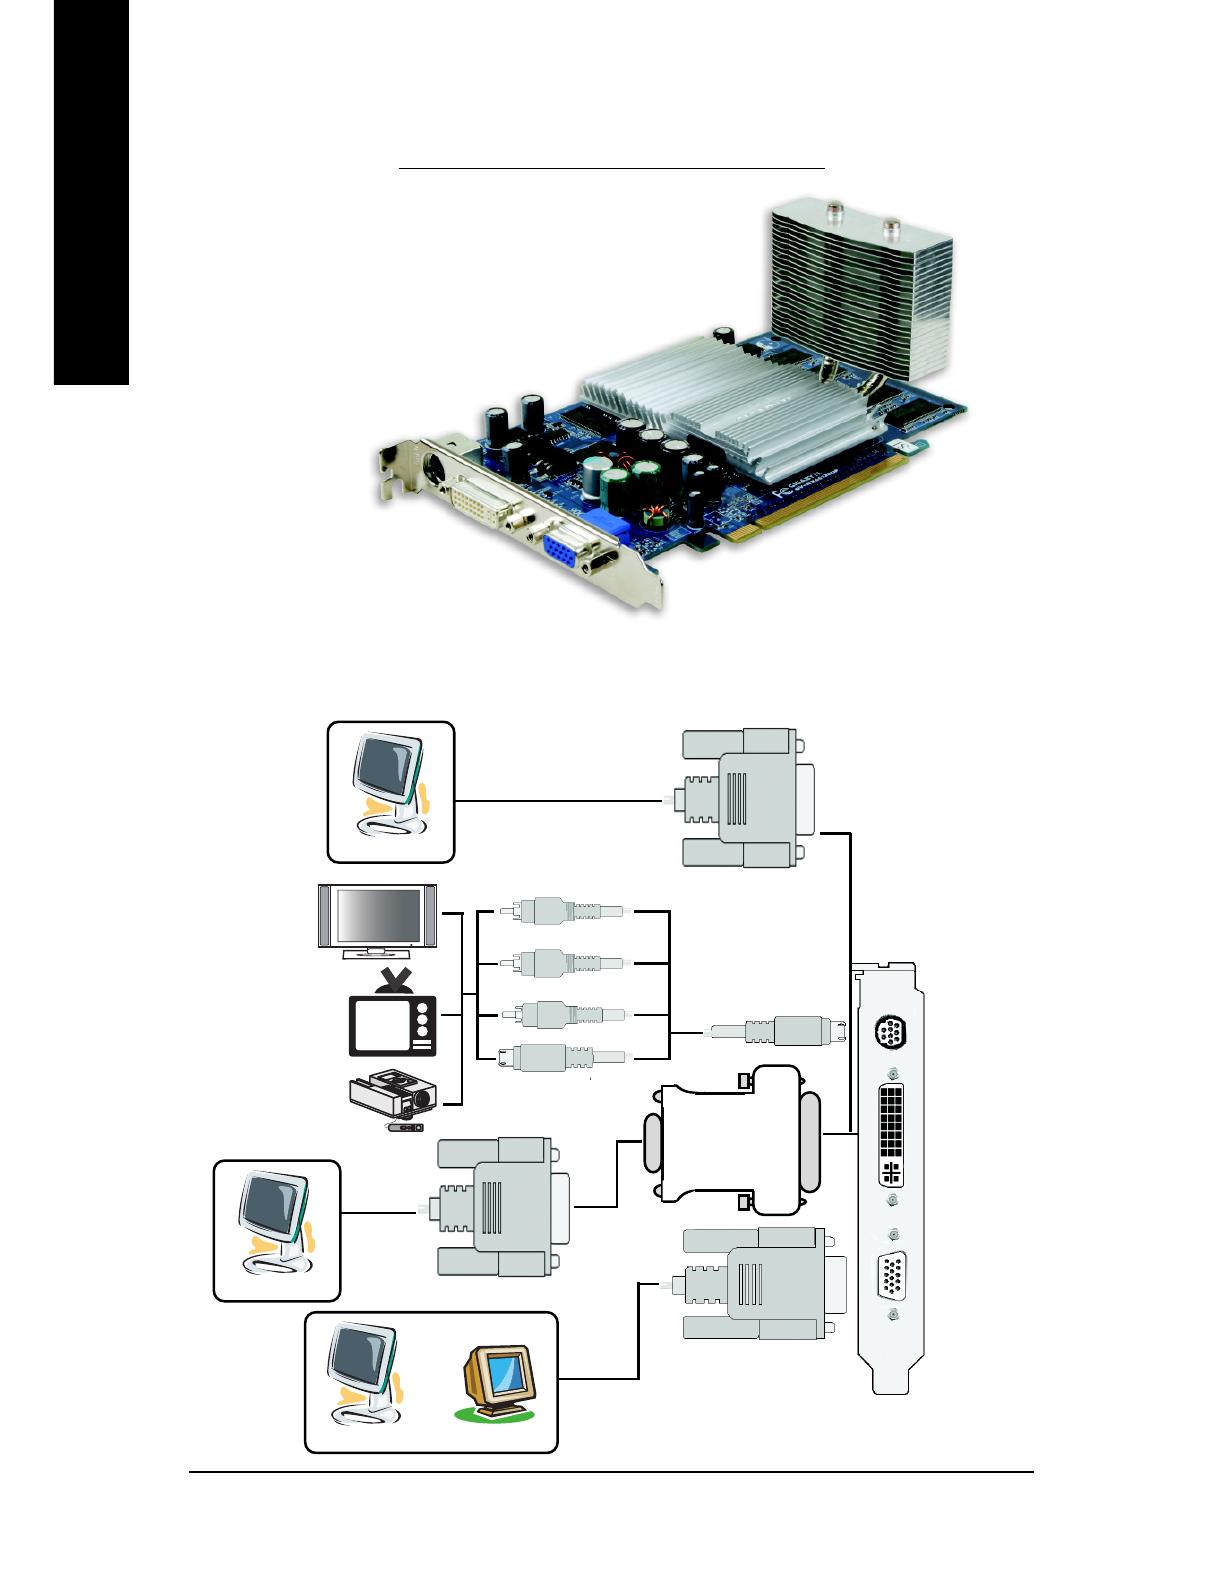
Display Model GV-NX66128DP
Matrix CRT+TV Yes
CRT+DVI Yes
DVI+TV Yes
Color Correction properties
The Color Correction Properties is used to compensate for
variations in luminance between a source image and its output
on a display device. Adjust the color correction settings to
provide more accurate color reproduction of images(such as
photographs) on your display device. Also, many 3D-
accelerated games may appear too dark to play. Increasing
the brightness and/or the gamma value equally across all
channels makes these games appear brighter and more
playable.
  • Page 1 1
  • Page 2 2
  • Page 3 3
  • Page 4 4
  • Page 5 5
  • Page 6 6
  • Page 7 7
  • Page 8 8
  • Page 9 9
  • Page 10 10
  • Page 11 11
  • Page 12 12
  • Page 13 13
  • Page 14 14
  • Page 15 15
  • Page 16 16
  • Page 17 17
  • Page 18 18
  • Page 19 19
  • Page 20 20
  • Page 21 21
  • Page 22 22
  • Page 23 23
  • Page 24 24
  • Page 25 25
  • Page 26 26
  • Page 27 27
  • Page 28 28
  • Page 29 29
  • Page 30 30
  • Page 31 31
  • Page 32 32
  • Page 33 33
  • Page 34 34
  • Page 35 35
  • Page 36 36

Gigabyte GV-NX66128DP User manual

Category
Graphics cards
Type
User manual
This manual is also suitable for

Gigabyte GV-NX66128DP-SI, powered by NVIDIA GeForce 6600 GPU, supports DirectX 9.0c, and accelerates 3D graphics. It has 128MB DDR memory and multiple connectors (D-Sub, DVI-I, AV/S-Video, and HDTV output), enabling connections to various displays, including VGA monitors, flat-panel displays, projectors, and TVs. It's suitable for GIGABYTE BTX motherboards, providing enhanced visuals for gaming, multimedia, and other graphics-intensive applications.

Ask a question and I''ll find the answer in the document

Finding information in a document is now easier with AI