
WTB Rim User’s Manual For all WTB Rims (ver.60910) Page 1 of 37
WTB TCS Rim User’s Manual
For WTB TCS rims only.
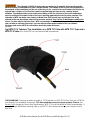
NOTE TO RETAILERS: If you are installing this component for your customer, please make sure that this
User’s Manual is passed along to the customer after you use it.
GI1-0410
Thank you for the confidence you have shown in WTB by selecting one of our products. We appreciate
your business, and your satisfaction is important to us. Because we would like to make sure that you get the
best performance and longest service life from any WTB product you use, you MUST read these instructions
BEFORE you assemble, install or use your new WTB components. YOUR SAFETY DEPENDS ON THIS. And
if you have any questions or problems, or feel you do not understand something about the product, its
installation or its use, please talk with your WTB dealer or contact WTB.
GI2-0410
IMPORTANT NOTE: This WTB user’s manual for this specific component on your bicycle is not a substitute for
all the safety and use information contained in the owner’s manual that was supplied with your bicycle. If you
do not have such an owner’s manual, contact the bicycle's manufacturer or retailer for a copy. To the extent
that your bicycle user’s manual and this component part user’s manual conflict as to the use of this specific
WTB component, this WTB user’s manual should be followed. If you are unsure about the resolution of a
conflict between this manual and any other manual or set of instructions, please consult your local bicycle
retailer.
GI3-0410
READ BEFORE USE: This User’s Manual refers to ESSENTIAL information for:
1(a) Intended Use
1(b) WTB TCS Rim Summary Chart
Current Model Year
Older Model Years
1(c) Rim Size Designation
1(d) Selecting the Correct Rim Tape Based on WTB TCS Inner Rim Width
1(e) Installing WTB TCS Rim Tape on a WTB TCS Rim with a WTB TCS Valve
1(f)) Rim/Tire Compatibility under ISO and ETRTO
1(g) Bike/Brake Compatibility
1(h) WTB TCS Tubeless Tire Installation on a WTB TCS Rim with WTB TCS Tape and a WTB TCS
Valve
NOTE: For additional technical information on bicycle wheel rims and tires, see the below manual matrix
available at wtb.com/manuals.
WTB Technical Manuals
(Detailed information)
WTB User Manuals
(Less detailed information)
TUBE TYPE
RIMS
A detailed technical explanation of
international bicycle rim standards and
fundamentals, as applied to WTB Tube
Type Rims, including previous model year
products.
Concise user information on WTB Tube Type
Rims.
TCS
RIMS
A detailed technical explanation of
international bicycle rim standards and
fundamentals, as applied to WTB Tube
Type Rims, including previous model year
products.
Concise user information on WTB Tube Type
Rims.

WTB Rim User’s Manual For all WTB Rims (ver.60910) Page 2 of 37
TUBE TYPE
TIRES
A detailed technical explanation of
international bicycle tire standards and
fundamentals, as applied to WTB Tube
Type Tires, including previous model year
products.
Concise user information on WTB Tube Type
Tires.
TCS
TIRES
A detailed technical explanation of
international bicycle tire standards and
fundamentals, as applied to WTB TCS
Tires, including previous model year
products.
Concise user information on WTB TCS tires.
RI1-0410 NEEDS TO BE UPDATED AS CHART HAS BEEN ALTERED

WTB Rim User’s Manual For all WTB Rims (ver.60910) Page 3 of 37
BEFORE EACH USE CHECK EACH OF THE FOLLOWING:
▪ Break wear / operation
▪ Always check your disc brake rotors or caliper brake pads for
excessive wear before you ride as well as the operation of the
brake levers and cables.
▪ Spoke tension
▪ Before any ride, always check your spoke tension. See Section 3
Maintenance and Repair, below.
▪ Rim wear / damage / trueness
▪ Always check your rims for any wear, dents, gouges and damage
and that the wheels are true before you ride. If there is any
damage to your rims, replace them BEFORE you ride.
▪ Tires / Pressure / Sealant
Retention
▪ Always check your tires for tire bead and tire sidewall fraying or
damage. If either is damaged, see WARNING at Section 3(a).
Additionally, check tire pressure and ensure that tires are within
the specified range on the tire’s sidewall. Visually inspect the
tire’s sidewall to ensure the bead is appropriately and evenly
seated around the circumference of the rim on both sides. For
WTB TCS rims and WTB TCS tires, take note and ensure that no
sealant is seeping from the tire’s sidewall. Any signs of seepage
or sealant can and may be indicative of a damaged tire and
require replacement before riding.
1. Before you start
GENERAL WARNING:
No matter how experienced you are as a cyclist, do not fail to read this WARNING or to carefully
follow the instructions below.
Technological advances have made bicycles and bicycle components more complex and many
bicycle component installation, service and repair tasks require special knowledge and tools. Improper
installation, adjustment or service may result in damage to the component or component failure.
All WTB products should be installed by a qualified bicycle mechanic using appropriate
professional tools. WTB assumes no liability for products which are improperly installed, assembled or
configured.
When installing WTB components in conjunction with another manufacturer’s components, you
should always follow that manufacturer’s instructions for their components and WTB’s for WTB
components. If there is a conflict, ask your dealer to help you resolve it. WTB assumes no liability for
damage caused by installing other manufacturers’ products.
After any installation, adjustment or repair to your bicycle or components, test your work by taking
a test ride in a controlled environment, away from cars, other cyclists, obstacles or other hazards.
Failure to follow these instructions can result in component failure. Component failure can cause
you to lose control of the bicycle and fall, leading to serious injury or death. WTB cannot warn of all
potential hazards resulting from misuse of its products, only those that it can reasonably foresee from
anticipated use of the product.
GW1-0410
1(a) Intended Use: This product is not intended for use by children age 12 and under. Check the
Intended Use information for this product at wtb.com/manuals to make sure this product is compatible with how
you intend to use it. Also please check our website to make sure you have the most current version of the
instructions for this product. If you have any questions or doubts, check with your WTB dealer or contact WTB.
Understand your bike and its intended use. Choosing the wrong component for your
intended purpose can be hazardous. Also read, in its entirety, the first WARNING of the Maintenance
and Repair section of these instructions.
IU1-0410

WTB Rim User’s Manual For all WTB Rims (ver.60910) Page 4 of 37
Determine the Intended Use of your WTB Rim BEFORE you ride it.
Intended Use as used in this Manual is influenced by several factors:
➢ Rim Size Designation. See Section 1(c);
➢ Rim / Tire Compatibility. See Section 1(f);
➢ Bike / Brake Compatibility. See Section 1(g);
➢ ASTM Intended Use Classification. See Section 1(b); and
➢ Industry Standard for Intended Use. See Section 1(b).
Intended Use is not the same as “Rim Size.” See also Section 1(c), Rim Size Designation for WTB rim sizes.
Information used to determine Intended Use of WTB Rims is contained in the WTB TCS Rim Summary Chart
for Model Years 2023 and older in Section 1(b) below.
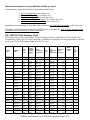
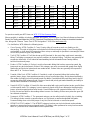
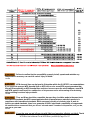
1(b) WTB TCS Rim Summary Chart
The Common Bicycle Type and Industry Standard Category Name for Intended Use, ASTM Intended Use
Classifications, Brake Type, Rim Size Designation, Rim Bead Seat Diameter, and Inner Rim Width as set forth
by ISO and ETRTO are integrated below for WTB TCS Rims:
Bicycle
Type
WTB Rim
Name
WTB
Rim
Std.
Industry
Standard
Name for
Intended
Use
ASTM
Intended Use
Classification
Brake
Type
ISO /
ETRTO Rim
Size
Designation
Rim Bead
Seat
Diameter
Inner Rim
Width (
Width in
mm)
TCS
Rim
Tape
Width
(in
mm)
Mountain 26"
and under
KOM Team i25
16"
TCS
Cross
Country
Condition 3
Disc
305 x 25c
305
25
30
KOM Team i25
20"
TCS
Cross
Country
Condition 3
Disc
407 x 25c
407
25
30
KOM Team i25
24"
TCS
Cross
Country
Condition 3
Disc
507 x 25c
507
25
30
KOM Team i30
16"
TCS
Cross
Country
Condition 3
Disc
305 x 30c
305
30
35
KOM Team i30
20"
TCS
Cross
Country
Condition 3
Disc
407 x 30c
407
30
35
KOM team i30
24"
TCS
Cross
Country
Condition 3
Disc
507 x 30c
507
30
35
KOM Team i30
26"
TCS
Cross
Country
Condition 3
Disc
559 x 30c
559
30
35
ST i25 16"
TCS
Cross
Country
Condition 3
Disc
305 x 25c
305
25
30
ST i25 20"
TCS
Cross
Country
Condition 3
Disc
407 x 25c
407
25
30
ST i25 24"
TCS
Cross
Country
Condition 3
Disc
507 x 25c
507
25
30
ST i30 16"
TCS
Cross
Country
Condition 3
Disc
305 x 30c
305
30
35
ST i30 20"
TCS
Cross
Country
Condition 3
Disc
407 x 30c
407
30
35
ST i30 24"
TCS
Cross
Country
Condition 3
Disc
507 x 30c
507
30
35
SX25 26"
Tube
Type
Cross
Country
Condition 3
Disc
559 x 25c
559
25
30
Mountain
27.5"
CZR i30 27.5"
TCS
Downhill
Condition 5
Disc
584 x 30c
584
30
35
EZR i25 27.5"
TCS
Cross
Country
Condition 3
Disc
584 x 25c
584
25
30
EZR i27 27.5"
TCS
Cross
Country
Condition 3
Disc
584 x 27c
584
27
32
KOM Light i25
27.5"
TCS
Cross
Country
Condition 3
Disc
584 x 25c
584
25
30

WTB Rim User’s Manual For all WTB Rims (ver.60910) Page 5 of 37
KOM Light i27
27.5"
TCS
Cross
Country
Condition 3
Disc
584 x 27c
584
27
32
KOM Light i30
27.5"
TCS
Cross
Country
Condition 3
Disc
584 x 30c
584
30
35
KOM Light i35
27.5"
TCS
Cross
Country
Condition 3
Disc
584 x 35c
584
35
40
KOM Light i40
27.5"
TCS
Cross
Country
Condition 3
Disc
584 x 40c
584
40
45
KOM Light i45
27.5"
TCS
Cross
Country
Condition 3
Disc
584 x 45c
584
45
50
KOM Light i76
27.5"
TCS
Cross
Country
Condition 3
Disc
584 x 76c
584
76
81
KOM Tough i25
27.5"
TCS
Cross
Country
Condition 3
Disc
584 x 25c
584
25
30
KOM Tough i27
27.5"
TCS
Cross
Country
Condition 3
Disc
584 x 27c
584
27
32
KOM Tough i30
27.5"
TCS
Trail/Enduro
Condition 4
Disc
584 x 30c
584
30
35
KOM Tough i35
27.5"
TCS
Trail/Enduro
Condition 4
Disc
584 x 35c
584
35
40
KOM Tough i40
27.5"
TCS
Trail/Enduro
Condition 4
Disc
584 x 40c
584
40
45
KOM Tough i45
27.5"
TCS
Trail/Enduro
Condition 4
Disc
584 x 45c
584
45
50
HTZ i23 27.5"
TCS
Cross
Country
Condition 3
Disc
584 x 23c
584
23
28
HTZ i27 27.5"
TCS
Trail/Enduro
Condition 4
Disc
584 x 27c
584
27
32
HTZ i30 27.5"
TCS
Trail/Enduro
Condition 4
Disc
584 x 30c
584
30
35
HTZ i35 27.5"
TCS
Trail/Enduro
Condition 4
Disc
584 x 35c
584
35
40
HTZ i40 27.5"
TCS
Trail/Enduro
Condition 4
Disc
584 x 40c
584
40
45
HTZ Trail i23
27.5"
TCS
Cross
Country
Condition 3
Disc
584 x 23c
584
23
28
HTZ Trail i25
27.5"
TCS
Cross
Country
Condition 3
Disc
584 x 25c
584
25
30
HTZ Trail i27
27.5"
TCS
Trail/Enduro
Condition 4
Disc
584 x 27c
584
27
32
HTZ Trail i30
27.5"
TCS
Trail/Enduro
Condition 4
Disc
584 x 30c
584
30
35
HTZ Trail i35
27.5"
TCS
Trail/Enduro
Condition 4
Disc
584 x 35c
584
35
40
HTZ Trail i40
27.5"
TCS
Trail/Enduro
Condition 4
Disc
584 x 40c
584
40
45
KOM Trail i27
27.5"
TCS
Cross
Country
Condition 3
Disc
584 x 25c
584
27
30
KOM Trail i30
27.5"
TCS
Trail/Enduro
Condition 4
Disc
584 x 27c
584
30
32
KOM Trail i35
27.5"
TCS
Trail/Enduro
Condition 4
Disc
584 x 30c
584
35
35
KOM Team i25
27.5"
TCS
Cross
Country
Condition 3
Disc
584 x 35c
584
25
40
KOM Team i27
27.5"
TCS
Cross
Country
Condition 3
Disc
584 x 40c
584
27
45
KOM Team i30
27.5"
TCS
Cross
Country
Condition 3
Disc
584 x 30c
584
30
35
KOM Team i35
27.5"
TCS
Cross
Country
Condition 3
Disc
584 x 35c
584
35
40
KOM Team i40
27.5"
TCS
Cross
Country
Condition 3
Disc
584 x 40c
584
40
45
ST Tough i30
27.5"
TCS
Trail/Enduro
Condition 4
Disc
584 x 30c
584
30
35
ST Tough i35
27.5"
TCS
Trail/Enduro
Condition 4
Disc
584 x 35c
584
35
40
ST i25 27.5"
TCS
Cross
Country
Condition 3
Disc
584 x 25c
584
25
30
ST i27 27.5"
TCS
Cross
Country
Condition 3
Disc
584 x 27c
584
27
32
ST i30 27.5"
TCS
Cross
Country
Condition 3
Disc
584 x 30c
584
30
35
ST i35 27.5"
TCS
Cross
Country
Condition 3
Disc
584 x 35c
584
35
40
ST i40 27.5"
TCS
Cross
Country
Condition 3
Disc
584 x 40c
584
40
45

WTB Rim User’s Manual For all WTB Rims (ver.60910) Page 6 of 37
ST i45 27.5"
TCS
Cross
Country
Condition 3
Disc
584 x 45c
584
45
50
ST i76 27.5"
TCS
Cross
Country
Condition 3
Disc
584 x 76c
584
76
81
SX25 27.5"
Tube
Type
Cross
Country
Condition 3
Disc
584 x 25c
584
25
30
Mountain 29"
CZR i30 29"
TCS
Downhill
Condition 5
Disc
622 x 30c
622
30
35
EZR i25 29"
TCS
Cross
Country
Condition 3
Disc
622 x 25c
622
25
30
EZR i27 29"
TCS
Cross
Country
Condition 3
Disc
622 x 27c
622
27
32
KOM Light i25
29"
TCS
Cross
Country
Condition 3
Disc
622 x 25c
622
25
30
KOM Light i27
29"
TCS
Cross
Country
Condition 3
Disc
622 x 27c
622
27
32
KOM Light i30
29"
TCS
Cross
Country
Condition 3
Disc
622 x 30c
622
30
35
KOM Light i35
29"
TCS
Cross
Country
Condition 3
Disc
622 x 35c
622
35
40
KOM Light i40
29"
TCS
Cross
Country
Condition 3
Disc
622 x 40c
622
40
45
KOM Light i45
29"
TCS
Cross
Country
Condition 3
Disc
622 x 45c
622
45
50
KOM Tough i25
29"
TCS
Cross
Country
Condition 3
Disc
622 x 25c
622
25
30
KOM Tough i27
29"
TCS
Cross
Country
Condition 3
Disc
622 x 27c
622
27
32
KOM Tough i30
29"
TCS
Trail/Enduro
Condition 4
Disc
622 x 30c
622
30
35
KOM Tough i35
29"
TCS
Trail/Enduro
Condition 4
Disc
622 x 35c
622
35
40
KOM Tough i40
29"
TCS
Trail/Enduro
Condition 4
Disc
622 x 40c
622
40
45
KOM Tough i45
29"
TCS
Trail/Enduro
Condition 4
Disc
622 x 45c
622
45
50
HTZ i23 29"
TCS
Cross
Country
Condition 3
Disc
622 x 23c
622
23
28
HTZ i27 29"
TCS
Trail/Enduro
Condition 4
Disc
622 x 27c
622
27
32
HTZ i30 29"
TCS
Trail/Enduro
Condition 4
Disc
622 x 30c
622
30
35
HTZ i35 29"
TCS
Trail/Enduro
Condition 4
Disc
622 x 35c
622
35
40
HTZ i40 29"
TCS
Trail/Enduro
Condition 4
Disc
622 x 40c
622
40
45
HTZ Trail i23 29"
TCS
Cross
Country
Condition 3
Disc
622 x 23c
622
23
28
HTZ Trail i25 29"
TCS
Cross
Country
Condition 3
Disc
622 x 25c
622
25
30
HTZ Trail i27 29"
TCS
Trail/Enduro
Condition 4
Disc
622 x 27c
622
27
32
HTZ Trail i30 29"
TCS
Trail/Enduro
Condition 4
Disc
622 x 30c
622
30
35
HTZ Trail i35 29"
TCS
Trail/Enduro
Condition 4
Disc
622 x 35c
622
35
40
HTZ Trail i40 29"
TCS
Trail/Enduro
Condition 4
Disc
622 x 40c
622
40
45
KOM Trail i27 29"
TCS
Cross
Country
Condition 3
Disc
622 x 25c
622
27
30
KOM Trail i30 29"
TCS
Trail/Enduro
Condition 4
Disc
622 x 27c
622
30
32
KOM Trail i35 29"
TCS
Trail/Enduro
Condition 4
Disc
622 x 30c
622
35
35
KOM Team i25
29"
TCS
Cross
Country
Condition 3
Disc
622 x 35c
622
25
40
KOM Team i27
29"
TCS
Cross
Country
Condition 3
Disc
622 x 40c
622
27
45
KOM Team i30
29"
TCS
Cross
Country
Condition 3
Disc
622 x 30c
622
30
35
KOM Team i35
29"
TCS
Cross
Country
Condition 3
Disc
622 x 35c
622
35
40
KOM Team i40
29"
TCS
Cross
Country
Condition 3
Disc
622 x 40c
622
40
45
ST Tough i30 29"
TCS
Trail/Enduro
Condition 4
Disc
622 x 30c
622
30
35

WTB Rim User’s Manual For all WTB Rims (ver.60910) Page 7 of 37
ST Tough i35 29"
TCS
Trail/Enduro
Condition 4
Disc
622 x 35c
622
35
40
ST i25 29"
TCS
Cross
Country
Condition 3
Disc
622 x 25c
622
25
30
ST i27 29"
TCS
Cross
Country
Condition 3
Disc
622 x 27c
622
27
32
ST i30 29"
TCS
Cross
Country
Condition 3
Disc
622 x 30c
622
30
35
ST i35 29"
TCS
Cross
Country
Condition 3
Disc
622 x 35c
622
35
40
ST i40 29"
TCS
Cross
Country
Condition 3
Disc
622 x 40c
622
40
45
ST i45 29"
TCS
Cross
Country
Condition 3
Disc
622 x 45c
622
45
50
SX25 29"
Tube
Type
Cross
Country
Condition 3
Disc
622 x 25c
622
25
30
For previous model year WTB rims see WTB TCS Rim Summary Chart.
Where possible, in addition to industry standard descriptions, this WTB Rim User Manual references American
Society for Testing and Materials (“ASTM”) Standard Classifications for Bicycle Usage to describe Intended
Use, along with Common Terms. See ASTM Designation F 2043-09 at www.astm.org
For clarification, WTB defines the following terms:
• Cross Country. ASTM Condition 3. Cross Country riding is focused as much on climbing as it is
descending. This style of riding does not include technical terrain and/or jumps. Cross Country bikes
are hardtails or short-travel full suspension bikes set up as minimally as possible to save weight. Riders
do not wear protective gear (only helmets).
• Trail. ASTM Condition 4. Trail (also known as All Mountain) is the most often used term in mountain
biking. Trail riding encompasses any and all conditions in mountain biking. Trail bikes are generally full
suspension bikes with 4- to 6-inches of travel and they’re built to handle Cross Country climbs,
technical terrain and jumps.
• Enduro. ASTM Condition 4. Enduro is a style of mountain biking that involves excessive speed, big
jumps and very technical terrain. Riders in this category are most concerned with speed down highly
demanding and technical natural and man made terrain. Enduro bikes are generally full suspension
bikes with 5- to 7-inches of travel.
• Freeride / Bike Park. ASTM Condition 4. Freeride is a style of mountain biking that involves high
speeds, jumps, drops, slow speed maneuvering, skinny wood bridge riding, and air-based acrobatics.
Man made and highly technical natural terrain are ridden. Freeride and bike park bikes tend to be full
suspension bikes with between 6 and 8 inches of travel with priority put toward durability and ability to
descend with somewhat of an ability to climb.
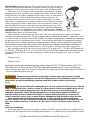
• Downhill. ASTM Condition 4. Downhill is often associated with racing and involves terrain-specific bikes
on bike-specific trails. This category is most commonly found at lift-access bike parks that feature big
jumps, excessive speed and technical terrain. Downhill bikes are full suspension bikes with 7- to 10-
inches of travel and built for descending without concern for climbing. Riders wear protective gear (full
face helmets and pads).
• Pavement. ASTM Condition 1. The pavement category can be called comfort, hybrid, city or trekking.
This riding includes smooth or paved surfaces, on city streets as well as designated bike paths.
Pavement riding does not include jumps of any kind, technical terrain or excessive speed.
• MTB/ATB. ASTM Condition 2. The MTB/ATB category involves non-technical terrain and moderate
speeds on unpaved surfaces and gravel roads. This riding is often performed on entry-level mountain
bikes or cyclocross bikes outfitted with offroad-capable tires.

WTB Rim User’s Manual For all WTB Rims (ver.60910) Page 8 of 37
If you would like to read a summary of the ASTM F2043 - 09 Standard Classification for Bicycle Usage please
visit this link http://www.astm.org/Standards/F2043.htm You will need to purchase the complete standard from
ASTM.
1(c) WTB Rim Size Designation
To identify Rim Size, WTB follows ETRTO (European Tire and Rim Technical Organization, www.etrto.org)
and ISO (International Standards Organization, www.iso.org) definitions and standards, including “Rim Size
Designation.”
Mountain 26” bikes use 559mm bead seat diameter rims, which are often referred to as 26” or “Mountain Bike”
rims. The 26” refers to a traditional measurement based on the outside diameter of a historical tire inflated on
an undefined matching rim. DO NOT USE THE 26” REFERENCE TO DETERMINE THE RIM SIZE
DESIGNATION. ALSO DO NOT USE THE 26” REFERENCE FOR TIRE SIZE DESIGNATION OR RIM / TIRE
COMPATABILITY.
Mountain 27.5” or 650b bikes use 584mm bead seat diameter rims, which are often referred to as 27.5” or
“650b” rims. DO NOT USE THE 27.5” NOR 650b REFERENCE TO DETERMINE THE RIM SIZE
DESIGNATION. ALSO DO NOT USE THE 27.5” NOR 650b REFERENCE FOR TIRE SIZE DESIGNATION
OR RIM / TIRE COMPATABILITY.
Mountain 29” bikes use 622mm bead seat diameter rims, which are often referred to as 29” or “29er” rims. The
29” refers to a traditional measurement based on the outside diameter of a historical tire inflated on an
undefined matching rim. DO NOT USE THE 29” REFERENCE TO DETERMINE THE RIM SIZE
DESIGNATION. ALSO DO NOT USE THE 29” REFERENCE FOR TIRE SIZE DESIGNATION OR RIM / TIRE
COMPATABILITY.
The (1) Rim Bead Seat Diameter and (2) Inner Rim Width are the two measurements that define Rim Size or
Rim Size Designation. Both numbers are necessary to determine correct rim and tire compatibility. They are
measured as shown below.
1(c)(1) Rim Bead Seat Diameter
ISO/ETRTO set forth the measuring convention for rim diameter or Rim Bead Seat Diameter. In
ISO/ETRTO, rims are grouped by their Bead Seat Diameter measurement. Rim Bead Seat Diameter is
measured at the diameter line where the tire bead sits on the Inner Rim Profile. This Rim Bead Seat
Diameter is often referred to as the D1 Dimension when referencing specific areas of a rim’s inner
profile in ISO and ETRTO.
It is very difficult to accurately measure the Rim Bead Seat Diameter pursuant to ISO/ETRTO. Special
tools are required. Measurement methods are outlined in ISO and ETRTO. The information in the
Summary Chart in Section 1(b) Intended Use above, can help you determine the Rim Bead Seat
Diameter of WTB Rims.
WTB produces rims with three different Rim Bead Seat Diameters:
ISO/ETRTO
Rim Bead Seat Diameter
Common Use
Common
Reference Term
1. 559 mm
Mountain bike
Comfort bike
Cruiser Bike
26”
2. 584 mm
Mountain bike
650B / 27.5”

WTB Rim User’s Manual For all WTB Rims (ver.60910) Page 9 of 37
3. 622 mm
Includes road, trekking,
hybrid and city bikes
29” Mountain Bike
Cyclocross / Gravel
700C
29”, 29er
Cyclocross /
Gravel
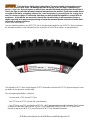
1(c)(2) Inner Rim Width
The “Inner Rim Width” Size is shown below as the width between the two Rim Sidewall Crochet
“hooks.” The Rim Sidewall Crochets are the “hooks” on the inside of the rim sidewall.
All WTB Rims are Crochet type rims as defined by ISO and ETRTO. All WTB Rims can be measured in
the location shown in the diagram below to determine the ISO and ETRTO Inner Rim Width.
1(c)(3) Rim Size Designation Once you know the ISO/ETRTO Rim Bead Seat Diameter and Inner
Rim Width of your WTB Rim you have the key measurements to determine the Rim Size Designation:
• The first number in the ISO/ETRTO form is the Rim Diameter.
• The second number, after “x” is the Inner Rim Width.
FOR EXAMPLE: A rim with a Rim Size Designation of 622 x 24C is a rim with a 622 Rim Bead
Seat Diameter and a 24mm Inner Rim Width. The “C” designates that the rim is a Crochet type
rim.
RIM SIZE DESIGNATION IS CRITICAL FOR DETERMINING RIM/TIRE COMPATIBILITY. Additionally,
Rim Size Designation can be instructive for Intended Use. For Intended Use see Section 1(b), WTB
Rim Summary Chart.

WTB Rim User’s Manual For all WTB Rims (ver.60910) Page 10 of 37

WTB Rim User’s Manual For all WTB Rims (ver.60910) Page 11 of 37
\ 1(c)(4) Finding the WTB Rim Size Designation with the WTB Rim Sticker
(a) Model Year 2010 and newer WTB Rim Stickers identify each WTB Rim’s Bead Seat Diameter,
Inner Rim Width and Rim Size Designation:
* See also Section 1(b) WTB Rim Summary Chart.
On the WTB Ci24 27.5" rim sticker shown above, the Rim Bead Seat Diameter is 584mm and the Inner
Rim Width is 24mm, meaning this is a “27.5” / 650b” Mountain Bike Rim” with a 24mm Inner Rim Width
and a 584mm Bead Seat Diameter. The Rim Size Designation is 584 x 24C.
RI2-0410 – CHANGE, NO LONGER VALID
1(d) Selecting the Correct WTB TCS Rim Tape Based on WTB TCS Inner Rim Width
Use only the correct size rim tape width, thickness and material on WTB Rims. The rim tape must be chosen to
guarantee the complete covering of all spoke holes and spoke heads during use, not slip from side to side in
the rim or slip around the rim’s diameter, and permit proper mounting, fit and seating of the tire. Dirt, moisture,
old sealant and tire mounting technique can contribute to the slippage or movement of some types of rim tape.
WTB only recommends WTB TCS rim tape be used with WTB TCS rims.
Example: WTB Ci24 27.5" Rim Sticker

WTB Rim User’s Manual For all WTB Rims (ver.60910) Page 12 of 37
When determining the appropriate TCS rim tape to use with TCS rims:
1. Locate and determine the inner rim width of the TCS rim in question. See Figure 1(c)(4) regarding
WTB rim stickers to help locating the inner rim width description.
2. Add 5mm to the specified inner rim width. For example, A Frequency i23 27.5” Rim has an internal rim
width of 23mm. Adding 5mm to the 23mm inner rim width results in the appropriate width of TCS rim
tape required, 28mm in this case.
3. Select the appropriate TCS rim tape based on the sum of the inner rim width plus 5mm.
See WTB TCS Rim Summary chart to find appropriate tape width for individual TCS rim models.
Failure to use the correct width rim tape on your WTB wheel, or improper installation of
any rim tape can result in improper seating of the tire bead in the rim, which may lead to the tire
coming off the rim while riding and or to sudden tire deflation while riding. Failure to make sure that
the rim tape covers all spoke holes completely and that it stays in place during use may also lead to
the tire coming off the rim while riding and/or sudden tire deflation. Sudden tire deflation (or tire
coming off while riding) can cause loss of control, resulting in serious injury or death. If you have any
questions about the correct size, material, thickness or fitting of the rim tape, check with your WTB
dealer or contact WTB.
RS1-0410 NEEDS TO BE UPDATED NOW
1(e) Installing WTB TCS Rim Tape on a WTB TCS Rim with a WTB TCS Valve
First:
Ensure that the rim is clean. All sealant remnants, old tape fragments, and other debris need be
removed from the rim’s inner rim well, On-Ramp, Bead Bump, Bead Shelf, and Crotchet or Bead Hook
area. See illustration below for clarification of this area. Failure to do so could result in improperly seated
tire beads, potentially resulting in deflation, the tire becoming unseated from the rim or being separated
from the rim, loss of tire, loss of control, a crash, and / or death. If cleaning products have been used to
ensure the inner surface of the rim is clean, ensure that the products used do not leave behind a slippery or
slick residue and that the cleaning products have had more than ample time to dry. Rubbing alcohol is
recommended.
Double check tape width / rim width correlation. Remember that TCS rim tape needs to be 5mm
wider than the inner rim width (inner rim width is found on the WTB Rim Size Designation of a WTB Rim
Sticker.)
Inspect the TCS rim to ensure integrity and proper functionality. Visually search for any dents,
dings, scratches, or cracks on both the TCS rim’s external surface as well as internal surface. If there is
any doubt as to the integrity or functionality of the rim, take it to a WTB Dealer or qualified mechanic to
assess the state of the rim. Visually inspect each bead hook, ensuring no wavering or deviation from a
straight and true line when eyeing the bead hook / crotchet hook holding the rim at eye level.
Applying the Tape:

WTB Rim User’s Manual For all WTB Rims (ver.60910) Page 13 of 37
(Rim Cross Section Profile Drawing) (Rim Cross Section Profile Actual Picture)
TCS Rim
Bead Bump
Bead Shelf = Tire Bead Seat Measuring Point
Bead Bump
Bead Shelf = Tire Bead Seat Measuring Point
Items Required:
- WTB TCS Rim
- WTB TCS Rim tape (5mm wider than inner rim width of WTB TCS rim)
- Sharp razor blade, X-Acto knife or equivalent style knife, or small sharp pocket knife
- Scissors or appropriate tape cutting device
- WTB TCS Brass or Alloy Valve
- Non metal, tire lever with rounded end
- Shop rag
Steps:
1. Remove the appropriate width WTB TCS Rim Tape from its packaging making sure not to damage the
TCS tape in the process. Double check that TCS tape is 5mm wider than the inner rim width of the

WTB Rim User’s Manual For all WTB Rims (ver.60910) Page 14 of 37
TCS rim (Model Year 2012 and newer WTB TCS rims, with the exception of Laser TCS rims, adhere to
a naming convention specifying inner rim width – for example, a Frequency i23 29” rim has an inner rim
width of 23mm as stated by the i23 in the naming convention – other examples include KOM i21 and
Asym i29, featuring 21mm and 29mm inner rim widths respectively. For 2011 TCS rims, please see
1(b) WTB TCS Rim Summary Chart.). Ensure that the end of your WTB TCS tape is cleanly cut with a
noticeable level of adhesiveness.
2. You may want to put something down over the floor or surface where you will be applying the rim tape.
A towel or blanket will help prevent the crochet hook / bead hook area from being damaged when
pressed against a concrete or hard floor.
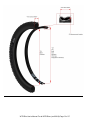
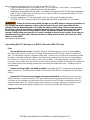
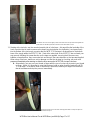
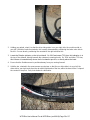
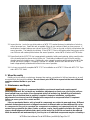
3. Find the valve hole on your WTB TCS rim. On some WTB TCS rims, the valve hole will be clearly
identified by a sticker, with others, when viewing from the inside trough of the rim, look for where three
holes are more closely spaced together than any other part of the rim, with the center hole being
substantially more round and larger than the two adjacent holes. Once found and identified, resting the
rim perpendicularly on the ground in front of you, orient the valve hole so that it is in the tallest, highest,
top position on the rim. See photo below for reference.
The valve hole in the WTB TCS rim is easily identified by closer spacing of three holes in the rim as seen above.
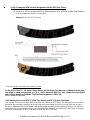
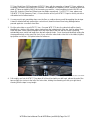
4. Pull roughly one foot of WTB TCS rim tape off of the roll and with your left hand, adhere the end of the
tape roughly four inches to the left of the valve hole, holding the remaining roll with your right hand,
ensuring that the tape is very taught.

WTB Rim User’s Manual For all WTB Rims (ver.60910) Page 15 of 37
Start to apply WTB TCS tape roughly four inches before valve hole in WTB TCS rims.
5. Place your left thumb firmly over the end of the WTB TCS tape adhered within the rim’s trough. While
maintaining pressure with your left thumb over the tape’s end, in a tight and taught manner, pull roughly
two feet of rim tape free from the roll with your right hand moving outward away from your body, in the
same plane that the rim’s trough extends outward and away from the tape’s end. If done with
appropriate force and tension, the tape should make buckling sounds as it becomes unstuck from the
remaining roll.
Ensure that you have a firm grip on the tape’s end as you apply ample tension when setting
WTB TCS rim tape into the WTB TCS rim trough.
6. Begin to adhere the unstuck TCS tape to the central trough, taking care to ensure the tape maintains its
tension and is applied in a taught manner while moving the tape in a downward motion with the right
hand, pressing in toward the central trough, conforming to the falling away circumference of the rim,
and taking care to line the width of the tape evenly within the crotchet hooks / bead hook area of the
rim’s inner well.
7. As you reach the roll of tape in your right hand, having now adhered the WTB TCS rim tape to your
WTB TCS rim, move your left thumb now to the junction of the WTB TCS rim tape adhered to the WTB
TCS rim and the remaining roll of WTB TCS rim tape. Firmly press your left thumb into the stuck tape,

WTB Rim User’s Manual For all WTB Rims (ver.60910) Page 16 of 37
ensuring that pressure is applied to the rim’s inner well and trough. In the same fashion as before
mentioned in Step 6, pull roughly two more feet of WTB TCS rim tape free from the remaining WTB
TCS rim tape roll, taking care to ensure you are keeping the freed tape taught with even and deliberate
tension.
8. Continue applying WTB TCS rim tape to the WTB TCS rim following the same instructions as outlined
and followed in steps 5 through 7 above until reaching the starting point, located just before that rim’s
valve.
Approaching where the taping began, continue taping roughly 4 inches beyond the valve hole.
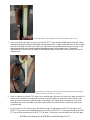
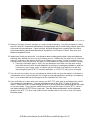
9. Having reached where the taping began, roughly four inches before the valve hole, continue taping with
one last taught piece extending roughly four inches past the valve hole, double layering the tape.
Ensure that this last piece is quite taught and applied firmly against the existing piece of tape. Take
care to ensure that there are no air bubbles or bumps on this last piece of tape, smoothing it out by
pressing one’s thumb or finger deliberately along the trough toward the remaining roll of tape past the
valve hole.
a. Exercise caution moving your thumb or finger along the taped rim trough toward the remaining
roll of tape. Rim tape can quickly heat up when pressure and friction are applied so if heat build
up is felt, make sure to remove your thumb or finger to avoid injury or discomfort.
10. Once the rim tape has been smoothly and firmly pressed against the rim and there is no additional
slack between applied tape and remaining roll, cut the rim tape free from the remaining roll. The rim
tape should have passed roughly four inches beyond the valve hole area and should be firmly applied.
You will not be able to see the valve hole as it will have already been taped over but you will have a
general idea of where it is based on taping over the origin of tape application.

WTB Rim User’s Manual For all WTB Rims (ver.60910) Page 17 of 37
The darker color seen in the upper portion of the WTB TCS rim tape to the left signifies the
portion that was double layered near the valve hole of the WTB TCS rim.
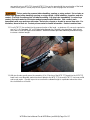
11. Starting at the rim hole, use the rounded smooth side of a tire lever – this would be the backside of the
hook or portion that is used to remove a tire bead (see photo below for clarification,) and press firmly
into the bottom of the rim trough, ensuring that the WTB TCS Rim tape is firmly adhere to the bottom
base of the trough within the WTB TCS rim. Start at the valve hole of the WTB TCS rim and work your
way around, following the same direction as the tape was applied, ensuring that if there are any
bubbles or imperfections, they are worked out and along in the same direction as the tape was applied.
When using a tire lever, make sure not to damage nor tear the rim tape by checking your work and
progress immediately after starting to slide the lever across the WTB TCS rim tape’s surface.
a. Alternatively, you may use your thumb or finger with the use of a shop rag to protect your thumb
or finger. Again, it is important to note that heat may build up when pressing against the WTB
TCS rim tape – if excessive heat or discomfort is observed, remove your finger or thumb from
the rim’s surface and stop the process immediately.
Using the smooth end of a tire lever to firmly press WTB TCS tape into place as
described in Step 12

WTB Rim User’s Manual For all WTB Rims (ver.60910) Page 18 of 37
12. Next, move to the crotchet / bead hook area. Use either the smooth butt end of a tire lever with care
not to tear nor gouge the WTB TCS rim tape, or use your finger or thumb with a shop rag, paying
attention and careful notice to heat build up. Push gently yet evenly against the rim’s wall, ensuring
that force is being applied both externally from the rim’s center outward and well as downward and in
the direction that the rim tape was applied. Start at the valve hole and work your way around the rim,
following the direction in which the tape was applied. Once finished, move to the other crotchet / bead
hook and being the process over again.
Pocketknives, razors, X-Acto knives or equivalent sharp instruments need to be
handled with the utmost care and caution as these aforementioned instruments are extremely
dangerous and may result in direct bodily harm to the user or to a bystander. Do not use nor perform
any of the following steps if you are not experienced, comfortable, or confident in your ability and
performance with a pocketknife, razor, X-Acto knife or equivalent type of instrument or device. Instead
take your taped rim to a qualified mechanic to perform the rest of the steps in this section.
13. Take out your small, sharp razor blade, X-Acto knife or equivalent device, or small, sharp pocket knife.
Locate the rim’s valve hole. Looking closely at your WTB TCS taped WTB TCS rim, you should be able
to see darker circles dotting the rim’s inner well, indicating spoke holes as well as the valve hole.
Finding the tightest grouping of three darker circles should indicate your valve hole, double checking
the outside surface of the rim should corroborate this.
a. Alternatively, a sharpened spoke, handled cautiously, or sharp device as shown below may be
used to create a small starter hole, as shown in the picture. Using the WTB TCS valve, you can
widen your starter hole and then set the WTB TCS valve into place through the valve hole in the
WTB TCS rim.
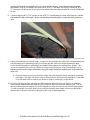
14. WTB TCS rim tape is composed of many fibers arranged lengthwise along rolls of WTB TCS tape.
Holding the rim as shown below, so that the fibers are running lengthwise, position your small, sharp
blade so that it is at a 45 degree angle to the rim well’s surface and so that the blade is directly above
the topmost portion of that valve hole. If the valve hole were a 12 hour clock, this would be the 12
o’clock position. Begin your incision, pressing into the edge of the valve hole at 45 degrees and with
enough force to make direct and positive contact with the metallic circumference and circular edge of
the valve hole. Press evenly as you cut from 12 o’clock downward, maintaining the 45 degree angle,
toward 6 o’clock. You will initially be cutting with the grain, then into the grain as you near 2 – 3 o’clock,
then once again with the grain as you near 6 o’clock. Once reaching 6 o’clock, stop.

WTB Rim User’s Manual For all WTB Rims (ver.60910) Page 19 of 37
Carefully making valve cut with a small pocketknife.
15. Start your cut again, this time moving in a counter clockwise direction. You will once again be cutting
from 12 o’clock to 6 o’clock and maintaining a 45 degree angle with the blade firmly pressed against the
rim’s valve hole circumference. If done correctly, and with enough force, a small sliver of the valve
hole’s external alloy should follow the blade in its path from 12 o’clock to 6 o’clock. Stop once your
blade has reached 6’oclock.
16. Inspect your freshly cut valve hole. You should be able to clearly see the hole’s silver circumference
signifying alloy material has been cut out in making your cut. Additionally, the valve hole cut should not
have any fragments of rim tape nor interferences infringing upon a clean, circular circumference cut.
Looking closely, there should not be any gaps nor voids between the edge of the cut and the rim tape.
a. If there are noticeable gaps or voids, you may attempt to work them out of the tape, moving
from within the rim’s inner rim well toward the valve hole cut, working any bubbles or voids out,
however any sign of gaps, voids, or bubbles may be indicative of an imperfect cut and may
require beginning the WTB TCS rim tape application on a WTB TCS rim process over again.
17. If you do not have a clean cut, you may attempt to further rectify your less than perfect cut though it is
not advisable as this is often indicative of a not tight enough tape application, resulting in an imperfect
seal. It is recommended that the taping process be restarted if this is the case.
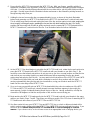
18. Upon verification of a clean valve hole, remove your WTB TCS valve from its packaging being careful
not to damage it in the process. Unscrew the plastic top cap of the WTB CS valve as well as its
washer. Place the WTB TCS valve through the WTB TCS rim’s taped inner wall through the valve hole
cut you have made. Ensure that the rubberized conical plug at the bottom of the WTB TCS valve is
now visible within the WTB TCS rim’s inner well. Take the washer and thread it onto the exposed
threads of the WTB TCS valve, now visible from the outside surface of the rim as seen in the photo
illustration below.

WTB Rim User’s Manual For all WTB Rims (ver.60910) Page 20 of 37
Conical plug of WTB TCS valve visible within WTB TCS rim’s inner rim profile.
19. Ensure the washer is tightly fastened against the external portion of the WTB TCS rim, firmly threading
onto the WTB TCS valve.
20. You have successfully completed taping a WTB TCS rim with WTB TCS Rim Tape and a WTB TCS
Valve.
Page is loading ...
Page is loading ...
Page is loading ...
Page is loading ...
Page is loading ...
Page is loading ...
Page is loading ...
Page is loading ...
Page is loading ...
Page is loading ...
Page is loading ...
Page is loading ...
Page is loading ...
Page is loading ...
Page is loading ...
Page is loading ...
Page is loading ...
-
 1
1
-
 2
2
-
 3
3
-
 4
4
-
 5
5
-
 6
6
-
 7
7
-
 8
8
-
 9
9
-
 10
10
-
 11
11
-
 12
12
-
 13
13
-
 14
14
-
 15
15
-
 16
16
-
 17
17
-
 18
18
-
 19
19
-
 20
20
-
 21
21
-
 22
22
-
 23
23
-
 24
24
-
 25
25
-
 26
26
-
 27
27
-
 28
28
-
 29
29
-
 30
30
-
 31
31
-
 32
32
-
 33
33
-
 34
34
-
 35
35
-
 36
36
-
 37
37


Ask a question and I''ll find the answer in the document
Finding information in a document is now easier with AI
Related papers
Other documents
-
 Mongoose EC-D User manual
-
Diamondback 2007 User manual
-
Coboc MERANO Owner's manual
-
 Whyte 603 Supplementary Service Manual
-
Suunto Bike POD Owner's manual
-
 Whyte RD-7C Cornwall Supplementary Service Manual
-
 FLX BLADE 2.0 User manual
-
Shimano CP-WH28 Dealer's Manual
-
-
Giant Yukon User manual


