Page is loading ...


20 21 22
1
2
3
4
5
6
7
8
9
10
11
12
13
14
15
16
17
18
19

4
GB
TABLE OF CONTENTS
SECTION PAGE
Symbols ........................................................................................................................................... 4
Safety Information ............................................................................................................................ 5
Unpacking and Product Features ..................................................................................................... 7
Assembly ......................................................................................................................................... 8
Operation ............................................................................................................................. ............ 9
Maintenance ....................................................................................................................................11
Troubleshooting .............................................................................................................................. 14
Technical Data ................................................................................................................................ 17
Recycling and Disposal .................................................................................................................. 17
Guarantee....................................................................................................................................... 18
SYMBOLS
Caution.
Read instruction manual. Failure to follow the warnings and
instructions may result in electric shock, re and/or serious injury.
Appliance in which protection against electric shock does not rely on
basic insulation only but in which additional safety precautions are
provided, such as double insulation or reinforced insulation, there
being no provision for protective earthing or reliance upon installation
conditions.
Do not dispose of electrical equipment in domestic waste.
Thank you for purchasing this Vacmaster® vacuum cleaner. This is a vacuum cleaner intended for
domestic use only and suitable for indoor use within a normal household environment for light, dry
dust and debris.
FOR YOUR SAFETY: CAREFULLY READ AND UNDERSTAND ALL INSTRUCTIONS.

5
GB
SAFETY INFORMATION
READ AND UNDERSTAND ALL INSTRUCTIONS BEFORE
USING THIS VACUUM CLEANER.
When using the equipment, a few safety precautions must be
observed to avoid injuries and damage. Please read the complete
operating manual with due care. Keep this manual in a safe
place so that the information is always available. If you give
the equipment to any other person, give them these operating
instructions as well. We cannot accept any liability for damage or
accidents which arise due to a failure to follow these instructions
and the safety information.
• This machine is for dry and indoor use only.
• Never leave the appliance switched on unattended, if you leave
the work area, switch the appliance off or unplug it from the
power supply.
• Do not vacuum or use this vacuum cleaner near ammable
liquids, gases or explosive vapours like gasoline or other fuels,
lighter uids, cleaners, oil-based paints, natural gas, hydrogen,
or explosive dusts like coal dust, magnesium dust, grain dust or
gun power, or toxic materials. Sparks inside the motor can ignite
ammable vapours or dust. Do not vacuum toxic materials.
• This vacuum cleaner is not suitable for the vacuuming of
asbestos or asbestos dust.
• Do not vacuum anything that is burning or smoking, such as
cigarettes, matches, or hot ashes.
• Do not use the vacuum cleaner in a wet environment or to
vacuum wet materials.
• Do not use steam cleaners, pressure washers or immerse in
water to clean the vacuum cleaner.
• Ensure the hose and connections are always pointed away from
the operators face, hair, ears and eyes during operation and
never direct the nozzle towards persons or animals.
• Clear the working area of any items or possessions that you do
not wish to be vacuumed before operation.
• Keep cord away from heated surfaces.
• Do not expose to rain. Store indoors only.

6
GB
• Do not unplug by pulling on the cord. To unplug, grasp the plug,
not the cord.
• Do not use with damaged cord, plug or other parts.
• Do not pull or carry by cord, use cord as handle, close a door on
cord, or pull cord around sharp edges or corners.
• Do not handle the plug or vacuum cleaner with wet hands.
• Do not use or store near hazardous materials.
• Do not use this vacuum cleaner with a torn lter or without the
lter installed.
• Do not allow to be used as a toy. Close attention is necessary
when used near children. Do not allow the appliance to be used
by children.
• Do not try to touch the brushroll while the vacuum cleaner is
switched on and the brushroll is spinning.
• Unplug from power supply when not in use or before carrying
out maintenance.
• The machine should be disconnected from its power source
during cleaning or maintenance and when replacing parts.
• Turn off vacuum cleaner before unplugging from power source.
• Do not cover the ventilation openings. Do not vacuum with any
ventilation openings blocked; keep free of dust, lint, hair or
anything that may reduce air ow.
• Keep hair, loose clothing, ngers, all parts of body away from
openings and moving parts.
• If the supply cord is damaged, it must be replaced by the
manufacturer, a qualied service agent or similarly qualied
persons in order to avoid a hazard.
• This appliance is not intended for use by persons (including
children) with reduced physical, sensory or mental capabilities,
or lack of experience and knowledge, unless they have been
given supervision or instruction concerning use of the appliance
by a person responsible for their safety.
• Children should be supervised to ensure that they do not play
with the appliance.
• Besides the operating instructions and the binding accident
prevention regulations valid in the country of use, observe
recognized regulations for safety and proper use.
• Before starting work, the operating staff must be informed on
- use of the vacuum cleaner.

7
GB
- risks associated with the material to be picked up.
- safe disposal of the picked up material.
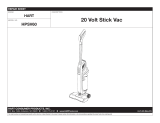
1 Handle 12 Power Cable
2 Dust Bin Release Button 13 Upper Cord Hook
3 Carry Handle 14 Upper Hose Storage
4 Dust Bin Lid Release Button 15 Flexible Suction Hose
5 Dust Bin 16 Accessory Storage
6 Exhaust Filter Cover 17 Connection Hose
7Task Lights 18 Lower Hose Storage
8 Motorised Floor Head 19 On/Off Switch
9 Brushroll Status Indicator 20 3-in-1 Combination Tool
10 Lower Cord Hook 21 Pet Mate (only for UC0413EUK)
11 Extension Wand 22 Instruction Manual
UNPACKING AND PRODUCT FEATURES

8
GB
ASSEMBLY
A at headed screwdriver is required for part of the assembly process.
1.
Remove all the contents from the packaging; make sure you have all contents as listed on page 7.
2. Remove the pre-installed screw bolt with a screwdriver or a coin. Insert the handle assembly
into the main body and secure with the screw bolt (Fig. 1).
3. Insert the larger end of the extension wand into the top of the connection hose through the
bracket until the wand is fully seated on the post (Fig. 2).
4. Insert the end of the exible hose into the main body by aligning the UNLOCKED marks (
1
).
Rotate the hose until the marks align with the LOCKED symbol (
2
). Run the exible hose over
the lower hose storage and the upper hose storage. Insert the suction hose end onto the top of
the extension wand (Fig. 3).
5. Insert the combination tool onto the accessory storage post located on the back of the main
body (Fig. 4).
6. Wrap the power cord around the upper and lower cord hooks (Fig. 5).
NOTE: Make sure to wrap the power cord around the upper cord hook rst, secure the power cord
into the guide (
3
).
7. Secure the plug to the power cord (Fig. 6).
WARNING: Wrapping the power cord too tightly with excessive stress on the cord may
cause damage. A damaged cord is an electrical shock hazard and could cause personal
injury or damage.

9
GB
OPERATION
CAUTION: Moving parts!
To reduce the risk of personal injury, DO NOT touch the brushroll
when vacuum cleaner is turned on. Contacting the brushroll while it is rotating can cut, bruise or
cause other personal injuries. Always turn off before maintenance. Use caution when operating
near children or pets (Fig. 7).
1. Power Cord - Release & Use
1) Turn the upper cord hook to either side to release the power cord (Fig. 8).
2) Detach the power cord plug from the power cord.
3) Be sure the power cord is locked into the upper locking notch (
3
) as shown (Fig. 9).
4) Plug the power cord into a power outlet.
5) Move the On/Off switch to the desired cleaning operation. Refer to page 9.
6) Once you have completed vacuuming, move the On/Off switch to the Off ‘O’ position and
unplug the power cord plug from the outlet.
7) Return the upper cable hook into the upright storage position and wrap the cord loosely.
WARNING: If any abnormality/failure occurs, stop using the product immediately and
disconnect the power plug.
2. Operation Modes
UPRIGHT MODE
NOTE: Make sure the vacuum cleaner is correctly assembled and the dust bin is empty before
using. Do not operate vacuum cleaner without lters in place.
1) Release the handle by placing foot on the oor head nozzle and pull back (Fig. 10).
2) To turn the vacuum cleaner on, press the On/Off switch to the desired position (Fig. 11).
'O' Power Off
'I' Hard oor, small area rugs and delicate surfaces. NOTE: The brushroll will not spin in this
position.
'II' Carpets. NOTE: The brushroll will spin in this position.
CAUTION: Do not allow the vacuum cleaner to remain in one spot for any length of time
when the brushroll is turning. Damage to carpet may occur.
3) Once you have completed vacuuming, switch to the Off “O” position and unplug the power cord
from the power outlet.
NOTE: Do not allow the motorised oor head to be lifted away from the oor surface when
vacuuming.

10
GB
The brushroll indicator status light:
Colour Status
Green The brushroll is spinning and working as intended.
Red There is a jam in the brushroll area. Turn off and unplug
the vacuum. Remove any blockages in the nozzle.
No Light The brushroll is not active.
ABOVE FLOOR MODE
1) Place the vacuum cleaner in the upright locked position.
2) Release the exible hose and/or extension wand (Fig. 12).
3) Choose the desired extension wand/attachments (Fig. 13).
CAUTION: When using attachments, be careful not to over stretch the suction hose to avoid
causing the vacuum cleaner to tip over.
3. Attachments
NOTE: All accessories are compatible with both the exible hose and extension wand. Included
accessories will vary by model.
1) 3-in-1 Combination Tool
Use crevice tool for cleaning in tight spaces (Fig. 14).
Use the dusting brush mode by sliding the adapter towards the end of the tool (Fig. 15). Ensure
the locking button (
4
) is engaged. Use the dusting brush for cleaning loose or delicate surfaces.
Press the locking button to remove the tool adaptor. Remove and ip the adapter to use the
upholstery brush (Fig. 16). Use in upholstery brush for cleaning fabric surfaces.
To return the combination tool to crevice tool mode, press the locking button and slide the adaptor
back down the tool.
2) Pet Mate (only for UC0413EUK)
Use Pet Mate to pick up pet hair and loose debris. Rotating brushroll powerfully, deep cleans
dander out of upholstery and other surfaces (Fig. 17).
WARNING: Never use the Pet Mate directly on pets.
CAUTION: Moving parts! To reduce the risk of personal injury, DO NOT touch the brushroll
when vacuum cleaner is on. Contacting the brushroll while it is rotating can cut, bruise or
cause other personal injuries.
3. Suction Control
The suction control is located on the exible hose. This allows you to adjust the suction
performance depending on the oor type.
Rotate to “+” to increase suction.
Rotate to “-” to reduce suction and increase maneuverability (Fig. 18).

11
GB
IMPORTANT! Unplug the power cord from the supply before performing any maintenance.
WARNING: Disconnect electrical supply before servicing or cleaning the vacuum cleaner.
Failure to do so could result in electrical shock or personal injury.
WARNING: There are sharp edges inside the motorised oor head to prevent hair
entanglement. Do not put any part of the body into the nozzle when servicing or cleaning, or
it may cause personal injury.
1. Cleaning Exterior And Attachments
1) To clean exterior, or to reduce static electricity and dust build-up, wipe outer surface with a
clean, dry, soft cloth.
2) Wash attachments in warm soapy water, rinse and air dry.
2. Vacuum Cleaner Storage
1) Replace exible hose and attachments in storage position if necessary (see page 8).
2) Wrap the power cord loosely around the upper and lower cord hooks. Lock plug retainer onto
the power cord.
3) Store the vacuum cleaner in a dry, indoor area, on the oor with the handle locked in the upright
position.
3. Emptying Dust Bin
When emptying any vacuum cleaner, it is difcult to avoid exposure to dust. To minimize this
risk, please ensure that you encase the dust bin in a large bag to empty it and close the bag as
tightly as possible round the bin. Remove the dust bin and close the bag as tightly and quickly
as possible and dispose of this immediately. It is advisable to wear disposable gloves and a face
mask while emptying the cleaner. If at all possible, ask a non-allergy sufferer to empty the dust pot
when required.
For best performance, empty dust bin after each use. Never operate vacuum cleaner without dust
bin and lters in place.
1) To remove the dust bin, slide the dust bin release button and tilt forwards to release (Fig. 19).
2) Remove any debris that might be located in the suction port (
5
) (Fig. 20).
3) Position dust bin over the waste receptacle. Press the dust release button to open lid (Fig. 21).
4) To reinstall the dust bin, align the bottom of the bin with the slots on the bottom of the main
body. Tilt back against the body until a click is heard (Fig. 22).
4. Pre-Filter Cleaning
The pre-lter is located within the dust bin. It is recommended to clean the pre-lter every three
months to optimize performance.
MAINTENANCE

12
GB
NOTE: Make sure dust bin is free of debris before opening.
1) Remove the dust bin.
2) Press the dust bin lid release button (Fig. 23).
3) Grasp the pre-lter (
6
) and rotate counterclockwise (Fig. 24).
4) Clean pre-lter by gently tapping.
NOTE: If necessary, rinse with cold water only. DO NOT use detergent or soap. Allow parts to dry
24 hours before putting back into vacuum cleaner. DO NOT wash in the dishwasher. DO NOT
install damp.
5) Place the pre-lter back into the dust bin and rotate clockwise to lock into place.
6) Reinstall the dust bin into the main body.
5. Pre-Motor Filters
Regularly rinse the lters to maintain your vacuum's suction power.
Rinse lters with cold water only. Allow all lters to air-dry for at least 24 hours before reinstalling
them to prevent liquid from being drawn into electronic parts.
NOTE: When the cleaning of lters no longer restores vacuum cleaner suction to full power, or the
lters are worn or broken, replace the lters. To purchase lters, contact the After Sales Helpline.
It is recommended to clean the foam and felt lters with cold water every three months.
1) With the dust bin removed, take out the foam (
7
) and felt lter (
8
) (Fig. 25).
2) Wash with cold water only. DO NOT use detergent or soap. Allow all lters to air dry before
reinstalling.
NOTE: DO NOT operate without foam and felt lters installed. DO NOT wash in the dishwasher.
DO NOT install foam and felt lters if damp.
6. HEPA Exhaust Filter
It is recommended to clean the HEPA exhaust lter with cold water every year.
1) Remove the exhaust lter cover by pressing the release tab (
9
) at the bottom of the cover.
Remove the HEPA exhaust lter (
10
) together with the foam lter (
11
) (Fig. 26).
2) Wash with cold water only. DO NOT use detergent or soap. Allow to air dry. Allow parts to air
dry before putting back into vacuum cleaner.
NOTE: DO NOT operate without exhaust lter installed. DO NOT wash in the dishwasher. DO
NOT install the lter if damp.
3) Replace the foam lter to the HEPA exhaust lter rst. Then replace the HEPA exhaust lter
with foam lter into the vacuum cleaner.
4) Insert the exhaust lter cover tabs (
12
) into the upper slots (
13
) and lock the lter cover into
place by pressing the lower part of the cover until a click is heard (Fig. 27).
7. WrapFree Brushroll
The motorised oor head is tted with a WrapFree brushroll, which actively removes the hair from
the brushroll when vacuuming.

13
GB
If you see any hair wrapped around the brushroll, continue cleaning, ensuring the On/Off switch is
in 'II' position with the brushroll rotating on low pile carpets or tile oors. Hair will be removed from
the WrapFree brushroll and be sucked into the dust bin.
If you hear a sound change when vacuuming, check for blockages or objects caught in the
brushroll.
1) Turn off the vacuum cleaner and unplug the power cord.
2) Check and rotate the brushroll counterclockwise to remove the blockage (Fig. 28).
NOTE: If any bers remain wrapped around brushroll, carefully cut them and remove from the
brushroll.
8. Pet Mate Cleaning (Only for UC0413EUK)
CAUTION: To reduce the risk of injury from moving parts, remove Pet Mate from vacuum
hose or wand before servicing.
Cut any tangled hair, carpet pile and lint entangled around brushroll (Fig. 29).
9. Checking for Blockages
FLEXIBLE HOSE BLOCKAGE
1) Rotate the exible hose until marks align as shown in UNLOCKED symbol to remove the hose
end (Fig. 30).
2) Check and remove any debris in the exible hose.
CONNECTION HOSE BLOCKAGE
1) Press the release tab (
14
) on hose cuff and pull the connection hose away from the main body
(Fig. 31).
2) Check and remove any debris in the hose.
EXTENSION WAND BLOCKAGE
1) Release the exible hose rst, then remove the extension wand (Fig. 32).
2) Check and remove any debris in the wand.

14
GB
TROUBLESHOOTING
WARNING: Disconnect electrical supply before performing maintenance to the vacuum
cleaner. Failure to do so could result in electrical shock or personal injury.
Cleaning Performance
Vacmaster vacuum cleaners are tested for endurance. If your motor is operating, then the most
likely cause for a loss in suction is a blockage or an opening in the vacuum.
To maintain a high cleaning performance from your machine, it is important to replace or clean
lters as necessary. Empty full dust cup to prevent performance drops. A performance drop with
clean lters can only be caused by a blockage in the tools or the hose.
PROBLEM POSSIBLE CAUSE SOLUTION
Vacuum cleaner
will not run.
The plug is not plugged into the
power source.
Plug in rmly, press the On/Off switch
to “I” or “II” position.
The On/Off switch is not pressed
to start the vacuum cleaner.
Press the On/Off switch to “I” or “II”
position.
Motor overheating protection
during use.
Unplug the power cord and let the
vacuum cool down for 50 minutes
before restarting it for use.
Functional fault in the power cord,
switch, or motor.
Have the damaged part checked by
qualied personnel or contact the
after sales helpline.
Defective wall outlet.
Check with a good appliance or lamp.
Be sure the power cord plug is fully
plugged into a good wall outlet.
Dirt pick-up is poor
or suction power is
weak.
Full or clogged dust bin. Empty the dust bin (page 11).
Filters need cleaning. Follow lter cleaning instructions on
page 11&12.
The exible hose is worn. Replace the hose. Contact the after
sales helpline.
The brushroll is worn. Contact the after sales helpline for
assistance.
The foam and felt lters are dirty
or worn.
Clean the foam and felt lters.
Replace if they are worn or broken.
Follow instructions on page 12.
There is a clog in the exible hose
or connection hose of the vacuum
cleaner.
Check and remove all clogs. Follow
instructions on page 13.

15
GB
PROBLEM POSSIBLE CAUSE SOLUTION
Dust bin is not installed correctly.
Check dust bin for correct installation
and ensure it is snapped rmly in
place.
The hose or attachments are not
installed correctly.
Check the hose and attachments for
correct installation and ensure they
are snapped rmly in place.
Suction control is in open position.
Adjust the suction control to increase
suction. Follow instructions on page
10.
Dust escapes from
the vacuum.
HEPA exhaust lter is damaged
and needs to be replaced.
Replace the exhaust lter. To
purchase online at www.cleva-
europe.com.
Dust bin is installed incorrectly. Position dust bin correctly and snap
rmly in place.
HEPA exhaust lter is installed
incorrectly.
Check exhaust lter for correct
installation. Follow instructions on
page 12.
Brushroll does not
spin.
Brushroll is jammed.
Turn off and unplug vacuum cleaner,
remove obstruction, then turn on the
vacuum cleaner.
Brushroll is not installed correctly. Contact the after sales helpline for
assistance.
The belt is worn or broken. Contact the after sales helpline for
assistance.
The belt is not routed correctly. Contact the after sales helpline for
assistance.
Fault in PCB section of the
motorised nozzle.
Contact the after sales helpline for
assistance.
Overheat protector of the
motorised nozzle is activated.
Wait the motorised oor head to cool
down, and then restart.
Sound changes.
Attachments in use restrict air
ow.
Check attachments for fuzz, lint, pet
hair or other debris.
Blocked air path. Check for and remove any clogs and
clean the hose.
HEPA exhaust lter is installed
incorrectly.
Check exhaust lter and the exhaust
lter cover for correct installation.
Ensure the lter cover is snapped
rmly in place.

16
GB
PROBLEM POSSIBLE CAUSE SOLUTION
Vacuum turns off
on its own.
Thermal protector is activated.
Turn the vacuum cleaner off and
unplug it. Allow the vacuum cleaner
to cool for a minimum of 50 minutes.
Plug in vacuum and turn it on.
The power cord plug is loose from
the outlet when using the vacuum.
Reinsert the power cord plug fully into
the outlet. Avoid pulling or dragging
the power cord when using the
vacuum.
The motor is damaged. Contact the after sales helpline for
assistance.
Brushroll status
indicator light emits
red.
There is a jam in the brushroll
area.
Turn off and unplug the vacuum, and
remove any blockages in the nozzle.
Fault in the brushroll motor or
PCB section of the motorised
nozzle.
Contact the after sales helpline for
assistance.

17
GB
TECHNICAL DATA
RECYCLING AND DISPOSAL
Model Number UC0412EUK / UC0413EUK
Voltage 220-240 V ~
Frequency 50 Hz
Power Input 800 W
This marking indicates that this product should not be disposed with other household
wastes. The machine must be delivered in rigid packaging to avoid damage during
transportation. The packaging and the machine itself are manufactured from recyclable
materials and should be disposed of accordingly.

18
GB
GUARANTEE
The following terms and conditions describe the prerequisites and the key terms associated with
our manufacturer’s guarantee only and do not affect your statutory rights or the obligations of your
retailer and your contract with them.
All Vacmaster products are carefully checked, tested and are subject to our stringent quality control
process.
Your Vacmaster appliance is automatically covered by an initial limited 2-year (24 month)
guarantee against material and/or workmanship defects from the date of purchase. An extended
1-year (12 month) will be applied on top of the initial manufacturers guarantee period upon
registering the product providing a total of 3-years (36 month) guarantee period at no additional
cost. The extended warranty offer detailed is limited to residences within UK and Ireland.
The guarantee covers replacement parts and/or replacement of the product (at the manufacturer’s
discretion) within the guarantee period. All claims must be accompanied by a valid proof of
purchase. This guarantee excludes (at the manufacturer’s discretion) damage resulting from direct
or indirect abuse, negligence, product misuse, accidents, unauthorised repairs or alteration and
lack of maintenance.
How to register your extended Guarantee?
If you have purchased your Vacmaster product directly from our website, your product will
automatically be registered for the full extended 3-year (36 month) period. If purchased from an
independent retailer follow the information below.
To benet from your products extended guarantee period, simply register your product within 28
days of purchase.
cleva-europe.com/register
To register your extended guarantee, you will require the product’s model number and serial
number which are located on the product rating label located on the vacuum cleaner and proof of
purchase.
220-240V ~ 50Hz VACUUM CLEANER
800W
Made in China
UC0413EUK
Suzhou Cleva Electric Appliance
NO.8 Ting Rong Street 215122
Suzhou - China
www.cleva-europe.com
WW2021
220-240V ~ 50Hz VACUUM CLEANER
800W
Made in China
WW2021
UC0412EUK
Suzhou Cleva Electric Appliance
NO.8 Ting Rong Street 215122
Suzhou - China
www.cleva-europe.com
Model number
Serial number

19
GB
What is not covered by the guarantee?
• Guarantee applies to the original owner and is not transferable nor does it carry a cash value.
• Appliances purchased from an unauthorized dealer.
• Use of appliance not in accordance with the product instruction manual including careless
operation or handling, misuse, abuse and/or lack of regular maintenance.
• Unauthorized use of the application or anything other than for domestic purposes e.g. For
commercial or rental use.
• Accidental damage or faults caused by negligent use or care.
• Repairs or alterations carried out by unauthorised parties or agents.
• Normal wear and tear of parts and accessories, including normal wearing parts and
consumables such as; Dust bin, Brush bar, lter(s) belt drive, fuses, batteries etc.
• Damage caused by blockages or other hazardous materials.
• The use of non-genuine parts and/or accessories.

/