Directed Electronics 1090 Owner's manual
- Category
- Car alarm
- Type
- Owner's manual
This manual is also suitable for

Model 7900
➤
Owner’s Guide


i
limited lifetime consumer warranty
Directed Electronics ("Directed") promises to the original purchaser to repair or replace
with a comparable reconditioned model any Directed unit (hereafter the "unit"), exclud-
ing without limitation the siren, the remote transmitters, the associated sensors and
accessories, which proves to be defective in workmanship or material under reasonable
use during the lifetime of the vehicle provided the following conditions are met: the
unit was professionally installed and serviced by an authorized Directed dealer; the unit
will be professionally reinstalled in the vehicle in which it was originally installed by an
authorized Directed dealer; and the unit is returned to Directed, shipping prepaid with
a legible copy of the bill of sale or other dated proof of purchase bearing the following
information: consumer's name, telephone number and address; the authorized dealers
name, telephone number and address; complete product description, including acces-
sories; the year, make and model of the vehicle; vehicle license number and vehicle iden-
tification number. All components other than the unit, including without limitation the
siren, the remote transmitters and the associated sensors and accessories, carry a one-year
warranty from the date of purchase of the same. This warranty is non-transferable and
is automatically void if: the original purchaser has not completed the warranty card and
mailed it within ten (10) days of the date of purchase to the address listed on the card; the
unit's date code or serial number is defaced, missing or altered; the unit has been modi-
fied or used in a manner contrary to its intended purpose; the unit has been damaged
by accident, unreasonable use, neglect, improper service, installation or other causes not
arising out of defects in materials or construction. The warranty does not cover damage
to the unit caused by installation or removal of the unit. Directed, in its sole discretion,
will determine what constitutes excessive damage and may refuse the return of any unit
with excessive damage. TO THE MAXIMUM EXTENT ALLOWED BY LAW, ALL
WARRANTIES, INCLUDING BUT NOT LIMITED TO EXPRESS WARRANTY,
IMPLIED WARRANTY, WARRANTY OF MERCHANTABILITY, FITNESS FOR
PARTICULAR PURPOSE AND WARRANTY OF NON-INFRINGEMENT OF
INTELLECTUAL PROPERTY, ARE EXPRESSLY EXCLUDED; AND DIRECTED
NEITHER ASSUMES NOR AUTHORIZES ANY PERSON OR ENTITY TO
ASSUME FOR IT ANY DUTY, OBLIGATION OR LIABILITY IN CONNECTION
WITH ITS PRODUCTS. DIRECTED DISCLAIMS AND HAS ABSOLUTELY
NO LIABILITY FOR ANY AND ALL ACTS OF THIRD PARTIES INCLUDING
ITS AUTHORIZED DEALERS OR INSTALLERS. DIRECTED SECURITY
SYSTEMS, INCLUDING THIS UNIT, ARE DETERRENTS AGAINST POSSIBLE
THEFT. DIRECTED IS NOT OFFERING A GUARANTEE OR INSURANCE
AGAINST VANDALISM, DAMAGE OR THEFT OF THE AUTOMOBILE,
ITS PARTS OR CONTENTS; AND HEREBY EXPRESSLY DISCLAIMS ANY
LIABILITY WHATSOEVER, INCLUDING WITHOUT LIMITATION,
LIABILITY FOR THEFT, DAMAGE AND/OR VANDALISM. THIS WARRANTY
DOES NOT COVER LABOR COSTS FOR MAINTENANCE, REMOVAL OR

ii
REINSTALLATION OF THE UNIT OR ANY CONSEQUENTIAL DAMAGES
OF ANY KIND. IN THE EVENT OF A CLAIM OR A DISPUTE INVOLVING
DIRECTED OR ITS SUBSIDIARY, THE PROPER VENUE SHALL BE SAN DIEGO
COUNTY IN THE STATE OF CALIFORNIA. CALIFORNIA STATE LAWS AND
APPLICABLE FEDERAL LAWS SHALL APPLY AND GOVERN THE DISPUTE.
THE MAXIMUM RECOVERY UNDER ANY CLAIM AGAINST DIRECTED
SHALL BE STRICTLY LIMITED TO THE AUTHORIZED DIRECTED DEALER'S
PURCHASE PRICE OF THE UNIT. DIRECTED SHALL NOT BE RESPONSIBLE
FOR ANY DAMAGES WHATSOEVER, INCLUDING BUT NOT LIMITED TO,
ANY CONSEQUENTIAL DAMAGES, INCIDENTAL DAMAGES, DAMAGES
FOR THE LOSS OF TIME, LOSS OF EARNINGS, COMMERCIAL LOSS, LOSS
OF ECONOMIC OPPORTUNITY AND THE LIKE. NOTWITHSTANDING
THE ABOVE, THE MANUFACTURER DOES OFFER A LIMITED WARRANTY
TO REPLACE OR REPAIR THE CONTROL MODULE AS DESCRIBED ABOVE.
Some states do not allow limitations on how long an implied warranty will last or the
exclusion or limitation of incidental or consequential damages. This warranty gives you
specific legal rights and you may also have other rights that vary from State to State.
This product may be covered by a Guaranteed Protection Plan ("GPP"). See your autho-
rized Directed dealer for details of the plan or call Directed Customer Service at 1-800-
876-0800. Directed security systems, including this unit, are deterrents against possible
theft. Directed is not offering a guarantee or insurance against vandalism, damage or
theft of the automobile, its parts or contents; and hereby expressly disclaims any liability
whatsoever, including without limitation, liability for theft, damage and/or vandalism.
Directed does not and has not authorized any person or entity to create for it any other
obligation, promise, duty or obligation in connection with this security system.
Make sure you have all of the following information from your dealer:
A clear copy of the sales receipt, showing the following:
➤ Date of purchase
➤ Your full name and address
➤ Authorized dealer's company name and address
➤ Type of alarm installed
➤ Year, make, model and color of the automobile
➤ Automobile license number
➤ Vehicle identification number
➤ All security options installed on automobile
➤ Installation receipts

1
© 2006 directed elect r o n i cs—all rights reser ved
limited‑lifetime‑consumer‑warranty . . . . . . . . . . . . . . . . . . . . . . . . . . . . . . . . . . . . . . . . . i
what‑is‑included . . . . . . . . . . . . . . . . . . . . . . . . . . . . . . . . . . . . . . . . . . . . . . . . . . . . . . . 3
important‑information . . . . . . . . . . . . . . . . . . . . . . . . . . . . . . . . . . . . . . . . . . . . . . . . . . 3
-your-warranty
. . . . . . . . . . . . . . . . . . . . . . . . . . . . . . . . . . . . . . . . . . . . . . . . . . . . 4
-fcc/id-notice
. . . . . . . . . . . . . . . . . . . . . . . . . . . . . . . . . . . . . . . . . . . . . . . . . . . . . 4
-caution
. . . . . . . . . . . . . . . . . . . . . . . . . . . . . . . . . . . . . . . . . . . . . . . . . . . . . . . . . 4
safety . . . . . . . . . . . . . . . . . . . . . . . . . . . . . . . . . . . . . . . . . . . . . . . . . . . . . . . . . . . . . . . 5
replacement remote‑control
. . . . . . . . . . . . . . . . . . . . . . . . . . . . . . . . . . . . . . . . . . . . . . 7
remote‑control introduction
. . . . . . . . . . . . . . . . . . . . . . . . . . . . . . . . . . . . . . . . . . . . . . 7
-remote control features
. . . . . . . . . . . . . . . . . . . . . . . . . . . . . . . . . . . . . . . . . . . . . 7
-remote control diagram
. . . . . . . . . . . . . . . . . . . . . . . . . . . . . . . . . . . . . . . . . . . . . 8
remote‑control button functions
. . . . . . . . . . . . . . . . . . . . . . . . . . . . . . . . . . . . . . . . . 10
using‑your‑system‑ . . . . . . . . . . . . . . . . . . . . . . . . . . . . . . . . . . . . . . . . . . . . . . . . . . . . 15
-warning!-safety-first
. . . . . . . . . . . . . . . . . . . . . . . . . . . . . . . . . . . . . . . . . . . . . . . 15
-active-arming
. . . . . . . . . . . . . . . . . . . . . . . . . . . . . . . . . . . . . . . . . . . . . . . . . . . . 18
-passive-arming
. . . . . . . . . . . . . . . . . . . . . . . . . . . . . . . . . . . . . . . . . . . . . . . . . . . 19
-multi-level-security-arming
. . . . . . . . . . . . . . . . . . . . . . . . . . . . . . . . . . . . . . . . . 23
-arming-while-driving
. . . . . . . . . . . . . . . . . . . . . . . . . . . . . . . . . . . . . . . . . . . . . . 24
-disarming
. . . . . . . . . . . . . . . . . . . . . . . . . . . . . . . . . . . . . . . . . . . . . . . . . . . . . . 25
-high-security-disarm
. . . . . . . . . . . . . . . . . . . . . . . . . . . . . . . . . . . . . . . . . . . . . . 25
-disarming-without-a-remote control
. . . . . . . . . . . . . . . . . . . . . . . . . . . . . . . . . . 26
-silent-mode
. . . . . . . . . . . . . . . . . . . . . . . . . . . . . . . . . . . . . . . . . . . . . . . . . . . . . 27
-panic-mode
. . . . . . . . . . . . . . . . . . . . . . . . . . . . . . . . . . . . . . . . . . . . . . . . . . . . . 27
-valet-mode
. . . . . . . . . . . . . . . . . . . . . . . . . . . . . . . . . . . . . . . . . . . . . . . . . . . . . 28
-auxillary channels
. . . . . . . . . . . . . . . . . . . . . . . . . . . . . . . . . . . . . . . . . . . . . . . . 30
-remote start functions
. . . . . . . . . . . . . . . . . . . . . . . . . . . . . . . . . . . . . . . . . . . . . 31
-rear defogger
. . . . . . . . . . . . . . . . . . . . . . . . . . . . . . . . . . . . . . . . . . . . . . . . . . . . 35
-car call
. . . . . . . . . . . . . . . . . . . . . . . . . . . . . . . . . . . . . . . . . . . . . . . . . . . . . . . . . 36
remote start safety‑features
. . . . . . . . . . . . . . . . . . . . . . . . . . . . . . . . . . . . . . . . . . . . . . 37
-starter-anti-grind-circuitry
. . . . . . . . . . . . . . . . . . . . . . . . . . . . . . . . . . . . . . . . . . 37
-disabling-the-remote-start-system
. . . . . . . . . . . . . . . . . . . . . . . . . . . . . . . . . . . . 37
-over-and-under-rev-protection
. . . . . . . . . . . . . . . . . . . . . . . . . . . . . . . . . . . . . . . 38
-shut-down-inputs
. . . . . . . . . . . . . . . . . . . . . . . . . . . . . . . . . . . . . . . . . . . . . . . . 38
diagnostics . . . . . . . . . . . . . . . . . . . . . . . . . . . . . . . . . . . . . . . . . . . . . . . . . . . . . . . . . . 39
-arming-diagnostics
. . . . . . . . . . . . . . . . . . . . . . . . . . . . . . . . . . . . . . . . . . . . . . . 39
-disarming-diagnostics
. . . . . . . . . . . . . . . . . . . . . . . . . . . . . . . . . . . . . . . . . . . . . 39
-nuisance-prevention-circuitry
. . . . . . . . . . . . . . . . . . . . . . . . . . . . . . . . . . . . . . . 40
-system-status-chirps
. . . . . . . . . . . . . . . . . . . . . . . . . . . . . . . . . . . . . . . . . . . . . . . 40
-zone identification
. . . . . . . . . . . . . . . . . . . . . . . . . . . . . . . . . . . . . . . . . . . . . . . . 41
table of contents

2
© 2006 directed elect r o n i cs—all rights reser ved
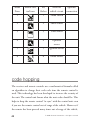
code‑hopping . . . . . . . . . . . . . . . . . . . . . . . . . . . . . . . . . . . . . . . . . . . . . . . . . . . . . . . .42
owner‑recognition‑ . . . . . . . . . . . . . . . . . . . . . . . . . . . . . . . . . . . . . . . . . . . . . . . . . . . .43
rapid‑resume‑logic . . . . . . . . . . . . . . . . . . . . . . . . . . . . . . . . . . . . . . . . . . . . . . . . . . . .43
power‑saver‑mode‑ . . . . . . . . . . . . . . . . . . . . . . . . . . . . . . . . . . . . . . . . . . . . . . . . . . . .44
remote‑control‑programming . . . . . . . . . . . . . . . . . . . . . . . . . . . . . . . . . . . . . . . . . . . .45
-enter-programming
. . . . . . . . . . . . . . . . . . . . . . . . . . . . . . . . . . . . . . . . . . . . . . .45
-exit-programming
. . . . . . . . . . . . . . . . . . . . . . . . . . . . . . . . . . . . . . . . . . . . . . . .45
-sleep mode
. . . . . . . . . . . . . . . . . . . . . . . . . . . . . . . . . . . . . . . . . . . . . . . . . . . . .45
-wake up the remote control
. . . . . . . . . . . . . . . . . . . . . . . . . . . . . . . . . . . . . . . . .46
-set the 12 hour clock
. . . . . . . . . . . . . . . . . . . . . . . . . . . . . . . . . . . . . . . . . . . . . .46
-page mode on/off
. . . . . . . . . . . . . . . . . . . . . . . . . . . . . . . . . . . . . . . . . . . . . . . .47
-beeps on/off
. . . . . . . . . . . . . . . . . . . . . . . . . . . . . . . . . . . . . . . . . . . . . . . . . . . .47
system programming‑options . . . . . . . . . . . . . . . . . . . . . . . . . . . . . . . . . . . . . . . . . . . .
48
‑security features . . . . . . . . . . . . . . . . . . . . . . . . . . . . . . . . . . . . . . . . . . . . . . . . . .
48
‑convenience and remote start features . . . . . . . . . . . . . . . . . . . . . . . . . . . . . . . . .
49
security‑&‑convenience‑expansions . . . . . . . . . . . . . . . . . . . . . . . . . . . . . . . . . . . . . . .51
quick‑reference‑guide . . . . . . . . . . . . . . . . . . . . . . . . . . . . . . . . . . . . . . . . . . . . . . . . . .53

3
© 2006 directed elect r o n i cs—all rights reser ved
what is included
➤ A control module
➤ A Responder receiver/antenna
➤ One 2‑way Color Remote Control P/N 7541V
➤ A Stinger Doubleguard shock sensor
➤ A 514N Neosiren
➤ The plug‑in status LED
➤ The plug‑in Valet/Program switch
➤ A hood pinswitch
➤ A toggle (override) switch
➤ One Remote Control charger
important information
Congratulations on the purchase of your combination remote
start alarm system. Due to the complexity of this system, it
must be installed by an authorized dealer only. Installation of
this product by anyone other than an authorized dealer voids the
warranty. All dealers are provided with a preprinted dealer certifi-
cate to verify authorization.
By carefully reading this Owner's Guide prior to using your
system, you will maximize the use of this system and its features.
You can print additional or replacement copies of this manual
by accessing our web site at www.directed.com.

4
© 2006 directed elect r o n i cs—all rights reser ved
➜
your warranty
Your warranty registration must be completely filled out and
returned within 10 days of purchase. Your product warranty
will not be validated if your warranty registration is not returned.
Make sure you receive the warranty registration from your dealer.
It is also necessary to keep your proof of purchase, which reflects
that the product was installed by an authorized dealer.
➜
fcc/id notice
This device complies with Part 15 of FCC rules. Operation is
subject to the following two conditions: (1) This device may
not cause harmful interference, and (2) This device must accept
any interference received, including interference that may cause
undesirable operation.
➜
caution
Changes or modifications not expressly approved by the party
responsible for compliance could void the user's authority to
operate this device.
FULL BATTERY LEVEL EMPTY

5
© 2006 directed elect r o n i cs—all rights reser ved
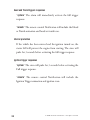
safety
➜
important safety instructions
1. Follow all instructions.
2. Do not use this apparatus near water.
3. Clean only with a dry cloth.
4. Do not block any of the ventilation openings. Install in accor
-
dance with the manufacturer's instructions.
5. Do not install near any heat sources such as radiators, heat
registers, stoves, or other apparatus (including amplifiers) that
produce heat.
6. Protect the power cord from being walked on or pinched par
-
ticularly at plugs, convenience receptacles, and the point where
they exit from the apparatus.
7. Only use the attachments/accessories specified by the manufac
-
turer.
8. Unplug the apparatus during lightning storms or when unused
for long periods of time.
9. Refer all servicing to qualified service personnel. Servicing is
required when the apparatus has been damaged in any way, such
a power supply cord or plug is damaged, liquid has been spilled
or objects have fallen into the device, the apparatus has been
exposed to rain or moisture, does not operate normally, or has
been dropped.

6
© 2006 directed elect r o n i cs—all rights reser ved
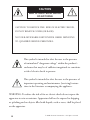
CAUTION
RISK OF ELECTRICAL SHOCK
DO NOT OPEN
CAUTION: TO REDUCE THE RISK OF ELECTRIC SHOCK,
DO NOT REMOVE COVER (OR BACK).
NO USER-SEVICEABLE PARTS INSIDE. REFER SERVICING
TO QUALIFIED SERVICE PERSONNEL.
is symbol is intended to alert the user to the presence
of uninsulated "dangerous voltage" within the product's
enclosure that may be of sufficient magnitude to constitute
a risk of electric shock to persons.
is symbol is intended to alert the user to the presence of
important operating and maintenance (servicing) instruc
‑
tions in the literature accompanying the appliance.
WARNING: To reduce the risk of fire or electric shock do not expose the
apparatus to rain or moisture. Apparatus shall not be exposed to dripping
or splashing and no objects filled with liquids, such as vases, shall be placed
on the apparatus.

7
© 2006 directed elect r o n i cs—all rights reser ved
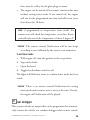
replacement remote controls
You can purchase replacement remote controls from your
Authorized Dealer or on-line at the following web site:
www.directedstore.com
Once you receive your new remote control, please refer to
instructions included on the remote packaging.
remote control introduction
This 2way Remote Control system operates at 434MHz using binary
data communication technology for sending and receiving of infor-
mation.
In this section you will find information about remote control
features, display screen icons, function buttons, communication and
maintenance.
It is recommended that you review this section prior to reading the
user information in this manual. It is a guide to how the remote
control functions.
remote control features
• Color on-screen animation
• Audible and visual output for Notifications
• Notification replay

8
© 2006 directed elect r o n i cs—all rights reser ved
• 12 Hour Clock
• Remote control battery level indicator
• Power saver sleep mode
• Beeps on/off
• Page Mode on/off
• Programmable alarm trigger animations & icons
• 2way garage door module capable
note: for detail on setting the clock and programming of
other remote control features, refer to the remote control
programming section in this manual.
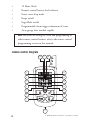
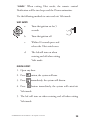
remote control diagram
6
7 9
10
4
3
2
1
12
13
14
15
18 17 16
5 11
8

9
© 2006 directed elect r o n i cs—all rights reser ved
1. ARM & DISARM ICON
2. SENSOR WARN TRIGGER & CAR CALL ICONS
3. HOOD TRIGGER ICON
4. TRUNK OR HOOD ICONS (PROGRAMMABLE)
5. IGNITION TRIGGER ICON
6. ARM/LOCK BUTTON
7. AUXILIARY CHANNEL BUTTON
8. TRANSMITTER PROGRAMMING BUTTON (ON
REAR)
9. REMOTE START BUTTON
10. DISARM/UNLOCK BUTTON
11. REMOTE START ON/OFF ICON
12. REMOTE CONTOL BEEPS ON/OFF ICON
13. SENSOR ZONE TRIGGER ICON
14. FULL TRIGGER FOR ALL ZONES & CAR CALL
ICONS
15. REMOTE CONTROL BATTERY LEVEL INDICATOR
ICON
16. GARAGE DOOR OPEN/CLOSE ICONS
17. CLOCK DISPLAY (12 HOUR)
18. DOOR TRIGGER ICON

10
© 2006 directed elect r o n i cs—all rights reser ved
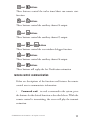
remote control button functions
The remote control buttons are initially programmed to Standard
Configuration for this system. The instructions in this manual
correspond to a Standard Configuration remote control.
NOTE: If desired, the remote control button configuration can
be customized by an authorized dealer.
➜
standard configuration
Button
This button controls the arm, lock and panic functions.
Button
This button controls the disarm, unlock and panic off func-
tions.
Button
This button controls the Silent mode and trunk release func-
tions.
Button
This button controls the remote start function.
and
Buttons
These buttons control the timer mode remote start function.

11
© 2006 directed elect r o n i cs—all rights reser ved
and Buttons
These buttons control the turbo timer/short run remote start
function.
and
Buttons
These buttons control the auxiliary channel 4 output.
and
Buttons
These buttons control the auxiliary channel 5 output.
and and
Buttons
These buttons control the rear window defogger function.
and Buttons
These buttons control the auxiliary channel 6 output.
and Buttons
These buttons will replay the last Notification animation
remote control communication
Below are descriptions of the functions and features the remote
control uses to communicate information.
•
Command send: to send a command to the system, press
the buttons for the desired function as described above. While the
remote control is transmitting, the screen will play the transmit
animation.

12
© 2006 directed elect r o n i cs—all rights reser ved
Note: If the remote control does not play the transmitting anima‑
tion, the remote control did not transmit the command.
•
Command response: one second after the system receives
and implements a command; it will transmit a command response
to the activating remote control. The remote control will play the
appropriate Notification output.
Note: If more than one remote control is programmed to the
system, a command update will follow ten seconds later.
•
Command Update: a command update is sent to keep
additional remote controls in sync with the current system state.
The command update remote control Notification will be a
repeat of the command response.
Note: If only one remote control is programmed to the system, a
command update IS NOT sent.
•
Page: a Page is a single transmission five seconds long to
all programmed remote controls.
A page is transmitted when the system state changes by means
other than a command from a remote control. Usually it is due to
an alarm warn or full trigger, a timer mode remote start, a remote
start shutdown, or the Car Call feature is activated.
•
Notification: a remote control Notification is the audible
beeps and animation output after the remote control receives
a command response, command update, or a page from the
system.

13
© 2006 directed elect r o n i cs—all rights reser ved
• Alarm Page Alert: an alarm page alert is a single beep that
repeats every sixty seconds after an alarm warn or full trigger
page has been received. It will continue to beep until it has been
cleared by the user.
•
Alarm Page: to clear an Alarm Page Alert, press any button
on the remote control.
Until the alert is cleared, the buttons on the remote control will
not transmit commands.
a. During Alarm Page Notification: press any button while
the Notification is playing, the alert will clear and the animation
will stop.
b. After Notification: press any button after the Notification,
the alert will clear and the animation will replay without the
beeps.
•
Out of Range: If the remote control does not receive a
command response with a few seconds of sending a command,
it will assume it is out‑of‑range and will play the appropriate
Notification.
notification replay feature
The notification replay feature allows you to replay the most recent
remote control Notification animation. This feature is convenient
for reviewing the detail for the Notification such as remote start
on/off, alarm page etc.

14
© 2006 directed elect r o n i cs—all rights reser ved
To replay, simultaneously press and release the “
” & “ ”
buttons. The screen will replay the animation once without beeps.
remote control maintenance
This remote control needs no specific maintenance beyond charging
of the remote control battery. It is powered by a 4.3V/600mA
Lithium Ion battery that will last approximately 1 week on a full
charge under normal use. Excessive viewing of on-screen anima-
tions will quickly diminish the battery charge.
The Battery Level icon has three bars as a visual indication of
battery charge. When the battery level icon displays one bar, the
battery charger should be connected promptly to assure uninter-
rupted operation. The remote control battery level icon is displayed
during each Notification and Notification replay.
charging the remote control battery
To charge the battery in the 2way color remote control plug the
AC adapter into a 115V AC wall socket and the other end into the
charging port of the Remote Control.
The charging time will depend on the battery charge level when
connected. If completely discharged, the battery will reach ½ charge
in about 25 minutes and full charge in approximately 2 hours.

15
© 2006 directed elect r o n i cs—all rights reser ved
using your system
➜
warning! safety first
The following safety warnings must be observed at all times:
➤ Due to the complexity of this system, installation of this
product must only be performed by an authorized Directed
dealer.
➤ When properly installed, this system can start the vehicle via
a command signal from the remote control. Therefore, never
operate the system in an enclosed area or partially enclosed
area without ventilation (such as a garage). When parking
in an enclosed or partially enclosed area or when having the
vehicle serviced, the remote start system must be disabled
using the installed toggle switch. It is the user's sole responsi-
bility to properly handle and keep out of reach from children
all remote control remote controls to assure that the system
does not unintentionally remote start the vehicle. THE USER
MUST INSTALL A CARBON MONOXIDE DETECTOR
IN OR ABOUT THE LIVING AREA ADJACENT
TO THE VEHICLE. ALL DOORS LEADING FROM
ADJACENT LIVING AREAS TO THE ENCLOSED OR
PARTIALLY ENCLOSED VEHICLE STORAGE AREA
MUST AT ALL TIMES REMAIN CLOSED.
These precau-
tions are the sole responsibility of the user.
➤ Use of this product in a manner contrary to its intended
mode of operation may result in property damage, personal

16
© 2006 directed elect r o n i cs—all rights reser ved
injury, or death. (1) Never remotely start the vehicle with the
vehicle in gear, and (2) Never remotely start the vehicle with
the keys in the ignition. The user must also have the neutral
safety feature of the vehicle periodically checked, wherein the
vehicle must not remotely start while the car is in gear. This
testing should be performed by an authorized Directed dealer
in accordance with the Safety Check outlined in the product
installation guide. If the vehicle starts in gear, cease remote
start operation immediately and consult with the authorized
Directed dealer to fix the problem.
➤ After the remote start module has been installed, contact
your authorized dealer to have him or her test the remote
start module by performing the Safety Check outlined in
the product installation guide. If the vehicle starts when
performing the Neutral Safety Shutdown Circuit test,
the remote start unit has not been properly installed. The
remote start module must be removed or the installer must
properly reinstall the remote start system so that the vehicle
does not start in gear. All installations must be performed
by an authorized Directed dealer. OPERATION OF
THE REMOTE START MODULE IF THE VEHICLE
STARTS IN GEAR IS CONTRARY TO ITS INTENDED
MODE OF OPERATION. OPERATING THE REMOTE
START SYSTEM UNDER THESE CONDITIONS MAY
RESULT IN PROPERTY DAMAGE OR PERSONAL
INJURY. YOU MUST IMMEDIATELY CEASE THE
USE OF THE UNIT AND SEEK THE ASSISTANCE OF
Page is loading ...
Page is loading ...
Page is loading ...
Page is loading ...
Page is loading ...
Page is loading ...
Page is loading ...
Page is loading ...
Page is loading ...
Page is loading ...
Page is loading ...
Page is loading ...
Page is loading ...
Page is loading ...
Page is loading ...
Page is loading ...
Page is loading ...
Page is loading ...
Page is loading ...
Page is loading ...
Page is loading ...
Page is loading ...
Page is loading ...
Page is loading ...
Page is loading ...
Page is loading ...
Page is loading ...
Page is loading ...
Page is loading ...
Page is loading ...
Page is loading ...
Page is loading ...
Page is loading ...
Page is loading ...
Page is loading ...
Page is loading ...
Page is loading ...
Page is loading ...
Page is loading ...
Page is loading ...
-
 1
1
-
 2
2
-
 3
3
-
 4
4
-
 5
5
-
 6
6
-
 7
7
-
 8
8
-
 9
9
-
 10
10
-
 11
11
-
 12
12
-
 13
13
-
 14
14
-
 15
15
-
 16
16
-
 17
17
-
 18
18
-
 19
19
-
 20
20
-
 21
21
-
 22
22
-
 23
23
-
 24
24
-
 25
25
-
 26
26
-
 27
27
-
 28
28
-
 29
29
-
 30
30
-
 31
31
-
 32
32
-
 33
33
-
 34
34
-
 35
35
-
 36
36
-
 37
37
-
 38
38
-
 39
39
-
 40
40
-
 41
41
-
 42
42
-
 43
43
-
 44
44
-
 45
45
-
 46
46
-
 47
47
-
 48
48
-
 49
49
-
 50
50
-
 51
51
-
 52
52
-
 53
53
-
 54
54
-
 55
55
-
 56
56
-
 57
57
-
 58
58
-
 59
59
-
 60
60


Directed Electronics 1090 Owner's manual
- Category
- Car alarm
- Type
- Owner's manual
- This manual is also suitable for
Ask a question and I''ll find the answer in the document
Finding information in a document is now easier with AI
Related papers
-
Directed Electronics 3300L User manual
-
Directed Electronics 592 User manual
-
Clifford 5902 User manual
-
Directed Electronics Responder 460 Owner's manual
-
-
-
-
-
-
Clifford 990 User manual