
1
English
Optional Lens User’s Manual
Important Safety Instructions
(Always follow these instructions)
Please read this section on important safety instructions before replacing the projector lens.
To prevent accidents during lens replacement and ensure product safety after replacing the
lens, be sure to follow the safety instructions described herein.
● These symbols indicate actions that can result in injury or damage if these operations are
not followed correctly.
Warning
This symbol indicates that there is a possibility of serious injury
or even death if the operation is not followed correctly
Caution
This symbol indicates that there is a possibility of physical
injury or damage to equipment if the operation is not followed
correctly.
● These symbols indicate the types of precautions that must followed.
This symbol indicates that
caution must be taken.
This symbol warns of possible
high heat.
This symbol warns of possible
electrical shock.
This symbol indicates an action
that must not be performed.
Do not look into the lens.
Do not block the projection light.
Warning
■ Make sure to follow the procedure on lens installation and removal
for your safety.
■ Please read this manual and manuals for the
projector to ensure correct usage through understanding.
Incorrect usage could result in re, an injury or damage.
■
Do not subject the device any shock or impact.
Any shock or impact could result in an injury or damage. The lens projects
out of the device. Take care not to strike it.

2
Informa tion for users applicable in European Union countries
This symbol on the product or on its packaging means that your electrical and
electronic equipment should be disposed at the end of life separately from your
household wastes. There are separate collection systems for recycling in EU.
For more information, please contact the local authority or the dealer where you
purchased the product.
Operations
• Project an image as described in the Projector user's manual, and adjust the size and
focus of the projected image.
• See the Projection Distance table in this user's manual for information on optional lens
projection distances.
Note
• The distance of projection may not allow focusing on the peripheral area of the screen.
Adjust the focus to keep the center and the peripheral area of the screen balanced.
• These specications are subject to change without notice.
• The zoom lens may cause some distortion of the image on the screen depending on the
zoom position.
• Distortion may appear on screen if the keystone correction (trapezoidal distortion
correction) is overly adjusted.
• Keystone correction (trapezoidal distortion correction) may be limited with some lenses.
Notice
■ Take care of the lens.
•
When transporting the lens, protect the lens by attaching the lens cap.
• Do not touch the lens to prevent fog or dirt on the lens that could cause deterioration of
display quality.
• Do not touch the lens directly. Dirty lens may cause deterioration in image quality.
• The lens is a precision optical device. Carefully handle the lens without subjecting it to
shocks or vibrations.
• When resting the lens on a surface, place the lens face down on a soft cloth.
■ Cleaning
• Use commercially available lens tissue to clean the lens (used to clean cameras,
eyeglasses, etc.).
•
Excepting for lens, use a soft cloth to clean. When excessively soiled dilute a neutral detergent in
water, wet and wring out the soft cloth.
• Do not use detergents or chemicals other than those noted above (e.g. benzene or
thinners).

3
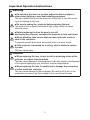
Important Operation Instructions
Warning
■ Do not place the lens in a location subject to direct sunlight or
other strong lighting or near heat-radiating equipment.
This can cause a re due to the properties of the lens. It can also cause
injury or damage to the lens.
■ Be sure to unplug the projector beforereplacing the lens.
The inside of the projector has areas of high voltage which can cause
electrical shock.
■ Before replacing the lens, be sure to turn off
and unplug the projector, and allow the projector to fully cool down.
■ When attaching, take care so that dust does not enter inside or
stick to the connector.
Continued use with dust inside may result in re or electric shock.
■ If the projector is mounted on a ceiling, ask the dealer to replace
the lens.
This can cause injury.
Caution
■ When replacing the lens, do not touch the polarizing plates of the
projector or subject them to shocks.
This can cause damage to the equipment. It can also cause a misalignment
of the optical adjustment and, therefore, require readjustments.
■ When replacing the lens, be careful not to damage the connectors
or wires inside the projector.
This can cause damage to the equipment. Be careful not to pull on the
connectors or wires or get them caught in the circuit board or case.

4
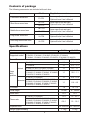
Contents of package
The following accessories are included with each lens.
Lens Model Supplied accessories
Fixed short throw lens
FL-701
Lens caps (front and rear)
Optional Lens User's Manual
Short throw zoom lens
SL-702
Lens caps (front and rear)
Optional Lens User's Manual
SL-712
Middle throw zoom lens
ML-703
Lens caps (front and rear)
Optional Lens User's Manual
ML-713
Long throw zoom lens
LL-704
Lens caps (front and rear)
Optional Lens User's Manual
Ultra long throw zoom lens
UL-705
Lens caps (front and rear)
Optional Lens User's Manual
Specications
Model FL-701
SL-712
*1)
Supported model
CP-X8150, CP-WX8240, CP-X8160, CP-X8170, CP-WX8255, CP-WX8265,
CP-SX8350, CP-WU8440, CP-WU8450, CP-WU8451, CP-WU8460,
CP-WU8461, CP-X8800, CP-WX8650, CP-WX8750, CP-WU8600, CP-WU8700
Zoom / Focus
-
/ Motorized Motorized
Lens
shift
position
Vertical
CP-X8150
1:1 9:-1 - 1:1
CP-WX8240
1:1 5:-1 - 1:1
CP-X8160, CP-X8170, CP-SX8350, CP-X8800,
1:1 9:1 - 1:1
CP-WX8255, CP-WX8265, CP-WU8440, CP-WU8450,
CP-WU8451, CP-WU8460, CP-WU8461, CP-WX8650,
CP-WX8750, CP-WU8600, CP-WU8700
1:1 10:0 - 1:1
Horizontal
CP-X8150, CP-WX8240
1:1 10:0 - 0:10
CP-X8160, CP-X8170, CP-WX8255, CP-WX8265,
CP-SX8350, CP-WU8440, CP-WU8450, CP-WU8451,
CP-WU8460, CP-WU8461, CP-X8800, CP-WX8650,
CP-WX8750, CP-WU8600, CP-WU8700
1:1 6:4 - 4:6
F-number 1.8 1.6 - 2.0
Focal length 13 mm 19 - 29 mm
Zoom ratio 1.0:1 1.5:1
Throw ratio
CP-X8150, CP-WX8240
1.0:1 1.5 - 2.2:1
CP-X8160, CP-X8170, CP-WX8255, CP-WX8265,
CP-SX8350, CP-WU8440, CP-WU8450, CP-WU8451,
CP-WU8460, CP-WU8461, CP-X8800, CP-WX8650,
CP-WX8750, CP-WU8600, CP-WU8700
0.8:1 1.2 - 1.8:1
Projection size
30 - 600 inch 30 - 600 inch
Weight (Approximately) 1.1 kg 0.7 kg

5
Specications (continued)
Model
SL-702 ML-703
Supported model
CP-X8150, CP-WX8240, CP-X8160, CP-X8170, CP-WX8255, CP-WX8265,
CP-SX8350, CP-WU8440, CP-WU8450, CP-WU8451, CP-WU8460, CP-WU8461
Zoom / Focus Motorized Motorized
Lens
shift
position
Vertical
CP-X8150
9:-1 - 1:1 9:-1 - 1:1
CP-WX8240
5:-1 - 1:1 5:-1 - 1:1
CP-X8160, CP-X8170, CP-SX8350
9:1 - 1:1 10:0 - 1:1
CP-WX8255, CP-WX8265, CP-WU8440, CP-WU8450,
CP-WU8451, CP-WU8460, CP-WU8461
10:0 - 1:1 10:-1 - 1:1
Horizontal
CP-X8150, CP-WX8240
10:0 - 0:10 10:0 - 0:10
CP-X8160, CP-X8170, CP-WX8255, CP-WX8265, CP-SX8350,
CP-WU8440, CP-WU8450, CP-WU8451, CP-WU8460, CP-WU8461
6:4 - 4:6 6:4 - 4:6
F-number
1.6 - 2.0 1.6 - 2.9
Focal length
19 - 29 mm 24 - 48 mm
Zoom ratio
1.5:1 2.0:1
Throw ratio
CP-X8150, CP-WX8240 1.5 - 2.2:1
1.9 - 3.8:1
CP-X8160, CP-X8170, CP-WX8255, CP-WX8265, CP-SX8350,
CP-WU8440, CP-WU8450, CP-WU8451, CP-WU8460, CP-WU8461
1.2 - 1.8:1
1.5 - 3.0:1
Projection size
30 - 600 inch 30 - 600 inch
Weight (Approximately)
0.7 kg 0.9 kg
Model
ML-713
*1)
LL-704 UL-705
Supported model
CP-X8150, CP-WX8240, CP-X8160, CP-X8170, CP-WX8255, CP-WX8265, CP-SX8350, CP-WU8440, CP-WU8450,
CP-WU8451, CP-WU8460, CP-WU8461, CP-X8800, CP-WX8650, CP-WX8750, CP-WU8600, CP-WU8700
Zoom / Focus Motorized Motorized Motorized
Lens
shift
position
Vertical
CP-X8150
9:-1 - 1:1 9:-1 - 1:1 9:-1 - 1:1
CP-WX8240
5:-1 - 1:1 5:-1 - 1:1 5:-1 - 1:1
CP-X8160, CP-X8170, CP-SX8350, CP-X8800
10:0 - 1:1 9:1 - 1:1 9:1 - 1:1
CP-WX8255, CP-WX8265, CP-WU8440, CP-WU8450,
CP-WU8451, CP-WU8460, CP-WU8461, CP-WX8650,
CP-WX8750, CP-WU8600, CP-WU8700
10:-1 - 1:1 10:0 - 1:1 10:0 - 1:1
Horizontal
CP-X8150, CP-WX8240
10:0 - 0:10 10:0 - 0:10
10:0 - 0:10
CP-X8160, CP-X8170, CP-WX8255, CP-WX8265,
CP-SX8350, CP-WU8440, CP-WU8450, CP-WU8451,
CP-WU8460, CP-WU8461, CP-X8800, CP-WX8650,
CP-WX8750, CP-WU8600, CP-WU8700
6:4 - 4:6 6:4 - 4:6 6:4 - 4:6
F-number
1.6 - 2.0 1.7 - 2.0 1.7 - 2.0
Focal length
24 - 47 mm 46 - 79 mm 77 - 133 mm
Zoom ratio
1.7:1 1.7:1 1.7:1
Throw
ratio
CP-X8150, CP-WX8240 2.2 - 3.7:1 3.6 - 6.1:1
6.0 - 10.3:1
CP-X8160, CP-X8170, CP-WX8255, CP-WX8265, CP-SX8350,
CP-WU8440, CP-WU8450, CP-WU8451, CP-WU8460, CP-WU8461,
CP-X8800, CP-WX8650, CP-WX8750, CP-WU8600, CP-WU8700
1.7 - 3.0:1 2.8 - 4.9:1
4.9 - 8.3:1
Projection size
30 - 600 inch 30 - 600 inch 30 - 600 inch
Weight (Approximately)
0.9 kg 1.5 kg 1.6 kg
*1) When SL-712 or ML-713 is used with CP-X8150, CP-WX8240, CP-X8160, CP-X8170, CP-WX8255, CP-WX8265,
CP-SX8350, CP-WU8440, CP-WU8450, CP-WU8451, CP-WU8460, CP-WU8461, it will be recoginazed as SL-702
or ML-703, but this is not a malfunction. Please consult your dealer for more information.

6
Lens Installation and Removal
Please be careful as the methods for lens installation/removal will differ according
to model.
■
Compatible Models
For CP-X8150, CP-WX8240, CP-X8160, CP-X8170, CP-WX8255, CP-WX8265,
CP-SX8350, CP-WU8440, CP-WU8450, CP-WU8451, CP-WU8460, CP-WU8461
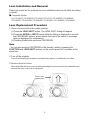
Lens Replacement Procedure
1. Return the lens shift to the center position
(1) Press the
LENS SHIFT
button. The LENS SHIFT dialog will appear.
(2) Press the
ENTER
or
INPUT
button while the dialog is displayed to execute
the CENTERING feature, which adjusts the lens to the center. A message
dialog is displayed for conrmation.
(3) Pressing the ►button performs CENTERING.
Note
• You can also perform CENTERING in the standby mode by pressing the
FUNCTION
and
LENS SHIFT
buttons on the control panel for 3 seconds at the
same time.
2. Turn off the projector
Turn off and unplug the projector, and allow the projector to sufciently cool down.
3. Remove the front cover
Move and slide the front cover up while pressing the front cover from the underside and
remove the front cover from the projector.
Front cover
(upper part)

7
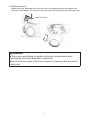
4. Remove the lens
Support the lens, and lower the lens lock lever to the lowest position and remove the
lens from the projector. You can move the lever while the upper plate touches lower one.
Lens lock lever
Caution
■ Take care to avoid hitting the surface of the lens on the projector when
removing the lens as this may lead to malfunction.
■ Do not touch the socket of the lens or subject it to impact as this may lead to
malfunction.

8
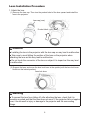
Lens Installation Procedure
1. Attach the lens
(1) Remove the lens cap. Then turn the product label of the lens upward and install the
lens in the projector.
Lens cap (rear)
Product label
Caution
■ Installing the lens in the projector with the lens cap on may lead to malfunction.
■ Take care to avoid hitting the surface of the lens on the projector when
attaching the lens as this may lead to malfunction.
■ Do not touch the connector of the lens or subject it to impact as this may lead
to malfunction.
(2) Support the lens, and move the lens lock lever to the upside (until the lens lock lever
clicks into the locked position).
Lens lock lever
Warning
■ To prevent the lens from falling off, after attaching the lens, check that it is
securely mounted and that the lens does not move. If the projector falls or topples
over, it could result in injury or damage to the projector and the surrounding
things.

9
2. Attaching the front cover
Insert the front cover into the projector body.
Front cover
(upper part)
Lens Installation and Removal
■
Compatible Models
For CP-X8800, CP-WX8650, CP-WX8750, CP-WU8600, CP-WU8700
Lens Installation Procedure
1. Pull out the dust protector knobs to remove it.
Note
• Keep the dust protector for future use.
Dust protector

10
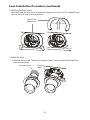
2. Remove the front cover
Move and slide the front cover up while pressing the front cover from the underside and
remove the front cover from the projector.
3. Install the lens
(1) Remove the lens cap. Then turn the product label of the lens upward and install the
lens in the projector.
Lens Installation Procedure (continued)
Front cover
(upper part)
Lens cap (rear) Product
label

11
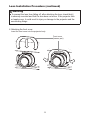
Caution
■ Installing the lens in the projector with the lens cap on may lead to malfunction.
■ Avoid hitting the surface of the lens on the projector when attaching the lens as
this may lead to malfunction.
■ Do not touch the connector of the lens or subject it to impact as this may lead
to malfunction.
Lens Installation Procedure (continued)
3. Install the lens (continued)
(2) Support the lens, and move the lens lock lever to the upside (until the lens lock lever
clicks into the locked position).
Lens lock lever

12
4. Attaching the front cover
Insert the front cover into the projector body
Lens Installation Procedure (continued)
Warning
■ To prevent the lens from falling off, after attaching the lens, check that it
is securely mounted and that the lens does not move. If the projector falls
or topples over, it could result in injury or damage to the projector and the
surrounding things.
Front cover
(lowwer part)

13
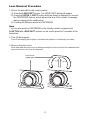
Lens Removal Procedure
1.
Return
the lens shift to the center position
(1) Press the
LENS SHIFT
button. The LENS SHIFT dialog will appear.
(2) Press the
ENTER
or
INPUT
button while the dialog is displayed to execute
the CENTERING feature, which adjusts the lens to the center. A message
dialog is displayed for conrmation.
(3) Pressing the ►button performs CENTERING.
Note
• You can also perform CENTERING in the standby mode by pressing the
FUNCTION
and
LENS SHIFT
buttons on the control panel for 3 seconds at the
same time.
2. Turn off the projector
Turn off and unplug the projector, and allow the projector to sufciently cool down.
3. Remove the front cover
Move and slide the front cover up while pressing the front cover from the underside and
remove the front cover from the projector.
Front cover
(upper part)

14
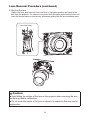
Lens Removal Procedure (continued)
4. Remove the lens
Support the lens, and lower the lens lock lever to the lowest position and remove the
lens from the projector. You can move the lever while the upper plate touches lower one.
Insert the dust protector to prevent any substance getting into the lens installation area.
Caution
■ Avoid hitting the surface of the lens on the projector when removing the lens
as this may lead to malfunction.
■ Do not touch the socket of the lens or subject it to impact as this may lead to
malfunction.
Lens lock lever
-
 1
1
-
 2
2
-
 3
3
-
 4
4
-
 5
5
-
 6
6
-
 7
7
-
 8
8
-
 9
9
-
 10
10
-
 11
11
-
 12
12
-
 13
13
-
 14
14


Hitachi FL-701 User manual
- Category
- Projectors
- Type
- User manual
Ask a question and I''ll find the answer in the document
Finding information in a document is now easier with AI
Related papers
-
Hitachi UL604 Installation guide
-
Hitachi CPX8160 User manual
-
Hitachi CP-WU8450 User manual
-
-
-
-
-
-
Hitachi Hitachi CP-WU8600W-ML713 User manual
-