Page is loading ...

ITEM #0880317
MODEL #FOU-515000
LIGHTED MILK JUG
FOUNTAIN
Français p. 7
Español p. 13
1
Questions, problems, missing parts? Before returning to your retailer, call our customer
service department at 1-800-643-0067, 8 a.m. - 8 p.m., EST, Monday - Friday.
ATTACH YOUR RECEIPT HERE
Serial Number
Purchase Date
AB17870
Garden Treasures ® is a registered trademark
of LF, LLC. All Rights Reserved.

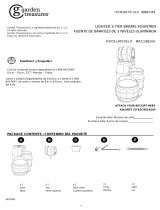
PACKAGE CONTENTS
2
E
A
C
D
B
PART DESCRIPTION QUANTITY
A Fountain Lid 1
B Pump 1
C Fountain Body 1
D Water Tube 1
E LED Light 1

SAFETY INFORMATION
3
Please read and understand this entire manual before attempting to assemble, operate or install the
product.
WARNING
WARNING
CAUTION
Refer to enclosed pump maintenance guide for cleaning.
Install the fountain pump correctly before operating it.
DO NOT allow the pump to run dry.
An adult should supervise children when they are around the pump.
Use the proper power source as indicated on the pump label.
Equip the electrical power for the pump with a Ground Fault Circuit Interrupter (GFCI) wall outlet.
For fountains with multiple sections or attached decorations: If any of the fountain’s attached
sections with electrical lights or components fall into the water located in fountain base, unplug the
fountain and turn off circuit breaker before trying to put the fountain pieces back in place.
If any leakage occurs around the pump housing, turn off the circuit breaker immediately and have
the pump serviced by a registered technician.
Do not operate the fountain if the pump has been dropped or has a damaged power cord or plug.
If the plug or your wall receptacle gets wet due to water dripping down the power cord or for any
other reason, do not remove the plug from the wall outlet until the circuit breaker is turned off.
NOTE: Allow the pump power cord to hang at a lower level than
the wall outlet to form a “drip loop”. This will help prevent water
from dripping down the power cord and getting into the wall outlet.
Always unplug the fountain pump and any other independent electrical
accessories (e.g. lights) from the outlet when not in use and before cleaning or replacing parts.
Disconnect the power cord from the outlet by holding the plug, not by pulling on the power cord.
Periodically change the water. Clean the fountain water basin, the pumpʼs outlet nozzle and the
water tube for dirt and debris with a damp cloth if necessary.
Do not expose the pump to direct sunlight or to low temperatures for any period of time.
Keep the power cord away from high temperatures or heat sources.
Use only an UL-approved extension cord of the correct rating to avoid overheating.
Only use fountain parts provided by the manufacturer.
Do not use the pump for any other than its intended use.
This fountain pump is not intended for commercial use.
1.
2.
3.
4.
5.
6.
7.
8.
9.
10.
11.
12.
13.
14.
15.
16.
17.
18.
GFCI
DRIP LOOP
This fountain is intended for outdoor use only.
Place the fountain in a location where any water spills or splashing will not reach any other
electrical equipment or cause damage.
Choose an appropriate location before installing the fountain. DO NOT lift or push/drag the water
basin to relocate the fountain when itʼs filled with water. Empty the water basin before lifting.
Excessive weight or pressure on any of the fountain sections may cause it to tip or fall over. Keep
pets and children away from any of the fountain sections.
•
•
•
•
Some splashing may occur. To avoid injury from electrical shock, observe basic safety precau-
tions and comply with the following instructions:
The pump on your fountain has no user-serviceable parts. Only an authorized service
representative should service the pump.
Do not open the sealed pump housing as this may result in electrical shock.
•
•

4
PREPARATION
ASSEMBLY INSTRUCTIONS
Before beginning assembly of product, make sure all parts are present. Compare parts with package
contents list. If any part is missing or damaged, do not attempt to assemble the product.
Estimated Assembly Time: 10 minutes
No Tools Required for Assembly
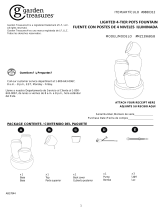
1
1. Route the power cord from the LED light (E) through
the center hole on the fountain lid (A), then connect the
water tube (D) to the LED light from beneath the lid.
Make sure the water tube is connected to the LED light
tightly.
E
D
B
A
2. Connect the water tube (D) to the pump (B). Make
sure the connection is tight. Plug the end of the power
cord from the LED light (E) into the end of the power
cord from the pump. Screw the preassembled ring over
the cable to secure the connection.
2
D
3. Place the fountain body (C) on a flat, level surface.
Route the power plug from the pump (B) through the
opening on the neck of the fountain body. Make sure the
power plug remains on the outside of the fountain.
Place the fountain lid assembly into the top of the
fountain body.
3
LED light
cord
C

CAUTION:
Be careful not to spill water onto the plug of the pump.
DO NOT allow the pump to run dry!
5
ASSEMBLY INSTRUCTIONS
4. Fill fountain from the top with water, making sure the
pump (C) is fully submerged. Then, plug item into the
nearest outlet.
Model# Description Volt. Power
Frequence Flow Height Flow Volme
YH-LV70T
Temperature
auto-shut off
pump
120v 4.8W
60Hz 75cm 310L / hour
4
CARE AND MAINTENANCE
Keep water clean. Using clean water will reduce mineral deposits, improve water clarity and prolong
the life of the pump.
Check regularly that the water reservoir has sufficient water to cover the pump at all times. It will be
necessary to check more frequently in warm or windy weather.
The pump rotor will require cleaning at approximately monthly intervals. A good indication will be if
the water flow rate drops. Switch off and unplug the water feature, remove the pump from the water
reservoir and disconnect the water pipe. Remove the filtering cover and pressure-casing from the
front of pump body. Clean the rotor and housing in clean water using cotton buds. Reassemble the
pump, reconnect the water pipe and reassemble the water feature.
Periodically it will be necessary to change the water and clean the water feature and reservoir. The
frequency of this will depend on the weather and location of the water feature. The outside of the
water feature can be cleaned using a soft cloth and clean water and the reservoir with a soft brush.
A mild detergent can be used but please note that this will cause the water to foam and should be
avoided unless strictly necessary.
Disconnect the power and empty the basin if the fountain will not be used for an extended time.
If installed outdoors and in a freeze-prone area of the country, ensure all water is removed and the
unit is completely dry before temperatures drop too low. This product is NOT to be operated below
41°F or freeze damage may occur.
•
•
•
•
•
•
•
NOTE: The pump data in this manual is from
lab tests. The actual pump may be different
due to the method of production or technical
improvements. This data can be used as a
reference when purchasing a similar pump.
Note: This fountain is equipped with a tempera-
ture-detecting auto-shut off pump. When there is less
water in the fountain than the required minimum or the
pump runs dry, the pump can overheat and become
damaged. This auto-shut off pump is designed to deactivate the pump when it overheats. When this
happens, the pump is not broken. Add more water to cover the pump. When temperature of the pump
drops, the pump will reactivate.

6
ONE-YEAR LIMITED WARRANTY
REPLACEMENT PARTS LIST
For replacement parts, call our customer service department at 1-800-643-0067, 8 a.m. - 8 p.m., EST,
Monday - Friday.
PART DESCRIPTION PART #
B Pump
D Water Tube
E LED Light
01699
01716
01715
B
TROUBLESHOOTING
PROBLEM POSSIBLE CAUSE CORRECTIVE ACTION
1. Pump is not plugged into the socket
properly.
2. Water level lower than pump.
3. Flow control on the pump.
4. Pump outlet nozzle and/or water tube
is clogged.
5. Connection between pump and water
tube is loose.
6. Pump may be "air locked".
1. Plug the pump power cord into
socket properly.
2. Add more water. Make sure the
pump is submerged completely.
3. Adjust flow control to “+”.
4. Clean pump outlet nozzle and
water tube.
5. Connect water tube to pump
tightly.
6. Plug and unplug the pump
several times to clear air.
Water does not flow
out of the fountain.
Kinked or loose water tube. Make sure water tubes are
connected properly.
Fountain pump fails
to operate.
This product is covered under a manufacturerʼs one-year limited warranty from date of purchase
against defects in materials and workmanship. This warranty only covers the product under normal
using; it does not cover damage due to neglect or abuse.
To get this warranty service, call our customer service department at 1-800-643-0067, 8 a.m. - 8 p.m.,
EST, Monday - Friday.
Printed in China
E
D
/