Page is loading ...

User Manual
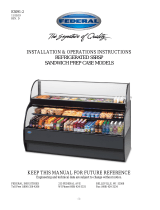
Refrigerated Countertop Merchandiser Display
CDCU-3C-WH CDCU-3C-SS CDCU-3C-BK CDCU-3C-SV
Please read the manual thoroughly prior to equipment
Set-up, operation and maintenance!
WWW.KOOLMORE.COM
- 1 -

Contents
1.
Structure and Parts…………………………………………………………………………….3
2.
Location and Set Up……………………………………………………………......................4
3.
Safety and Power Supply……………………………………………………...........................5
4.
Operation…………………………………………………………………..............................6-7
5.
Digital Controller…………………………………………………………………........................6-7
6.
Maintenance…………………………………………………………………..........................7
7.
Troubleshooting………………………………………………………………………………8
8.
Technical Specifications…………………………………………………………………………..9
9.
Warranty………………………………………………………………………………………… 10
WWW.KOOLMORE.COM
-2-

Structure and Parts
Glass Door
Air Suction
Never block the suction. Air
is sucked in and cold air is
circulated inside the
refrigerator.
Shelf
The height of the shelf is
adjustable for various
goods.
For adjustment:
1. Take out the shelf
2. Move the shelf
support to suitable
height.
3. Put the shelf on
the supports.
Air Outlet
Never block the air
outlet. Let inside
circulating cold air flow
out.

Refrigerator Location and Set Up
Handle With Care
Unplug the wall socket, never tilt over 45 degrees while handling
Wait!
Wait at least two hours after handling the unit before plugging in to the wall socket
Dry Surface
Always place the refrigerator on completely dry surface
Level Surface
Place the refrigerator on a solid and level surface, the unit may be noisy or even malfunction if placed
on an uneven surface.
Sufficient Space
Place the refrigerator no less than 4” away from the wall or other surface to avoid blocked airflow
Location Temperature
Select an indoor location away from heat and moisture-generating equipment. High ambient
temperatures may cause the compressor to malfunction and will void the warranty. Never place the
refrigerator under direct sunshine.
No Heavy Load
Never store a heavy load on top of the refrigerator, never install anything on to the refrigerator. Do not
puncture any holes in to the refrigerator.
WWW.KOOLMORE.COM
-4-

Safety and Power Supply
The unit should have its own 110/60Hz dedicated outlet, do not share the outlet.
Do not use extension cords.
Ensure the unit is not resting on or against the electrical cord. Make sure there is no damage to the
cable
After unplugging the unit, wait at least 10 minutes before plugging it back in. Failure to do so could
cause damage to the compressor, lease make sure there is no damage to the cable.
To avoid shock and fire hazards, do not plug in or unplug the unit with wet hands.
Please ensure that the required voltage is being supplied at all times.
Do not store flammable and explosive gas or liquids inside the unit.
Never giver the refrigerator surface a flush otherwise, this will cause damage to the refrigerator.
WWW.KOOLMORE.COM
-5-

Operation
1. Plug the refrigerator in to a 115V exclusive socket. After the refrigerator is running, place your hand on
the air suction to confirm that it is sufficiently cool
2. Set the digital controller to the desired temperature (see below)
3. Adjust the shelves to the desired location
- Remove the shelves.
- Move the shelve support to a suitable height.
- Place the shelves on the support.
- To get an even temperature between the top and bottom, please space the shelves equally.
Front Panel Operation
1.
Set temperature:
Press button, the set temperature is displayed.
Press or to adjust the temperature
Press button to exit the adjustment and display the unit’s current temperature.
-6-

2.
If no more buttons are pressed within 10 seconds, the unit’s current temperature will be displayed.
3.
Lights: Press button to turn lights ‘on’ or ‘off’.
Manual start/stop defrost: Press button and hold for 6 seconds to defrost or stop defrost.
4.
Refrigerant LED: When the compressor is running, the LED is on; when the
refrigerator temperature is constant, the LED is off; During the delay start, the LED
flashes.
5.
Defrost LED: during the defrost cycle, the LED is on; when it stops defrosting, the LED is
off. During the delayed display of defrost, the LED flashes.
Maintenance
Periodical cleaning and maintenance is necessary. Always unplug the socket before maintenance. Never
use a damaged plug or loose socket to prevent electric shock or short circuit.
To clean the interior
• When cleaning the cabinet interior, use a solvent of warm water and mild soap.
• Do not use steel wool, caustic soap, abrasive cleaners, or bleach that may damage the interior finish.
• Periodically remove the shelves and shelf brackets from the unit, and clean them with a mild soap and
warm water
Cleaning the Fan Blades and Motor
• If necessary, clean the fan blades and motor with a soft cloth.
• If it is necessary to wash the fan blades, cover the fan motor to prevent moisture damage.
Cleaning the Condenser Coil
• For efficient operation, keep the condenser surface free of dust, dirt, and lint.
• We recommend cleaning the condenser coil at least once per month.
• Clean the condenser with a commercial condenser coil cleaner.
WWW.KOOLMORE.COM
-7-

Troubleshooting
Issue
Cause and Remedy
No refrigeration
Is the plug in the socket?
Is the fuse working?
Is there power?
Unsatisfactory refrigeration
Is the unit under direct sunlight?
Is there a heat source nearby?
Is the surrounding ventilation adequate?
Does the door close well?
Is door open for long periods of time?
Is the door seal strip deformed or damaged?
Does food block the air suction or outlet?
Is the refrigerator to full?
The refrigerator is too noisy
The refrigerator is not leveled
The refrigerator is touching the wall
There is a loose part
in the
refrigerator.
Contact us at [email protected] if the trouble shooting does not solve your issue
WWW.KOOLMORE.COM
-8

Technical Specifications
Coolant and injection quantity(g)
R290(40)
General Rated input power(W)
180
Type of climate
4
Refrigeration temperature (F)
32-53.6
Electric shock protection class
I
Rated Current(A):
1.6/1.7
Lamp power(W):
ll(T4),l.44/PC(LED)
Total effective volume (CU.FT.)
3.2
Net weight(lbs.)
79.3
Rated voltage(V)
110-120V-
Rated Frequency(Hz)
60
Overall dimension (in)
(LxWxH)
16.7x15.9x38.5
WWW.KOOLMORE.COM
-9-

Warranty
The one year1 Year warranty -is Valid only in the United States
Unless otherwise stated, KOOLMORE Supply Inc. warrants to the original purchaser of new,
qualified Koolmore units (and all parts thereof), that such equipment will be free from defects in
material and workmanship for a period of 1 year from the date of delivery.
If a qualified product is found to be defective during this period, KOOLMORE Supply Inc. will
repair the defective unit, replace any defective parts, or replace the defective unit.
What This Warranty Does Not Cover:
KOOLMORE Supply Inc. will not warrant coverage for component failure or other damages that
arise under the following conditions:
•
Failure to install and/or use the unit within proper operating conditions specified by
KOOLMORE Supply Inc.
•
Failure to properly maintain the unit. This includes, but is not limited to, basic
preventative maintenance like cleaning the condenser coil.
•
Installation in non-commercial or residential applications.
•
Products sold or used outside of the United States.
•
Any damage that occurs as a result of negligence or improper handling.
•
Overloading or improper loading of the unit in a manner that prevents proper airflow.
Additionally, no claims can be made against this warranty for spoilage of products, loss of sales or
profits, or any other consequential damages.
Normal wear type parts, such as light bulbs and gaskets, are not included in warranty coverage.
Warranty is not transferable. This warranty is not assignable and applies only in favor of the original
purchaser/user to whom delivered. ANY SUCH ASSIGNMENT OR TRANSFER SHALL VOID THE
WARRANTIES HEREIN MADE AND SHALL VOID ALL WARRANTIES, EXPRESS OR IMPLIED,
INCLUDING ANY WARRANTY OF MERCHANTABILITY OR FITNESS FOR A PARTICULAR
PURPOSE.
WARRANTY CLAIMS. All claims should include: model number of the cooler, the serial number of the
cabinet, proof of purchase, date of installation, and all pertinent information supporting the existence of the
alleged defect. Any action or breach of these warranty provisions must be commenced within one (1) year
after that cause of action has accrued.
For Warranty Inquiries or Service:
To obtain warranty service contact [email protected]
Failure to contact KOOLMORE Supply Inc. prior to obtaining equipment service may void your
warranty.
-10-
/