Page is loading ...

Bristol Babcock
Product Information Package
For BBI Instruction Manual CI-3530-10B
TeleFlow MODEM GROUNDING KIT
621495-01-8
INSTALLATION INSTRUCTIONS
TeleFlow MODEM GROUNDING KIT
621495-01-8
INSTALLATION INSTRUCTIONS
No. PIP-3530MGKI
Issue 07/2000
J5
TB1
1
U3
TB3
1
U2
U4
J8
1
3
P1
J4
U6
U1
J6
1
3
5
1
6
9
15
JP1C
1
JP1B
JP1A
5v
BAT
6v
BAT
6v
12v
J7
J1
1
TB4
1
TB2
U10
U4
U1
Modem

NOTICE
Copyright Notice
The information in this document is subject to change without notice. Every effort has been
made to supply complete and accurate information. However, Bristol Babcock assumes no
responsibility for any errors that may appear in this document.
Request for Additional Instructions
Additional copies of instruction manuals may be ordered from the address below per
attention of the Sales Order Processing Department. List the instruction book numbers or
give complete model number, serial or software version number. Furnish a return address
that includes the name of the person who will receive the material. Billing for extra copies
will be according to current pricing schedules.
TeleFlow
TM
and ACCOL
TM
are trademarks of Bristol Babcock. Other trademarks or copy-
righted products mentioned in this document are for information only, and belong to their
respective companies, or trademark holders.
Copyright (c) 2000 Bristol Babcock, 1100 Buckingham St., Watertown, CT 06795. No part of
this manual may be reproduced in any form without the express written permission of
Bristol Babcock.

IMPORTANT! READ INSTRUCTIONS BEFORE STARTING!
Be sure that these instructions are carefully read and understood before any
operation is attempted. Improper use of this device in some applications may result
in damage or injury. The user is urged to keep this book filed in a convenient
location for future reference.
These instructions may not cover all details or variations in equipment or cover
every possible situation to be met in connection with installation, operation or
maintenance. Should problems arise that are not covered sufficiently in the text, the
purchaser is advised to contact Bristol Babcock for further information.
EQUIPMENT APPLICATION WARNING
The customer should note that a failure of this instrument or system, for
whatever reason, may leave an operating process without protection. Depending
upon the application, this could result in possible damage to property or injury to
persons. It is suggested that the purchaser review the need for additional backup
equipment or provide alternate means of protection such as alarm devices, output
limiting, fail-safe valves, relief valves, emergency shutoffs, emergency switches, etc.
If additional information is required, the purchaser is advised to contact Bristol
Babcock.
RETURNED EQUIPMENT WARNING
When returning any equipment to Bristol Babcock for repairs or evaluation,
please note the following: The party sending such materials is responsible to ensure
that the materials returned to Bristol Babcock are clean to safe levels, as such levels
are defined and/or determined by applicable federal, state and/or local law
regulations or codes. Such party agrees to indemnify Bristol Babcock and save
Bristol Babcock harmless from any liability or damage which Bristol Babcock may
incur or suffer due to such party's failure to so act.
ELECTRICAL GROUNDING
Metal enclosures and exposed metal parts of electrical instruments must be
grounded in accordance with OSHA rules and regulations pertaining to "Design
Safety Standards for Electrical Systems," 29 CFR, Part 1910, Subpart S, dated: April
16, 1981 (OSHA rulings are in agreement with the National Electrical Code).
The grounding requirement is also applicable to mechanical or pneumatic
instruments that include electrically-operated devices such as lights, switches, relays,
alarms, or chart drives.
EQUIPMENT DAMAGE FROM ELECTROSTATIC DISCHARGE VOLTAGE
This product contains sensitive electronic components that can be damaged by
exposure to an electrostatic discharge (ESD) voltage. Depending on the magnitude
and duration of the ESD, this can result in erratic operation or complete failure of the
equipment. Read BBI supplemental document S14006 for proper care and handling
of ESD-sensitive components.
Bristol Babcock 1100 Buckingham Street, Watertown, CT 06795
Telephone (860) 945-2200

WARRANTY
A. Bristol warrants that goods described herein and manufactured by Bristol are free
from defects in material and workmanship for one year from the date of shipment
unless otherwise agreed to by Bristol in writing.
B. Bristol warrants that goods repaired by it pursuant to the warranty are free from
defects in material and workmanship for a period to the end of the original warranty
or ninety (90) days from the date of delivery of repaired goods, whichever is longer.
C. Warranties on goods sold by, but not manufactured by Bristol are expressly limited
to the terms of the warranties given by the manufacturer of such goods.
D. All warranties are terminated in the event that the goods or systems or any part
thereof are (i) misused, abused or otherwise damaged, (ii) repaired, altered or
modified without Bristol's consent, (iii) not installed, maintained and operated in
strict compliance with instructions furnished by Bristol, or (iv) worn, injured or
damaged from abnormal or abusive use in service time.
E. THESE WARRANTIES ARE EXPRESSLY IN LIEU OF ALL OTHER
WARRANTIES EXPRESS OR IMPLIED (INCLUDING WITHOUT LIMITATION
WARRANTIES AS TO MERCHANTABILITY AND FITNESS FOR A PARTICULAR
PURPOSE), AND NO WARRANTIES, EXPRESS OR IMPLIED, NOR ANY
REPRESENTATIONS, PROMISES, OR STATEMENTS HAVE BEEN MADE BY
BRISTOL UNLESS ENDORSED HEREIN IN WRITING. FURTHER, THERE ARE
NO WARRANTIES WHICH EXTEND BEYOND THE DESCRIPTION OF THE
FACE HEREOF.
F. No agent of Bristol is authorized to assume any liability for it or to make any written
or oral warranties beyond those set forth herein.
REMEDIES
A. Buyer's sole remedy for breach of any warranty is limited exclusively to repair or
replacement without cost to Buyer of any goods or parts found by Seller to be
defective if Buyer notifies Bristol in writing of the alleged defect within ten (10) days
of discovery of the alleged defect and within the warranty period stated above, and if
the Buyer returns such goods to Bristol's Watertown office, unless Bristol's Water-
town office designates a different location, transportation prepaid, within thirty (30)
days of the sending of such notification and which upon examination by Bristol
proves to be defective in material and workmanship. Bristol is not responsible for
any costs of removal, dismantling or reinstallation of allegedly defective or defective
goods. If a Buyer does not wish to ship the product back to Bristol, the Buyer can
arrange to have a Bristol service person come to the site. The Service person's
transportation time and expenses will be for the account of the Buyer. However,
labor for warranty work during normal working hours is not chargeable.
B. Under no circumstances will Bristol be liable for incidental or consequential damages
resulting from breach of any agreement relating to items included in this quotation
from use of the information herein or from the purchase or use by Buyer, its
employees or other parties of goods sold under said agreement.

Bristol Babcock
Training
GET THE MOST FROM YOUR BRISTOL
BABCOCK INSTRUMENT OR SYSTEM
● Avoid Delays and problems in getting your system on-line
● Minimize installation, start-up and maintenance costs.
● Make the most effective use of our hardware and software.
● Know your system.
As you know, a well-trained staff is essential to your operation. Bristol Babcock offers a full
schedule of classes conducted by full-time, professional instructors. Classes are offered
throughout the year at four locations: Houston, Birmingham, Orlando and our Watertown,
CT headquarters. By participating in our training, your personnel can learn how to install,
calibrate, configure, program and maintain any and all Bristol Babcock products and realize
the full potential of your system.
For information or to enroll in any class, contact our training department in Watertown at
(860) 945-2269. For Houston classes, you can also contact our Houston office, at (713) 685-
6200.

A Few Words About Bristol Babcock
For over 100 years, Bristol
7
has been providing innovative solutions for the measurement
and control industry. Our product lines range from simple analog chart recorders, to
sophisticated digital remote process controllers and flow computers, all the way to turnkey
SCADA systems. Over the years, we have become a leading supplier to the electronic gas
measurement, water purification, and wastewater treatment industries.
On off-shore oil platforms, on natural gas pipelines, and maybe even at your local water
company, there are Bristol Babcock instruments, controllers, and systems running year-in
and year-out to provide accurate and timely data to our customers.
Getting Additional Information
In addition to the information contained in this manual, you may receive additional assis-
tance in using this product from the following sources:
Contacting Bristol Babcock Directly
Bristol Babcock's world headquarters are located at 1100 Buckingham Street, Watertown,
Connecticut 06795, U.S.A.
Our main phone numbers are:
(860) 945-2200
(860) 945-2213 (FAX)
Regular office hours are Monday through Friday, 8:00AM to 4:30PM Eastern Time,
excluding holidays and scheduled factory shutdowns. During other hours, callers may leave
messages using Bristol's voice mail system.
Telephone Support - Technical Questions
During regular business hours, Bristol Babcock's Application Support Group can provide
telephone support for your technical questions.
For technical questions about TeleFlowÔ products call (860) 945-8604.
For technical questions about ControlWave call (860) 945-2244 or (860) 945-2286.
For technical questions regarding Bristol’s OpenEnterprise product, call (860) 945-2501 or
e-mail: openenterprise@bristolbabcock.com
For technical questions regarding ACCOL products, Open BSI Utilities, as well as
Bristol's Enterprise Server
7
/Enterprise Workstation
7
products, call (860) 945-2286.
For technical questions about Network 3000 hardware, call (860) 945-2502.
You can e-mail the Application Support Group at: [email protected]

The Application Support Group also maintains a service area within our main web site.
Technical information, as well as software updates are available in this area. To access our
web site, go to: bristolbabcock.com/services/techsupport/
For assistance in interfacing Bristol Babcock hardware to radios, contact Communication
Technologies in Orlando, FL at (407) 629-9463 or (407) 629-9464.
Telephone Support - Non-Technical Questions, Product Orders, etc.
Questions of a non-technical nature (product orders, literature requests, price and delivery
information, etc.) should be directed to the nearest sales office (listed below) or to your
Bristol-authorized sales representative.
Major U.S. Sales Offices Major International Sales Offices:
Watertown, CT (860) 945-2262 Bristol Babcock Ltd (UK): (441) 562-820-001
Birmingham, AL (205) 980-2010 Bristol of Canada: (416) 675-3820
Ontario, CA (909) 923-8488 Bristol Babcock Asia Pacific 61 8-9455-9955
Farmington, NM (505) 327-3271 BBI, S.A. de C.V. (Mexico) (525) 254-2131
Houston, TX (713) 685-6200
Richardson, TX (972) 238-8935
Please call the main Bristol Babcock number (860-945-2200) if you are unsure which office
covers your particular area.
Visit our Site on the World Wide Web
For general information about Bristol Babcock and its products, please visit our site on the
World Wide Web at: www.bristolbabcock.com

PIP-3530MGKI Page 0-1 Table Of Contents
PIP-3530MGKI
TeleFlow MODEM GROUNDING KIT
INSTALLATION INSTRUCTIONS
PT. Number 621495-01-8
Product Information Package
TABLE OF CONTENTS
TITLE PAGE #
Installation Instructions for the TeleFlow Modem Grounding Kit...............................................................1
Additional TeleFlow Grounding Considerations..........................................................................................8
REFERENCED DOCUMENTS
TeleFlow Elect. Meas. Computer Model 3530-10B Instruction Manual ..................................CI-3530-10B
9600 bps PSTN Modem Instruction Manual .....................................................................................CI-9600
Site Considerations for Equipment Installation, Grounding & Wiring .........................Supplement S1400A
BBI Specification Summary – PGI.............................................................................................F1670SS-0a

PIP-3530MGKI Page 1 Modem Grounding Kit
Installation Instructions for the TeleFlow Modem Grounding Kit
Prior to the installation of a 9600 bps Modem into a TeleFlow (3530-10B), the TeleFlow
enclosure (case) must be modified to accommodate the Modem Grounding Kit. Units that
are already field installed must be removed to a safe, clean and static-free work environ-
ment.
The TeleFlow Modem Grounding Kit consists of the following items:
• Hex Nut - #10-32 (Item A – Figure 4)
• Cabinet Ground Cable (Item B – Figures 2 & 4)
• Self-Locking Nut - #10-32 UNF (Item C – Figure 4)
• Flat Washer - #10 (Item D – Figure 4)
• Ground Lug (Item F – Figures 2 & 4)
• Pan Head Screw - #10-32 x 3/4” (Item G – Figures 2 & 4)
• Pan Head Screw - - #4-40 x 3/8” (Item H – Figure 2)
• Self-Locking Nut - #4-40 UNC (Item J – Figure 2)
• Hex Nut - #4-40 (Item K – Figure 2)
To modify a TeleFlow (3530-10B) follow steps 1 through 15 below.
1. Open the Instrument Front Cover. Disconnect power by removing the power plug
from primary power connector J8 on the modem’s CPU Board. Note: In the event
the TeleFlow requires continuous operation, a small auxiliary 9V battery
can be plugged into the secondary power connector J7. If a modem is
installed in the unit, remove its’ power wires from modem connector TB4. If these
wires are connected to the battery system, make sure that you prevent them from
shorting together. Remove the modem’s phone line connections. Then remove the
modem. This is accomplished by removing the four (4) screws that secure the modem
to stand-offs, on the Modem Mounting Plate (see Figure 4). Remove the wiring
harness connector from the modem’s D-type Port J5 after removing the modem. The
modem must be handled using ESD safe handling techniques.
2. Referring to Figure 1, determine the location of the 13/64-inch hole that must be
drilled through the bottom of the enclosure. Mark this location on the bottom of the
enclosure. Clamp the TeleFlow (3530-10B) in a vise (or otherwise secure the unit)
and drill a 13/64 inch hole through the bottom case at the location specified in
Figure 1. Use an appropriate size rat-tail file to remove any slag from the edges of
the hole. Take extra precautions to assure that no filing are left within the enclosure
and that no debris enters the unit’s Multivariable Transducer.
3. Referring to Figures 2, 3 & 4, install the Ground Lug (Item F). The Ground Lug will
be situated on the bottom of the enclosure and is to be secured via a Pan Head Screw
(Item G), a washer (Item D) and a Self-Locking Nut (Item C) as illustrated in Figure
4. Note: The inside of the enclosure has been painted with a conductive
coating. This coating serves to provide an effective EMI/RFI shield.
Connecting the Ground Lug to a known good earth ground will ground the
modem and the TeleFlow enclosure. This coating can be easily and
accidentally scraped away. Make sure that the Flat Washer (Item D) is
installed prior to installing the Self-locking Nut (Item C) or the conductive
coating may be scrapped off causing a loss of EMI/RFI shunt protection.

Modem Grounding Kit Page 2 PIP-3530MGKI
4. Connect one end of the Cabinet Ground Cable to the Modem PCB as illustrated in
Figures 2, 3 & 4. Figure 4 shows the location of the Modem Ground. This is the point
where the modem’s protective surge circuitry is to be connected to Ground. Connect
the Modem Interface Cable to the 9-pin D-Type Connector (J5) on the bottom edge of
the modem. Mount the modem onto the stand-offs on the Modem Mounting Plate. If
required, install the modem (mounted on the Modem Mounting Plate) onto the
Radio/Modem Mounting Plate (that in turn is mounted on the Battery Mounting
Bracket).
TeleFlow Case
Cutaway
Top View
Cabinet Ground Cable
TeleFlow Case
Cutaway
Front View
Cabinet Ground Cable
Location of Ground
Lug Mounting Hole
3/4“
Location of Ground Lug
Mounting Hole
=13/64“
2 & 1/16“
Figure 1 - Ground Lug Hole Location Diagram

PIP-3530MGKI Page 3 Modem Grounding Kit
Figure 2 - Modem Grounding Kit Installation Drawing #1
5. Secure the other end of the Cabinet Ground Cable (Item B) to the Pan Head Screw
(Item G) on the inside of the enclosure via the #10-32 Hex Nut (Item A) as
illustrated in Figures 2, 3 & 4.
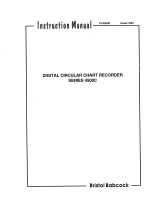
6. If required, configure the Modem Jumpers (See Figure 5). Note: Jumper J8 must be
set on position 1-2 for PSTN RTS to CTS loopback operation.
7. If installing a modem for the first time, remove the seal plug associated with the
modem/radio option from the bottom of the enclosure and loosely install the Phone
Connector and Sealing Nut in its place making sure not to tighten the knurled

Modem Grounding Kit Page 4 PIP-3530MGKI
portion of the Cord Connector. The TeleFlow (3530-10B) must be mounted at its’
assigned installation site prior to performing the remaining steps.
Figure 3 - Modem Grounding Kit Installation Drawing #2
8. Route the Phone Cable (cord) through the Cord Connector installed in step 7. Route
the Phone Cable as far away as possible from the Multivariable Transducer’s Flex
Cable and far enough into the enclosure to accommodate connection of the wires to
the modem and then tighten the knurled portion of the Cord Connector that was
installed in step 7.
9. Connect the end of the Modem Interface Cable, that was not installed in step 4, to
the appropriate TeleFlow CPU Board connectors (see Table 1).

PIP-3530MGKI Page 5 Modem Grounding Kit
Figure 4 - Modem Grounding Kit Installation Drawing #1

Modem Grounding Kit Page 6 PIP-3530MGKI
Figure 5 - TeleFlow/Modem Jumper Configuration
Table 1 - Wiring Listing
TeleFlow
CPUs
TeleFlow
Conn. & Sig.
Signal
Direction
Modem
Conn. & Sig.
Port
Usage
Wire
Color
392561XXX
392926XXX
J5-17 (RTXD)
J13-7 (RTXD) To Modem J5-3 (TD) RS-232 Brown
392561XXX
392926XXX
J5-16 (RRXD)
J13-6 (RRXD) From Modem J5-2 (RD) RS-232 Blue
392561XXX
392926XXX
J5-13 (RDTR)
J13-3 (RDTR) To Modem J5-4 (DTR) RS-232
Yellow
392561XXX
392926XXX
J5-15 (RRTS)
J13-5 (RRTS) To Modem J5-7 (RTS) RS-232 Orange
392561XXX
392926XXX
J5-14 (RCTS)
J13-4 (RCTS) --- --- RS-232 ---
392561XXX
392926XXX
J5-12 (RDCD)
J13-2 (RDCD) From Modem J5-1 (CD) RS-232 Gray
392561XXX
392926XXX
J5-11 (GND)
J13-1 (GND) --- J5-5 (GND) Ground
Green
392561XXX
392926XXX
J8-1 (PWR1)
J8-1 (PWR1) To Modem TB4-2 (EXTVDC) Power Red
392561XXX
392926XXX
J8-2 (GND)
J8-2 (GND)
--- TB4-1 (GND) Pwr Gnd Black
TB1-1 (T/R) Phone Line ---
TB1-2 (T/R) Phone Line ---
Note: A jumper wire should be installed between RRTS and RCTS
on the TeleFlow CPU Board.

PIP-3530MGKI Page 7 Modem Grounding Kit
10. Connect the Modem Power Cable to the Modem as follows:
Red Wire = Modem Board Connector TB4-2
Blk Wire = Modem Board Connector TB4-1
Don’t connect the modem’s power cable to the CPU Board at this time.
Figure 6 - Earth Grounding of TeleFlow Modem and Case
11. Connect a ground wire between the Ground Lug (on the bottom of the case) and a
known good Earth Ground (see Figure 6). Observe these recommendations:
• Ground wire size should be AWG 4. It is recommended that stranded copper wire
is used for this application and that the length should be as short as possible.
• This ground wire should be clamped or brazed to the Ground Bed Conductor (that
is typically a stranded copper AWG 0000 cable installed vertically or horizontally).
• The wire ends should be tinned with solder prior to insertion into the TeleFlow
Ground Lug.
• The ground wire should be run such that any routing bend in the cable (once it
enters the earth) has a minimum of a 12-inch radius.

Modem Grounding Kit Page 8 PIP-3530MGKI
• See next section of this document, i.e., Additional TeleFlow Grounding Con-
siderations.
12. Connect the modem to the phone line (see Modem Manual CI-9600). After the
telephone company has installed the jack, connect the modem’s phone cable to the
phone company’s wall jack. After routing the phone cable as far away as possible
from the Multivariable Transducer’s Flex Cable and far enough into the TeleFlow
enclosure to accommodate connection of the wires to the modem, connect the phone
cable to the modem’s phone jack (J1). A Telephone cable (which terminates to a wall
jack) may be hard-wired to the modem’s Terminal Block TB1 (see Table 2) in lieu of
J1.
13. Connect the modem's power cable to the CPU Board as follows:
Red Wire = To J8-1 = PWR1
Blk Wire = To J8-2 = GND
14. Reconnect power to the CPU Board. Configure the TMS or ACCOL Load for modem
operation.
15. The configuration of the PSTN modem is now complete.
Table 2 - Alternate Telephone Connector #1 - TB1
TB1 Pin # Signal Name Description Input/Output
1 T/R Transmit/Receive I/O
2 T/R Transmit/Receive I/O
3 R Receive 4-Wire Not Used
4 R Receive 4-Wire Not Used
5 N/A Not Used N/A
6 N/A Not Used N/A
Additional TeleFlow Grounding Considerations
• Meter Runs without Cathodic Protection
TeleFlows may be mounted directly on the pipeline or remotely on a vertical stand-alone
two-inch stand-pipe. The ground conductor is to run between the TeleFlow and Earth
Ground even though the TeleFlow’s Multivariable Transducer is grounded to the
pipeline.
• Meter Runs with Cathodic Protection
Dielectric isolators are included in the direct mount parts list and are always
recommended as an added measure in isolating the TeleFlow from the pipeline even
though TeleFlow does provide 500V galvanic isolation from the pipe and should not be
affected by cathodic protection or other EMF on the pipeline. While users are warned to
avoid “grounding” the electronics to the pipeline, we also recommend that installers
thoroughly review the grounding and wiring practices information contained in
supplement document S1400A, Site Considerations for Equipment Installation,
Grounding & Wiring. Isolation Fittings should also be used in remotely mounted meter
systems. See BBI Specification Summary F1670SS-0a for information on PGI Direct
Mount Systems and manifolds.

READER RESPONSE FORM
Please help us make our documentation more useful to you! If you have a complaint, a sug-
gestion, or a correction regarding this manual, please tell us by mailing this page with your
comments. It's the only way we know we're doing our job by giving you correct, complete, and
useful documentation.
DOCUMENT NUMBER: PIP-3530MGKI
TITLE: TeleFlow Modem Grounding Kit 621495-01-8 Installation Instructions Product
Information Package
ISSUE DATE: JULY, 2000
COMMENT/COMPLAINT:
______________________________________________________________________________
______________________________________________________________________________
______________________________________________________________________________
______________________________________________________________________________
______________________________________________________________________________
______________________________________________________________________________
______________________________________________________________________________
______________________________________________________________________________
______________________________________________________________________________
______________________________________________________________________________
______________________________________________________________________________
______________________________________________________________________________
______________________________________________________________________________
Mail this page to:
Bristol Babcock Inc.
1100 Buckingham Street
Watertown, CT 06795
Attn: Technical Publications Group, Dept. 315

Bristol Babcock Inc.
an FKI company
1100 Buckingham Street
Watertown, CT 06795
Telephone: (860) 945-2200

/