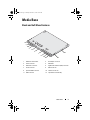
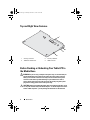
Dell Latitude XT2: Expand your productivity with a versatile 2-in-1 laptop featuring a 12.5" touchscreen display, a powerful processor, and a long-lasting battery. Its flexible design allows you to seamlessly transition between laptop and tablet modes, making it perfect for work, creativity, and entertainment on the go.
Dell Latitude XT2: Expand your productivity with a versatile 2-in-1 laptop featuring a 12.5" touchscreen display, a powerful processor, and a long-lasting battery. Its flexible design allows you to seamlessly transition between laptop and tablet modes, making it perfect for work, creativity, and entertainment on the go.


-
 1
1
-
 2
2
-
 3
3
-
 4
4
-
 5
5
-
 6
6
-
 7
7
-
 8
8
-
 9
9
-
 10
10
-
 11
11
-
 12
12
-
 13
13
-
 14
14
-
 15
15
-
 16
16
-
 17
17
-
 18
18
-
 19
19
-
 20
20
-
 21
21
-
 22
22
-
 23
23
-
 24
24
-
 25
25
-
 26
26
-
 27
27
-
 28
28
-
 29
29
-
 30
30
-
 31
31
-
 32
32
-
 33
33
-
 34
34
-
 35
35
-
 36
36
-
 37
37
-
 38
38
-
 39
39
-
 40
40
-
 41
41
-
 42
42
-
 43
43
-
 44
44
-
 45
45
-
 46
46
-
 47
47
-
 48
48


Dell Latitude XT2: Expand your productivity with a versatile 2-in-1 laptop featuring a 12.5" touchscreen display, a powerful processor, and a long-lasting battery. Its flexible design allows you to seamlessly transition between laptop and tablet modes, making it perfect for work, creativity, and entertainment on the go.
Ask a question and I''ll find the answer in the document
Finding information in a document is now easier with AI
in other languages
- français: Dell Latitude XT2 Guide de démarrage rapide
- español: Dell Latitude XT2 Guía de inicio rápido
- português: Dell Latitude XT2 Guia rápido
Related papers
-
Dell Latitude XT2 Quick start guide
-
Dell Latitude D420 Quick start guide
-
-
-
-
-
-
-
-
Dell Latitude D430 Quick start guide