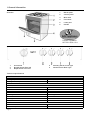
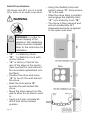
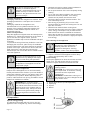
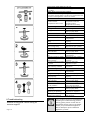
Defy DGS168 is a 4-burner gas stove with an 8100012000 model number, designed for safe and efficient cooking. It features a gas oven with a 2.5kW burner, providing various cooking options. The stove's burners offer different power levels, including a 2000W normal burner, a 2500W rapid burner, a 1000W auxiliary burner, and another 2000W normal burner, allowing you to choose the appropriate heat for different cooking tasks.
Defy DGS168 is a 4-burner gas stove with an 8100012000 model number, designed for safe and efficient cooking. It features a gas oven with a 2.5kW burner, providing various cooking options. The stove's burners offer different power levels, including a 2000W normal burner, a 2500W rapid burner, a 1000W auxiliary burner, and another 2000W normal burner, allowing you to choose the appropriate heat for different cooking tasks.


-
 1
1
-
 2
2
-
 3
3
-
 4
4
-
 5
5
-
 6
6
-
 7
7
-
 8
8
-
 9
9
-
 10
10
-
 11
11
-
 12
12
-
 13
13
-
 14
14
-
 15
15
-
 16
16
-
 17
17
-
 18
18
-
 19
19
-
 20
20


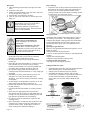
Defy DGS168 is a 4-burner gas stove with an 8100012000 model number, designed for safe and efficient cooking. It features a gas oven with a 2.5kW burner, providing various cooking options. The stove's burners offer different power levels, including a 2000W normal burner, a 2500W rapid burner, a 1000W auxiliary burner, and another 2000W normal burner, allowing you to choose the appropriate heat for different cooking tasks.
Ask a question and I''ll find the answer in the document
Finding information in a document is now easier with AI
Related papers
-
Defy 600 Series Gas Stove Owner's manual
-
-
-
-
-
-
Defy Gemini Gas Hob DHG 128/ DHG 129 Owner's manual
-
-
-
Other documents
-
KitchenAid ACM 223 User guide
-
Beko CSM 61320 Owner's manual
-
Beko CSG 52000 DW User manual
-
Elba EGS-M6992(SS) GAS STOVE Owner's manual
-
Technika TEG75U User manual
-
Rubine RGH-LOTOFLEXI3B-BLFX User manual
-
Samsung NY90T5010SS User manual
-
Technika T150EG95U User manual
-
 Euro Appliances EMD900FAN User manual
-
Fisher & Paykel OR60 models User guide
