Electrolux EPS12V57HWO User Manual For Accessories
- Type
- User Manual For Accessories
Page is loading ...

2 www.electrolux.com
WE’RE THINKING OF YOU
Thank you for purchasing an Electrolux appliance. You’ve chosen a product that brings
with it decades of professional experience and innovation. Ingenious and stylish, it has
been designed with you in mind. So whenever you use it, you can be safe in the knowl-
edge that you’ll get great results every time.
Welcome to Electrolux.
Visit our website to:
Get usage advice, brochures, trouble shooter, service information:
www.electrolux.com
Register your product for better service:
www.electrolux.com/productregistration
Buy Accessories, Consumables and Original spare parts for your appliance:
www.electrolux.com/shop
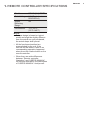
CUSTOMER CARE AND SERVICE
We recommend the use of original spare parts.
When contacting Service, ensure that you have the following data available.
The information can be found on the rating plate. Model, PNC, Serial Number
Warning / Caution-Safety information.
General information and tips.
Environmental information.
Subject to change without notice.
CONTENTS
1. REMOTE CONTROLLER SPECIFICATIONS .....................................................3
2. FUNCTION BUTTONS ........................................................................................4
3. REMOTE LCD SCREEN INDICATORS ..............................................................6
4. HOW TO USE THE BASIC FUNCTIONS ...........................................................7
5. HOW TO USE THE ADVANCED FUNCTIONS .................................................13

3 ENGLISH
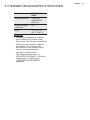
1. REMOTE CONTROLLER SPECIFICATIONS
Model RG66B4(2H)/BGEF
Rated Voltage 3.0V(Dry batteries
R03/LR03×2)
Signal
Receiving
Range
8m
Environment -5°C~60°C
(23°F~140°F)
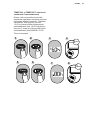
NOTE:
• Buttons design is based on typical
model and might be slightly different
from the actual one you purchased,
the actual shape shall prevail.
• All the functions described are
accomplished by the unit. If the
unit has no this feature, there is no
corresponding operation happened
when press the relative button on the
remote controller.
• When there are wide differences
between “Remote controller
Illustration” and “USER’S MANUAL”
on function description, the description
of “USER’S MANUAL” shall prevail.

4 www.electrolux.com
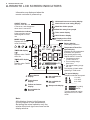
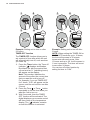
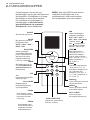
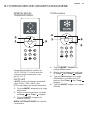
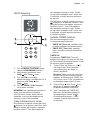
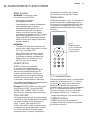
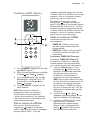
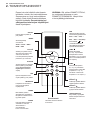
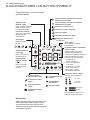
2. FUNCTION BUTTONS
Before you begin using your new air
conditioner, make sure to familiarize
yourself with its remote control. The
following is a brief introduction to the
remote control itself. For instructions on
how to operate your air conditioner, refer
to the How to Use The Basic/Advance
Functions section of this manual.
NOTE: Please do not select HEAT mode
if the machine you purchased is cooling
only type. Heat mode is not supported by
the cooling only appliance.
ON/OFF
Turns the unit on or off
FAN
Selects fan speeds in
the following order:
TEMP
Increases temperature in
0.5°C(1°F) increments.
Hold down this button to
increase temperature in
1°C(1°F) increments.
Max. Temperature is
30°C(86°F).
TEMP
Decreases temperature
in 0.5°C(1°F) increments.
Hold down this button to
decrease temperature
in 1°C(1°F) increments.
Min. Temperature is
16°C(60°F).
SWING
Starts and stops horizontal
louver movement.
SWING
Starts and stops vertical
louver movement.
SELF CLEAN
Starts and stops the unit
self clean feature.
Press the Adjust
or button to increase
/decrease the fan
speed in 1% increments.
MODE
Scrolls through operation
modes as follows:
ECO/SLEEP
Starts and stops energy
efcientfeature.Ifhold
down this button for
more than 2 seconds,
the sleep feature is
activated.
TIMER
Sets timer to turn unit on
and off (see How to Use
Basic Functions for
instructions)
LED
TurnsindoorunitʼsLED
display on and off.
FOLLOW ME
Temperature sensing and
room temperature display
button.
TURBO
Enables unit to reach
preset temperature in
shortest possible time
FRESH
Hold down this button
for at least 2 seconds
to activate/cancel
Fresh feature
Detects the people activities
in the room.
INTELLIGENT EYE
AUTO g COOL g DRY g
HEAT g FAN
AU% g 20% g 40% g
60% g 80% g F%(100%).
Mode
Timer
Turbo
Fresh
Self
clean
Follow
me
LED
FanON/OFF

5 ENGLISH
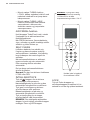
3. HANDLING THE REMOTE CONTROLLER
NOT SURE WHAT A FUNCTION DOES?
Refer to the How to Use Basic
Functions and How to Use Advanced
Functions sections of this manual for a
detailed description of how to use your
air conditioner.
SPECIAL NOTE
• Button designs on your unit may differ
slightly from the example shown.
• If the indoor unit does not have a
particular function, pressing that
function s button on the remote control
will have no effect.
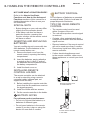
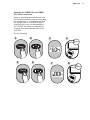
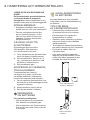
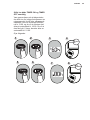
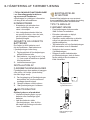
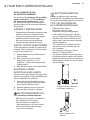
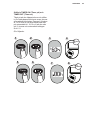
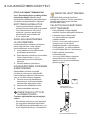
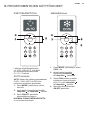
INSERTING AND REPLACING
BATTERIES
Your air conditioning unit comes with two
AAA batteries. Put the batteries in the
remote control before use:
1. Remove the back cover from the
remote control, exposing the battery
compartment.
2. Insert the batteries, paying attention
to match up the (+) and (-) ends of
the batteries with the symbols inside
the battery compartment.
3. Install the back cover on.
INSTALLING REMOTE
CONTROL HOLDER
The remote controller can be attached
to a wall or stand by using a remote
controller holder (optional part, not
supplied with the unit).
1. Before installing the remote controller,
check that the air conditioner receives
the signals properly.
2. Install the holder with two screws.
3. Put the remote controller in the holder.
BATTERY NOTES
For optimum product performance:
• Do not mix old and new batteries, or
batteries of different types.
• Do not leave batteries in the remote
control if you don t plan on using the
device for more than 2 months.
BATTERY DISPOSAL
Do not dispose of batteries as unsorted
municipal waste. Refer to local laws for
proper disposal of batteries.
TIPS FOR USING REMOTE
CONTROL
• The remote control must be used
within 8 meters of the unit.
• The unit will beep when remote signal
is received.
• Curtains, other materials and direct
sunlight can interfere with the infrared
signal receiver.
• Remove batteries if the remote control
will not be used more than 2 months.
• Prevent any liquid from falling into the
remote controller.
• If other electrical appliances react
to the remote controller, either move
these appliances or consult your local
dealer.
Remove the back cover
to install batteries
Put the remote controller
in the holder.

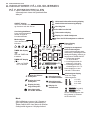
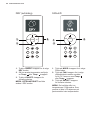
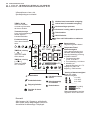
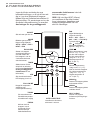
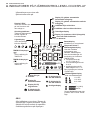
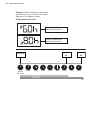
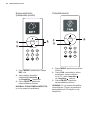
6 www.electrolux.com
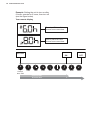
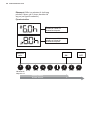
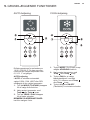
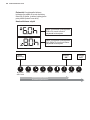
Information are displayed when the
remote controller is powered up.
ON/OFF display
Appears when the unit
is turned on, and disappears
when the it is turned off.
Transmission Indicator
Lights up when remote
sends signal to indoor
unit
MODE display
Displays the current
mode, including:
Displays when TIMER
ON is set
Displays when TIMER
OFF is set
TIMER ON display
(
ON
)
TIMER OFF display
(
OFF
)
Silence feature
display
Not available for
this unit
Horizontal louver auto swing display
Vertical louver auto swing display
Wind ow follow people
Wind ow away from people
Battery display
Low battery detection
Temperature/Timer/Fan
speed display
Fan speed display
Displays selected fan speed:
1%-10%
11%-20%
21%-30%
..................
F%(100%)
AUTO
Displays the set temperature
by default, fan speed or
timer setting when using
TIMER ON/OFF functions
● Temperaturerange:
16-30°C/60-86°F
● Timersettingrange:
0-24 hours
● Fan speed setting range:
AU -F%
This display is blank when
operating in FAN mode.
Turbo mode display
LOCK feature display
Displays when ECO
feature is activated
Not available for
this unit
This fan speed can not be
adjusted in AUTO or DRY
mode.
Sleep mode display
Fresh feature
display
Follow me feature
display
Not available for
this unit
AUTO
COOL
DRY
HEAT
FAN
AUTO COOL DRY HEAT FAN
OFF
SET TEMP.
AUTO
ON
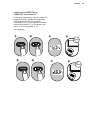
Note:
All indicators shown in the gure are
for the purpose of clear presentation.
But during the actual operation only the
relative functional signs are shown on the
display window.
4. REMOTE LCD SCREEN INDICATORS

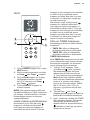
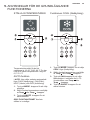
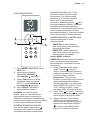
7 ENGLISH
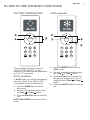
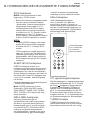
SETTING TEMPERATURE
Mode Fan
ON/OFF
3
1
2
Timer
Follow
me
LED
Self
clean
Turbo
Fresh
The operating temperature range for
units is 16-30°C/60-86°F. You can
increase or decrease the set temperature
in 0.5°C/1°F increments.
AUTO operation
In AUTO mode, the unit will automatically
select the COOL, FAN, HEAT or DRY
mode based on the set temperature.
1. Press the MODE button to select
Auto mode.
2. Set your desired temperature using
the Temp or Temp button.
3. Press the ON/OFF button to start the
unit.
NOTE: FAN SPEEDcanʼtbesetinAuto
mode.
COOL operation
Timer
Follow
me
LED
Self
clean
Turbo
Fresh
Mode FanON/OFF
4
1
3
2
1. Press the MODE button to select
COOL mode.
2. Set your desired temperature using
the Temp or Temp button.
3. Press the FAN button to select the
fan speed in a range of Au%-F%, in
conjunction with Temp or Temp
button.
4. Press the ON/OFF button to start the
unit.
5. HOW TO USE THE BASIC FUNCTIONS

8 www.electrolux.com
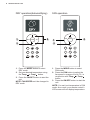
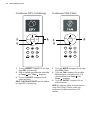
DRY operation(dehumidifying)
Mode Fan
ON/OFF
3
1
2
Timer
Follow
me
LED
Self
clean
Turbo
Fresh
1. Press the MODE button to select
DRY mode.
2. Set your desired temperature using
the Temp or Temp button.
3. Press the ON/OFF button to start the
unit.
NOTE: FAN SPEED canʼtbechangedin
DRY mode.
FAN operation
1
2
3
Mode FanON/OFF
Timer
Follow
me
LED
Self
clean
Turbo
Fresh
1. Press the MODE button to select
FAN mode.
2. Press the FAN button to select the
fan speed in a range of Au%-F%, in
conjunction with Temp or Temp
button.
3. Press the ON/OFF button to start the
unit.
NOTE: YoucanʼtsettemperatureinFAN
mode.Asaresult,yourremotecontrolʼs
LCD screen will not display temperature.

9 ENGLISH
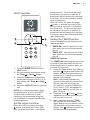
HEAT operation
1
2
3
4
1
Mode FanON/OFF
Timer
Follow
me
LED
Self
clean
Turbo
Fresh
1. Press the MODE button to select
HEAT mode.
2. Set your desired temperature using
the Temp or Temp button.
3. Press the FAN button to select the
fan speed in a range of Au%-F%, in
conjunction with Temp or Temp
button.
4. Press the ON/OFF button to start the
unit.
NOTE: As outdoor temperature drops,
the performance of your unit’s HEAT
function may be affected. In such
instances, we recommend using this
air conditioner in conjunction with other
heating appliance.
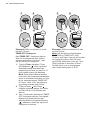
Settheangleofairow
When the unit is on, press the swing
button, to activate the louver. Each
time you press the button, it will adjust
the louver by 6°. Press the button until
the direction you prefer is reached. If
press and hold this button for more than
2 seconds, the louver will swing up and
down continuously.
When the unit is on, press the swing
button, to activate the louver. Each
time you press the button, it will adjust
the louver by 6°. Press the button until
the direction you prefer is reached. If
press and hold this button for more than
2 seconds, the louver will swing left and
right continuously.
Setting the TIMER function
Your air conditioning unit has two timer-
related functions:
• TIMER ON - sets the amount of timer
after which the unit will automatically
turn on.
• TIMER OFF - sets the amount of time
after which the unit will automatically
turn off.
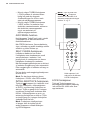
TIMER ON function
The TIMER ON function allows you to set
a period of time after which the unit will
automatically turn on, such as when you
come home from work.
1. Press the Timer button, the Timer on
indicator “ ”displaysandashes.By
default, the last time period that you
set and an “h” (indicating hours)will
appear on the display.
Note: This number indicates the
amount of time after the current time
that you want the unit to turn on.
For example, if you set TIMER ON
for 2.5 hours, “2.5h” will appear on
the screen, and the unit will turn on
after 2.5 hours.
2. Press the Temp or Temp button
repeatedly to set the time when you
want the unit to turn on.
3. Wait 3 seconds, then the TIMER
ON function will be activated. The
digital display on your remote control
will then return to the temperature
display. The “ ” indicator remains on
and this function is activated.

10 www.electrolux.com
ON/OFF
MODE
FAN
SHORT
CUT
TIMER ON
TIMER O
F
F
TEMP
SLEEP
3sec
1
3
2
4
Timer
or
Example: Setting unit to turn on after
2.5 hours.
TIMER OFF function
The TIMER OFF function allows you to
set a period of time after which the unit
will automatically turn off, such as when
you wake up.
1. Press the Timer button, the Timer off
indicator “ ”displaysandashes.
By default, the last time period that
you set and an “h” (indicating hours)
will appear on the display.
Note: This number indicates the
amount of time after the current time
that you want the unit to turn off.
For example, if you set TIMER OFF
for 5 hours, “2.0h” will appear on the
screen, and the unit will turn on after
5 hours.
2. Press the Temp or Temp button
repeatedly to set the time when you
want the unit to turn on.
3. Wait 3 seconds, then the TIMER
OFF function will be activated. The
digital displayon your remote control
will then return to the temperature
display. The “ ” indicator remains
on and this function is activated.
ON/OFF
MODE
FAN
SHORT
CUT
TIMER
O
N
TI
MER
OF
F
TEMP
SLEEP
3sec
1
3
2
4
Timer
or
Example: Setting unit to turn off after
5 hours.
NOTE: When setting the TIMER ON or
TIMER OFF functions, up to 10 hours,
the time will increase in 30 minute
increments with each press. After
10 hours and up to 24, it will increase in
1 hour increments. The timer will revert
to zero after 24 hours.
You can turn off either function by
setting its timer to “0.0h”.

11 ENGLISH
ON/OFF
ON/OFF
MODE
MODE
SHORT
SHORT
CUT
CUT
TIMER ON
TIMER ON
TEMP
TEMP
3
3
sec
sec
4
8
3
7
2
6
1
5
Timer
Timer
or
or
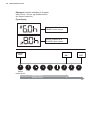
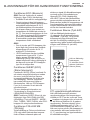
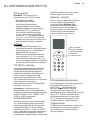
Setting both TIMER ON and TIMER
OFF at the same time
Keep in mind that the time periods you
set for both functions refer to hours after
the current time. For example, say that
the current time is 1:00 PM, and you
want the unit to turn on automatically
at 7:00 PM. You want it to operate for
2 hours, then automatically turn off at
9:00 PM.
Do the following:

12 www.electrolux.com
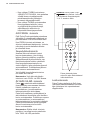
Example: Setting the unit to turn on after
6 hours, operate for 2 hours, then turn off
(seethegurebelow)
Your remote display
Current
time 1PM
2PM 3PM
4PM 5PM
6PM 7PM 8PM 9PM
Timer starts
Unit turns Unit turns
ON
OFF
6 hours later
8 hours later
Timer is set To turn ON
6 hours from current time
Timer is set to turn OFF
8 hours from current time

13 ENGLISH
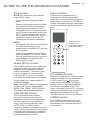
ECO function
NOTE: This function is only available
under COOL mode.
• Usedtoentertheenergyefcient
mode.
• Under cooling mode, press this button,
the remote controller will adjust the
temperature automatically to 24°C,
fan speed of Auto to save energy (but
only if the set temperature is less than
24°C). If the set temperature is above
24°C, press the ECO button, the fan
speed will change to Auto, the set
temperature will remain unchanged.
NOTE:
• Pressing the ECO button, or modifying
the mode or adjusting the set
temperature to less than 24°C will stop
ECO operation.
• Under ECO operation, the set temper-
ature should be 24°C or more. it may
resultininsufcientcooling.Ifyoufeel
uncomfortable, just press the ECO
button again to stop it.
SLEEP (ECO) Function
The SLEEP function is used to decrease
energyusewhileyousleep(anddonʼt
need the same temperature settings
to stay comfortable). This function can
only be activated via remote control.
Hold down ECO button for more than
2 seconds,the sleep feature is activated.
For the detail, see “sleep operation” in
“USER’S MANUAL”.
Note: The SLEEP function is not available
in FAN or DRY mode. Press ON/OFF,
MODE, FAN, TURBO, SELF CLEAN or
ECO button will stop sleep operation.
FOLLOW ME function
The Follow me function enables
the remote control to measure the
temperature at its current location and
send this signal to the air conditioner
every 3 minutes interval When using
AUTO, COOL, or HEAT modes,
measuring ambient temperature from the
remote control (instead of from the indoor
unit itself) will enable the air conditioner
to optimize the temperature around you
and ensure maximum comfort.
Silence function
Hold down Fan speed button for
2 seconds to activate/cancel Silent
mode. Due to low frequency operation of
compressor,itmayresultininsufcient
cooling and heating capacity. (applicable
to the air conditioner with Silent feature
only)
Mode FanON/OFF
Timer
LED
Self
clean
Follow
me
Hold down Fan
button for 2
seconds to activate
Silence function
Turbo
Fresh
8°C Heating Function
When the air conditioner operates under
heating mode with the set temperature
of 16°C, press Temp button twice
in one second will activate 8 Degree
heating function. The unit will operate
at a setting temperature of 8°C. The
indoor unit display shows “FP”. For some
units, press this button can activate 12°C
heating feature, please refer to the
“Owner’s Manual” of the air conditioner.
TURBO function
The TURBO function makes the unit
work extra hard to reach your present
temperature in the shortest amount of
time possible.
6. HOW TO USE THE ADVANCED FUNCTIONS

14 www.electrolux.com
• When you select TURBO feature in
COOL mode, the unit will blow cool air
with strongest wind setting to jump-
start the cooling process.
• When you select TURBO feature in
HEAT mode, for units with Electric
heat elements, the Electric Heater will
activate and jump-start the heating
process.
AIR FRESH function
Hold down the Turbo/Fresh button for
at least 2 seconds to activate/cancel
FRESH feature.
When the FRESH function is initiated,
e-ffectively eliminates bacteria, virus,
microbes, and other harmful substances
and refresh the air.
SELF CLEAN function
Airborne bacteria can grow in the
moisture that condenses around heat
exchanger in the unit. With regular use,
most of this moisture is evaporated from
the unit.
When the Self clean feature is activated,
your unit will clean itself automatically.
After cleaning the unit will turn off
automatically.
You can use Self clean feature as often
as you like.
Note: You can only activate this function
in COOL or DRY mode.
INTELLIGENT EYE function
Mode FanON/OFF
Timer
LED
Turbo
Fresh
Self
clean
Follow
me
NOTE: Press and hold Temp + and –
buttons together for 3 seconds will
alternate the temperature display
between the OC & OF scale.
Hold together for one
second to activate
LOCK function
LOCK function
Press Turbo button and Self clean button
simultaneously for one second to lock or
unlock the keyboard.
Press the button to activate wind
flow follow people feature, the auto
swing feature is activated.
Press it again to stop the wind flow
follow people feature and the wind
flow away people feature is activated.
The auto swing feature is turned off.
Press it the third time to stop the wind
flow away people feature.
Note: The Intelligent eye function will
stop if you press ON/OFF, Mode, and
Swing buttons or under 8
0
C (46
0
F)
heating mode, self clean mode
operation.
Page is loading ...
Page is loading ...
Page is loading ...
Page is loading ...
Page is loading ...
Page is loading ...
Page is loading ...
Page is loading ...
Page is loading ...
Page is loading ...
Page is loading ...
Page is loading ...
Page is loading ...
Page is loading ...
Page is loading ...
Page is loading ...
Page is loading ...
Page is loading ...
Page is loading ...
Page is loading ...
Page is loading ...
Page is loading ...
Page is loading ...
Page is loading ...
Page is loading ...
Page is loading ...
Page is loading ...
Page is loading ...
Page is loading ...
Page is loading ...
Page is loading ...
Page is loading ...
Page is loading ...
Page is loading ...
Page is loading ...
Page is loading ...
Page is loading ...
Page is loading ...
Page is loading ...
Page is loading ...
Page is loading ...
Page is loading ...
Page is loading ...
Page is loading ...
Page is loading ...
Page is loading ...
Page is loading ...
Page is loading ...
Page is loading ...
Page is loading ...
Page is loading ...
Page is loading ...
Page is loading ...
Page is loading ...
Page is loading ...
Page is loading ...
Page is loading ...

www.electrolux.com/shop
-
 1
1
-
 2
2
-
 3
3
-
 4
4
-
 5
5
-
 6
6
-
 7
7
-
 8
8
-
 9
9
-
 10
10
-
 11
11
-
 12
12
-
 13
13
-
 14
14
-
 15
15
-
 16
16
-
 17
17
-
 18
18
-
 19
19
-
 20
20
-
 21
21
-
 22
22
-
 23
23
-
 24
24
-
 25
25
-
 26
26
-
 27
27
-
 28
28
-
 29
29
-
 30
30
-
 31
31
-
 32
32
-
 33
33
-
 34
34
-
 35
35
-
 36
36
-
 37
37
-
 38
38
-
 39
39
-
 40
40
-
 41
41
-
 42
42
-
 43
43
-
 44
44
-
 45
45
-
 46
46
-
 47
47
-
 48
48
-
 49
49
-
 50
50
-
 51
51
-
 52
52
-
 53
53
-
 54
54
-
 55
55
-
 56
56
-
 57
57
-
 58
58
-
 59
59
-
 60
60
-
 61
61
-
 62
62
-
 63
63
-
 64
64
-
 65
65
-
 66
66
-
 67
67
-
 68
68
-
 69
69
-
 70
70
-
 71
71
-
 72
72


Electrolux EPS12V57HWO User Manual For Accessories
- Type
- User Manual For Accessories
Ask a question and I''ll find the answer in the document
Finding information in a document is now easier with AI
in other languages
- dansk: Electrolux EPS12V57HWO
- svenska: Electrolux EPS12V57HWO
- suomi: Electrolux EPS12V57HWO
Related papers
Other documents
-
Midea RG57A6/BGEF User manual
-
Cooper&Hunter CH09MSPHWM-230VI Quick start guide
-
CH RHDZ-48-24/18WM User manual
-
EMI Deluxe Heat Ductless Split System Remote Controller User manual
-
NAPOLEON NHAS-12 User manual
-
Magnavox RG57H/BG Owner's manual
-
 Star Air Kontrol SAK-12-21MS/220V Installation guide
-
Cooper & Hunter CH-NY12MIA-230VO Owner's manual
-
-
Wilfa Trysil 650 User manual
