
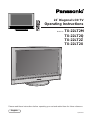
22˝ Diagonal LCD TV
Operating Instructions
TX-22LT2
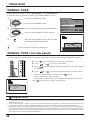
F.P. INDEX HOLD
PICTURE
SOUND
SET UP
TV/TEXT
ASPECT
TV/AV
1
2 3
4
5 6
7
8 9
0
SURROUND
TX-22LT2
Please read these instructions before operating your set and retain them for future reference.
English
Model No.
TX-22LT2M
TX-22LT2Q
TX-22LT2Z
TX-22LT2X
TQBC0534

2
Dear Panasonic Customer
Welcome to the Panasonic family of customers. We hope that you will have many
years of enjoyment from your new 22
″
Diagonal LCD TV.
To obtain maximum benefit from your set, please read these instructions before
making any adjustments, and retain them for future reference.
Retain your purchase receipt also, and note down the model number and serial
number of your set in the space provided on the rear cover of these instructions.
Warnings and Precautions.................................3
TV Games / Home Computers................................... 3
Cabinet and LCD panel care...................................... 3
Preparation................................................................. 3
Receiver Location ...................................................... 3
Optional External Equipment ..................................... 3
For optimum quality picture........................................ 3
How to use the LCD stand ......................................... 3
Before Operating This Set..................................4
Supplied Accessories ................................................. 4
Fitting remote control batteries................................... 4
Quick start Guide ................................................5
1. Choose Your Connection Type............................... 5
2. Connecting the AC Adaptor.................................... 6
3. Switch TV ON......................................................... 6
Connections ........................................................7
How to connect the input terminals ............................ 7
How to connect the AUDIO OUT terminals ................ 8
Connecting Headphones / Earphones ....................... 8
Using the On Screen Displays...........................9
Basic controls ...................................................10
Side panel controls and Remote control .................. 10
SETUP MENU..................................................... 12
TUNING MENU................................................... 13
Channel Selection .................................................... 13
AUTO TUNE ............................................................ 15
AUTO TUNE (via side panel) ................................... 15
MANUAL TUNE........................................................ 16
MANUAL TUNE (via side panel) .............................. 16
PICTURE ............................................................17
SOUND ...............................................................18
Stereo Bilingual Sound Selection..................... 19
ASPECT Controls.............................................. 20
Advanced Remote Control Operation ............. 21
TELE TEXT .............................................................. 21
VCR / DVD Operation .............................................. 23
Manufacturer setting ................................................ 24
Channel Allocation............................................25
Troubleshooting ................................................ 26
Maintenance ......................................................26
Specifications.................................................... 27
Table of Contents

3
Warnings and Precautions
• This TV set is designed to operate on DC 15V.
• To prevent damage which might result in electric shock
or fire, do not expose this TV set to rain or excessive
moisture. This TV must not be exposed to dripping or
splashing water, and objects filled with liquid, such as
vases, must not be placed on top of or above the TV.
• WARNING : HIGH VOLTAGE!!!
Do not remove the rear cover as live parts are
accessible when it is removed. There are no user
serviceable parts inside.
• TV Games / Home Computers
Extended use of TV games or home computers with
any television set can cause a permanent ‘shadow’ on
the screen. This type of irreversible LCD panel
damage, can be limited by observing the following
points:
•
Reduce the brightness and contrast levels to a
minimum viewing level.
•
Do not allow a still picture to be displayed for an
extended period, as this can cause a permanent after-
image to remain on the LCD TV screen.
•
Examples of still pictures include logos, video games,
computer images, teletext and images displayed in 4:3
mode.
•
This type of LCD panel damage, is not an operating
defect, and as such is not covered by the Panasonic
warranty.
• The On/Off switch on this model does not fully
disconnect the TV from the mains supply. Remove the
mains plug from the wall socket when the TV set is not
used for a prolonged period of time.
Note:
•
If the set is not switched off when the TV station stops
transmitting, it will automatically go to stand-by mode
after 30 minutes. This function will not operate when
the TV is in AV mode.
• Cabinet and LCD panel care
Remove the mains plug from the wall socket. The
cabinet and LCD panel can be cleaned with a soft, dry
cloth. Do not use water or solutions containing benzol
or petroleum.
• When ambient temperature is cool, the picture may
take a short time to reach normal brightness, but this
is not a malfunction. (After brief moment, the picture
will have normal brightness.)
• Adequate ventilation is essential to prevent failure of
electrical components, we recommend that a gap of
at least 10cm is left all around this television receiver
even when it is placed inside a cabinet or between
shelves.
• Avoid exposing the TV set to direct sunlight and other
sources of heat.
• Receiver Location
Locate for comfortable viewing. Avoid placing where
sunlight or other bright light (including reflections) will
fall on the screen.
Use of some types of fluorescent lighting can reduce
remote control transmitter range.
Adequate ventilation is essential to prevent internal
component failure. Keep away from areas of excessive
heat or moisture.
To insure optimum picture do not position magnetic
equipment (motors, fans, other speakers, etc.) nearby.
• Optional External Equipment
The Video/Audio connection between components can
be made with shielded video and audio cables. For
best performance, we recommend 75 ohm coaxial
aerial cable is used. Cables are available from your
dealer or electronic supply store.
Before you purchase any cables, be sure you know
what type of output and input connectors your various
components require. Also determine the length of cable
you’ll need.
• For optimum quality picture
When the LCD is exposed to light from outdoors or
lighting fixtures, high-contrast pictures may not be
displayed clearly. Turn off florescent lamps near the
LCD and place in a location not exposed to outdoor
light.
• How to use the LCD stand
Adjust the stand to your desired angle. The stand angle
can be adjusted between 0 ° to 15 ° back, 30 ° left and
30 ° right.
Preparation

4
F.P. INDEX HOLD
PICTURE
SOUND
SET UP
TV/TEXT
ASPECT
TV/AV
1
2 3
4
5 6
7
8 9
0
VCR
SURROUND
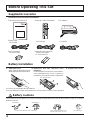
Battery Installation
Before Operating This Set
Supplied Accessories
Check the accessories before installations.
•
Operating Instruction book
•
Remote Control Transmitter
•
AC Adaptor
•
Batteries for the Remote
Control Transmitter
(2 × R6 (AA) size)
•
Mains Lead
TX-22LT2M
TX-22LT2Q/Z TX-22LT2X
•
AC Plug Adaptor
TX-22LT2X only
Old Batteries New Batteries
Replace both batteries at the same time. Don't mix diffrent battery types.
(alkaline with carbon zinc, etc.)
Don't Recharge.
3 Replace the cover.
Do not use rechargeable (Ni-Cd) batteries.
They are different in shape and performance and may fail to ensure correct operation.
The incorrect use of batteries can cause electrolyte leakage which will corrode the Remote Control or cause the
batteries to burst.
Battery cautions
Two “R6 (AA)” size
2
Batteries: Use two “R6 (AA)” size
batteries.
Insert the batteries ensuring the correct polarities.
This is identifiable by the “+” and “−” symbols on
the batteries and inside the battery compartment.
Open the cover.
Apply slight downward pressure
while pulling towards the bottom.
1

5
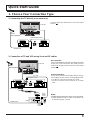
Quick start Guide
1. Choose Your Connection Type
1. Connecting the TV directly to an aerial only
Connect the Aerial lead into the TV Aerial Input
socket (
).
Aerial Input socket
Aerial
(Not Supplied)
LCD TV
Aerial Lead
VCR
Aerial Input socket
RF cable
Aerial
(Not Supplied)
LCD TV
Aerial Lead
Aerial
Output
socket
Aerial
Input
socket
Scart socket
AV1,AV2
Scart sockets
Scart cable
RF connection
Connect the AERIAL lead to the Aerial input socket
of the VCR and connect the RF cable from the
VCR Aerial Output socket to the TV Aerial Input
socket ( ).
Scart Connections
The VCR can also be connected to the TV using a
Scart cable if you are using a Scart equipped VCR.
• Use the TV’s AV1 Scart socket for a VCR.
• Use the TV’s AV2 Scart socket for an S Video
VCR.
Notes:
• Additional equipment and cables are not supplied.
• Further details of audio / video connections can
be found on pages 7 and 8.
2. Connection of TV and VCR using Scart and RF cables

6
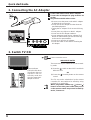
Quick start Guide
2. Connecting the AC Adaptor
2
1
3
1 Connect the mains lead to the AC Adaptor.
2 Connect the AC Adaptor DC plug to the DC IN
socket.
3 Plug into household mains socket.
• Be sure to use the power cord and AC adaptor
included in the accessories.
• Do not use the AC adaptor for other than the
specified equipment.
• Unplug the AC adaptor if it is not used for long
time.
• Do not place any objects on the AC adaptor.
• Do not use the AC adaptor outdoors.
• Do not attempt to repair the AC adaptor if it is
broken or malfunctioning. Refer the servicing
to the service representative.
• Do not try to open the AC adaptor.
• Do not use water or wet cloth for cleaning the
AC adaptor.
3. Switch TV ON
Power-Indicator
The RED LED when
lit indicates that not
only the TV set is in
stand-by mode but
also the external AC
adaptor is still on.
TX-22LT2
Press to turn the set on.
IMPORTANT NOTES
There are two ways to switch the TV set to stand-
by mode.
(A) Press the switch on the LCD TV and check
RED LED is lit.
OR
(B) Press the Stand-by button on the remote
control.
The TV set can be switched on by the remote
controller if it was switched to stand-by using
method (A) or method (B).
When programme number up ( )/down ( )
buttons on the side panel of the main part or
on the remote control are pressed in stand-by
mode, TV turns on.

7
Connections
How to connect the input terminals
Connects VCRs and other peripheral equipment
S VIDEO
cable
VIDEO
cable
AUDIO
cable
Audio
OUT
RL
S Video
OUT
Video
OUT
Connect the S VIDEO or
VIDEO Terminal.
AV1 Scart Socket
Input/Output from
AV1 Scart Socket
Scart cable
Scart socket Scart socket
Connection example:
AV3 connection
Connection example:
AV1,2 connection
AV2 Scart Socket
Input/Output from
AV2 Scart Socket
VCR
SET TOP BOX
DVD PLAYER
CAMCORDER
GAMES CONSOLE
VCR/S VHS VCR
DVD PLAYER
Scart cable
VCR/S VIDEO VCR
SET TOP BOX
DVD PLAYER
CAMCORDER
S VIDEO CAMCORDER
Notes:
• Additional equipment and cables shown are not supplied with this TV set.
• Do not connect a computer with TTL output (5V) to this set.
• The AV2 21 pin socket can also be used as an output to Audio/Video equipment. (see page 5)
• Select the desired VIDEO input position by pushing the TV/AV button. (see page 10, 11)
• For Scart socket wiring information see page 27.

8
Connections
How to connect the AUDIO OUT terminals
AUDIO IN
L
R
3.5 mm stereo plug
to stereo phono lead.
Notes:
• The AUDIO OUT terminal provides a fixed level output only.
(The menu settings and remote control volume controls have no effect.)
• Additional equipment and cables shown are not supplied with this TV set.
Amplifier to speaker system
Connecting Headphones / Earphones
Connect headphones / earphones as follows.
(Optional)
(Not supplied)
(3.5 mm stereo plug)
Notes:
• The volume level of the headphones can be adjusted by selecting “HEADPHONE VOL.” from the SOUND.
• Additional equipment and cables shown are not supplied with this TV set.

9
N
DVD
REC
-
VCR
STR
TV/AV
1 2 3
456
789
0
F.P.
INDEX HOLD
PICTURE
SOUND
SET UP
TV/TEXT
ASPECT
SURROUND
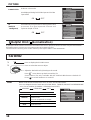
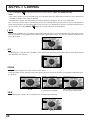
Using the On Screen Displays
Many features available on this TV can be accessed via the On Screen Display menu system. Use the remote control
as shown below to access and adjust features as desired.
Press to move the cursor up and down on the menu.
Press to access menus, adjust levels or to select from a range of options.
An On Screen Help box is displayed whenever a menu
is displayed on the TV. This Help box indicates which
keys on the remote control are used to navigate the menu
shown, see above for descriptions of button functions.
Please refer to the On Screen Help
Note:
• If the On Screen Menu is opened in ZOOM mode, the screen will be switched into 16:9 aspect ratio.
The screen will return to ZOOM mode after exiting the On Screen Menu.
Press to display “SOUND” screen.
BASS
TREBLE
HEADPHONE VOL.
SURROUND
VOLUME
BALANCE
SOUND
OFF
MENU
STANDARD
SYS SELECT
AUTO TUNE
MANUAL TUNE
SOUND SYS
COLOUR SYS
SKIP
CH SELECT DIRECT
FINE TUNE
TUNING MENU
ASIA/M. EAST
5.5MHz
AUTO
OFF
ACCESS
ACCESS
Press to display “SETUP MENU”
screen.
SYS SELECT
AUTO TUNE
MANUAL TUNE
SOUND SYS
COLOUR SYS
SKIP
FINE TUNE
TUNING MENU
ASIA/M. EAST
5.5MHz
AUTO
OFF
ACCESS
ACCESS
Note:
• Models intended for markets other than Australia (TX-22LT2Q) have the CH SELECT function (see page 14).
Examples in this manual show a model that has the CH SELECT function.
TELETEXT
FASTEXT
SETUP MENU
TEXT SELECT
OFF TIMER
CH COLOUR SET
VCR/GAME
OFF
OFF
ENGLISH
CHILD LOCK
OFF
TUNING MENU
ACCESS
Press to display “PICTURE” screen.
CONTRAST
BRIGHTNESS
COLOUR
SHARPNESS
COMB FILTER
AI
BACKLIGHT
MENU
C.TEMP
PICTURE
DYNAMIC
STANDARD
ON
ON
EXIT
RETURN
TV/AV
SEARCH —/+
PROGRAMME —/+
BUTTON
STORE
STR
MANUAL TUNE
CH 2
2
ON SCREEN HELP
‘Instruction’ box
For Australia (TX-22LT2Q) only
STR
Press to store settings after adjustments have been made or options have been set.
TV/AV
Press to exit the menu system and return to the normal viewing screen.

10
TV/TEXT Selection (see page 21, 22, 23)
PICTURE
(see page 17, 18)
SOUND
(see page 18)
TEXT Favourite Page Selection
(see page 22)
SURROUND (see page 19)
ASPECT Controls (see page 20)
Stereo/Bilingual Sound Selection
(see page 19)
VCR / DVD Rewind / Review
Normalization / Normalise
(see page 18, 19)
SETUP MENU
(see page 12)
Recall
Press the Recall button to display
the current system status, for
example, Programme number,
Channel number, Stereo mode,
Aspect mode, Sound menu,
Picture menu.
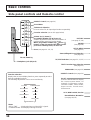
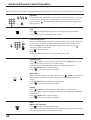
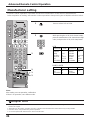
Basic controls
Side panel controls and Remote control
ASPECT Control (see page 20)
Sound Mute
TV/AVmode Selection
Press to select TV, AV input signal modes sequentially.
TV ON / Stand-by
Headphone Jack (M3 jack)
Function selection (see on this page below)
Volume Up (+), Down (-)/
Programme Number Up (
), Down ( )
Volume adjustment which uses these buttons is
performed after pressing Function button.
When programme number up ( )/down ( )
buttons on the side panel of the main part are
pressed in stand-by mode, TV turns on.
Store (see page 14 - 16, 22)
Function selection
Displays the on screen display functions, press repeatedly to select
from the available functions.
The following adjustments can be accessed directly.
VOLUME
BACKLIGHT
CONTRAST
BRIGHTNESS
COLOUR
TUNING MODE
BALANCE
TREBLE
BASS
NTSC-TINT
SHARPNESS
Notes:
• NTSC-TINT : Displayed when receiving NTSC signals.
• TUNING MODE : Not displayed during AV mode.

11
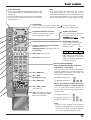
N
DVD
REC
-
VCR
STR
TV/AV
1 2 3
456
789
0
F.P.
INDEX HOLD
PICTURE
SOUND
SET UP
TV/TEXT
ASPECT
SURROUND
Basic controlsBasic controls
Power (Stand-by)
The TV set must first be plugged into the wall outlet
and turned on at the TV ON / Stand-by button on the
side panel.
Press this button to turn the TV set On from Standby
mode, press it again to turn the TV set OFF to
Standby mode.
Note:
• It is also possible to turn the TV set on from
STANDBY mode by pressing the “Direct
Programme Number Selection” Buttons (0-9) and
the “Programme Number Up or Down” Button,
either on the side panel or on the Remote Control.
Sound Mute
Press to mute the sound completely the “ ” symbol will appear.
Press again to restore the previous sound level, and cancel the mute.
TEXT Index (see page 22)
TEXT hold (see page 22)
Direct Programme Number
• Direct Programme Number Selection
(CH SELECT = POSITION)
You can select the numbers directly by
pressing “Number 0-9” button and the two
digit Numbers by pressing “Two Digit” and
“Programme Number” buttons.
Programme Number 8 .......
8
Programme Number 12...... ,
1
,
2
• Direct Programme Number Selection
(CH SELECT = DIRECT ; except TX-22LT2Q)
You can select the number directly by
pressing the corresponding programme
number button.
Programme Number 8.......
8
Programme Number 36.....
3
,
6
Programme Number 124...
1
,
2
,
4
Note:
• When the Skip setting for Programme
Number 100 through 125 is on, the channel
selection time will be shortened, and thus
you can not input three digits at a time.
VCR / DVD Play
VCR / DVD
Fast Forward / cue
VCR / DVD Stop
VCR / DVD Control
(see page 23)
Store (see page 14 - 16, 22)
Stores some settings in TUNING
MENU and TELETEXT.
Programme Number Selection
Press to select the next higher or
lower Programme number.
Volume Adjustment
Press to increase or decrease
the sound volume level.
TV/AV Mode Selection
Press to select TV, AV input
signal modes sequentially.
Coloured buttons used for ASPECT
control (see page 20)
Teletext functions (see page 21, 22, 23)
AV Selection
AV1 AV2/S AV3/S
Remote control :
Press to display AV1 - AV3/S at the
bottom of the screen. Each coloured
button corresponds to each input
signals. For example, pressing the
Red button selects AV1.
TV/AV
VOLUME
24

12
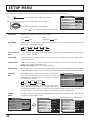
SETUP MENU
The setup menu provides access to various advanced features and also to the Tuning menu.
1 Press to display the setup menu screen.
2 Press to select the menu to adjust.
Press to adjust the desired setting.
Press
TV/AV
at any time to go back to watching TV.
SET UP
Allows you to choose 2 modes. (See page 21)
TOP LIST
FASTEXT LIST
•TX-22LT2Q •other
TELETEXT
TELETEXT
OFF TIMER
CH COLOUR SET
VCR/GAME
TEXT SELECT
OFF
OFF
ENGLISH
FASTEXT
CHILD LOCK
OFF
TUNING MENU
ACCESS
SETUP MENU
OFF TIMER
CH COLOUR
SET
VCR/GAME
TEXT SELECT
CHILD LOCK
COLOUR
SYS
TUNING
MENU
Switches the TV off within a preset time which you can choose from between 0 to 90
minutes in 15 minute intervals.
Colour density varying between broadcast channels can be adjusted to three levels for
each reception channel.
Reproduction of irregular signals, such as certain TV games and rental video tapes,
may be improved.
Select character set, so that all characters needed are available for text on teletext
pages (eg: cyrillic characters, etc).
Mode Languages: ENGLISH/CIS/E.EUROPE
When ON, picture and sound of the TV/AV mode being viewed will disappear and a Black
screen will appear. CHILD LOCK can be set for each programme number and each AV mode.
During AV mode, COLOUR SYSTEM is displayed.
If a clear picture with current colours cannot be
obtained when a Broadcast or AV signal is received,
this function is used.
PAL, SECAM and NTSC 3.58 are different colour
signal broadcast transmission systems applicable
to differing countries. NTSC 4.43 is a trick playback mode used in special VCR’s to
playback NTSC recorded video tapes through PAL television equipment.
Provides access to many other features including SYS SELECT and AUTO TUNE. (See page 14)
Not displayed during
A
V mode.
OFF
607590
3015 45
AUTO PAL
NTSC3.58 NTSC4.43
SECAM
CH COLOUR SET
VCR/GAME
TEXT SELECT
OFF
ENGLISH
CHILD LOCK
OFF
SETUP MENU
TELETEXT FASTEXT
OFF TIMER
OFF
COLOUR SYS
AUTO
CH COLOUR SET
VCR/GAME
TEXT SELECT
OFF
ENGLISH
CHILD LOCK
OFF
SETUP MENU
TELETEXT FASTEXT
OFF TIMER
OFF
TUNING MENU
ACCESS
SYS SELECT
AUTO TUNE
MANUAL TUNE
SOUND SYS
COLOUR SYS
SKIP
CH SELECT DIRECT
FINE TUNE
TUNING MENU
ASIA/M. EAST
5.5MHz
AUTO
OFF
ACCESS
ACCESS
SYS SELECT
AUTO TUNE
MANUAL TUNE
SOUND SYS
COLOUR SYS
SKIP
FINE TUNE
TUNING MENU
ASIA/M. EAST
5.5MHz
AUTO
OFF
ACCESS
ACCESS
For Australia (TX-22LT2Q) only

13
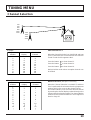
TUNING MENU
Channel Selection
Select the most easily viewed channel selection method.
14ch
16ch
18ch
20ch
12ch
10ch
8ch
6ch
4ch
2ch
Example
Programme
Number
Channel
Display
Received
Channel
1
2
3
4
5
6
7
8
9
10
2
4
6
8
10
12
14
16
18
20
2
4
6
8
10
12
14
16
18
20
Example
Programme
Number
Channel
Display
Received
Channel
1
2
3
4
5
6
7
8
9
10
20
–
2
–
4
–
6
–
8
–
10
20
–
2
–
4
–
6
–
8
–
10
20
POSITION SELECT
When the Channel Selection is on POSITION, and Auto
Tune is performed, the unit memorises the channels
Tuned in order from Programme No.1.
Press the button
1
to view channel 2.
Press the button
2
to view channel 4.
Press the button
3
to view channel 6.
During Position mode various reception channels can
be viewed.
DIRECT SELECT
[
Except TX-22LT2Q
]
When the Channel Selection is on DIRECT, and Auto
Tune is performed, the unit memorises the programme
number which is the same as the channel Tuned.
This method allows you to select the desired channel
by pressing the channel display number directly on the
remote control to select the station. The channel display
numbers for the broadcast stations in each region are
listed on Page 25.

14
1 Press to display the SETUP MENU.
2 Press to select the TUNING MENU.
Press to access the TUNING MENU screen.
3 Press to select the menu to adjust.
Press to adjust option or access chosen menu.
TUNING MENU
[
Except TX-22LT2Q
]
Select the most easily viewed channel selection method. (See page 13)
Select the system.
CH SELECT
(Channel Selection)
SYS SELECT
(System Selection)
CHINA
HK/UK
ASIA/M.EAST NZ/INDONES AUSTRALIA
JAPAN CATV AMERICA
SPECL VER
E.EUROPE
SYSTEM SELECT
REGION
CHINA
HK/UK
ASIA/M.EAST
NZ/INDONES
AUSTRALIA
E
.
EUROPE
SPECL VER
AMERICA
CATV
JAPAN
China
Hong Kong, United Kingdom
Malaysia, Singapore, Thailand, Asia countries, Kuwait, Saudi Arabia, United Arab Emirates, Middle East countries, etc.
New Zealand, Indonesia, etc.
Australia
CIS, Poland, etc.
South Africa
U.S.A., Chile, Mexico, Panama, Pelu, Philippines, Taiwan, Venezuela, etc.
USA CATV
Japan
System Select by Region
Allows you to automatically retune the TV. Useful if you move house and wish
to retune your TV to the local stations. (See page 15)
Allows individual program positions to be tuned, manually. (See page 16)
You can change the sound system used for a programme channel.
Choose the required sound system:
Lets you select the correct transmission standard for the transmission signal
being received (See page 12).
Use to make small adjustments to the tuning of an individual station (useful for
example when weather conditions are affecting reception quality of a program).
To cancel the FINE TUNE, tune again by MANUAL TUNE.
It is possible to skip Program Number on which no TV stations are tuned appearing on
the screen. The function is only effective when pressing the Program Number UP or
DOWN button either on the TV set or on the remote control.
4.5 MHz 5.5 MHz
6.5 MHz 6.0 MHz
SYS SELECT
AUTO TUNE
MANUAL TUNE
SOUND SYS
COLOUR SYS
SKIP
CH SELECT DIRECT
FINE TUNE
TUNING MENU
ASIA/M. EAST
5.5MHz
AUTO
OFF
ACCESS
ACCESS
CH COLOUR SET
VCR/GAME
TEXT SELECT
OFF
ENGLISH
CHILD LOCK
OFF
SETUP MENU
TELETEXT FASTEXT
OFF TIMER
OFF
TUNING MENU
ACCESS
AUTO PAL
NTSC3.58 NTSC4.43
SECAM
AUTO TUNE
MANUAL TUNE
SOUND SYS
(Sound System)
COLOUR SYS
(Colour System)
FINE TUNE
SKIP
POSITION DIRECT
PICTURE
SOUND
SET UP
TV/AV
STR
HELP
Press at any time to go back to watching TV.
Pressing this button after having adjusted a
feature will store the setting as the default
(replacing the factory setting).
PICTURE
SOUND
SET UP
TV/AV
STR
HELP

15
TUNING MENU
AUTO TUNE
Before AUTO TUNE, set the “CH SELECT” and “SYS SELECT”.
Follow the step on the previous page to display the TUNING MENU screen.
AUTO TUNE (via side panel)
It is also possible to use the control panel buttons on the side of the TV to tune individual programme positions.
1 Press (Side panel) until Tuning mode is reached.
2 Press or to access Tuning mode.
3 Press (Side panel) to access Auto tune.
4 Press or to start search.
Press at any time to exit the Tuning menu.
1. If a clear picture with correct colours cannot be obtained when a Broadcast or AV signal is received, refer to the “Colour System
Selection” operation on page 14.
2.
After the Automatic tune is finished, press the Programme Number “Up” Button to confirm the tuning condition for each Programme
Number. If some Programme Numbers are unused, it is possible to skip such Programme Numbers. Please refer to the Programme skip
function on page 14.
Helpful Hint
1 Press to select AUTO TUNE.
Press to access AUTO TUNE.
Notes:
• If you proceed with the next step all tuning data will be erased (all stations
and their programme positions stored in your TV's memory will be wiped out
so that the new settings can be stored).
• If you exit the procedure after this point and before AUTO TUNE is
complete, no station information will be stored. Restart and complete
the AUTO TUNE procedure so that the TV is re-tuned.
2 Press to start AUTO TUNE.
Once this operation is completed the TV will display the program now
stored on programme position 1.
SYS SELECT
MANUAL TUNE
SOUND SYS
COLOUR SYS
5.5MHz
SKIP
OFF
AUTO
ASIA/M. EAST
CH SELECT
DIRECT
ACCESS
FINE TUNE
TUNING MENU
AUTO TUNE
CH 29
29
AUTO SETUP IN PROGRESS
SEARCHING :
SETUP : RETURN TO TUNING MENU
TV/AV : TO EXIT
STORED CH29
TV/AV
Press at any time to go back to watching TV (please read
the Note in the above procedure).

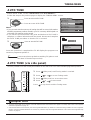
16
1 Press to select MANUAL TUNE.
Press to access MANUAL TUNE.
2 Press to select the desired Programme Number.
Press to search the higher or lower channel.
3 When the desired station is found, press to store.
The programme position will flash.
Press at any time to go back to watching TV.
SYS SELECT
SOUND SYS
COLOUR SYS
5.5MHz
SKIP
OFF
AUTO
ASIA/M. EAST
CH SELECT
DIRECT
FINE TUNE
TUNING MENU
AUTO TUNE
ACCESS
MANUAL TUNE
TUNING MENU
MANUAL TUNE
Before MANUAL TUNE, set the “CH SELECT” and “SYS SELECT”.
Follow the step on page12 to display the TUNING MENU screen.
EXIT
RETURN
TV/AV
SEARCH –/+
PROGRAMME –/+
BUTTON
STORE
’STR’
MANUAL TUNE
CH 2
2
MANUAL TUNE (via side panel)
It is also possible to use the control panel buttons on the side of the TV to tune individual programme positions.
CH 2
5.5 MHz
2
MANUAL TUNE (SIDE PANEL)
—/+ : SEARCH
TV/AV : MOVE CURSOR
STR : TO STORE
F : TO EXIT
1 Press (Side panel) until Tuning mode is reached.
2 Press or to access Tuning mode.
3 Press to move between Change programme, Search and Change
TV system.
4 Press or to change programme position or start search.
When the desired station is found, press to store.
The programme position will flash.
Repeat above procedure to tune additional programme positions.
Press at any time to exit the Tuning menu.
1. If a clear picture cannot be obtained even when a Broadcast or AV signal is received, refer to the “Colour System Selection”
operation on page 14.
2. After the Manual tune is finished, press the Programme Number “Up” Button to confirm the tuning condition for each
Programme Numbers. If some Programme Numbers are unused, it is possible to skip such Programme Numbers.
3. When using a VCR without video and audio input/output terminals, it is convenient to connect the aerial cable as indicated
in the instruction manual of VCR and to set the designated channel to programme No.“0”. In that case, perform manual tune
after setting the colour system and sound system in advance. Further, in multi-system VCR, it is more convenient to set the
designated channel to several programme Numbers.
Helpful Hint
PICTURE
SOUND
SET UP
TV/AV
STR
HELP
TV/AV

17
PICTURE
Brightness of the back light is adjusted.
Adjust for contrast.
Adjusts for easier viewing of dark pictures such as night scenes and hair.
Adjusts slightly to a lighter.
Displays a sharp image.
Adjusts the picture hue.
Function
BACKLIGHT
CONTRAST
BRIGHTNESS
COLOUR
SHARPNESS
NTSC-TINT
1 Press to display the PICTURE screen.
2 Press to select the menu to adjust.
Adjust the desired level by looking at the picture behind the menu.
3 Press to exit from the PICTURE screen.
This returns the set to the normal viewing condition.
TV/AV
PICTURE
CONTRAST
BRIGHTNESS
COLOUR
SHARPNESS
COMB FILTER
ON
BACKLIGHT
PICTURE
C.TEMP
STANDARD
AI
ON
DYNAMIC
MENU
MENU mode will be memorized for each TV, AV1, AV2 and
AV3 mode.
MENU
CINEMADYNAMIC STANDARD
Notes:
• When the TV is receiving NTSC Signals, NTSC-TINT is displayed and level adjustment is possible.
• Only BACKLIGHT and CONTRAST will be displayed during TEXT mode.
BACKLIGHT, CONTRAST, BRIGHTNESS, COLOUR, SHARPNESS, NTSC-TINT
You can change the level of each Item (BACKLIGHT, CONTRAST, BRIGHTNESS,
COLOUR, SHARPNESS, NTSC-TINT) for each MENU (DYNAMIC, STANDARD
and CINEMA) according to your personal preference.
With an NTSC-TINT signal source connected to the TV, the picture hue can be
adjusted to suit your taste.
Less
More
Less
More
Less
More
Less
More
BrighterDarker
BrighterDarker
Item
CONTRAST
BRIGHTNESS
COLOUR
SHARPNESS
COMB FILTER
ON
C.TEMP
STANDARD
AI
BACKLIGHT
MENU
DYNAMIC
ON
PICTURE
Effect
Function
Displays a bright screen with maximum contrast.
Displays standard image.
Ideal for movies in the dark room.
MENU
DYNAMIC
STANDARD
CINEMA
C.TEMP
AIlows you to set the overall colour tone of the picture.
WARMSTANDARDCOOL
CONTRAST
BRIGHTNESS
COLOUR
SHARPNESS
COMB FILTER
ON
AI
BACKLIGHT
MENU
DYNAMIC
ON
PICTURE
C.TEMP
STANDARD

18
COMB FILTER
Reduces colour noise.
Not displayed during RGB Video input and S Video
input mode.
CONTRAST
BRIGHTNESS
COLOUR
SHARPNESS
COMB FILTER
BACKLIGHT
MENU
DYNAMIC
PICTURE
C.TEMP
STANDARD
AI
ON
ON
PICTURE
Automatically analyses the incoming picture and
processes it to give improved contrast and
optimum depth of field.
AI
(Artificial
Intelligence)
CONTRAST
BRIGHTNESS
COLOUR
SHARPNESS
COMB FILTER
ON
BACKLIGHT
MENU
DYNAMIC
PICTURE
C.TEMP
STANDARD
AI
ON
ON OFF
ON OFF
Helpful Hint ( Normalization)
By pressing the Normal “N” Button on the Remote Control while the Picture menu is displayed, the selected menu will be changed to the Normal Mode.
Normalization will not occur if the menu is not displayed when the “N” Button is pressed.
The Normal mode is the factory preset condition. Returning to this original condition is called “Normalization”.
SOUND
1 Press to display the SOUND screen.
2 Press to select the menu to adjust.
Adjust the desired level by listening to the sound.
SOUND
BASS
TREBLE
HEADPHONE VOL.
SURROUND
VOLUME
BALANCE
SOUND
OFF
MENU
STANDARD
Press
TV/AV
at any time to go back to watching TV.
Some features are only available with the SURROUND feature switched off.
Press to switch between On and Off.
MENU MENU mode will be memorized for each TV, AV1, AV2 and AV3 mode.
•You can change the level of each Item (VOLUME, BASS, TREBLE, BALANCE and HEADPHONE
VOL.) for each MENU (DYNAMIC, STANDARD and SOFT).
MENU Function
DYNAMIC
STANDARD
SOFT
Amplifies the Low frequencies and outputs
optimum sound.
For music programmes for example.
For Normal use.
Human voices (middle pitch sounds) will
sound more clear.
SOFTDYNAMIC STANDARD

19
Notes:
• If the stereo signal is poor or the receiving conditions are not optimum or if STEREO:MONO automatic switching
occurs, it is recommended you switch from STEREO to MONO.
• Even when the contents of the receiving signal undergo changes, selection mode is kept intact.
• When the receiving conditions deteriorate, listening will be easier if the mode is set to the “MONO” position, using
the stereo/bilingual sound selection button.
• “DUAL”, also known as “DUAL MONO” or as “BILINGUAL” is not currently transmitted in some countries.
To enjoy a concert hall effect, turn SURROUND to on.
Switching is also possible by pressing the
button.
SURROUND
Off
BASS
TREBLE
HEADPHONE VOL.
SURROUND
VOLUME
BALANCE
SOUND
ON
MENU
STANDARD
The benefits of SURROUND sound are enormous. You can be completely enveloped in
sound; just as if you were at a concert hall or cinema.
The SURROUND effect can be obtained without the use of external SURROUND speakers.
SURROUND ON SURROUND OFF
Helpful Hint ( Normalization)
By pressing the Normal “N” Button on the Remote Control while the Picture menu is displayed, the selected menu will be changed to the Normal Mode.
Normalization will not occur if the menu is not displayed when the “N” Button is pressed.
The Normal mode is the factory preset condition. Returning to this original condition is called “Normalization”.
Press to switch between
ON and OFF.
ON OFF
Type of broadcast
Mode Indicator
Type of broadcast
Mode Indicator
Regular broadcast
(Standard Audio)
NICAM STEREO
STEREO
Mode Indicator
NICAM .......Used in New Zealand, Malaysia, Thailand, Indonesia etc.
I
No Indicator
Regular broadcast
(Standard Audio)
No Indicator
II
I
I
II
I
II
Regular + NICAM MONO I
(MAIN I )
NICAM DUAL MONO
(MAIN I / SUB II )
BILINGUAL or DUAL MONO:
MAIN I / SUB II
A2(German) .......Used in Australia, Malaysia,Singapore, China.
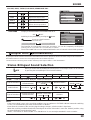
Audio Signal
STEREO MAIN I SUB II MONO
When you receive the stereo/bilingual sound system, sound output modes can be selected
by pressing the stereo/bilingual sound selection button.
Stereo Bilingual Sound Selection
VOLUME, BASS, TREBLE, BALANCE, HEADPHONE VOL.
BASS
TREBLE
HEADPHONE VOL.
SURROUND
VOLUME
BALANCE
SOUND
OFF
MENU
STANDARD
Less
Less
Less
Left SP
Less
More
More
More
Right SP
More
Item
VOLUME
BASS
TREBLE
BALANCE
HEADPHONE VOL.
Effect Function
Adjusts output volume.
Adjusts lower deeper sounds.
Adjusts higher sharper sounds.
Adjusts the sound level difference
between left and right speakers.
Adjusts Headphone volume.
SOUND

20
ASPECT Controls
Press the ASPECT to move through the four aspect options: JUST, 4:3, ZOOM and 16:9.
Notes:
• The screen modes (JUST/4:3/ZOOM/16:9) are selectable manually (wide-aspect modes are not automatically
selected if a wide-screen signal is applied).
• During Aspect change, the displayed picture will momentarily disappear. This is not a malfunction.
The on screen selector keys (corresponding to the two coloured buttons on the remote control) will appear for
some Aspect functions and disappear after a few seconds. If you would like to select an operation when the keys
are not shown, press the ASPECT button once more and the keys will reappear.
JUST
JUST mode will display a 4:3 picture at maximum size but with aspect correction applied to the center of the screen
so that elongation is only apparent at the left and right edges of the screen. The size of the picture will depend on
the original signal.
JUST
4:3
4:3 will display a 4:3 picture at its standard 4:3 size without any stretching. Black stripes will be visible down the left
and right sides of the picture.
4 : 3
4 : 3
ZOOM
ZOOM mode magnifies the central section of the picture.
Press the yellow or blue buttons to move the picture vertically (useful when there are sub-titles positioned below
the picture).
Blue button has been pressed
to move picture upwards
ZOOM
ZOOM
V-POS− V-POS+ V-POS− V-POS+ V-POS− V-POS+
ZOOM ZOOM
Yellow button has been pressed
to move picture downwards
16:9
16:9 will display the picture at its maximum size but with slight stretching.
16 : 9
16 : 9
Page is loading ...
Page is loading ...
Page is loading ...
Page is loading ...
Page is loading ...
Page is loading ...
Page is loading ...
Page is loading ...
-
 1
1
-
 2
2
-
 3
3
-
 4
4
-
 5
5
-
 6
6
-
 7
7
-
 8
8
-
 9
9
-
 10
10
-
 11
11
-
 12
12
-
 13
13
-
 14
14
-
 15
15
-
 16
16
-
 17
17
-
 18
18
-
 19
19
-
 20
20
-
 21
21
-
 22
22
-
 23
23
-
 24
24
-
 25
25
-
 26
26
-
 27
27
-
 28
28


Panasonic TX22LT2Z Operating instructions
- Category
- LCD TVs
- Type
- Operating instructions
Ask a question and I''ll find the answer in the document
Finding information in a document is now easier with AI
Related papers
-
Panasonic TC20LA2H Operating instructions
-
-
-
-
-
-
-
-
-