Armstrong Magic-Pak PVVC24ElO.7 User manual

Category
Split-system air conditioners
Type
User manual
INSTALLATION AND
MAINTENANCE INSTRUCTIONS
PWC Series "Magic-Pak"
Self-Contained Heat Pump
[ WARNING
Improper installation, adjustment, alteration, service or maintenance can cause injury
or property damage. Refer to this manual. For assistance or additional information,
consult a qualified installer or service agency.
I _'WARNING I
For your safety, do not store or use gasoline or
other flammable vapors and liquids in the
vicinity of this or any other appliance. Such
actions could result in property damage, per-
sonal injury or death.
Installation and servicing of air conditioning
equipment can be hazardous due to internal
refrigerant pressure and live electrical compo-
nents. Only trained and qualified service
personnel should install or service this equip-
ment. Installation and service performed by
unqualified persons can result in property
damage, personal injury or death.
] A CAUTION I
These units are not approved for mobile home
applications. Such use could result in prop-
erty damage, p_rsonal injury or death.
TABLE OF CONTENTS
INSTALLATION ....................................... 2
OPERATION .......................................... 5
MAINTENANCE ..................................... 6
WIRING DIAGRAMS .............................. 7
WARRANTY ......................................... 10
ManufacturedBy
A.A.C.
A Lennox International Company
421 MonroeStreet
Bellevue,OH 44811
IIIIIIIIIIII)llllllllllllllllllllllllll}lilllllll
I A CAUTION [
The installation of this appliance must conform to the requirements of the National Fire Protection Associa-
tion; the National Electrical Code, ANSl/NFPA No. 70 (latest edition) in the United States; the Canadian
Electrical Code Part 1, CSA 22.1 (latest edition) in Canada; and any state or provincial laws or local ordi-
nances. Local authorities having jurisdiction should be consulted before installation is made. Such appli-
cable regulations or requirements take precedence over the general instructions in this manual.
Save these instructions for future reference
INSTALLATION
General
=.seinstructions explain the recommended method of
,llation of the PWC heat pump unit and associated
e_uctricalwiring.
the unit inside the carton ifthe carton isdamaged. File a
cfaimwith the transportation company. If any damages
are discovered and reported to the carrier DO NOT
INSTALL THE UNIT, as claim may be denied.
Check the unit rating p'late to confirm specifications
are as ordered.
This unit is designed and approved for use as a self-
contained air to air heat pump system.
These instructions, and any instructions packaged with
mating components and/or accessories, should be carefully
read prior to beginning installation. Note particularly any
CAUTIONS or WARNINGS in these instructions and all la-
bels on the units.
These instructions are intended as a general guide only,
for use by qualified personnel and do not supersede any
national or local codes in any way. Compliance with all
local, state, provincial or national codes pertaining to this
type of equipment should be determined priorto installa-
tion.
Inspection
Upon receipt of equipment, carefully inspect itfor possible
shipping damage. If damage is found, it should be noted
on the carrier's freight bill. Take special care to examine
Location
The design is certified for through-the-wall installation only.
The interior portions of the unit may be surrounded by a
closet with clearances to combustible material held to 0" at
sides, 0" top and 0" front ofthe plenum.
The grille side of the unit may be flush with, or extend
beyond, the face of the exterior wall, but should not be
recessed more than 2" from the face of the building and
should not be obstructed with trees, landscape materials
or building structure.
There is no minimum clearance required on locating the
unit to an interior corner of a building. If the unit is to be
enclosed, provisions should be made allowing access to
the indoor side of the unit for changing filters and for
inspection. At least 33" of unobstructed space should be
provided infront ofthe indoor side, whether enclosed or
not, to permit removal of the cooling chassis should
repairs or inspection be required.
PWCInstallation
Sleeve
F MinimumOpening to
Align with ReturnAir Opening
In Unit.
VibrationIsolating Matedal
{TopLayer)
Fin-re 1
If the unitis installed in a residential garage, it must be
located or protected to avoid physical damage by vehicles.
The unit must be installed so that no electrical compo-
nents are exposed to water.
I
[A CAUT,ON]
This unit must be installed level to allow for
proper drainage of the chassis base pan and
unit drain pan.
Installing With a Wall Sleeve
[ _, CAUTION l
The sleeve is not intended as the sole support
for the unit. An additional support must be
provided near the return opening on the unit
for adequate support. The use of vibration
isolation material between the unit and the
support is recommended.
Refer to the installation instructions packed with the wall
sleeve and Figure 1 for guidance in assembly and mount-
ing using a wall sleeve.
Make sure the gaskets attached to the sleeve are not
damaged.
Seal the space between the wall sleeve and-the building
opening with non-hardening caulking compound. The seal
must be weathertight to prevent entrance of moisture and
water into the building.
Assure that the unit is completely seated against the
gaskets on the wall sleeve.
Installing Without a Wall Sleeve
Refer to the following directions and Figure I for guidance
in installing the unit without a wall sleeve:
.
Measure the size of the unit and provide an opening in
an outside wall that will accept the unit. Local ordi-
nances may require a steel lintel to support the wall
above the opening. The opening must be square in all
4 corners.
,
Position the unit so that the grilles on the outside face
of the unit are flush or extend beyond the face of the
exterior wall, but not recessed more than 2" from the
face of the building. Provide a support under the
unit, inside the building. Make sure that the inside
support does not block the return air. The unit should
be installed level
.
Seal the space between the unit and building opening
using a non-hardening caulking compound. The seal
mustbe weathertight to prevent entrance of moisture
and water into the building. Make sure the drain holes
in the base are not plugged with caulking,
Condensate Drain
Install the plastic drain tube (furnished) over the 5/8" O.D.
fitting welded to the center ofthe condensate pan. Con-
nect the other end of the drain tube to trapped drain line
(see Figure 2). The plastic drain connection to the chassis
base is provided so that itmay be disconnected from the
permanent drain tubing in the base of unitin the event it
becomes necessary to remove the chassis assetnbly.
The drain line should pitch gradually downward at least 1"
per 10 feet of horizontal run to the open drain.
Be certain that the plastic drain tubing has free drainage
and is not crimped or flattened at any bend.
PWC Drain Installation
Drain Pan_
Figure 2
Limitations
The unitshould be installed in accordance with all national
and local safety codes.
Limitations of the unit and appropriate accessories must
also be observed.
The unitmust not be installed with any ductwork in the
outdoor air stream. The outdoor fan is not designed to
operate against any additional static pressure.
Minimum and maximum operation conditions must be
observed to assure maximum system performance with
minimum service required. Refer to Table 1 on page 4 for
the application limitations ofthe unit.
Application Limitations AirFilter
Outdoor Ambient Air Temperature °F
Minimum DB - Cooling Maximum DB
Cool Heat
65
125 75
Indoor Ambient Air Temperature °F I
Minimum Maximum
DB/WB DB DB,_VB DB
Cool Heat Cool Heat
62/57 50 90/72 80
Table t
Ductwork
Ductwork should be designed and sized according to the
methods in Manual Q of the Air Conditioning Contractors
of America (ACCA).
It is recommended that supply and return duct connec-
-'_s at the unit be made with flexible joints.
1ne supply and return air duct systems should be de-
signed for the CFM and static requirements of the job.
They should not be sized to match the dimensions of
the duct connections on the unit.
Supply duct flanges are shipped flat and must be bent
up before attaching the supply duct.
To connect the return duct to the unit, use a straight piece
of duct 22" wide by 7" deep. Insert the duct into the return
opening in the bottom of the unit. Flange the duct over the
existing flanges around the opening inside unit. Make
sure that all sides of the duct are flanged over to permit
removal of cooling chassis if required. Use a flexible
connection to attach remainder of return duct. The return
duct should be sealed to the unit casing and terminate
outside the space contai_ningthe furnace.
The return duct must allow for the unit drain pan
connections and drain tube.
[ ACAUTION J
no not screw intothe side of the drain pan.
All indoor return air must be filtered. A permanent-type
filter is furnished with the unit, located directly behind the
access panel. Removing the panel permits access to the
filter.
The filter should be cleaned at least three times during
each of the heating and cooling seasons, or more fre-
quently if unusual conditions are encountered. To clean
the permanent filter, shake filter to remove excess dirt
and/or use a vacuum cleaner. Wash filter in soap or
detergent water and replace after filter is dry. It is not
necessary to oil the permanent filter after washing.
If an installation is.made in which it is more desirable to
mount the filter exterior to the unit, in the return duct work
or elsewhere, the permanent filter can be used or re-
placed with a disposable filter. If a disposable filter is
used, use the information provided in Table 2 when sizing
the disposable filter.
Minimum Required Surface Area
for Disposable Filters
Model Number Filter Area (minimum)
PWC183 - 480 square inches
PWC24,3 480 square inches
Table 2
Thermostat
The room thermostat should be located on an inside wall
where it will not be subject to drafts, sun exposure or heat
from electrical fixtures or appliances. Follow the
manufacturer's instructions enclosed with the thermostat
for general installation procedures. Color coded insulated
wires (#18 AWG) should be used to connect the thermo-
stat tothe unit.
Electrical Connections
All wiring must be done In accordance with the
National Electrical Code (NEC), ANSl/NFPA No. 70
(latest edition); Canadian Electrical Code CSA C22.2
Part I (latest edition); or local codes, where they
prevail. Any alteration of internal wiring will void
certification and warranty.
Units are factory wired for a 230 volt power supply. If
power supply is 208 volts, it will be necessary to
change a wire connection on unit transformer from
240 volt terminal to 208 volt terminal as shown on the
wiring diagram.
Usewiringwithatemperaturelimitation of 75 =C mini-
mum. Run the 208 or 230 volt, 60 hertz electric power
supply through a fused disconnect switch to the control
box of the unitand connect as shown in the wiring dia-
gram located on the inside of the control access panel.
The unit must be electrically grounded in accordance with
local codes or, in the absence of local codes, with the
National Electrical Code ANSI/NFPA No. 70 (latest edition)
or CSA C22.2 Part 1 (latest edition).
Power supply to the unit must be NEC Class 1 and must
comply with all applicable codes. A fused disconnect
switch should be field provided for the unit. The switch
must be separate from all other circuits. If any of the wire
supplied with the unit must be replaced, replacement wire
must be of the type shown on the wiring diagram.
Electrical wiring must be sized to minimum circuit
ampacity marked on the unit. Use copper conductors
only. Each unitmust be wired with a separate branch
circuit and be properly fused.
OPERATION
Sequence of Operation
Cooling
When the thermostat is in the cooling mode, the O circuit
is powered which energizes the reversing valve. Upon
cooling demand, the thermostat closes circuit R toY and
G. Closing R to Y closes the unit contactor, starting the
compressor and outdoor fan. The thermostat automati-
cally closes R to G circuit which also brings on the indoor
blower at the same time. Upon satisfying cooling demand,
the thermostat will open the above circuits and open the
main contactor, stopping the compressor and outdoor fan.
If the unit is equipped with a time delay, the blower will
continue to operate for 90 seconds which improves
system efficiency.
Heating
Upon heating demand, the thermostat closes circuit R to
Y, which closes the unit contactor, starting the compressor
and outdoor fan. The reversing valve is not energized in
the heating mode. -The thermostat again automatically
brings on the indoor fan at the same time. The second
stage of the thermostat closes circuit R to W, which closes
the unit sequencers, bringing the auxiliary electric heat on.
Upon satisfying heating demand, the thermostat opens
the above circuits and stops unit operation.
Defrost Cycle
Ifthe outdoor ambient conditions are such that frost forms
on the outdoor coil, the defrost control monitors the need
for and initiates and terminates defrost cycles as neces-
sary to maintain system performance. The defrost control
is time/temperature initiated and temperature terminated
with a maximum defrost time (time-out) of 10 minutes.
Time between defrost cycles is preset at 60ominute
intervals at the factory, but can be field adjusted between
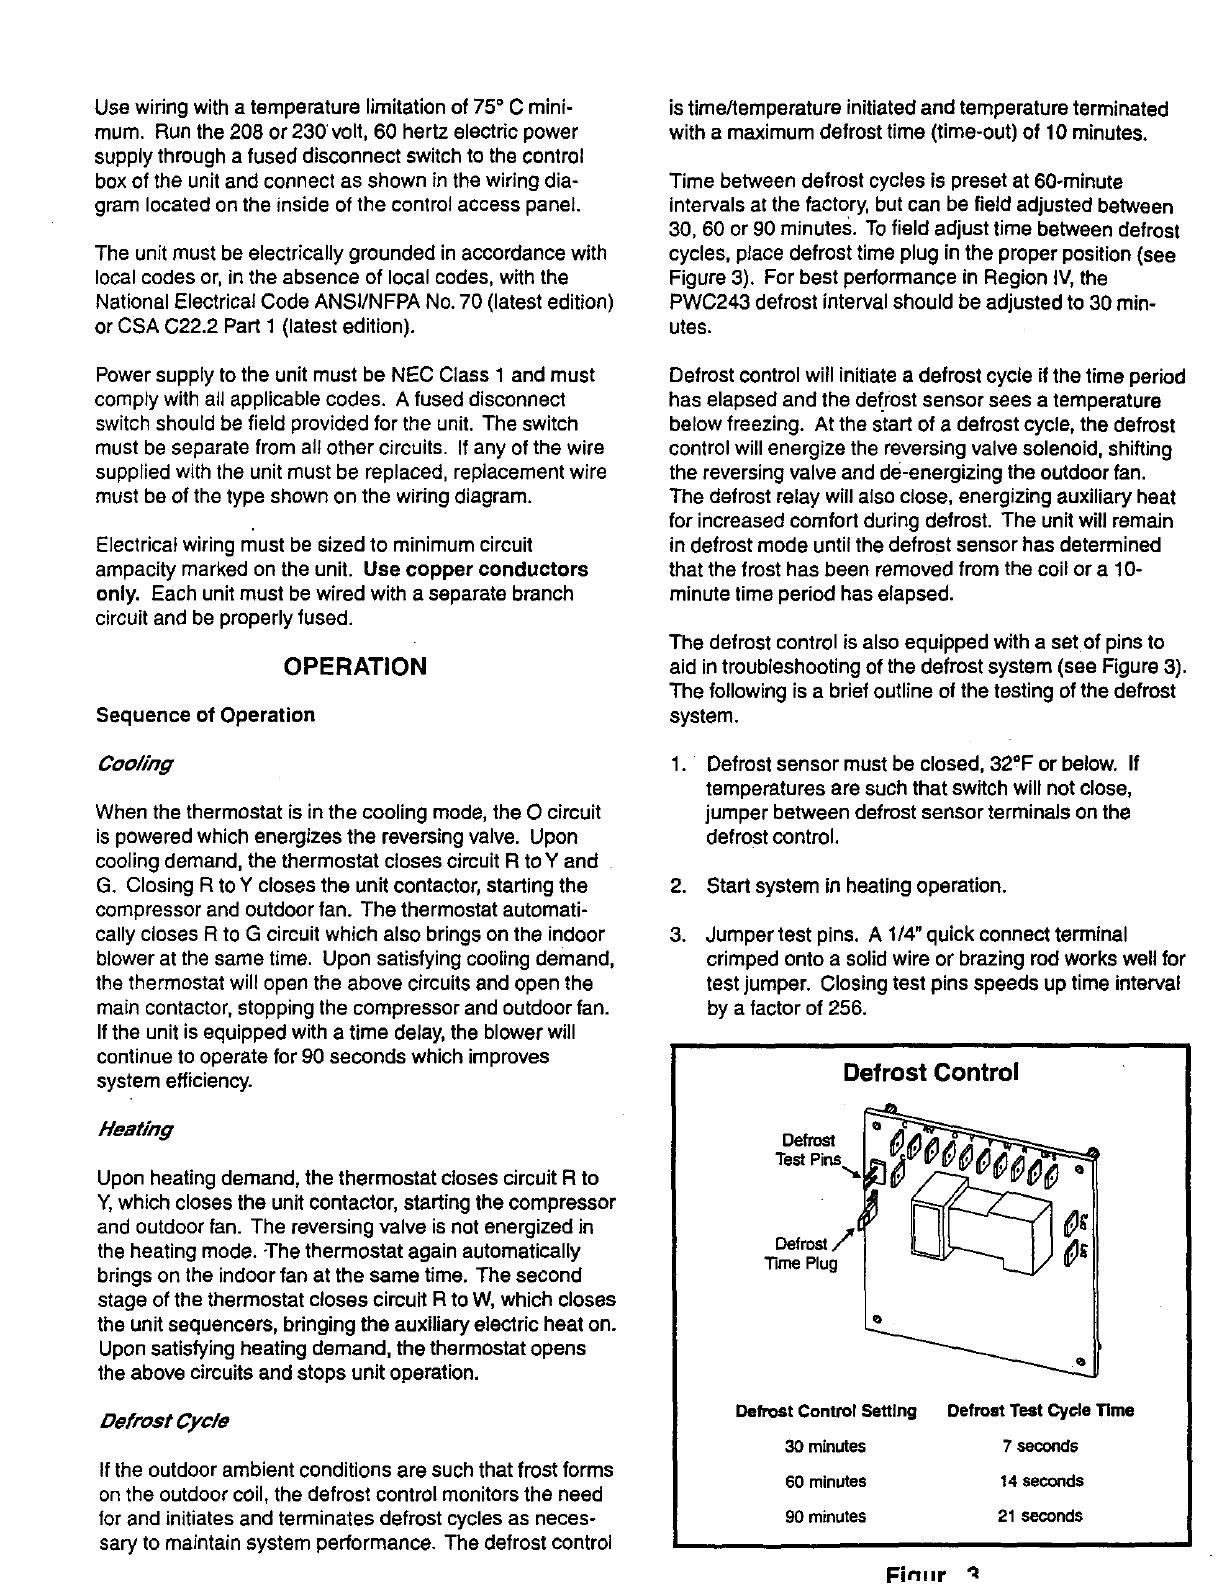
30, 60 or 90 minutes. To field adjust time between defrost
cycles, place defrost time plug in the proper position (see
Figure 3). For best performance in Region IV,the
PWC243 defrost interval should be adjusted to 30 min-
utes.
Defrost controlwill initiate a defrost cycle ifthe time period
has elapsed and the defrost sensor sees a temperature
below freezing. At the start of a defrost cycle, the defrost
control will energize the reversing valve solenoid, shifting
the reversing valve and de-energizing the outdoor fan.
The defrost relay will also close, energizing auxiliary heat
for increased comfort during defrost. The unit will remain
in defrost mode until the defrost sensor has determined
that the frost has been removed from the coil or a 10-
minute time period has elapsed.
The defrost control is also equipped with a setof pins to
aid in troubleshooting of the defrost system (see Figure 3).
The following is a brief outline of the testing of the defrost
system.
. Defrost sensor must be closed, 32°F or below. If
temperatures are such that switch will not close,
jumper between defrost sensor terminals on the
defrost control,
2. Start system in heating operation.
.
Jumper test pins, A 1/4" quick connect terminal
crimped onto a solid wire or brazing rod works well for
test jumper. Closing test pins speeds up time interval
by a factor of 256.
Defrost
TestPins.,,,=i
Defro=/
TimePlug
Defrost Control
Defrost Control Setting Defrost Test Cycle Time
30 minutes 7 seconds
60 minutes 14 seconds
90 minutes 21 seconds
FinHr
After closing test pins and appropriate cycle time has
elapsed, the reversing valve should shift to defrost mode
and the outdoor fan should stop. After 2 seconds of
defrost operation, the reversing valve should shift back to
",tingoperation and the outdoor fan should start.
System Performance
For maximum performance of this heat pump system, the
operating temperatures and pressures should be checked
and superheat determined at Standard ARI test conditions
of 82°F outdoor - 80°F indoor dry bulb/67°F wet bulb. If
superheat measured deviates from the values given in
Table 3, refrigerant charge should be adjusted accordingly
for maximum performance.
Suction Superheat
Suction Superheat
Outdoor
@ ARI Conditions
Unit
82 ° OD
Model
80° IDDB/67 ° IDWB
PWC183 18° - 20° F
PWC243 17° - 19° F
Motors
The indoor and outdoor fan motors are permanently
lubricated and require no maintenance.
Outdoor Coil
Foreign material should not be allowed to accumulate on
the outdoor coil surface or other parts in the air circuit.
Cleaning should be as often as necessary to keep the coil
clean. Use a brush, vacuum cleaner attachment or other
suitable means. Be sure power to unit is shut off
before using water to clean the coil.
Care should be used when cleaning the coils so that
the coil fins are not damaged.
Outdoor Base Drain
Foreign material should not be allowed to clogthe drain
hole. inspect and clear drain opening priorto heating
season.
Table 3
MAINTENANCE
Shutoff all electrical power to the unit before
conducting any maintenance procedures.
Failure to do so could cause personal injury.
Periodic inspection and maintenance normally consists of
changing or cleaning filters and (under some conditions)
cleaning the coils.
Filter
Inspect the filter once a month. Replace disposable filter
or clean the permanent-type filter as necessary (a mini-
mum ofthree times each heating or cooling season is
recommended). Do not replace permanent-type filter with
a disposable filter unless an installation was made in
which the filter was mounted exterior to the unit (see Air
Filter section on page 4).
208/230-1-60
POWERSUPPLYWITHMIN.
75"CCOPPERWIRE
I CIRCUIT1I I (lo_cO_L'qCIRCUIT2I
•; ..; : :
P_D
BLACK
LOWER MOTORvloI_rr
RED
UNE VOLTAGE-FACTORY
UNE VOLTAGE-RELD
........ UNE VOLTAGE-RELD (IF USED)
LOW VOLTAGE-FACTORY
.......... LOW VOLTAGE-FIELD
7 AND 10PWC ONLY
I
BLOWER
(
M1
CAPACr_R-RUN
BLUE
NOTE:
IF ANY OF THE ORIGINAL
WIRES ARE REP_, THE
SAME SIZE AND TYPE WIRE
MUST BE USED.
CONNECTOR
CONDENSER FAN
BLACK
BROWN
REV
VALVE
©
DEFROST
SENSOR
Connection Diagram
PWC with 5, 7 or 10 KW Heat Strip
Part #41164-3
Fin.r== 4
208/230-1-60
:OWER SUPPLY WITH MIN.
75"C COPPER WIRE
I CIRCUIT 1 I CIRCUIT 2
: i : :
:
RED
F_
UNE VOLTAGE-FACTORY
..... LINE VOLTAGE-RELD
........ LINE VOLTAGE-FIELD (IF USED)
LOW VOLTAGE-FACTORY
.......... LOW VOLTAGE-R ELD
BLUE
UMrT
BLOWER
m
NT
CAPACITOR-RUN
RED
¥
I
DEFROST
NOTE:
IF ANY OF THE ORIGINAL
WIRES ARE REPLACED, THE
SAME SIZE AND TYPE WIRE
MUST BE USED.
CONNECTOR
BLOCK
CONDENSER FAN
E_CK
REV
VALVE
O
I
Connection Diagram
PWC with 15 KW Heat Strip
Part #42203-2
208/230-1-60
POWER SUPPLY WITH MIN.
75"C COPPER WIRE
LINE VOLTAGE-FACTORY
..... UNE VOLTAGE-FIELD
........ UNE VOLTAGE-FIELD (IF USED)
LOWVOLTAGE-FACTORY THERMOSTAT
.......... LOW VOLTAGE-FIELD
NOTE:
IF ANY OF THE ORIGINAL
WIRES ARE REPLACED, THE
SAME SIZE AND TYPE WIRE
MUST BE USED.
BLOWER MOTOR
BLOWER
I_)
RED
_-RUN
RE)
CONDENSER FAN
BROWN
: : °
!
, POTENTIAL
RELAY
pFUSe_
I
Connection Diagram
PWC with No Heat Strip
Part #45322-1
Fin-r== 6
I
Limited Warranty
August 1, 1997
Thiswarran(ygivesyou specificlegalrightsand you may have otherrights
which varyfrom state/provincetostate/province.
Warrantor: Armstrong Air Conditioning Inc., 421 Monroe St., Bellevue, OH 44811
Armstrong Air Conditioning Inc products are available under the following names: Air Ease, Armstrong Air, American Airs, Concord
Subject to the limitafions.stated in this warranty, we warrant to the first buyer for use the residential heating, cooling or heat pump unit, when
installed, operated and maintained as required by this warranty, to be free of defects in workmanship or material for a pehod of five years (two years
for commercial equipment) from the time of installation. We will replace any defective component without cost or expense to you except for the costs
of delivery and labor for removal and replacement of the defective component.
Warranty Begins
The warranty period begins when the installafion iscomplete and the product is ready to operate. You must be able to verity this date whenever a
warranty claim is made. Original bill of sale, installer's invoice or other similar document will suffice..If the beginnir_gdate cannot be Verified. we will
consider warranty coverage to begin six months after the date the product was shipped from our factory.
Limitations on Implied Warranties
Implied warranties of merchantability or, to the extent applicable, fitness for a particular purpose are timited to five years, the same duration as the
basic limited written warranty provided herein. Some states/provincas do not allow limitations on how tong an implied warranty of merchantability or
fitness lasts, so the above limitations dr exclusions may not apply to you.
Only Warranty
This written Limited Warranty is the only warranty made by the warrantor; this warranty is in lieu of and excludes all other warranties, express or
implied. The warrantor does not authorize any person to provide any other warranty or to assume for it any further obligation in connection withthe
warranted product.
What is NOT Covered
I. Cabinets or cabinet pieces.
2. Normal maintenance items such as filters, fan belts, fuses or other consumable items.
3 Damage caused by misuse, failure to maintain properly, accidents or acts of God.
4 External wiring, piping, venting or attachment of accessory products not integral to our product, including without limitation, humidifier,
air cleaner, vent damper, thermostat or other mechanical devices not manufactured by the warrantor.
5 Products that have been operated in a corrosive atmosphere where e concentration of acids, halogenated hydrocarbons or other
corrosive elements causes deterioratfon to metsi surfaces or integral components. NOTE: Operation in a corrosive atmosphere is
considered abuse and voids this warranty
6 Products that have NOT been installed in accordance with our published installation instructions, applicable focal, state/provincial or
national codes, ACCA published standards.
7 Products that have NOT been installed by competent, qualified installers.
8 Products that have been moved from their odginai place of installation.
Warranty on Replacement Components
Any replscement component furnished by us will assume the remaining (unused) portion of the Limited Warranty.
Consequential Damages
The warrantor shall not be responsible for any consequential damages caused by any defect in the product. Some state/provinces do not allow the
exclusion or limitations of incidental or consequential damages, so the above limitation or exclusion may not apply to you.
NOTE: After the first year, in the event that a gas or oil heat exchanger is no longer being manufactured by the warrantor, the warrantor will allow a
credit equal to the then current wholesale price of an equivalent heat exchanger towards the purchase of a new Armstrong gas or oil furnace.
This product must be installed, used and cared for in accordance with the instructiott manual You are responsible for required pedodic maintenance
or service, such as changing or cleaning of air filters and lubrication or cleaning of components. Failure to properly install, operate or maintain your
unit voids this warranty.
!
Model #
, INSTALLED BY:
I ealer
Address
Telephone #
Owner Record
Serial # Installation Date
License #
INSTALLATION INSTRUCTIONS
Wall Sleeve Kit CA239
For Use With
HW/HWC/EWC/PWC Series
Magic-Pak Thru-the-Wall Unit
age_
_WARNING
Parts List
Quantity Description
1 TopPanel
1 BottomPanel
1 Right Side Panel
1 LeftSide Panel
2 Squaring Braces
1 TopSupportAngle
2 Side SupportAngles
24 #8 x 3/8" Screws
1 InstallationInstructions
Manufactured By
A.A.C.
A Lennox International Company
421 Monroe Street
Bellevue,OH 44811
General
The wall sleeveisdesignedtofacilitatethe installationof
Magic-Pakunitsby providingan accurateopeningduring
buildingconstruction.The useofa wall sleeveallowsunits
toremainoff-siteuntilbuildingconstructionapproaches
completion.
The wall sleeveiscomprisedoffourassemblies
(top,bottom,and rightand leftsides) whicheasily slip
togetheron thejob toform a rectangularbox correctly
sizedto receive a Magic-Pak unit.
When inplace and securelyfastened, the wall sleeve
openingprovideseasy access tothe finishedwall pedm-
efarfor caulksealing.
The weather-seal caulkingiseasier to performwhen the
sleeveprotrudesbeyondthe finishedwall by3/8" to 1".
Inspection of Shipment
Ifany damage tothe contentsofthis kitisfound at the
timeof delivery,propernotificationshouldbe made onthe
carrier's freight bill.Damage claimsshouldbefiledwith
thecarrierat once.Claimsofshortage shouldbe filedwith
the manufacturerwithin 5 days.
1111111Ill1111111111IllIllIIIIIIIIIRillIIIIIIII
Save these instructionsforfuturereference
INSTALLATION
Wall Sleeve Assembly
Toassemble the wall sleeve, refer tothe followinginstruc-
tionsand Figure 1.
1. Slidetop panelover side panels untilretaining clips
are engaged in slottedopenings.
2_
Place side and top assemblydown withthe front
flange againstfloorand slidebottom panel intoside
panelslipstripsuntiltabs on bottompanels are locked
inplace.
3. Attach squaring bracesto top and side panels using
existingholes. (Do not remove braces untilwall sleeve
issecuredto building.)
4.
8.
Attachthe supportanglestotop and side panels
usingthe #8 x 318"screwsprovided.Two sets of holes
are providedin thepanels for attaching the support
angles. Use the rowof holesnearest thefrontof the
sleeveto attachthe supportanglesfor 1"spacing or
the secondset of holesfor 3-3/4" spacing.
The wall sleeve must be square in opening before
securing sleeve to building. Thisis requiredto
assure the Magic-Pak unitwill slideintothe sleeve.
Caulk all seams where the bottompaneljoins tothe
side panelsincludingthefront corners ofthe bottom
panel and the top ofside panel slipjoints.Caulk
sealing is bestaccomplishedafterthe wall sleeve is
assembledbutbefore Risplaced inthe wall opening.
Remainingfinalcaulk sealing can be donejust after
the sleeve issecured intothe wall opening, ifdesired,
to avoidbreakingthe seal duringhandling.
Wall Sleeve Assembly
TopPanel
P/N33021B000
Frontof
RightSide Panel P/N 33024B002-
Squaring
Braces
P/N33048B000
LeftSide Panel P/N 33024B001
Side SupportAngle PIN 33027BG00- 2 Side=
Figure I
Furthersealing againstair infiltrationmustbe donealter
the Magic-Pak unitisinstalledin the wall sleeveand utility
connectionshavebeen completed (see Sealing/Weath-
erproofing Wall Sleeves section).
Wall Sleeve Installation
The wall sleeve may be installedfrom either the insideor
outsideofthe building.
Some builderswillattachthe wall sleevetothe support
wallthroughthe side supportangleswhether theyare
insertingthesleeve fromthe outsideor the inside.Othem
willuse the side angles simplyas a locating"stop"to
achievethe appropriatedimensionwhileshootingfasten-
ersthroughthe sides ofthe wallsleeve intothesupporting
wall.In either case,the wall sleeve must be fastened to
the supporting wall and notto thefinishedwall.
The sleeve may extend farther than 1"beyondthe finished
wall,but reachingtheperimeter ofthe openingfrom inside
for sealing becomes increasinglydifficult.In anycase,
adequate safety precautionsmustbeconsideredto
protectpersonnel.
Instailing Wall Sleeve from Inside
The mostpopular methodofinstallingthe wallsleeve is
from theinside ofthe buildingwiththe weather seal
appliedfrom the outsideas thefinishwall isapplied.
Instalflng Wall Sleeve from Outside
In manyhigh-rise constructionapplications,contractors
insertthewall sleevesfrom the outsidewhilethewall is
beingconstructed.The two-sidedsupportanglesshould
then be attached tothe wall sleevesides at a locationthat
willexceed the thicknessofthe outsidefinish wall bythe
recommended3/8" to 1"dimension.
Forexample, ifthesupportingwall isconcreteblockwith a
brickfacing, there is usuallya space betweenthe block
and the brick.This space dimensionmustbe addedto the
widthofthe brick(plus3/8" to 1")sothatwhen thesleeve
is inserted intothe blockwall opening,up tothe angles
and fastened to the blockwallbefore thebrickisinstalled,
the sleevewilt protrudebeyondthefinishedbrickby3/8"
to 1",as needed for caulk sealing.
The same applies ifthe supportingwall iswoodframe.
One may insertthe sleevefromthe outside uptothe
angleslocated on each side,allowingforthe thicknessof
sheathing,finishsiding,and caulk sealing.
Recessed Sleeves
In someapplications,where eitherthe buildingwallsare
verythick(over 16") or architecturaldesign dictates,units
can berecessed. Avoidrecessingthewall sleeve ifthe
wallopening is requiredto bethe same size as the wall
sleeveopening.However,ifthe wall openingcan be larger
inverticaldimensionthan the wall sleeve sothat the
bottomcan rest ona sillthat isat least2" higher thanthe
bottomofthewall opening,some recessing ispermitted.
Thissillshouldbe recessed further than the sleeve by3/8"
to 1"to permitweather-seal caulking along the bottom
edge withoutpluggingthe drain holesin the sleeve.
The topof thewall opening shouldbe above the topof the
wall sleevebya dimensionequal toor greater than the
amountofthe recessin orderto avoidrestrictionofthe
condenserdischargeair.
Sealing/Weatherproofing Wall Sleeves
A highgrade non-hardeningcaulkingcompoundapproved
forexterioruse mustbe appliedoutsidearoundthe
perimeterofthe wall sleeveand thefinishedwall. Caulk
shouldalso beappliedaround thesleeve's perimeter and
thefinishedinteriorwall.
Final sealingagainstair infiltrationmust be donealter the
Magic-Pakunitis installedin thewall sleeve. Foradditional
protection,the space between the unitand the wall sleeve
shouldbe sealed on all sideswith a bead ofsealant.
2--I=
Wall Sleeve Dimensions (in.)
-$--
I
i
45
I
I
_t._
I.---- z9- -,4
Flar_es may b_assembl_l
1"or 5_/4" fromthis e_e ofthe elc_v_
<.. 1or 3_/4
.16,.._15 or 12_
!
Figure 2
I_A_T_°.I 4"948°96----I
I
INSTALLATION
ANDMAINTENANCE
INSTRUCTIONS
PWCSERIES
SELF-CONTAINEDHEATPUMP
ManufacturedBy
ARMSTRONG AIR CONDITIONING INC.
A LENNOXInternationalInc. Company
421 MonroeStreel
I PART.OI .,,,,RO..I OATE12''0 I SUPERSEOESI I PAGE2OF,0
GENERAL
Theseinstructionsexplainthe recommendedmethodof installationof thePWCheatpumpunitand associatedelec-
tricalwiring.
This unit is designed and approvedfor use as a self-containedair to air heat pump system.
These instructions,and anyinstructions packagedwith maling componentsand/or accessories,shouldbe carefully
read priorto beginning installation.Note parliculady anyCAUTIONSor NOTESin theseinstructions andall labels on
the unit.
Theseinstructionsareintendedasa generalguideonly.for usebyqualifiedpersonnel,anddo notsupersedeanyna-
tionalor localcodesinanyway. Compliancewithalllocal,state,provincial,or nationalcodespertainingtothistypeof
equipmentshouldhe determinedpriorto installation.
INSPECTIONOFSHIPMENT
Uponreceiptofequipment,carefullyinspectit forpossibleshippingdamage.Ifdamageisfound,it shouldbenoted
on the carder's freightbill. Take specialcaretoexaminethe unitinsidethecartonif the cartonis damaged.Filea
claimwith the transportationcompany.
If any damagesare discoveredand reportedto the carrier DONOTINSTALLTHE UNIT as claim may be denied.
Checkthe unitrating plate to confirmspecificationsare as ordered.
CAUTION:INSTALLATIONANDSERVICINGOFAIR CONDITIONINGEQUIPMENTCANREHAZARDOUSDUETO IN-
TERNALREFRIGERANTPRESSUREAND LIVE ELECTRICALCOMPONENTS.ONLYTRAINEDANOQUALIFIEDSER-
VICE PERSONNELSHOULDINSTALL,REPAIR,ORSERVICETHIS EQUIPMENT.
WARNING
FORYOURSAFETY
DONOTSTOREORUSEGASOLINEOROTHERFLAMMABLEVAPORSANDLIQUIDSIN THE VICINITYOFTHIS
ORANY OTHERAPPLIANCE.
NOMENCLATURE:
1. ELECTRICHEATING
5 = 5kW
7 = .7kW
10 = 10kW
15 = 15kW
2. PWC=(HEAT) PUMPWITH COOLING
3. COOLINGCAPACITYTONNAGE
182 = TON
242 = 2 TON
302 = TON
10 PWC 242 A-1A
1 2 3 4 5
4. ElectricalRatingCode:
A=208/230 volts; OOHz; 1 phase,
5. RevisionCode
PARTNO. I 41194BOg6I DATE I 2-1-96 I SUPERSEDESI 411940094 I PAGE3OFIO
I
LOCATION
Thedesigniscertifiedfor through-the-wallinstallationonly. Theinteriorportionsoftheunitmay besurroundedbya
closetwith clearancestocombustiblematerial heldto 0" at sides,0" top and O" frontof the plenum.
Thegrillesideofthe unitmay beflushwith orextendbeyondthefaceof theexteriorwall, butshouldnotberecessed
morethan two(2) inchesfrom theface ofthebuildingand shouldnotbe obstructedwithtrees, landscapematerials,
or buildingstructure.
Thereisnominimumclearancerequiredonlocatinga unittoaninteriorcornerofa building. If theunitistobeenclos-
ed, provisionsshouldbemadeallowingaccesstotheindoorsideof theunitfor changingfilters.and forinspection.At
least33" of unobstructedspaceshouldbe providedin front of the indoorside. whetherenclosedor noL to permit
removalof the coolingchassisshouldrepairsor inspectionbe required.
If this unitis installedin a residentialgarageit mustbe locatedor protectedtoavoidph_,sicaldamagebyvehicles.
Thisunit mustbe installedso that no electricalcomponentsare exposedto water.
INSTALLATION
CAUTION:THESLEEVEISNOTINTENDEDASTHESOLESUPPORTFORTHEUNIT. ANADDITIONALSUPPORTMUST
BE PROVIDEDNEARTHE RETURNOPENINGON THE UNIT FOR ADEQUATESUPPORT.THE USEOF VIBRATION
ISOLATIONMATERIALBETWEENTHE UNIT ANDTHE SUPPORTIS RECOMMENDED,
CAUTION:THIS UNITMUST BEINSTALLEDLEVELFORPROPERDRAINAGEOFTHE CHASSISBASEPANANDUNIT
DRAINPAN.
WITHOUTWALLSLEEVE
Measurethesizeoftheunitandprovideanopeningin anoutsidewall thatwillaccepttheunit. Localordinancesmay
require a steellintel tosupportthe wall abovethe opening.Thisopeningmust besquarein all corners.
Positiontheunitsothat thegrilleson the outsidefaceofthe unitareflushor extendbeyondthe faceofthe exterior
wall,but notrecessedmorethantwo(2) inchesfromthefaceof thebuilding.PROVIOEA SUPPORTUNDERTHE UNIT
INSIDETHE BUILDING.Makesure thattheinsidesupportdoesnot blockthereturnair. The unitshouldbeinstalled
level.
Sealthespacebetweentheunitand thebuildingopeningusinga non-hardeningcaulkingcompound.Thesealmust
beweather-tighttoprevententranceof moistureandwater intothe building.Makesure thedrainholesin the base
are notpluggedwith caulking.
WITH WALL SLEEVE
Seethe installationinstructionspacked with Ihe wall sleeveto assembleand mountin a wall. Make sure that the
gasketsattachedtothe sleevearenotdamaged.Assurethatthe unitiscompletelyseatedagainstthegasketsonthe
wall sleeve.
Sealspacebetweenwall sleeveand buildingopeningusingnon-hardeningcaulkingcompound.Thisseal mustbe
watertight.
CONDENSATEDRAIN
Install theplasticdraintube(furnished)overthe5/8" O.O.fittingweldedtothecondensatepan. Connectotherend
ofthedraintubetotrappeddrain line(See Figure2). Theplasticdrain connectiontothechassisbaseisprovidedso
thatitmay bedisconnectedfromthepermanentdrain tubingin thebaseof unitin theeventit becomesnecessaryto
removethe chassisassembly.
L
The drain line should pitchgradualtydownwardat least 1" per 10 footof horizontalrun to theopendrain.
Be certainthat the plasticdrain tubinghastreedrainageand is notcrimpedor flattenedat anybend.
PA.T.O.I ,,,,_,,.0_,I 0','_ I _'"_ I SU"ERSEOESI ""_"00_"I PA_E,'O_,O
FIGURE1
INSTRUCTIONFORSUPPORTINGPWCUNITS
Wall Sleeve
7 x 22 Min. OpeningTo
A#ignwith'Return Air
Openingin Unit.
VibrationIsolatingMaterial
%
Plywood
FIGURE2
DRAINPAN
5/8 " I.D. PLASTIC
(FURNISHED)
CHASSISDRAIN
'ASSEMBLY
(FURNISHED)
5/8" I,O. PLASTIC
TU"BE(FURNISHEO]
\
RETURN
AIR DUCT\
5/8" O.O. DRAIN
_LINEAND TRAP
(iNSTALLERSUPPLIED)
.ARTNO.I "f9"Bog I OATEI 2"t'g6I .SUPERSEOESI 4119'0094[ PAGESOFtO
LIMITATIONS
The unit shouldbe installedin accordancewith all nationaland local safetycodes.
Limitationsof the unitand appropriateaccessoriesmustalso beobserved.
The unitmustNOTbe installedwithanyductwork in theoutdoorairstream,Theoutdoorfanisnotdesignedtooperate
againstany additionalstaticpressure.
Minimum and maximum operating conditionsmust be observedto assure maximumsystem performancewith
minimum servicerequired,
TABLE1 - APPLICATIONLIMITATIONS
OUTDOORAMBIENTAIR TEMP. OF INDOORAMBIENTTEMP. °F
MIN, DB - COOL MAX, DB MIN. MAX.
65 COOL HEAT OB/WB DB DB/WB DO
125 75
COOL HEAT COOL HEAT
62/57 50 90/72 80
DUCTWORK
Ductwork shouldbe designedand sizedaccordingto applicablemethods fromthe Air ConditioningContractorsof
America(ACCA).
It is recommendedthat supplyand return duct connectionsat the unitbemadewith flexible joints.
' The supplyand return air ductsystemsshouldbedesignedfortheCFMstaiicrequirementsofthejob. Theyshould
NOT be sized Io matchthe dimensionsol theduct connectionson the unit.
NOTE:SUPPLYDUCTFLANGESARESHIPPEDFLATANDMUSTBEBENTUPBEFOREAFI'ACHINGTHESUPPLYDUCT,
ToconnectthereturnducttotheunJt,usea straightpieceofduct22" wideby7" deep.Inserttheductintothereturn
openingin thebottomoftheunit. Flangetheductovertheexistingflangesaroundtheopeninginsideunit. Makesure
thatall sidesoftheductareflangedovertopermitremovalofcoolingchassisifrequired.Usea flexibleconnectionto
attachremainderofreturnduct.The returnductshouldbesealedtotheunitcasingand terminateoutsidethespace
containingthe furnace,
NOTE:THE RETURNDUCTMUST ALLOWFORTHE UNIT DRAINPANCONNECTIONSAND DRAINTUBE.
CAUTION:00 NOTSCREWINTOTHE SIDEOFTHE DRAINPAN.
AIR FILTER
Allindoorreturn airmustbefiltered.Apermanent-type filter isfurnished withtheunit. locateddirectly behindtheac-
cess panel. Removingthe panelpermitsaccessto the filter.
The tiltershouldbecleanedat leastthreetimesduringeachoftheheatingandcoolingseasons,ormorefrequently if
unusualconditionsare encountered.To cleanthe permanentfiller, shakefilterto removeexcessdirt and/or use
vacuumcleaner. Washtilterin soapor detergentwaterand replacealter filteris dry.
The filter suppliedneed not be oiledalter washing.
I PA.TNoI .tt9..o96I DATE12196 I SUPERSEDESI ,rig.DO9.I PAGE,O.tO
It an installation is madein which it is moredesirableto mount the filter exterior totheunit, in the return duct work, or
olherwise, either the permanent filter supplied or a disposable filter maybe used. If a disposablefilter is used, the
minimum area required is as follows:
MOOELNO. FILTERAREA(MtN.)
PWC 182 480 sq. in.
PWC242 480 sq. in.
PWC302 480 sq. in.
THERMOSTAT
The room thermostatshouldbe locatedonan insidewall whereitwilt not besubjecttodrafts,sun exposureor heat
from electricalfixturesorappliances.Followthemanufacturer'sinstructionsenclosedwiththethermostatforgeneral
installationprocedures.Colorcodedinsulatedwires(#18 AWG)shouldbeusedtoconnectthethermostattothe unit.
POWERAND CONTROLWIRING
ELECTRICALCONNECTIONS
ALLWIRINGSHOULDBEDONEIN ACCORDANCEWITHNATIONALELECTRICALCODE,ANSI/NFPA NO.70 (LATEST
EDITION).IN CANADA(_SAC22.2 Part 1 (LATESTEDITION),ORWITH LOCALCODES,WHERETHEY PREVAIL.
NOTE:UNITSAREFACTORYWIREDFORA 230 VOLTPOWERSUPPLY. IF POWERSUPPLYIS 208 VOLTS.IT WILL
BENECESSARYTOCHANGEAWIRECONNECTIONONUNIT TRANSFORMERFROM240V TERMINALTO20SV TER-
MINALAS SHOWNONWIRING DIAGRAM.
Usewiringwitha temperaturelimitationof 75°C rain. Runthe208 or 230 volt,60 hertzelectricpowersupplythrough
a fuseddisconnectswitchtothecontrolboxof theunitandconnectas showninthewiringdiagramlocatedon thein-
sideof the controlaccesspanel.
The unitmustbe electricallygroundedin accordancewith local codesor in the absenceof localcodeswith the Na-
tionalElectricCodeANSI/NFPA No. 70 (latestedition)or CSAC22.2 Part 1 (latestedition).
Powersupplyto the unit must be N.E.C. Class1, and must complywith all applicablecodes.A fused disconnect
switchshouldbe field providedfor the unit. The switchmust beseparatefromall othercircuits.If anyofthe wire
suppliedwith the unit must be replaced, replacementwire mustbe of the type shownon the wiring diagram.
Electricalwiringmustbesized tominimumcircuitampacitymarkedon the unit. USECOPPERCONDUCTORSONLYI
Eachunit mustbewired with a separatebranchcircuitand be properlyfused.
SEQUENCEOFUNIT OPERATION
COOLING- WhenthethermostatisIn the coo[ingmode,theOcircuitis poweredwhichenergizesthereversing valve.
Uponcoolingdemand,thethermostatclosescircuitRtoYand G.ClosingRtoY closestheunitcontactor,startingthe
compressorandoutdoorfan. ThethermostatautomaticallyclosesRtoGcircuitwhichalsobringsontheindoorblower
at thesametime. Uponsatisfyingcoolingdemand,thethermostatwillopentheabovecircuitsandopenthemaincon-
tactor,stoppingthecompressorand outdoorfan. If theunitis equippedwith a timedelay,the blowerwillcontinueto
operate.for 90 secondswhich improvessystemefficiency.
HEATING- Uponheatingdemandthe thermostatclosescircuit Rto Y closingthe unitcontactor,startingthe com-
pressorand outdoorfan. The reversing valveisnotenergizedin theheating mode.Thethermostatagainautomatical-
ly bringsontheindoorblower at thesametime. Thesecondstageofthethermostatclosescircuit RtoW closingthe
unitsequencers,bringtheauxiliaryelectricheaton.Uponsatisfyingheatingdemandthethermostatopensabovecir-
cuits and stopsunitoperation.
DEFROSTCYCLE- If outdoor ambientconditionsare such thatfrost formson theoutdoorcoil, the defrost control
monitorstheneed for andinitiates and terminatesdefrost cyclesas neccessaryto maintain system performance.The
defrost controlis time/temperatureinitiated and temperature terminated with a maximum defrost time (time-out)of
10 minutes. Timebetweendefrost cyclesispre-set at 60 minuteintervalsat thefactory, but canbefield adjustedto
30, 60, or 90 minutes.See illustrationfor field adjustmentofdefrosttiming.For bestperformancein RegionIV, the
PWC242defrostinterval shouldbeadjustedto30 minutes.
PA...o,I .,,9.o09.I
IDNSTALLATION
AN MAINTENANCE
INSTRUCTIONS
PWCSERIES
SELF-CONTAINEDHEATPUMP
PARTNO.] 4,,94°O94I OA_E] 4-,5-94I SU_RSEOESI .EWI _'AGE_O_IOI
Manulaclured By
ARMSTRONG AIR CONDITIONING INC,
A LENNOXInternationalInc. Company
421 MonroeSlreel
Bellevue, OH44811
  • Page 1 1
  • Page 2 2
  • Page 3 3
  • Page 4 4
  • Page 5 5
  • Page 6 6
  • Page 7 7
  • Page 8 8
  • Page 9 9
  • Page 10 10
  • Page 11 11
  • Page 12 12
  • Page 13 13
  • Page 14 14
  • Page 15 15
  • Page 16 16
  • Page 17 17
  • Page 18 18
  • Page 19 19
  • Page 20 20
  • Page 21 21
  • Page 22 22
  • Page 23 23
  • Page 24 24
  • Page 25 25
  • Page 26 26
  • Page 27 27
  • Page 28 28
  • Page 29 29
  • Page 30 30
  • Page 31 31
  • Page 32 32
  • Page 33 33
  • Page 34 34
  • Page 35 35
  • Page 36 36
  • Page 37 37
  • Page 38 38
  • Page 39 39
  • Page 40 40
  • Page 41 41

Armstrong Magic-Pak PVVC24ElO.7 User manual

Category
Split-system air conditioners
Type
User manual

Ask a question and I''ll find the answer in the document

Finding information in a document is now easier with AI