Philips GC440/47 User manual

Category
Clothes steam cleaners
Type
User manual

This manual is also suitable for

4
EN Do not use your bare hand as a supporting surface when you steam.
Pull the sides of the garment to stretch it.
IT Non reggere il capo a mani nude durante la vaporizzazione.
Tirare il capo dai lati per tenderlo.
ES No sujete el aparato con las manos descubiertas.
Tire de los lados de las prendas para estirarlas.
PT Não utilize as mãos desprotegidas como superfície de suporte quando
vaporiza tecidos.
Puxe as partes laterais da peça de roupa para a esticar.
FR N’utilisez pas votre main nue comme surface de support lorsque vous
défroissez un vêtement.
Tirez sur les côtés du vêtement pour l’étirer.
7
FR Maintenez la tête du défroisseur à une certaine distance pour les robes ornées
de volants, de ruches, de paillettes ou les robes plissées.
Utilisez la vapeur uniquement pour assouplir le tissu. Vous pouvez également
le défroisser de l’intérieur.
EN For garments with buttons such as shirts, jackets and pants, close the rst
button to help straighten the fabric.
To steam sleeves, start from the shoulder area and move the steamer head
downwards. Steam while you pull the sleeve diagonally down with the other hand.
For shirt pockets, move the steamer head upwards while pressing against the fabric.
Note: The appliance can be used for creating a natural look and for quick
touch-ups. For garments with tough wrinkles and for a more formal look, it is
recommended to use an iron instead.
IT In caso di capi con bottoni come camicie, giacche e pantaloni, chiudere il primo
bottone anché il tessuto sia ben teso.
Per eettuare l’operazione sulle maniche, iniziare dalla parte della spalla e
procedere verso il basso. Vaporizzare tenendo la manica tesa in posiziona
diagonale con l’altra mano.
In caso di maglie con tasche, muovere la bocchetta del sistema di stiratura a
vapore verso l’alto mentre la si preme sul tessuto.
Nota: l’apparecchio può essere utilizzato per creare un look naturale e ritocchi
veloci. In caso di capi con pieghe persistenti e per un look più formale, si
consiglia invece di utilizzare un ferro da stiro.
ES En el caso de prendas con botones como camisas, chaquetas y pantalones,
cierre el primer botón para ayudar a estirar el tejido.
Para vaporizar las mangas, empiece desde la zona del hombro y mueva la
cabecera del vaporizador hacia abajo. Vaporice mientras tira de la manga hacia
abajo en diagonal con la otra mano.
En los bolsillos de las camisas, mueva la cabecera del vaporizador hacia arriba
mientras sigue presionando contra el tejido.
Nota: El aparato se puede utilizar para crear un aspecto natural o para retoques
rápidos. Para prendas con arrugas difíciles y para obtener un aspecto más
formal, es recomendable utilizar también una plancha.
10
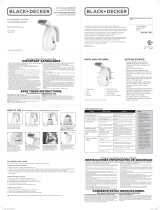
EN Your appliance has been designed to be used with tap water.
Note: Do not ll the water tank beyond the MAX indication
Warning: Do not add perfume, water from tumble dryer, vinegar, magnetically
treated water (e.g., Aqua+), starch, descaling agents, ironing aids, chemically
descaled water or other chemicals as they may cause water spitting, brown
staining or damage to your appliance.
IT L’apparecchio è stato progettato per essere usato con l’acqua del rubinetto.
Nota: non superare il livello di riempimento massimo (MAX) indicato
Avviso: non aggiungere profumoe acqua proveniente dall’asciugatrice, aceto,
acqua trattata magneticamente (es. Aqua+), amido, agenti disincrostanti,
prodotti per la stiratura, acqua decalcicata chimicamente o altre sostanze
chimiche, poiché potrebbero causare la fuoriuscita di acqua, la comparsa di
macchie marroncine oppure danni all’apparecchio.
ES El aparato se ha diseñado para utilizarse con agua del grifo.
Nota: No llene el depósito de agua por encima de la indicación MAX
Aviso: No añada perfume, agua de una secadora, vinagre, agua tratada
magnéticamente (por ejemplo, Aqua+), almidón, productos desincrustantes ni
otros productos químicos, ya que pueden provocar fugas de agua, manchas
marrones o daños en el aparato.
PT O seu aparelho foi concebido para ser utilizado com água canalizada.
Nota: não encha o depósito de água acima da indicação MAX
Aviso: não adicione perfume, água de uma máquina de secar, vinagre,
água tratada magneticamente (por ex., Aqua+), goma, agentes anticalcário,
produtos para ajudar a engomar, água descalcicada quimicamente nem
outros químicos, pois estes podem causar expelição de água, manchas
castanhas ou danos no aparelho.
FR Votre appareil a été conçu pour être utilisé avec de l’eau du robinet.
Remarque : ne remplissez pas le réservoir au-delà de l’indication MAX.
Avertissement : n’ajoutez pas de parfum, d’eau provenant du sèche-linge,
de vinaigre, d’eau magnétique (par ex. Aqua+), d’amidon, de détartrants, de
produits d’aide au repassage ou d’autres agents chimiques dans le réservoir
d’eau car ils peuvent entraîner des projections d’eau, laisser des taches marron
ou endommager votre appareil.
13
1
3 4
2
60 sec.
Specic
types only
EN The brush attachment improves steam penetration to achieve faster and better
steaming result on thick and heavy garment such as coat and jacket. Brush
is to be used together with steam by pressing the steam trigger and slowly
moving the bristles along the garments.
Note: Always unplug the steamer before you attach or detach the brush
attachment. Be careful, the steamer head may still be hot.
IT L’accessorio spazzola migliora la penetrazione del vapore in tessuti spessi e
pesanti come cappotti e giacche, consentendo di ottenere risultati di stiratura
migliori e più rapidi. La spazzola deve essere utilizzata congiuntamente al vapore
premendo il pulsante del vapore e passando lentamente le setole sul capo.
Nota: prima di inserire o disinserire l’accessorio spazzola, accertarsi di
scollegare il sistema di stiratura a vapore. Prestare attenzione, perché la
bocchetta potrebbe essere ancora calda.
19
2
approx. 60 min
1
EN To use De-Calc function, place the steamer down with De-Calc function facing
up. Once De-Calc door and inlet stopper are opened, invert the steamer to
shake o any scales and water deposited inside the chamber.
If the De-Calc hole is blocked by scales, you may use a tool to loosen the scales.
Warning: Do not pour water, vinegar, descaling agents or other chemicals into
the opening of the De-Calc function.
IT Per utilizzare la funzione De-Calc, posizionare il sistema di stiratura a vapore
verso il basso con la funzione De-Calc rivolta verso l’alto. Una volta che
l’apertura e il fermo sono aperti, capovolgere il sistema di stiratura a vapore
per rimuovere il calcare e l’acqua depositatisi nel vano.
Se il foro De-Calc è ostruito dal calcare, è possibile utilizzare uno strumento
per sciogliere il calcare.
Avviso: non versare acqua, aceto, anticalcare o altre sostanze chimiche nel
ferro attraverso l’apertura della funzione De-Calc.
ES Para usar la función de eliminación de los depósitos de cal, coloque el
vaporizador hacia abajo, con la función situada hacia arriba. Tras abrir la puerta
y el tapón de entrada de eliminación de la cal, invierta el vaporizador para que
los posibles depósitos de cal y agua del interior de la cámara se agiten.
Si el oricio de la función De-Calc está bloqueado por la cal, puede usar una
herramienta para liberarlo.
Advertencia: No vierta agua, vinagre, productos desincrustantes ni otros
agentes químicos en la abertura de la función de eliminación de los depósitos
de cal.
PT Para utilizar a função de descalcicação, pouse o vaporizador com a função
de descalcicação voltada para cima. Depois da tampa da descalcicação e
do bloqueador de entrada estarem abertos, volte o vaporizador ao contrário e
sacuda partículas de calcário e água depositadas no interior da câmara.
Se o orifício De-Calc estiver bloqueado por calcário, pode usar um utensílio
para soltar o calcário.
Aviso: não coloque água, vinagre, agentes anticalcário nem outros químicos
na abertura da função de descalcicação.
21
Problem Possible cause Solution
The steamer does not
heat up.
The steamer is not
plugged in properly or not
switched on.
Check if the mains plug is
inserted properly and its wall
socket is working.
Check if the steamer is switched on.
The steamer does not
produce any steam.
The steamer is not
plugged in properly or not
switched on.
Check if the mains plug is
inserted properly and its wall
socket is working.
Check if the steamer is switched on.
The steamer has not
heated up suciently.
Let the steamer heat up for
60 seconds (steam-ready light
ashes). When the steamer is
ready for use, the light goes on
continuously.
You have not pressed the
steam trigger fully.
Press the steam trigger fully for
a few seconds.
The water level in the
water tank is too low.
Unplug the steamer and rell
the water tank.
Water droplets drip
from the steamer head.
Scales/calc are formed
inside the steamer.
Perform De-Calc function
(refer to section).
The steamer head is
placed horizontally for a
long time.
Place the steamer in an upright
position on a at surface after
each usage.
The steamer produces
a pumping sound/the
handle vibrates.
Water is pumped to
the steamer head to be
converted into steam.
This is normal.
The water level in the
water tank is too low.
Unplug the steamer and rell
the water tank.
Steam and water leak
around De-Calc door,
steam trigger and
gripping area.
De-Calc inlet stopper is
not inserted properly.
Open the De-Calc door and
push in the De-Calc inlet
stopper. Close the De-Calc door.
Water tank lling door is
not closed properly
Press down the lling door.
Steam gets weaker
over time
Scales/calc are formed
inside the steamer.
Perform De-Calc function
(refer to section).
EN
22
Problem Possible cause Solution
Steam leaves stains
on the garment or
impurities come out
of the steamer head
Scales/calc are formed
inside the steamer.
Perform De-Calc function (refer
to section).
Apart from tap water, you
have lled other liquids /
additives or descaling
agents into the water tank.
Use only tap, demineralized or
ltered water when lling up the
water tank.
The De-Calc hole is
blocked by scales.
The water you use is very
hard and/or you have
not performed De-Calc
function frequently. A
large amount of scales are
formed inside the steamer.
Use a tool to loosen the scales.
Perform De-Calc function once
a month or more frequently.
Problema Possibile causa Soluzione
Il sistema di stiratura a
vapore non si riscalda.
Il sistema di stiratura a vapore
non è collegato correttamente o
non è acceso.
Controllare se la spina
di alimentazione è stata
correttamente inserita e se la
presa a muro funziona.
Controllare se il sistema di
stiratura a vapore sia acceso.
Il sistema di stiratura a
vapore non produce
vapore.
Il sistema di stiratura a vapore
non è collegato correttamente o
non è acceso.
Controllare se la spina
di alimentazione è stata
correttamente inserita e se la
presa a muro funziona.
Controllare se il sistema di
stiratura a vapore sia acceso.
Il sistema di stiratura a
vapore non si è riscaldato
sucientemente.
Far riscaldare il sistema di
stiratura a vapore per 60 secondi
(la spia "Steam ready" (Vapore
pronto) lampeggia). Quando il
sistema di stiratura a vapore è
pronto per essere utilizzato, la
spia si illumina con luce ssa.
Non avete premuto
completamente il pulsante del
vapore.
Premere il pulsante del vapore
no in fondo per alcuni secondi.
IT
  • Page 1 1
  • Page 2 2
  • Page 3 3
  • Page 4 4
  • Page 5 5
  • Page 6 6
  • Page 7 7
  • Page 8 8
  • Page 9 9
  • Page 10 10
  • Page 11 11
  • Page 12 12
  • Page 13 13
  • Page 14 14
  • Page 15 15
  • Page 16 16
  • Page 17 17
  • Page 18 18
  • Page 19 19
  • Page 20 20
  • Page 21 21
  • Page 22 22
  • Page 23 23
  • Page 24 24
  • Page 25 25
  • Page 26 26
  • Page 27 27
  • Page 28 28
  • Page 29 29
  • Page 30 30
  • Page 31 31
  • Page 32 32

Philips GC440/47 User manual

Category
Clothes steam cleaners
Type
User manual
This manual is also suitable for

Ask a question and I''ll find the answer in the document

Finding information in a document is now easier with AI