S
A
Y
H
E
L
L
O
T
O
M
O
D
U
L
A
R
F
R
E
E
D
O
M
You have the freedom to do what you want – that’s the fun part. You have the freedom to lay out your design
and change it around until you find the look you want.
Pick up a tile. Flip it over. Look at the arrows on the back. We put them there to help make sure all of your tiles
face the direction you choose. Many FLOR styles can be installed multiple ways. For straight installation, all
arrows (back of tile) should point in the same direction. Parquet style looks like a basketweave when every other
tile is turned 90 degrees. Feel free to create a style of your own or use one of ours. Personalize it. The freedom
to choose is yours, and it is so easy.
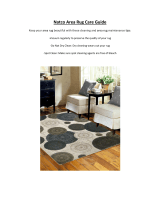
AREA RUG
Freedom to move – this is the part that makes you smile. When you have decided on the design you want,
use your FLORdots to attach the tiles together. It’s easy! A carpenter’s square helps to make sure your rows are
squared before sticking the tiles together (A). The FLORdots have tic marks to help you align the four corners or
the two edges of your tiles to make a perfect fit (B). Lift the corner of one tile and slide the FLORdot under it, sticky
side up (C), and then adhere the corners of the three remaining tiles. For borders, place additional FLORdot as
shown (D). FLORdots were invented to get stickier for a better hold after installation. Low initial adhesion makes it
easy. Stick. Change your mind. Move around your tiles. No problem. Let the tiles settle. The rug becomes stronger
with time (2 hours). If necessary, carefully peel FLORdot from backing or simply cut. With FLORdots you can do so
much more with your FLOR. You can leave the rug where it is or easily pick it up and move it to a different spot.
It can go anywhere. No mess, no fuss…easy. DO NOT USE OTHER ADHESIVES OR DOUBLE STICK TAPE. All you
need are the FLORdots!
Cleaning is a breeze! We recommend regular steam cleaning or dry powder treatment for general care. FLOR is
manufactured using stain resistant material and fiber. However, spills should be treated as soon as possible.
When you notice a spill or stain, pick up the tile and rinse it under cold running tap water. Using your hand, gently
rinse the stain out of your FLOR. Don’t use a brush. Let as much water drain out of your FLOR as possible. Dab it dry
using colorless absorbing paper. Make certain the tile is completely dry before replacing it. Never place FLOR on
heating elements to dry! You may have to replace the FLORdot in order to adhere the tile back into the rug. Don’t
worry. You can always order extra FLORdots.
If the above procedure doesn’t remove the stain, consider the purchase of the FLOR Cleaning Kit. Order yours
at FLOR.com or call 866.433.3567. If the stain is not removable, just replace the tile. Simple.
1 These instructions are for a “do-it-yourself”
purchaser who is installing FLOR for residential
use in his/her home or apartment. If you plan
to install FLOR somewhere other than your
home or apartment, you should contact
FLOR’s Customer Care Representatives toll
free at 866.433.3567 to obtain installation
instructions and warranty information for
other applications.
2 FLOR tiles can be installed over common
residential sub-floors such as plywood and
concrete with the following constraints:
• Plywood should be smooth, flush, dry, level,
securely attached and clean.
• Concrete should be fully cured, as well as
smooth, dry, level and clean. Under normal
conditions concrete usually takes at least 90
days to cure after it’s poured, provided atmo-
spheric conditions are dry during the curing
phase. Large cracks (greater than 1/16 inch
differential) should be leveled then patched
with patching compound. ALL concrete must
be sealed with a water based concrete sealer
per the manufacturer’s instructions. Failure to
properly seal a concrete floor prior to installation
can cause the backing of FLOR to react with
the floor, which can result in indoor air quality
issues, and/or adherence problems of FLOR’s
backing to the floor.
3 FLOR cannot be installed over carpeted floors
or carpet padding.
4 FLOR should not be installed in areas that are
subject to being wet or damp, or over surfaces
where moisture could accumulate. Such conditions
must be corrected before installing FLOR.
Failure to do so could result in mold and mildew
growth and deterioration of indoor air quality.
Please call FLOR’s Customer Care Representatives
if you have any questions regarding the appropriate
level of moisture for FLOR.
SPECIAL NOTES AND CAUTIONS
FLOR.COM
4/15 OM
Align your FLOR tile
and cut a notch in
the tile’s face where
it aligns with the
outside of your door
jamb (point A). Now
notch the face of your
tile where it aligns
with the baseboard
(point B).
Don’t panic.
FLOR is easy to cut,
but make sure you are
using sharp blades. It
is better to undercut
– you can always cut
more off.
Flip your tile so the
arrows face up and
use your square to
make two perpen-
dicular cuts from the
marks you made in
the previous step.
Cut away the
corner scrap.
Make two cuts along
doorstop of jamb and
trim away waste.
Adhere tiles together
with the FLORdots.
Always pick up large
scrappings or shavings
before vacuuming.
Full FLOR tiles should
be kept in the original
boxes. Please recycle
all discarded boxes.
DOOR JAMBS WITH WALL-TO-WALL
5 If your room has an unfinished, waxed wood
floor or a floor with vintage varnish, we do
not recommend installing FLOR, as FLOR
may cause some discoloration or staining
of the floor.
6 Over time, sunlight could cause discolor-
ation of your exposed floor. The floor
directly under your FLOR rug will remain
protected from the sun’s fading.
7 Certain FLOR products are not intended
for installation over a radiant heat floor
and, if those products are installed over
such a heat source, they may cause some
discoloration or staining of the floor and/or
their backing may adhere to the floor. If
your room has a radiant heat floor, please
call our FLOR Customer Care Representatives
at 866.433.3567 prior to installation of
FLOR to determine whether the FLOR
product you have chosen is compatible
with installation over a radiant heat floor.
INSTALLATION INSTRUCTIONS FOR
FLOR AREA RUGS AND WALL-TO-WALL
A B C D
PARQUET
STRAIGHT
Printed on
100% post-consumer
waste paper
77343_Flor.indd 1 12/6/13 7:50 AM