
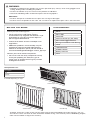
Picket, Closed Top &
Picket, Closed Top &
Picket, Closed Top &
Picket, Closed Top &
Picket, Closed Top &
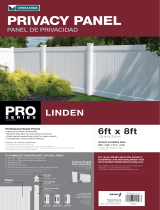
Semi-Privacy Vinyl Fence Kit
Semi-Privacy Vinyl Fence Kit
Semi-Privacy Vinyl Fence Kit
BOM-34107824
Read all instructions prior to installing product.
Refer to manufacturers safety instructions when operating any tools.
To register your product, please visit:
barretteoutdoorliving.com
INSTALLATION INSTRUCTIONS
INSTALLATION INSTRUCTIONS
INSTALLATION INSTRUCTIONS
INSTALLATION INSTRUCTIONS
• English
• English
........................................................................................................
........................................................................................................
1
• Français
• Français
......................................................................................................
......................................................................................................
6
• Español
• Español
.....................................................................................................
.....................................................................................................
11

2
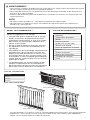
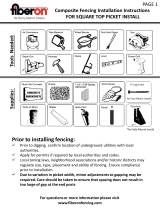
Posts
Post Tops
Concrete
Coarse Gravel (6" per hole)
Post Hole Digger/Shovel
String Line Stakes with String
Level
Tape Measure
Rubber Mallet
Safety Glasses
Glue
TOOLS NEEDED:
BEFORE YOU BEGIN:
Check your local zoning laws.
• Local zoning laws and Home Owners
Associations may regulate the location, style
and height of your fence or even require a
permit signoff beforehand.
• Check local codes for frost line depth and
regulations.
• Additional products and assembly may be
required to meet wind code requirements.
Notice of acceptance (NOA) can be found at
www.miamidade.gov/building/pc-search_app.asp
Contact your local utilities companies.
• You must have the utility companies clearly
mark your property for electrical, gas or
water lines to avoid puncturing any unseen
underground utilities.
WARNING:
• Improper installation of this product can result in personal injury. Always wear safety goggles when
cutting, drilling and assembling the product.
• Incorrect installation may cause harm to the product or individual.
• Check local building codes to determine pool-safe fencing options.
NOTICE:
• DO NOT attempt to assemble the kit if parts are missing or damaged.
• DO NOT return the product to the store. For assistance or replacement parts call: 1-800-336-2383.
Component list:
Description
Rails
Boards*
Pickets*
Closed Top
Semi-Privacy
Picket Top
*Included depending on style
To obtain and review a copy of the warranty please go to: BarretteOutdoorLiving.com/warranty. You can
also contact 1-800-336-2383 or write to Barrette Outdoor Living, 7830 Freeway Circle, Middleburg Heights,
Ohio 44130 to obtain a copy of the warranty.

3
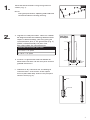
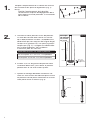
1.
2.
Mark the fence location using string and line
stakes (Fig. 1).
NOTE:
Plan gate placement, opening and hardware
clearance before installing fencing.
a. Dig the rst two post holes. Hole size should
be dug based on the following determination:
Depth is determined by your local frost line
measurements plus 6" for gravel/ ller (Fig. 2).
Width is determined by the post size.
See chart below for measurements.
Diameters based on post size:
10" for 5" x 5" post
8" for 4" x 4" post
b. Insert 6" of gravel/ ller into the bottom of
both holes and then set the rst post into the
ground and level it.
c. Add wet or dry concrete mix according to
manufacturer's instructions to the top of
the rst post hole only and assure your post
remains level (Fig. 3).
Fig. 1
Fig. 2
5x5 Post
Example:
Frost
Line
Gravel/
Filler
6"
10"
Fig. 3
Post
Concrete
Gravel/Filler

4
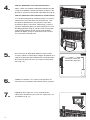
Fig. 4
Fig. 5
Fig. 6
Fig. 7
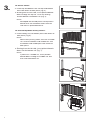
3.
For Picket Panels:
a. Insert top and bottom rails into top and bottom
post hole routes of both posts (Fig. 4).
b. Starting from the left side, insert pickets/boards
down through the top rail. Finish by locking
pickets/boards into bottom rail (Fig. 5).
NOTE:
Scalloped and arched panels have pickets/
boards that are numbered. Start from left
side with #1 picket/board rst.
For Closed Top/Semi-Privacy Panels:
a. Insert bottom rail into bottom post hole routes of
both posts (Fig. 6).
NOTE:
Some semi-privacy panels will have a middle
rail. Insert the bottom and middle rails into
the bottom and middle post hole routes of
both posts.
b. Starting from the left side, insert pickets/boards
down into the bottom rail (Fig. 7).
NOTE:
If panel has a middle rail, insert pickets/
boards down through the middle rail and
then into the bottom rail.

5
Fig. 8
Fig. 9
Fig. 10
Fig. 11
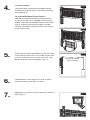
4.
5.
6.
7.
For Picket Panels:
Plumb and level second post and add concrete
according to manufacturer's instructions to top of
post hole (Fig. 8).
Check to ensure the second post is level, then add
panel width plus one half (
1
⁄
1
⁄
1
2
⁄2⁄
) the width of your post.
This will locate the center of your next hole. Then
dig the third post hole accordingly (Fig. 10).
Repeat process from steps 2 to 5 until all fence
panels and posts have been installed.
Apply glue on inside rim of post tops then attach to
posts (Fig. 11).
For Closed Top/Semi-Privacy Panels:
Add top rail to pickets/boards working from left
to right. Once top rail is engaged with all pickets/
boards, snap top rail into both top post hole routes
(Fig. 9). Plumb and level second post and add
concrete according to manufacturer's instructions
to top of post hole.
Center-to-Center
Post Distance
Page is loading ...
Page is loading ...
Page is loading ...
Page is loading ...
Page is loading ...
Page is loading ...
Page is loading ...
Page is loading ...
Page is loading ...
Page is loading ...
Page is loading ...
-
 1
1
-
 2
2
-
 3
3
-
 4
4
-
 5
5
-
 6
6
-
 7
7
-
 8
8
-
 9
9
-
 10
10
-
 11
11
-
 12
12
-
 13
13
-
 14
14
-
 15
15
-
 16
16


Ask a question and I''ll find the answer in the document
Finding information in a document is now easier with AI
in other languages
- français: Veranda 73025464 Guide d'installation
- español: Veranda 73025464 Guía de instalación
Related papers
-
Barrette Outdoor Living 73012194 Operating instructions
-
Barrette Outdoor Living 73014887 Installation guide
-
Barrette Outdoor Living 73040981 Installation guide
-
Barrette Outdoor Living 73025736 Operating instructions
-
 Veranda 73013028 Installation guide
-
 Veranda FNS RL BKT J Operating instructions
-
 Veranda FNC-PKT-D-C-69-WS WC Installation guide
-
 Veranda FNC PKT D G 3.5 WC Installation guide
-
 Veranda FNS RL BKT J Installation guide
-
Barrette Outdoor Living 73014887 Operating instructions


Other documents
-
Freedom 73024661 Installation guide
-
Freedom 73023173 Operating instructions
-
-
-
-
-
-
-
-
Barrette Outdoor Living 73009966 Installation guide