Page is loading ...

THANK YOU
We appreciate the trust and condence you have placed in Hampton Bay through the purchase of these solar lights. We strive to continually
create quality products designed to enhance your home. Visit us online to see our full line of products available for your home improvement
needs. Thank you for choosing Hampton Bay!
USE AND CARE GUIDE
SOLAR POWERED PATH LIGHT - 2 PACK
Questions, problems, missing parts? Before returning to the store,
call Hampton Bay Customer Service
8 a.m. - 7 p.m., EST, Monday - Friday, 9 a.m. - 6 p.m., EST, Saturday
1-855-HD-HAMPTON
HAMPTONBAY.COM
Item #1001 855 894
Model #HD28572

3 HAMPTONBAY.COM
Please contact 1-855-HD-HAMPTON for further assistance.
Table of Contents
Table of Contents ...................................3
Safety Information ..................................3
Warranty ..........................................3
Pre-Installation .....................................4
How your solar powered xture works .................4
First time use .....................................4
Installation tips ...................................4
Package contents .................................4
Installation ........................................5
Assembling the xture ..............................5
Replacing the battery ...............................5
Troubleshooting ....................................6
Service Parts .......................................6
Safety Information
CAUTION: Safe for outdoor operation.
CAUTION: Failure to insert battery/batteries in the correct
polarity, as indicated in the battery compartment, may
shorten the life of the battery/batteries or cause battery/
batteries to explode or leak.
CAUTION: Do not mix old and new batteries. Replace all
batteries of a set at the same time.
CAUTION: Do not mix Alkaline, Standard (Carbon-Zinc) or
Rechargeable (Nickel Cadmium) or (Nickel Metal Hydride)
batteries.
CAUTION: Do not dispose of batteries in re.
IMPORTANT: Dispose of the batteries in accordance with
local, state and federal regulations.
CAUTION: Remove battery/batteries if consumed or if
product is to be left unused for a long period.
Warranty
TWO (2) YEAR LIMITED WARRANTY
This product is guaranteed to be free from defects in material and workmanship for two (2) years following the date of purchase (excluding
the battery/batteries). Should a defect occur within the warranty period, please contact our customer service team. A proof of purchase
(sales receipt) will be required. If we cannot replace the defective part you require, you can return your product to the original point of
purchase for a full refund or a replacement product. The consumer is responsible for the removal of and reinstallation of the product.
Damage to any parts as such by accident, misuse, or improper installation is NOT covered by this warranty. Our policy does not include
liability for incidental or consequential damages. Some states or provinces do not allow the exclusion or limitation of consequential
damages; therefore, the above exclusion may not apply to you. This warranty gives you specic legal rights and you may also have other
rights that vary from place to place.
Contact the Customer Service Team at 1-855-HD-HAMPTON or visit www.hamptonbay.com.

4
Pre-Installation
HOW YOUR SOLAR POWERED FIXTURE WORKS
During the day, the solar panel converts sunlight into electricity and recharges the battery / batteries. At night, the light turns on
automatically using the electricity stored during that day.
The number of hours the light stays on depends on your geographical location, weather conditions and seasonal sunlight availability.
Place the solar light xture in an area where it can receive direct sunlight for at least 8 hours each day. Shadowed locations will not allow
the battery / batteries to charge fully and will reduce the hours of nighttime lighting. The selected location should not be near nighttime light
sources, such as porch lights, street lights or pool lights, as these may cause the solar light to turn off prematurely.
FIRST TIME USE
If the solar panel is covered by a protective lm, remove it before using the product. Remove the pull-tab from the top cap. Place the solar
light in a location where it can receive a full 8 hours of sunlight to allow the rechargeable battery/batteries to reach maximum capacity.
INSTALLATION TIPS
□ If the soil is of a loose, sandy or organic type, grasp the post with both hands near the spike and rmly push into the ground.
□ If the soil is hard, pour some water onto the ground to soften it.
□ If the soil is stony, soften the ground with a rake or shovel and remove large rocks. Dig a small hole, insert the xture spike, replace
the soil and tap down.
PACKAGE CONTENTS
Part Description Quantity
A Top Cap 2
B Body 2
C Post 2
D Spike 2
A
B
C D

5 HAMPTONBAY.COM
Please contact 1-855-HD-HAMPTON for further assistance.
Installation
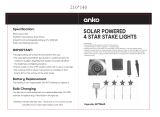
1
Assembling the xture
NOTICE: The spike is located inside the post.
WARNING: Never push the xture into the ground by the
xture head or use a hammer to insert the spike into the
ground.
□ Install the top cap (A) on the body (B) by turning it
clockwise.
□ Attach the plastic spike (D) to the post (C) by pressing them
together and press the post (C) into the bottom of the body
(B) base.
2
Replacing the battery
NOTICE: This operation should be done in the morning on a sunny
day. This will allow the light to receive a full 8 hours of sunlight so
that the rechargeable battery/batteries can reach maximum capacity.
□ Remove the top cap (A) by turning it counterclockwise.
□ Remove the battery cover.
□ Remove the old 500 mAh battery and replace it with a new
AA size 1.2V, Ni-Mh, 500 mAh rechargeable battery.
NOTICE: Clean the battery contacts and those of the device prior to
battery installation.
□ Be sure to insert the battery in the proper direction.
□ Replace the battery cover.
□ Replace the top-cap by turning clockwise.
A
Battery
Battery Cover
C
B
A
D

6
Troubleshooting
Problem Solution
The light does not turn on at dusk after 8 hours of charging. □ Ensure the solar panel is in a bright sunny location.
□ Make sure the light’s photocell is not affected by other light
sources at night.
□ Make sure the pull-tab has been removed.
□ Verify the battery/batteries are making contact with the terminal
and that they have been inserted in the correct polarity.
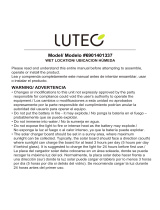
Service Parts
MODEL TYPE
Part Description Quantity
A Top Cap 2
B Body 2
C Post 2
D Spike 2
B
A
C D

Questions, problems, missing parts? Before returning to the store,
call Hampton Bay Customer Service
8 a.m.-7 p.m., EST, Monday-Friday, 9 a.m. - 6 p.m., EST, Saturday
1-855-HD-HAMPTON
HAMPTONBAY.COM
Retain this manual for future use.

GRACIAS
Apreciamos la conanza que ha depositado en Hampton Bay por la compra de estas lámparas solares. Nos esforzamos por crear
continuamente productos de calidad diseñados para mejorar su hogar. Visítenos en Internet para ver nuestra línea completa
de productos disponibles para sus necesidades de mejorar su hogar. ¡Gracias por elegir a Hampton Bay!
GUÍA DE USO Y CUIDADO
LÁMPARA PARA CAMINOS ALIMENTADA POR
ENERGÍA SOLAR - PAQUETE DE 2
¿Tiene preguntas, problemas, o faltan piezas? Antes de regresar a la tienda,
llame a Servicio al Cliente de Hampton Bayde lunes a viernes entre
8 a.m. y 7 p.m., sábado de 9 a.m. a 6 p.m., hora local del Este
1-855-HD-HAMPTON
HAMPTONBAY.COM
Núm. de artículo
1001 855 894
Núm. de modelo
HD28572

2 HAMPTONBAY.COM
Póngase en contacto con el 1-855-HD-HAMPTON para asistencia adicional.
Índice
Índice ............................................3
Información de seguridad ............................3
Garantía. . . . . . . . . . . . . . . . . . . . . . . . . . . . . . . . . . . . . . . . . . . 3
Pre-instalación .....................................4
Cómo funciona su dispositivo alimentado por energía solar ..4
Uso por primera vez ................................4
Consejos de instalación .............................4
Contenido del paquete ..............................4
Instalación ........................................5
Ensamblaje del dispositivo ..........................5
Reemplazo de la batería ............................5
Resolución de fallas .................................6
Piezas de servicio ...................................6
Información de seguridad
PRECAUCIÓN: Segura para funcionamiento en exteriores.
PRECAUCIÓN: No insertar la(s) batería(s) en la polaridad
correcta, como se indica en el compartimiento de la batería,
puede acortar la vida de la(s) baterïa(s) o hacer que
explote(n) o chorree(n).
PRECAUCIÓN: No mezcle baterías viejas con nuevas.
Reemplace todas las baterías de un juego al mismo tiempo.
PRECAUCIÓN: No mezcle baterías alcalinas, estándar
(Carbón-Cinc) o recargables (Níquel-Cadmio)
o (Níquel Hidruro-metálico).
PRECAUCIÓN: NO deseche las baterías en el fuego.
IMPORTANTE: Elimine las baterías de acuerdo
con regulaciones locales, estatales y federales.
PRECAUCIÓN: Retire la(s) batería(s) si está(n) agotada(s)
o si el producto no se va a usar por un largo periodo de tiempo.
Garantía
GARANTÍA LIMITADA DE 2 AÑOS
Este producto está garantizado estar libre de defectos en materiales y fabricación durante dos (2) años a partir de la fecha de compra (excluyendo
la(s) batería(s)) En caso de que ocurra un defecto dentro del periodo de la garantía, comuníquese con nuestro equipo de servicio al cliente.
Es necesaria la prueba de compra (recibo de venta). Si no podemos reemplazar la pieza defectuosa que usted exige, puede devolver el producto
al punto de compra original para un reembolso completo o reemplazo del producto. El consumidor es responsable del retiro y reinstalación del
producto. Los daños a cualquier pieza por accidente, mal uso o instalación inapropiada NO están cubiertos por esta garantía. Nuestra política no
incluye responsabilidad por daños incidentales o consecuentes. Algunos estados o provincias no permiten la exclusión o la limitación de
daños consecuentes; por lo tanto, la exclusión anterior podría no aplicar a usted. Esta garantía le otorga derechos legales especícos,
y también puede tener otros derechos que varían de un lugar a otro.
Póngase en contacto con el Equipo de Servicio al Cliente llamando al 1-855-HD-HAMPTON o visite www.hamptonbay.com.
Núm. de artículo
1001 855 894
Núm. de modelo
HD28572

3
Pre-instalación
CÓMO FUNCIONA SU DISPOSITIVO ALIMENTADO POR ENERGÍA SOLAR
Durante el día, el panel solar convierte la luz del sol en electricidad y recarga la(s) batería/baterías. En la noche, la lámpara enciende
automáticamente usando la electricidad almacenada durante el día.
El número de horas que la lámpara permanece encendida depende de su área geográca, condiciones del clima y disponibilidad de la luz
del sol estacional.
Coloque la luminaria solar en un área donde pueda recibir luz solar directa durante al menos 8 horas cada día. Los lugares con sombra no
permitirán que la(s) batería/baterías se cargue(n) por completo y reducirá las horas de iluminación nocturna. El lugar seleccionado no
debe estar cerca de fuentes de luz nocturna, como luces de porche, luces de la calle o luces de piscinas ya que pueden hacer que la
lámpara solar se apague prematuramente.
USO POR PRIMERA VEZ
Si el panel solar está cubierto por una película protectora, retírela antes de usar el producto. Retire la lengüeta de tirar de la tapa de la
cubierta. Coloque la lámpara solar en un lugar donde pueda recibir luz solar durante 8 horas completas para permitir que la(s)
batería/baterías recargable(s) alcance(n) la máxima capacidad.
CONSEJOS DE INSTALACIÓN
□ Si el suelo es ojo, arenoso u orgánico, sujete el poste con ambas manos cerca de la estaca y empuje con rmeza en el suelo.
□ Si el suelo es duro, vierta un poco de agua sobre el suelo para ablandarlo.
□ Si el suelo es pedregoso, ablande el suelo con un rastrillo o pala y retire las rocas grandes. Haga un agujero pequeño,
inserte la estaca del dispositivo, vuelva a colocar el suelo y golpee.
CONTENIDO DEL PAQUETE
Pieza Descripción Cantidad
A Tapa de la cubierta 2
B Cuerpo 2
C Poste 2
D Estaca 2
A
B
C D

4 HAMPTONBAY.COM
Póngase en contacto con el 1-855-HD-HAMPTON para asistencia adicional.
Instalación
1
Ensamblaje del dispositivo
AVISO: La estaca está localizada dentro del poste.
ADVERTENCIA: Nunca empuje el dispositivo en el suelo
por el cabezal del dispositivo ni use un martillo para insertar
la estaca en el suelo.
□ Instale la tapa de la cubierta (A) en el cuerpo (B) girándola
hacia la derecha.
□ Instale la estaca plástica (D) en el poste (C) presionándolos
juntos y presione el poste (C) en el fondo de la base
del cuerpo (B).
2
Reemplazo de la batería
AVISO: Esta operación debe hacerse en la mañana de un día soleado.
Esto permitirá que lámpara reciba luz solar durante 8 horas completas
para que la(s) batería/baterías recargable(s) pueda(n) alcanzar la
máxima capacidad.
□ Extraiga la tapa de la cubierta (A) girándola hacia la izquierda.
□ Retire la cubierta de la batería.
□ Retire la batería vieja de 500 mAh y reemplácela por una
batería recargable nueva tamaño AA de 1.2V, Ni-Mh, 500 mAh.
AVISO: Limpie los contactos de las baterías y también los del dispositivo
antes de instalar las baterías.
□ Asegúrese de insertar la batería en la dirección correcta.
□ Vuelva a colocar la cubierta de las baterías.
□ Vuelva a colocar la tapa de la cubierta girándola hacia
la derecha.
A
Batería
Cubierta de la batería
C
B
A
D

5
Resolución de fallas
Problema Solución
La lámpara no enciende al anochecer después de 8 horas de carga. □ Asegúrese de que el panel solar esté en un lugar bajo sol brillante.
□ Asegúrese de que la fotocelda de la lámpara no resulte afectada
por otras fuentes de luz en la noche.
□ Asegúrese de haber retirado la lengüeta de tirar.
□ Verique que la(s) batería/baterías esté(n) haciendo contacto con la
terminal y que haya(n) sido insertada(s) en la polaridad correcta.
Piezas de servicio
TIPO DE MODELO
Pieza Descripción Cantidad
A Tapa de la cubierta 2
B Cuerpo 2
C Poste 2
D Estaca 2
B
A
C D

¿Tiene preguntas, problemas, o faltan piezas? Antes de regresar a la tienda,
llame a Servicio al Cliente de Hampton Bay de lunes a viernes entre
8 a.m. y 7 p.m., sábado de 9 a.m. a 6 p.m., hora local del Este
1-855-HD-HAMPTON
HAMPTONBAY.COM
Conserve este manual para uso futuro.
/